
How to find and copy a file path on Mac
Whether for troubleshooting a problem or for quick access, it’s useful to know how to find and copy a file path on Mac. This places the path name on your clipboard for you to paste elsewhere, like in Notes as a reference or in Terminal for additional actions.
We’ll show you a few ways to locate and copy the path for a file or folder in macOS.
File paths in Finder
One of the easiest ways to view a file path is in Finder on your Mac. Along with it, we’ll show you how to use the context menu to copy that path.
Step 1: Open Finder on your Mac and navigate to the file or folder you want to view.
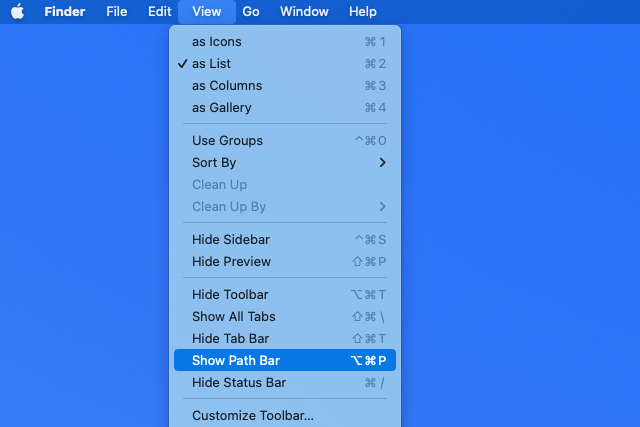
Step 2: To simply see the file path, select View > Show path bar in the menu bar.
Step 3: You’ll then see the path display at the bottom of the Finder window.

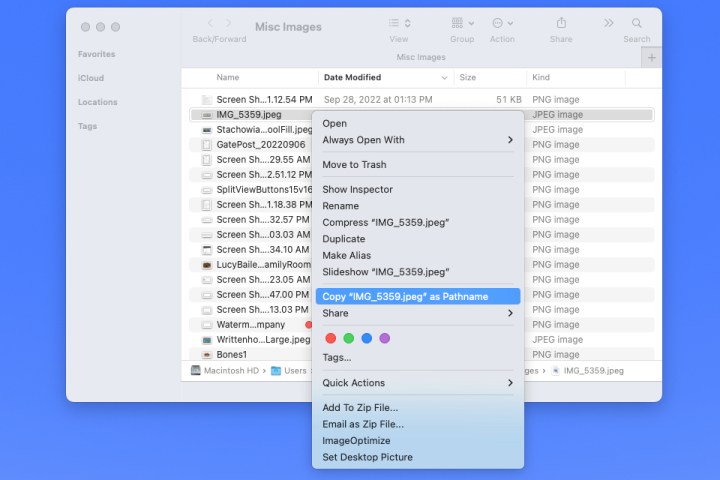
Step 4: To copy the file path, right-click the item in Finder to display the context menu.

Step 5: Hold the Option key while the context menu is open and select Copy [name] as Pathname.
The file path is then on your clipboard for you to paste where you wish.
File paths in Get Info
Another convenient location to view and copy a file path is with the Get Info tool.
Step 1: Select the item on your desktop or in Finder.
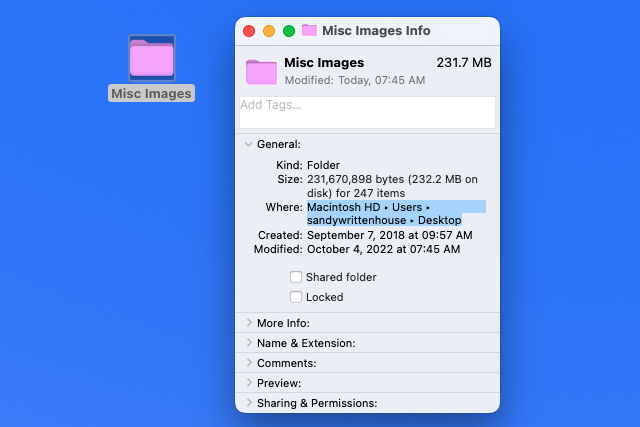
Step 2: Press Command + I or right-click and pick Get info.

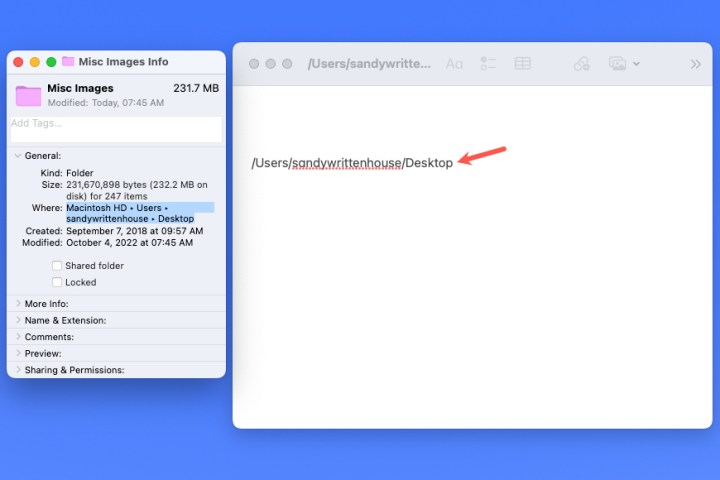
Step 3: When the Get Info window opens, expand the General section at the top and you’ll see the file path next to Where. Drag your cursor through the path to highlight it.
Step 4: Press Command + C to copy the path or right-click and choose Copy as Pathname.

Step 5: With the path on your clipboard, you can then paste it where needed. The path should display correctly with the arrows replaced by forward slashes.
File paths in Go To Folder
You may only think of opening Finder’s Go To Folder tool when you need to navigate somewhere on Mac. But this nifty tool can also provide the file path of an item.
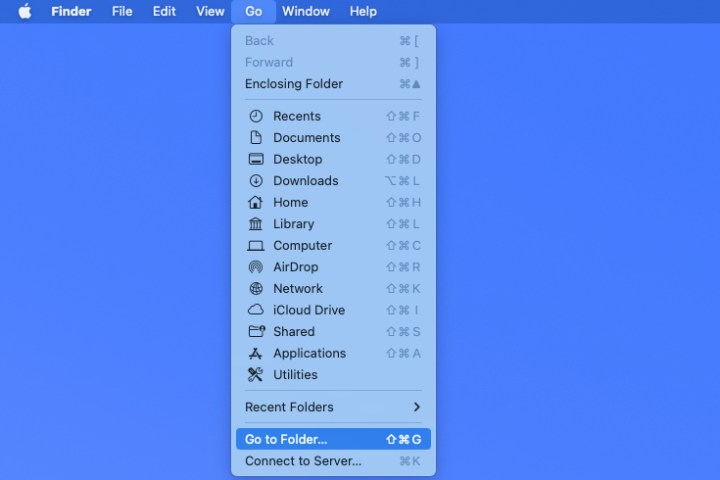
Step 1: With Finder active, select Go > Go to folder from the menu bar.
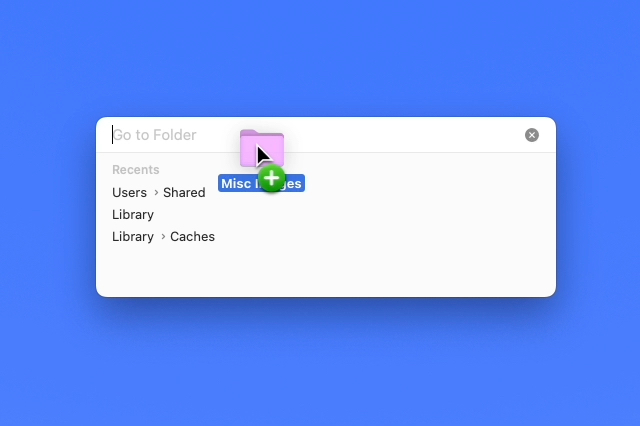
Step 2: When the window opens, select the X on the right side of the Search bar to clear the field if necessary.
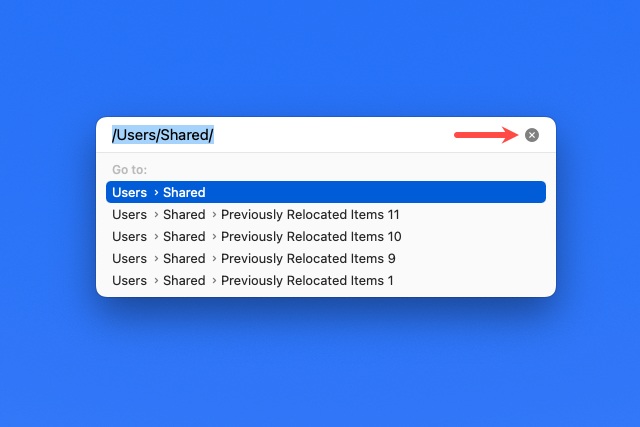
Step 3: Drag your file or folder into the Search bar at the top of the window. You’ll then see the path for the item in that field.
Step 4: From there, select the path and either use Command + C or right-click and pick Copy.
With the path on your clipboard, you can paste it where you like.

File paths in Terminal
If you’re a fan of using Terminal to perform actions on your Mac, then you can use this app to display and copy a file path as well.
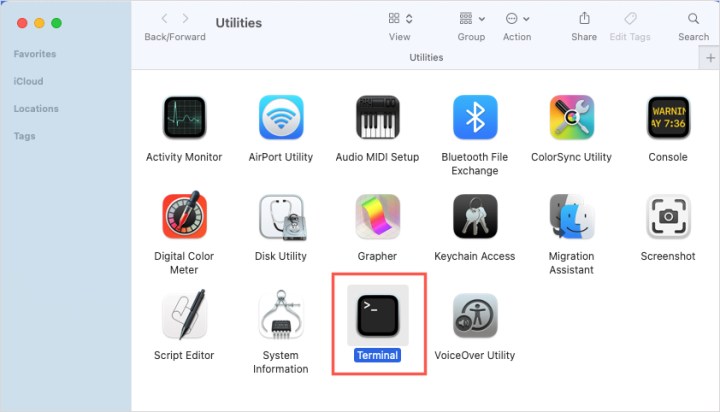
Step 1: Open Terminal as you normally would or by going to the Utilities folder and selecting the application.
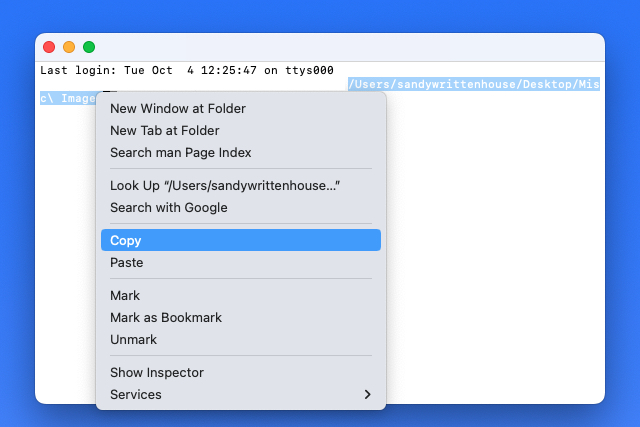
Step 2: When the Terminal window opens, drag your file or folder into it. You’ll then see the file path display in the window.

Step 3: Right-click and choose Copy to place the path on your clipboard and paste it where needed.
If you want to see the full path of a file or folder on Mac, you have a few easy ways to do so, as well as copying that path to your clipboard.
Editors’ Recommendations
Whether for troubleshooting a problem or for quick access, it’s useful to know how to find and copy a file path on Mac. This places the path name on your clipboard for you to paste elsewhere, like in Notes as a reference or in Terminal for additional actions.
We’ll show you a few ways to locate and copy the path for a file or folder in macOS.
File paths in Finder
One of the easiest ways to view a file path is in Finder on your Mac. Along with it, we’ll show you how to use the context menu to copy that path.
Step 1: Open Finder on your Mac and navigate to the file or folder you want to view.
Step 2: To simply see the file path, select View > Show path bar in the menu bar.
Step 3: You’ll then see the path display at the bottom of the Finder window.
Step 4: To copy the file path, right-click the item in Finder to display the context menu.
Step 5: Hold the Option key while the context menu is open and select Copy [name] as Pathname.
The file path is then on your clipboard for you to paste where you wish.
File paths in Get Info
Another convenient location to view and copy a file path is with the Get Info tool.
Step 1: Select the item on your desktop or in Finder.
Step 2: Press Command + I or right-click and pick Get info.
Step 3: When the Get Info window opens, expand the General section at the top and you’ll see the file path next to Where. Drag your cursor through the path to highlight it.
Step 4: Press Command + C to copy the path or right-click and choose Copy as Pathname.
Step 5: With the path on your clipboard, you can then paste it where needed. The path should display correctly with the arrows replaced by forward slashes.
File paths in Go To Folder
You may only think of opening Finder’s Go To Folder tool when you need to navigate somewhere on Mac. But this nifty tool can also provide the file path of an item.
Step 1: With Finder active, select Go > Go to folder from the menu bar.
Step 2: When the window opens, select the X on the right side of the Search bar to clear the field if necessary.
Step 3: Drag your file or folder into the Search bar at the top of the window. You’ll then see the path for the item in that field.
Step 4: From there, select the path and either use Command + C or right-click and pick Copy.
With the path on your clipboard, you can paste it where you like.
File paths in Terminal
If you’re a fan of using Terminal to perform actions on your Mac, then you can use this app to display and copy a file path as well.
Step 1: Open Terminal as you normally would or by going to the Utilities folder and selecting the application.
Step 2: When the Terminal window opens, drag your file or folder into it. You’ll then see the file path display in the window.
Step 3: Right-click and choose Copy to place the path on your clipboard and paste it where needed.
If you want to see the full path of a file or folder on Mac, you have a few easy ways to do so, as well as copying that path to your clipboard.
Editors’ Recommendations
Denial of responsibility! Techno Blender is an automatic aggregator of the all world’s media. In each content, the hyperlink to the primary source is specified. All trademarks belong to their rightful owners, all materials to their authors. If you are the owner of the content and do not want us to publish your materials, please contact us by email – [email protected]. The content will be deleted within 24 hours.