
How to sign a PDF on Mac
As a Mac user, you’re likely familiar with Preview as the default app for viewing images. But this handy application gives you an easy way to sign documents, too. You can create and save a signature using your trackpad, camera, or mobile device. Then, pop that signature into the document in just a few steps.
Here’s how to sign a PDF on Mac using Preview by inserting a saved signature or creating a new one.
Sign a PDF on Mac using Preview
If you already have a saved signature, signing the PDF in Preview on Mac is a simple process.
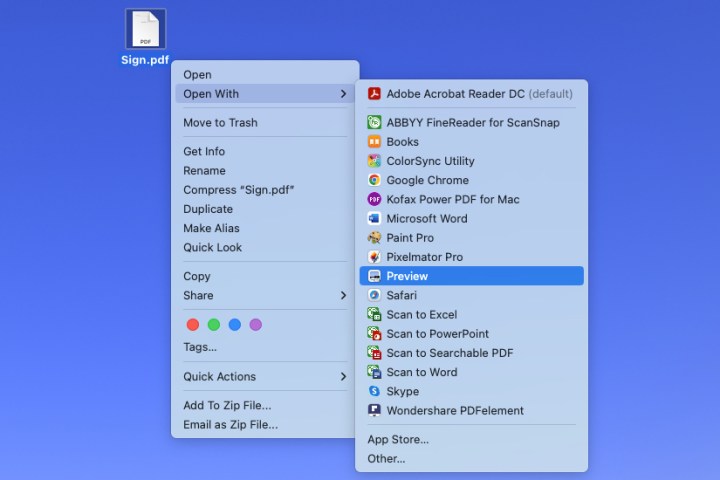
Step 1: Open the PDF file in Preview. You can do this by right-clicking the file in a folder or on your desktop, moving to Open with, and choosing Preview from the shortcut menu.
Alternatively, if you already have Preview open, select File > Open and browse for the file. Choose the PDF and pick Open.
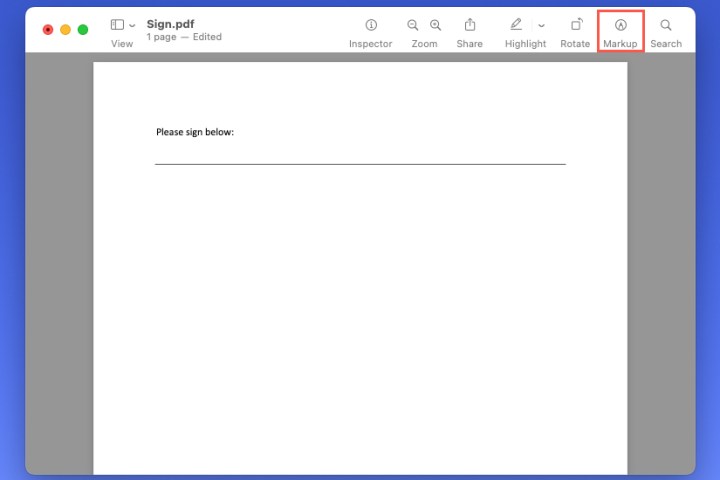
Step 2: Select Markup in the Preview toolbar at the top. This displays a bar for the Markup tools.
Step 3: Use the drop-down arrow next to the Sign button to choose your signature.

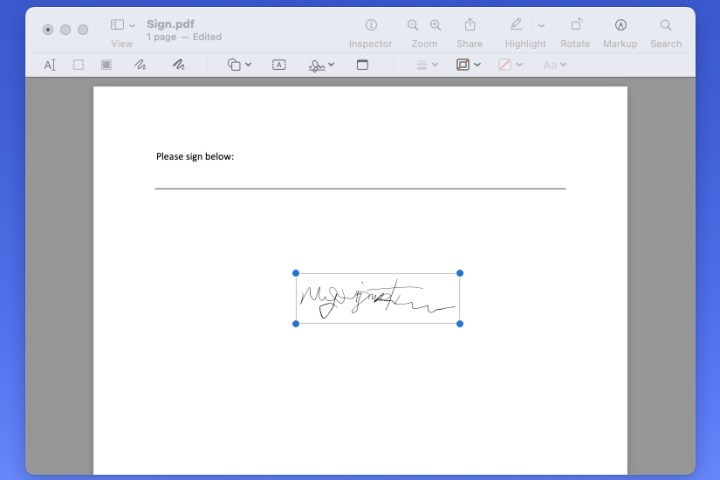
Step 4: When your signature displays, drag it to the spot where you want it in the document. You can also drag a corner to resize the signature to fit the document if needed.
You can then save the PDF, export it, or share it using File in the menu bar.

Create a signature and sign your PDF in Preview
If you don’t yet have a signature, you can create one to sign your document easily in Preview. Your new signature will automatically save so that you can reuse it in Preview later.
Step 1: Open your PDF in Preview, and select Markup in the toolbar.
Step 2: Use the drop-down arrow next to the Sign button to choose Create signature.

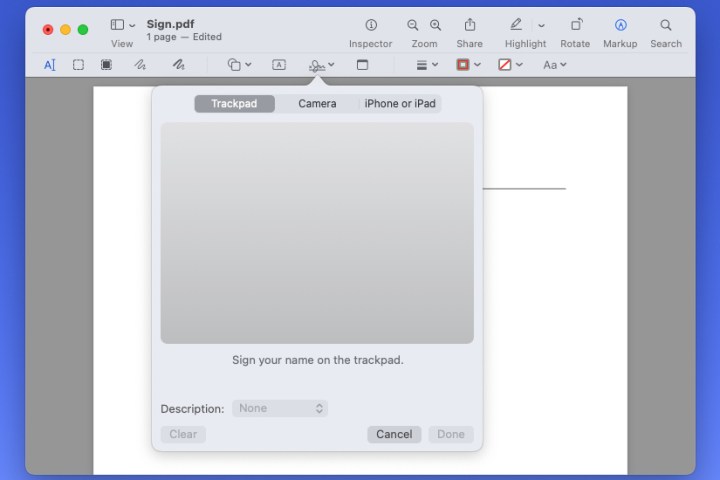
Step 3: You can then create your signature using your trackpad, camera, iPhone, or iPad. Here are the instructions for each option:
Tackpad: Select Trackpad to sign your name using your Mac’s trackpad, and choose Click here to begin. Use your finger to sign your name on the trackpad.
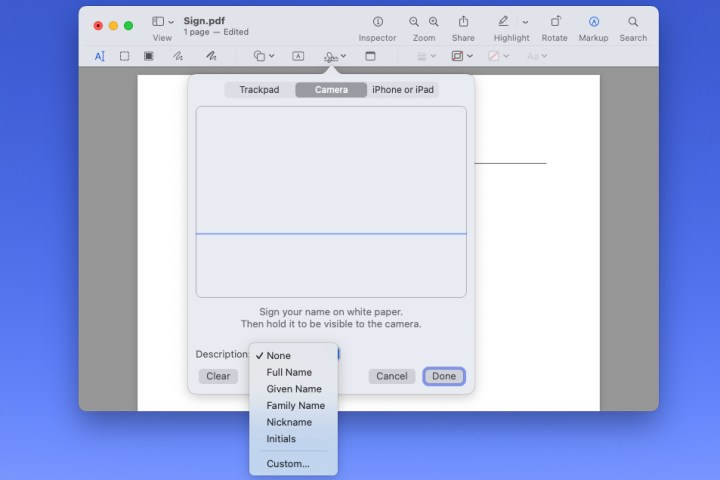
Camera: Select Camera to capture an image of your signature from a physical paper. Use a white piece of paper and sign your name. Then, hold the paper up to your camera so that your signature is even with the blue line on the screen.
iPhone or iPad: Select iPhone or iPad > Select device in the Preview window, and pick your iPhone or iPad from the list. You’ll then see a screen appear on your mobile device ready for your signature. Create the signature, and tap Done.
Step 4: With each of the above methods, you can use the Description box to describe the signature. You can also select Clear if you want to redo the signature.
Select Done when you finish.
Step 5: When you see the signature display in Preview using one of the above options, you can then drag to move it where needed in the document. Again, you can drag a corner to resize your signature.
Next, you can save, export, or share the signed PDF using File in the menu bar.
When you need to sign a PDF document for work, school, or business, it takes only a few minutes in Preview on Mac. For more, look at how to print a PDF on Mac as well.
Editors’ Recommendations
As a Mac user, you’re likely familiar with Preview as the default app for viewing images. But this handy application gives you an easy way to sign documents, too. You can create and save a signature using your trackpad, camera, or mobile device. Then, pop that signature into the document in just a few steps.
Here’s how to sign a PDF on Mac using Preview by inserting a saved signature or creating a new one.
Sign a PDF on Mac using Preview
If you already have a saved signature, signing the PDF in Preview on Mac is a simple process.
Step 1: Open the PDF file in Preview. You can do this by right-clicking the file in a folder or on your desktop, moving to Open with, and choosing Preview from the shortcut menu.
Alternatively, if you already have Preview open, select File > Open and browse for the file. Choose the PDF and pick Open.
Step 2: Select Markup in the Preview toolbar at the top. This displays a bar for the Markup tools.
Step 3: Use the drop-down arrow next to the Sign button to choose your signature.
Step 4: When your signature displays, drag it to the spot where you want it in the document. You can also drag a corner to resize the signature to fit the document if needed.
You can then save the PDF, export it, or share it using File in the menu bar.
Create a signature and sign your PDF in Preview
If you don’t yet have a signature, you can create one to sign your document easily in Preview. Your new signature will automatically save so that you can reuse it in Preview later.
Step 1: Open your PDF in Preview, and select Markup in the toolbar.
Step 2: Use the drop-down arrow next to the Sign button to choose Create signature.
Step 3: You can then create your signature using your trackpad, camera, iPhone, or iPad. Here are the instructions for each option:
Tackpad: Select Trackpad to sign your name using your Mac’s trackpad, and choose Click here to begin. Use your finger to sign your name on the trackpad.
Camera: Select Camera to capture an image of your signature from a physical paper. Use a white piece of paper and sign your name. Then, hold the paper up to your camera so that your signature is even with the blue line on the screen.
iPhone or iPad: Select iPhone or iPad > Select device in the Preview window, and pick your iPhone or iPad from the list. You’ll then see a screen appear on your mobile device ready for your signature. Create the signature, and tap Done.
Step 4: With each of the above methods, you can use the Description box to describe the signature. You can also select Clear if you want to redo the signature.
Select Done when you finish.
Step 5: When you see the signature display in Preview using one of the above options, you can then drag to move it where needed in the document. Again, you can drag a corner to resize your signature.
Next, you can save, export, or share the signed PDF using File in the menu bar.
When you need to sign a PDF document for work, school, or business, it takes only a few minutes in Preview on Mac. For more, look at how to print a PDF on Mac as well.
Editors’ Recommendations
Denial of responsibility! Techno Blender is an automatic aggregator of the all world’s media. In each content, the hyperlink to the primary source is specified. All trademarks belong to their rightful owners, all materials to their authors. If you are the owner of the content and do not want us to publish your materials, please contact us by email – [email protected]. The content will be deleted within 24 hours.