
Building a Health Entity labelling service using Azure Kubernetes Service, Seldon Core and Azure Cognitive | by Bogdan Cojocar | Jun, 2022
In this tutorial we will build an inference service entirely in Kubernetes in the Azure ecosystem
In this tutorial we will use the following technologies:
- AKS: Azure Kubernetes Service on Azure cloud as our platform to deploy the ML model
- Seldon core: Open-source platform for rapidly deploying machine learning models on Kubernetes
- cdktf: will allow us to build infrastructure in Azure cloud in python
- Azure Cognitive Services: ready-made AI services in Azure that can be accessed via APIs
- s2i: A comand line tool used to create docker images from source code
- Istio: An open source project that Istio enables organizations to secure, connect, and monitor microservices
TL;DR: The code is on GitHub.
I this article we will deploy a health search entity inference service in Azure. We will deploy infrastructure with cdktf and will write a seldon core model that will interact with Azure Cognitive Services APIs to analyse health data. We will also use helm to install seldon core in AKS and various other dependencies. We assume that you have already installed kubectl, helm and the azure CLI in your environment and you are able to run most of the command shown here in a linux based terminal.
To build and deploy the infrastructure we will need access to an azure account (free trial enrolment is available here) and cdktf installed in our environemnt. We can use brew for this purpose:
brew install cdktf
Ok, so now we can start coding. The first thing we need to do in cdktf is to create the main class that will hold all the azure components, we will call it MLAzureStack:
As we can see we need to inherit from TerraformStack and also to create an AzurermProvider that will help with communicating with the azure cloud APIs in order to build the desired infrastructure.
Next we will create a resource group. This is a logic container that will hold all the infrastructure we deploy. It’s a nice way to group all your resources together.
We use a vars instance of a class StackVariables that will hold all the custom values for our infrastructure. Please visit the github repo for full details about this.
In the next part we create the Kubernetes cluster. We will create a basic cluster with 2 nodes and D2_V4 VMs that will be enough to host the Seldon Core and Istio installations.
We also need to create the Cognitive Account responsible of the Text Analytics API that will run the Health Entity Service that will be used to label new data.
We will have to create a docker container with our code and this container will have to be hosted in Azure. For this purpose we will create a container registry.
And the final piece of infra we need is creating a Key vault. Basically we have sensitive information that we want to store securely. For this purpose we create a KeyVault.
In the KeyVault we can define the permission we want to give for new secrets and keys. We also create 2 Vault Secrets that will hold the Cognitive access key and endpoint. These values are needed to access the Health Entity Service API.
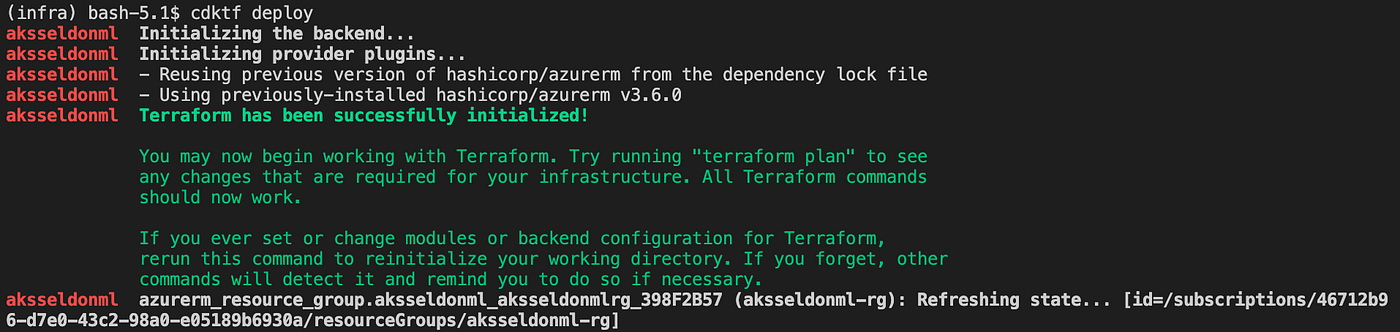
We are now ready to deploy the Azure stack. We need to run the cdktf deploy command from the terminal:
cdktf deploy
This will initialise the terraform provider and deploy the declared resources:
If we navigate to the azure portal we should see the all the resources created in the resource group:

In this section we will write the Seldon model that will receive new requests and will send back labeled health data if it encounters that.
We define a health_entity class that will have an __init__ method and the predict method that will be basically responsible to handle requests.
In the constructor we connect to the KeyVault and we get our secrets that we defined previusly. We use these parameters to create a TextAnalyticsClient which will be responsible with handling the ML requests.
In the predict method we pass our data request to the healthcare azure client. We get back from the API some entities and some defined relationships between them. We create a JSON response will all the information and we return it to the user.
In the folder that we define the health_entity.py we also have to create another file .s2i/environment that will contain all the environment variables used by Seldon in the docker image.
MODEL_NAME=HealthModel
API_TYPE=REST
SERVICE_TYPE=MODEL
PERSISTENCE=0
We can see we will create a standard model and we will serve REST requests. GRPC is also supported.
To be able to deploy the Seldon model in AKS we need to install a couple of things in the cluster. We will need the azure cli, helm and kubectl to run some installation scripts.
To connect kubectl to the Azure cluster we need to add the needed credentials in the kube config file:
az aks get-credentials --resource-group aksseldonml-rg --name aksseldonml-aks --admin
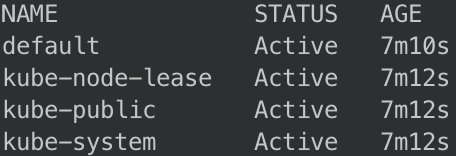
We can test if this works, checking the namespaces that are available in the cluster using kubectl get ns :
The next component that seldon core needs is istio. First we need to download it using:
curl -L https://istio.io/downloadIstio | sh -
Move into the istio package directory and add it to your path, in order to be able to use the istio comand line utility istioctl:
cd istio-1.11.4
export PATH=$PWD/bin:$PATH
Now we can install istio on the cluster:
istioctl install --set profile=demo -y
The namespace label istio-injection=enabled instructs Istio to automatically inject proxies alongside anything we deploy in that namespace. We’ll set it up for our seldon namespace that will contain our inference model:
kubectl create namespace seldon
kubectl label namespace seldon istio-injection=enabled
In order to let Seldon Core use the Istio mesh we need to create an Istio Gateway that will help to root traffic into the mesh:
kubectl apply -f - << END
apiVersion: networking.istio.io/v1alpha3
kind: Gateway
metadata:
name: seldon-gateway
namespace: istio-system
spec:
selector:
istio: ingressgateway
servers:
- port:
number: 80
name: http
protocol: HTTP
hosts:
- "*"
END
If we want to check if all the Istio components are installed correctly we can run kubectl -n istio-system get all and we should have something simmilar:

Before we install Seldon we need to create a namespace to host it:
kubectl create namespace seldon-system
And using helm we can install Seldon core next:
helm install seldon-core seldon-core-operator \
--repo https://storage.googleapis.com/seldon-charts \
--set usageMetrics.enabled=true \
--set istio.enabled=true \
--namespace seldon-system
We can check if the Seldon controller is running using kubectl -n seldon-system get pods:

No we have our environment setup to be able to do the deployment. We will uses2i to build the docker image. To install it we can run:
brew install source-to-image
We will build a docker image using the seldonio/seldon-core-s2i-python36:1.14.0-dev as a base. We will name our new image seldon-health:0.1
s2i build . seldonio/seldon-core-s2i-python36:1.14.0-dev seldon-health:0.1
Next we need to login into the Azure container that we created in step 1. This will allow us to push the new image in the registry.
az acr login --name seldonservice
We need to tag the image before we can push it to Azure:
docker tag seldon-health:0.1 seldoncontainerregistry.azurecr.io/seldon-health:0.1
And finally we can send the image into the container registry:
docker push seldoncontainerregistry.azurecr.io/seldon-health:0.1
Once the image is in the azure container we can deploy the seldon model using kubectl. The kubernetes manifest contains the image that we just deployed:
kubectl apply -f - << END
apiVersion: machinelearning.seldon.io/v1
kind: SeldonDeployment
metadata:
name: seldon-health
namespace: seldon
spec:
name: seldon-health
predictors:
- componentSpecs:
- spec:
containers:
- name: classifier
image: seldoncontainerregistry.azurecr.io/seldon-health:0.1
graph:
name: classifier
name: default
replicas: 1
END
And we can verify id the deployment is successful using kubectl -n seldon get pods:

We can test the health service in two ways. First we will test the code locally using the seldon-core-microservice CLI and we will also test the deployment on AKS.
We need to install the seldon core CLI with pip:
pip install seldon-core
Then in a separate terminal we can run a local seldon core micro service server:
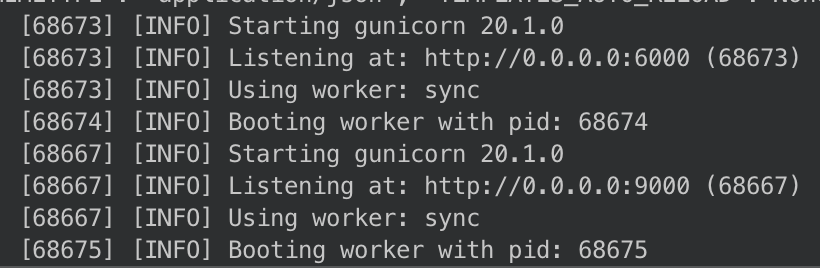
cd model/ && seldon-core-microservice --service-type MODEL health_entity
And you should be able to see a gunicorn server started listening on port 9000:
On a separate terminal we can run a curl command to check our service:
curl -X POST http://localhost:9000/api/v1.0/predictions -H 'Content-Type: application/json' -d '{ "data": { "ndarray": ["Patient needs to take 50 mg of ibuprofen every day."] } }'
As we can see we’ve sent some medical info in the curl request. We should get back a JSON with labeled information:
[
{
"entity":{
"name":"50 mg",
"category":"Dosage",
"confidence_score":0.99
}
},
{
"entity":{
"name":"ibuprofen",
"category":"MedicationName",
"confidence_score":1.0
}
},
{
"entity":{
"name":"every day",
"category":"Frequency",
"confidence_score":1.0
}
},
{
"relation_type":"DosageOfMedication",
"roles":[
{
"role":"Dosage",
"entity":"50 mg"
},
{
"role":"Medication",
"entity":"ibuprofen"
}
]
},
{
"relation_type":"FrequencyOfMedication",
"roles":[
{
"role":"Medication",
"entity":"ibuprofen"
},
{
"role":"Frequency",
"entity":"every day"
}
]
}
]
As we can see we get back the medical terms labeled for example ibuprofen is recognised as an entity of type MedicationName and we can also see relations between different terms such as 50 mg (Dosage) and ibuprofen (Medication) and the relationship type is DosageOfMedication.
We can also sun a similar curl command in AKS. We need to get the cluster ip and port for our deployed seldon health service. For this we need to run a couple of kubectl commands:
export INGRESS_HOST=$(kubectl -n istio-system get service istio-ingressgateway -o jsonpath='{.status.loadBalancer.ingress[0].ip}')
export INGRESS_PORT=$(kubectl -n istio-system get service istio-ingressgateway -o jsonpath='{.spec.ports[?(@.name=="http2")].port}')
export INGRESS_URL=$INGRESS_HOST:$INGRESS_PORT
echo $INGRESS_URL
Once we have the INGRESS_URL we can replace it in our curl command:
curl -X POST http://$INGRESS_URL/api/v1.0/predictions -H 'Content-Type: application/json' -d '{ "data": { "ndarray": ["Patient needs to take 50 mg of ibuprofen every day."] } }'
and we should have a similar response as the local request.
Well we finally reached the end of the tutorial. I was a complex one, but we’ve managed to create a Kubernetes ML solution end to end in Azure. We’ve seen how we can create complex infrastructure in python using CDKTF, how we can install various frameworks in Kubernetes using helm and kubectl and also how we can create and deploy an ML RESTful service using Seldon Core, that is very scalable, secure and easily configurable.
In this tutorial we will build an inference service entirely in Kubernetes in the Azure ecosystem

In this tutorial we will use the following technologies:
- AKS: Azure Kubernetes Service on Azure cloud as our platform to deploy the ML model
- Seldon core: Open-source platform for rapidly deploying machine learning models on Kubernetes
- cdktf: will allow us to build infrastructure in Azure cloud in python
- Azure Cognitive Services: ready-made AI services in Azure that can be accessed via APIs
- s2i: A comand line tool used to create docker images from source code
- Istio: An open source project that Istio enables organizations to secure, connect, and monitor microservices
TL;DR: The code is on GitHub.
I this article we will deploy a health search entity inference service in Azure. We will deploy infrastructure with cdktf and will write a seldon core model that will interact with Azure Cognitive Services APIs to analyse health data. We will also use helm to install seldon core in AKS and various other dependencies. We assume that you have already installed kubectl, helm and the azure CLI in your environment and you are able to run most of the command shown here in a linux based terminal.
To build and deploy the infrastructure we will need access to an azure account (free trial enrolment is available here) and cdktf installed in our environemnt. We can use brew for this purpose:
brew install cdktf
Ok, so now we can start coding. The first thing we need to do in cdktf is to create the main class that will hold all the azure components, we will call it MLAzureStack:
As we can see we need to inherit from TerraformStack and also to create an AzurermProvider that will help with communicating with the azure cloud APIs in order to build the desired infrastructure.
Next we will create a resource group. This is a logic container that will hold all the infrastructure we deploy. It’s a nice way to group all your resources together.
We use a vars instance of a class StackVariables that will hold all the custom values for our infrastructure. Please visit the github repo for full details about this.
In the next part we create the Kubernetes cluster. We will create a basic cluster with 2 nodes and D2_V4 VMs that will be enough to host the Seldon Core and Istio installations.
We also need to create the Cognitive Account responsible of the Text Analytics API that will run the Health Entity Service that will be used to label new data.
We will have to create a docker container with our code and this container will have to be hosted in Azure. For this purpose we will create a container registry.
And the final piece of infra we need is creating a Key vault. Basically we have sensitive information that we want to store securely. For this purpose we create a KeyVault.
In the KeyVault we can define the permission we want to give for new secrets and keys. We also create 2 Vault Secrets that will hold the Cognitive access key and endpoint. These values are needed to access the Health Entity Service API.
We are now ready to deploy the Azure stack. We need to run the cdktf deploy command from the terminal:
cdktf deploy
This will initialise the terraform provider and deploy the declared resources:
If we navigate to the azure portal we should see the all the resources created in the resource group:
In this section we will write the Seldon model that will receive new requests and will send back labeled health data if it encounters that.
We define a health_entity class that will have an __init__ method and the predict method that will be basically responsible to handle requests.
In the constructor we connect to the KeyVault and we get our secrets that we defined previusly. We use these parameters to create a TextAnalyticsClient which will be responsible with handling the ML requests.
In the predict method we pass our data request to the healthcare azure client. We get back from the API some entities and some defined relationships between them. We create a JSON response will all the information and we return it to the user.
In the folder that we define the health_entity.py we also have to create another file .s2i/environment that will contain all the environment variables used by Seldon in the docker image.
MODEL_NAME=HealthModel
API_TYPE=REST
SERVICE_TYPE=MODEL
PERSISTENCE=0
We can see we will create a standard model and we will serve REST requests. GRPC is also supported.
To be able to deploy the Seldon model in AKS we need to install a couple of things in the cluster. We will need the azure cli, helm and kubectl to run some installation scripts.
To connect kubectl to the Azure cluster we need to add the needed credentials in the kube config file:
az aks get-credentials --resource-group aksseldonml-rg --name aksseldonml-aks --admin
We can test if this works, checking the namespaces that are available in the cluster using kubectl get ns :
The next component that seldon core needs is istio. First we need to download it using:
curl -L https://istio.io/downloadIstio | sh -
Move into the istio package directory and add it to your path, in order to be able to use the istio comand line utility istioctl:
cd istio-1.11.4
export PATH=$PWD/bin:$PATH
Now we can install istio on the cluster:
istioctl install --set profile=demo -y
The namespace label istio-injection=enabled instructs Istio to automatically inject proxies alongside anything we deploy in that namespace. We’ll set it up for our seldon namespace that will contain our inference model:
kubectl create namespace seldon
kubectl label namespace seldon istio-injection=enabled
In order to let Seldon Core use the Istio mesh we need to create an Istio Gateway that will help to root traffic into the mesh:
kubectl apply -f - << END
apiVersion: networking.istio.io/v1alpha3
kind: Gateway
metadata:
name: seldon-gateway
namespace: istio-system
spec:
selector:
istio: ingressgateway
servers:
- port:
number: 80
name: http
protocol: HTTP
hosts:
- "*"
END
If we want to check if all the Istio components are installed correctly we can run kubectl -n istio-system get all and we should have something simmilar:
Before we install Seldon we need to create a namespace to host it:
kubectl create namespace seldon-system
And using helm we can install Seldon core next:
helm install seldon-core seldon-core-operator \
--repo https://storage.googleapis.com/seldon-charts \
--set usageMetrics.enabled=true \
--set istio.enabled=true \
--namespace seldon-system
We can check if the Seldon controller is running using kubectl -n seldon-system get pods:
No we have our environment setup to be able to do the deployment. We will uses2i to build the docker image. To install it we can run:
brew install source-to-image
We will build a docker image using the seldonio/seldon-core-s2i-python36:1.14.0-dev as a base. We will name our new image seldon-health:0.1
s2i build . seldonio/seldon-core-s2i-python36:1.14.0-dev seldon-health:0.1
Next we need to login into the Azure container that we created in step 1. This will allow us to push the new image in the registry.
az acr login --name seldonservice
We need to tag the image before we can push it to Azure:
docker tag seldon-health:0.1 seldoncontainerregistry.azurecr.io/seldon-health:0.1
And finally we can send the image into the container registry:
docker push seldoncontainerregistry.azurecr.io/seldon-health:0.1
Once the image is in the azure container we can deploy the seldon model using kubectl. The kubernetes manifest contains the image that we just deployed:
kubectl apply -f - << END
apiVersion: machinelearning.seldon.io/v1
kind: SeldonDeployment
metadata:
name: seldon-health
namespace: seldon
spec:
name: seldon-health
predictors:
- componentSpecs:
- spec:
containers:
- name: classifier
image: seldoncontainerregistry.azurecr.io/seldon-health:0.1
graph:
name: classifier
name: default
replicas: 1
END
And we can verify id the deployment is successful using kubectl -n seldon get pods:
We can test the health service in two ways. First we will test the code locally using the seldon-core-microservice CLI and we will also test the deployment on AKS.
We need to install the seldon core CLI with pip:
pip install seldon-core
Then in a separate terminal we can run a local seldon core micro service server:
cd model/ && seldon-core-microservice --service-type MODEL health_entity
And you should be able to see a gunicorn server started listening on port 9000:
On a separate terminal we can run a curl command to check our service:
curl -X POST http://localhost:9000/api/v1.0/predictions -H 'Content-Type: application/json' -d '{ "data": { "ndarray": ["Patient needs to take 50 mg of ibuprofen every day."] } }'
As we can see we’ve sent some medical info in the curl request. We should get back a JSON with labeled information:
[
{
"entity":{
"name":"50 mg",
"category":"Dosage",
"confidence_score":0.99
}
},
{
"entity":{
"name":"ibuprofen",
"category":"MedicationName",
"confidence_score":1.0
}
},
{
"entity":{
"name":"every day",
"category":"Frequency",
"confidence_score":1.0
}
},
{
"relation_type":"DosageOfMedication",
"roles":[
{
"role":"Dosage",
"entity":"50 mg"
},
{
"role":"Medication",
"entity":"ibuprofen"
}
]
},
{
"relation_type":"FrequencyOfMedication",
"roles":[
{
"role":"Medication",
"entity":"ibuprofen"
},
{
"role":"Frequency",
"entity":"every day"
}
]
}
]
As we can see we get back the medical terms labeled for example ibuprofen is recognised as an entity of type MedicationName and we can also see relations between different terms such as 50 mg (Dosage) and ibuprofen (Medication) and the relationship type is DosageOfMedication.
We can also sun a similar curl command in AKS. We need to get the cluster ip and port for our deployed seldon health service. For this we need to run a couple of kubectl commands:
export INGRESS_HOST=$(kubectl -n istio-system get service istio-ingressgateway -o jsonpath='{.status.loadBalancer.ingress[0].ip}')
export INGRESS_PORT=$(kubectl -n istio-system get service istio-ingressgateway -o jsonpath='{.spec.ports[?(@.name=="http2")].port}')
export INGRESS_URL=$INGRESS_HOST:$INGRESS_PORT
echo $INGRESS_URL
Once we have the INGRESS_URL we can replace it in our curl command:
curl -X POST http://$INGRESS_URL/api/v1.0/predictions -H 'Content-Type: application/json' -d '{ "data": { "ndarray": ["Patient needs to take 50 mg of ibuprofen every day."] } }'
and we should have a similar response as the local request.
Well we finally reached the end of the tutorial. I was a complex one, but we’ve managed to create a Kubernetes ML solution end to end in Azure. We’ve seen how we can create complex infrastructure in python using CDKTF, how we can install various frameworks in Kubernetes using helm and kubectl and also how we can create and deploy an ML RESTful service using Seldon Core, that is very scalable, secure and easily configurable.
Denial of responsibility! Techno Blender is an automatic aggregator of the all world’s media. In each content, the hyperlink to the primary source is specified. All trademarks belong to their rightful owners, all materials to their authors. If you are the owner of the content and do not want us to publish your materials, please contact us by email – [email protected]. The content will be deleted within 24 hours.