
Dead gadget battery? This $6 tool is a must-have for tech repairs
The other day, I found myself repairing someone’s rather painful failed repair.
The client had a defective Joy-Con for their child’s Nintendo Switch, and it seemed that the battery had failed.
Also: Why you need a batteryless jump starter (and how it works)
Rather than buy a new Joy-Con, they decided it would make a decent repair project and bought replacement batteries. These Nintendo joycons are quite easy to open and the battery easy to replace, so it is a good repair project.
The repair seemed to go well; but after refitting the battery, the Joy-Con still didn’t work. It was dead and wouldn’t seem to charge up, so they went back in, started poking around, and then things took a serious turn: They accidentally broke the little fastener that connects the battery to the Joy-Con.
This is where I came in. I assured the client that things like this happen, that the broken connector could be fixed with a bit of soldering, and that the problem with the “new” battery was that it was so completely discharged, it wouldn’t charge up when connected to the Nintendo Switch.
Also: How to solder: Tools, tips, and tricks to get you started the easy way
But the underlying issue here is simple — and quite common: You can’t fully trust “new” parts to be working properly. The most common repair that people start out with is a battery swap; whenever possible, I test batteries before fitting them, because having to open something up a second time to get at the battery increases your risk of breaking something.
Batteries are easy to test: all you need is a multimeter set to read DC volts, and you touch the red lead to the red wire or the one marked as positive (+), the black lead to the black wire or the one marked as negative (-) and compare the reading on the screen to the rated voltage on the battery.
Also: The best rechargeable batteries you can buy
The Joy-Con has a single-cell lithium ion battery with a voltage of 3.7 volts. Fully charged, these hit a high of around 4.2 volts, and fully discharged can be below 3.3 volts (you can find these numbers for different batteries with a quick search of the internet). For some reason the replacement battery had drained to below 3.3 volts and so it wouldn’t charge.
Testing a rechargeable battery Adrian Kingsley-Hughes/ZDNET
It’s a super quick test.
I now make a habit of testing all rechargeable batteries before fitting, because I too have fitted a defective battery into a device, and was left scratching my head as to what was the matter.
Also: This $10 gadget is my favorite repair tool of all time
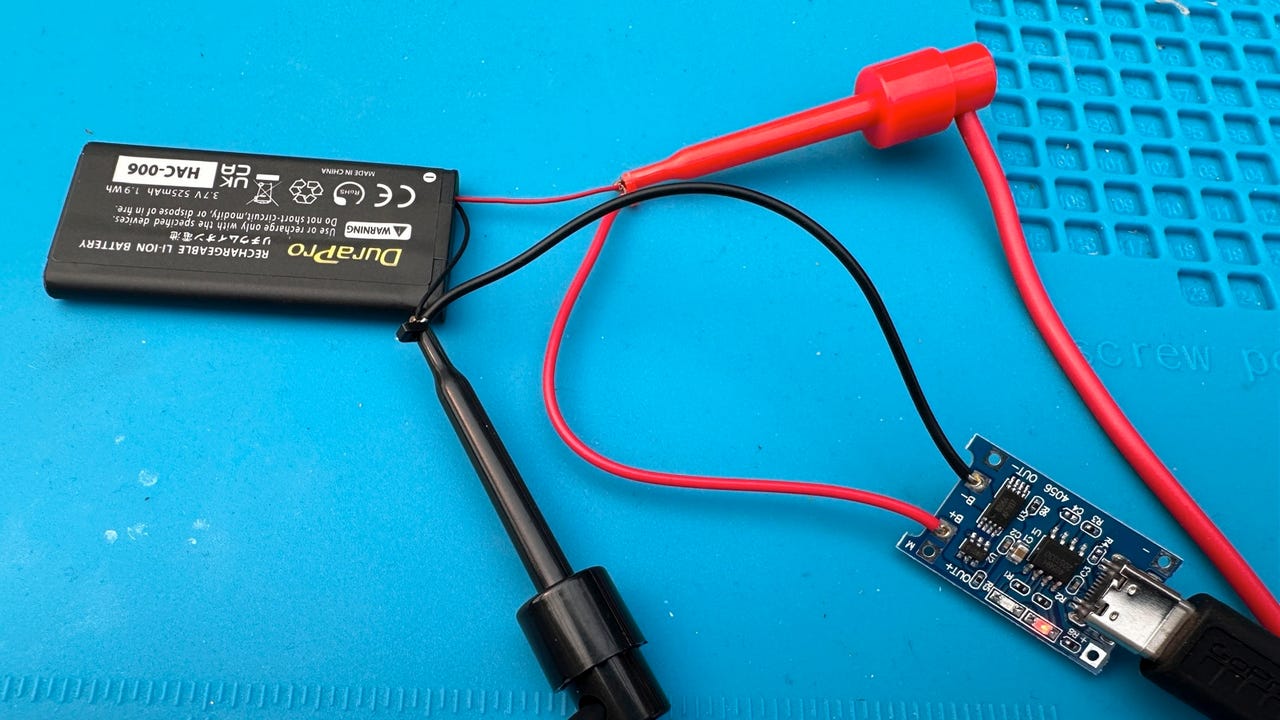
I have a trick up my sleeve, in the form of a little TP4056 charging board.
This board is designed for charging single-cell lithium ion batteries — you connect the battery leads to the module (I used clips), connect USB power to the module, and wait for it to charge the battery.
This brought the Joy-Con battery to full charge, and it has been working fine since.
Bringing a discharged lithium ion battery back to life with a TP4056 charging board Adrian Kingsley-Hughes/ZDNET
You can get these charging boards for USB-C and microUSB, they’re cheap — you can buy five for only $6 — and they’re great for charging single-cell lithium ion batteries outside of the device they’re supposed to be in.
Also: You’ll never guess how many tech repair tools this little bag can fit
Need a multimeter? I really like the Pokit Pro that connects to a smartphone, but if you’re starting out, you can pick up a good multimeter for $12.
The other day, I found myself repairing someone’s rather painful failed repair.
The client had a defective Joy-Con for their child’s Nintendo Switch, and it seemed that the battery had failed.
Also: Why you need a batteryless jump starter (and how it works)
Rather than buy a new Joy-Con, they decided it would make a decent repair project and bought replacement batteries. These Nintendo joycons are quite easy to open and the battery easy to replace, so it is a good repair project.
The repair seemed to go well; but after refitting the battery, the Joy-Con still didn’t work. It was dead and wouldn’t seem to charge up, so they went back in, started poking around, and then things took a serious turn: They accidentally broke the little fastener that connects the battery to the Joy-Con.
This is where I came in. I assured the client that things like this happen, that the broken connector could be fixed with a bit of soldering, and that the problem with the “new” battery was that it was so completely discharged, it wouldn’t charge up when connected to the Nintendo Switch.
Also: How to solder: Tools, tips, and tricks to get you started the easy way
But the underlying issue here is simple — and quite common: You can’t fully trust “new” parts to be working properly. The most common repair that people start out with is a battery swap; whenever possible, I test batteries before fitting them, because having to open something up a second time to get at the battery increases your risk of breaking something.
Batteries are easy to test: all you need is a multimeter set to read DC volts, and you touch the red lead to the red wire or the one marked as positive (+), the black lead to the black wire or the one marked as negative (-) and compare the reading on the screen to the rated voltage on the battery.
Also: The best rechargeable batteries you can buy
The Joy-Con has a single-cell lithium ion battery with a voltage of 3.7 volts. Fully charged, these hit a high of around 4.2 volts, and fully discharged can be below 3.3 volts (you can find these numbers for different batteries with a quick search of the internet). For some reason the replacement battery had drained to below 3.3 volts and so it wouldn’t charge.
Testing a rechargeable battery Adrian Kingsley-Hughes/ZDNET
It’s a super quick test.
I now make a habit of testing all rechargeable batteries before fitting, because I too have fitted a defective battery into a device, and was left scratching my head as to what was the matter.
Also: This $10 gadget is my favorite repair tool of all time
I have a trick up my sleeve, in the form of a little TP4056 charging board.
This board is designed for charging single-cell lithium ion batteries — you connect the battery leads to the module (I used clips), connect USB power to the module, and wait for it to charge the battery.
This brought the Joy-Con battery to full charge, and it has been working fine since.
Bringing a discharged lithium ion battery back to life with a TP4056 charging board Adrian Kingsley-Hughes/ZDNET
You can get these charging boards for USB-C and microUSB, they’re cheap — you can buy five for only $6 — and they’re great for charging single-cell lithium ion batteries outside of the device they’re supposed to be in.
Also: You’ll never guess how many tech repair tools this little bag can fit
Need a multimeter? I really like the Pokit Pro that connects to a smartphone, but if you’re starting out, you can pick up a good multimeter for $12.
Denial of responsibility! Techno Blender is an automatic aggregator of the all world’s media. In each content, the hyperlink to the primary source is specified. All trademarks belong to their rightful owners, all materials to their authors. If you are the owner of the content and do not want us to publish your materials, please contact us by email – [email protected]. The content will be deleted within 24 hours.