
Having eye or hand tracking issues on Vision Pro? Here’s how you can recalibrate
Unlike most mixed-reality headsets on the market today, Apple Vision Pro isn’t designed to work with physical controllers. Instead, the headset is controlled by a user’s eyes and hands. This is a really intuitive and simple way to control Vision Pro—at least when it works as intended. Users are guided through the hand and eye tracking setup when they first start using Vision Pro, whether that be after purchasing one or during the in-store demo experience.
However, you might need to redo the hand and eye tracking setup a few times to get it working perfectly. Luckily, the calibration tool is easy to access at any time. It doesn’t require completely resetting your Vision Pro headset and only takes a few minutes. Here’s everything you need to know about hand and eye tracking on Vision Pro and how to redo it if things go awry.
How Vision Pro tracking works
Apple Vision Pro uses an array of cameras and sensors, both positioned to look at your eyes and your external environment, for hand and eye tracking. In order for this to work, the headset will look at the front and back of your hands during setup. Then, it will ask you to look at a circle of dots in Vision Pro, pinching your pointer finger and thumb together to select each one. This “pinch” gesture is how you select and navigate visionOS, and your eyes will determine what gets selected. It’s a simple five-minute setup process, but it is necessary for using Vision Pro.
Understanding the Eyes & Hands menu

Viewing and managing settings related to visionOS tracking happens in the Eyes & Hands page in the Settings app. At the top of the visionOS window, you’ll see the buttons for redoing eye and hand setup. Under that, there’s a Hands menu that lets you decide which hands can control Vision Pro. You’ll also find a Comfort Tips shortcut that will open guidance on how to adjust the Head Band, fit dial, and Light Seal.
Below, information about a user’s ZEISS optical inserts (if applicable) will be displayed. Apple Vision Pro can remember multiple pairs of optical inserts and switch between them. So, if you’re having issues with eye tracking, make sure your optical inserts setting is correct. visionOS will display a check mark next to the pair of optical inserts that are active. If you do not use optical inserts, there will be a check mark beside No Optical Inserts.
The other button worth keeping in mind is called Realign Displays. Each display inside Vision Pro is pushed by a motor based on the user’s inter-pupillary distance (IPD). IPD adjustments happen automatically on Vision Pro, and an on-screen graphic instructs users to hold the Digital Crown to confirm them when necessary. Vision Pro users shouldn’t need to manually realign their displays often, but the option is there.
Recalibrating hand tracking

You can redo the hand tracking setup on Vision Pro in just a minute or two, separately from the eye tracking setup. Here’s how:
- Open the Settings app in visionOS
- Navigate to the Eyes & Hands menu
- Look at the Redo Hand Setup button and pinch your finger and thumb to select it.
- Put your hands out in front of Vision Pro and look at them. (You may be asked to flip around your hands to show your palms)
- Vision Pro will display a checkmark when hand calibration is complete, and return the user to visionOS
After that, Vision Pro should be ready to detect your hands and related gestures. You can do this process as many times as is necessary for hand tracking to improve. However, if a few calibration attempts doesn’t solve your issues, you should move on to recalibrating your eye tracking next.
Recalibrating eye tracking
You should start by redoing your hand tracking calibration first, because the process is so short. Those having persistent problems should try redoing their eye setup, which takes longer, but is still fairly quick. Here’s how to do it:
- Open the Settings app in visionOS
- Navigate to the Eyes & Hands menu
- Look at the Redo Hand Setup button and pinch your finger and thumb to select it.
- Wait for visionOS to adjust the lighting of your environment
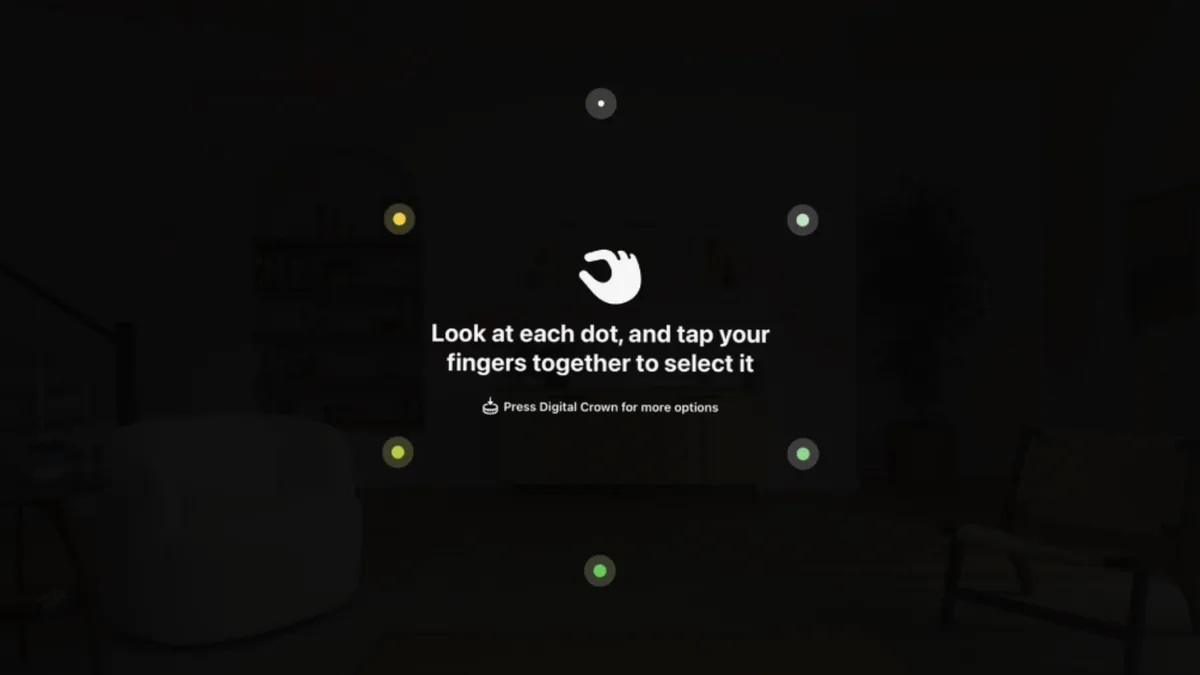
- You will be asked to select one dot first, in dark lighting. Look directly at the dot, then pinch your finger and thumb to select it
- Next, you will be asked to select six dots in a circle, in a dark environment. Look directly at each dot, then pinch your finger and thumb to select it. You may be asked to redo one or more dots
- You will be asked to repeat the above process in two more lighting conditions, each brighter than the one before it
- After that, you will see a Completing Eye Setup progress circle that may take a minute to complete. When finished, you will see a checkmark
After redoing the eye and hand setup processes, you should be all set to navigate visionOS without issue. Like with hand tracking, you can go through the eye tracking calibration as many times are as needed to provide great results. It can be easy to rush through the setup process, but going slow and steady is probably a good idea to get the most precise eye tracking experience.
Tips & tricks for Vision Pro tracking

Hopefully, by this point, you’ve managed to get hand and eye tracking on Vision Pro working as advertised. However, there are still a few tips and tricks to keep in mind. To redo hand and eye setup immediately — without the need to go through visionOS — just put on Vision Pro and press the top button four times rapidly. This will launch you straight into the hand and eye calibration environment.
You can also choose a different input method for Vision Pro if pressing your thumb and finger together isn’t an option, or isn’t working well. Open the Settings app, go to the Accessibility page, and check out Sound Actions and Dwell Control. Sound Actions make it possible for you to use Vision Pro with your voice, while Dwell Control can be used to select objects by looking at them long enough.
There’s also a way to use Vision Pro without eye tracking at all. In the Settings app, go to Accessibility and then Pointer Control. Then, tap the Control menu and select either Head, Wrist, or Index Finger as your pointer. Finally, back out of the menu and toggle Pointer Control on to use your new input method.
It’s also worth remembering that Vision Pro uses cameras and sensors for tracking, so keep your lenses and external display clean with the included polishing cloth. After redoing hand and eye setup, tweaking your settings, and cleaning Apple Vision Pro, any tracking woes you had should be all fixed.
Unlike most mixed-reality headsets on the market today, Apple Vision Pro isn’t designed to work with physical controllers. Instead, the headset is controlled by a user’s eyes and hands. This is a really intuitive and simple way to control Vision Pro—at least when it works as intended. Users are guided through the hand and eye tracking setup when they first start using Vision Pro, whether that be after purchasing one or during the in-store demo experience.
However, you might need to redo the hand and eye tracking setup a few times to get it working perfectly. Luckily, the calibration tool is easy to access at any time. It doesn’t require completely resetting your Vision Pro headset and only takes a few minutes. Here’s everything you need to know about hand and eye tracking on Vision Pro and how to redo it if things go awry.
How Vision Pro tracking works

Apple Vision Pro uses an array of cameras and sensors, both positioned to look at your eyes and your external environment, for hand and eye tracking. In order for this to work, the headset will look at the front and back of your hands during setup. Then, it will ask you to look at a circle of dots in Vision Pro, pinching your pointer finger and thumb together to select each one. This “pinch” gesture is how you select and navigate visionOS, and your eyes will determine what gets selected. It’s a simple five-minute setup process, but it is necessary for using Vision Pro.
Understanding the Eyes & Hands menu
Viewing and managing settings related to visionOS tracking happens in the Eyes & Hands page in the Settings app. At the top of the visionOS window, you’ll see the buttons for redoing eye and hand setup. Under that, there’s a Hands menu that lets you decide which hands can control Vision Pro. You’ll also find a Comfort Tips shortcut that will open guidance on how to adjust the Head Band, fit dial, and Light Seal.
Below, information about a user’s ZEISS optical inserts (if applicable) will be displayed. Apple Vision Pro can remember multiple pairs of optical inserts and switch between them. So, if you’re having issues with eye tracking, make sure your optical inserts setting is correct. visionOS will display a check mark next to the pair of optical inserts that are active. If you do not use optical inserts, there will be a check mark beside No Optical Inserts.
The other button worth keeping in mind is called Realign Displays. Each display inside Vision Pro is pushed by a motor based on the user’s inter-pupillary distance (IPD). IPD adjustments happen automatically on Vision Pro, and an on-screen graphic instructs users to hold the Digital Crown to confirm them when necessary. Vision Pro users shouldn’t need to manually realign their displays often, but the option is there.
Recalibrating hand tracking
You can redo the hand tracking setup on Vision Pro in just a minute or two, separately from the eye tracking setup. Here’s how:
- Open the Settings app in visionOS
- Navigate to the Eyes & Hands menu
- Look at the Redo Hand Setup button and pinch your finger and thumb to select it.
- Put your hands out in front of Vision Pro and look at them. (You may be asked to flip around your hands to show your palms)
- Vision Pro will display a checkmark when hand calibration is complete, and return the user to visionOS
After that, Vision Pro should be ready to detect your hands and related gestures. You can do this process as many times as is necessary for hand tracking to improve. However, if a few calibration attempts doesn’t solve your issues, you should move on to recalibrating your eye tracking next.
Recalibrating eye tracking
You should start by redoing your hand tracking calibration first, because the process is so short. Those having persistent problems should try redoing their eye setup, which takes longer, but is still fairly quick. Here’s how to do it:
- Open the Settings app in visionOS
- Navigate to the Eyes & Hands menu
- Look at the Redo Hand Setup button and pinch your finger and thumb to select it.
- Wait for visionOS to adjust the lighting of your environment
- You will be asked to select one dot first, in dark lighting. Look directly at the dot, then pinch your finger and thumb to select it
- Next, you will be asked to select six dots in a circle, in a dark environment. Look directly at each dot, then pinch your finger and thumb to select it. You may be asked to redo one or more dots
- You will be asked to repeat the above process in two more lighting conditions, each brighter than the one before it
- After that, you will see a Completing Eye Setup progress circle that may take a minute to complete. When finished, you will see a checkmark
After redoing the eye and hand setup processes, you should be all set to navigate visionOS without issue. Like with hand tracking, you can go through the eye tracking calibration as many times are as needed to provide great results. It can be easy to rush through the setup process, but going slow and steady is probably a good idea to get the most precise eye tracking experience.
Tips & tricks for Vision Pro tracking
Hopefully, by this point, you’ve managed to get hand and eye tracking on Vision Pro working as advertised. However, there are still a few tips and tricks to keep in mind. To redo hand and eye setup immediately — without the need to go through visionOS — just put on Vision Pro and press the top button four times rapidly. This will launch you straight into the hand and eye calibration environment.
You can also choose a different input method for Vision Pro if pressing your thumb and finger together isn’t an option, or isn’t working well. Open the Settings app, go to the Accessibility page, and check out Sound Actions and Dwell Control. Sound Actions make it possible for you to use Vision Pro with your voice, while Dwell Control can be used to select objects by looking at them long enough.
There’s also a way to use Vision Pro without eye tracking at all. In the Settings app, go to Accessibility and then Pointer Control. Then, tap the Control menu and select either Head, Wrist, or Index Finger as your pointer. Finally, back out of the menu and toggle Pointer Control on to use your new input method.
It’s also worth remembering that Vision Pro uses cameras and sensors for tracking, so keep your lenses and external display clean with the included polishing cloth. After redoing hand and eye setup, tweaking your settings, and cleaning Apple Vision Pro, any tracking woes you had should be all fixed.
Denial of responsibility! Techno Blender is an automatic aggregator of the all world’s media. In each content, the hyperlink to the primary source is specified. All trademarks belong to their rightful owners, all materials to their authors. If you are the owner of the content and do not want us to publish your materials, please contact us by email – [email protected]. The content will be deleted within 24 hours.