How to add a watermark in Word
Watermarks are helpful visuals for letting others know your document is confidential, private, or that it shouldn’t be copied. These types of images display in the background of your document and are faded. This lets your audience read your document without distraction but still be aware of your watermark’s message.
Here, we’ll show you how to add a watermark in Word.
Add a quick text watermark in Word
You can add the watermark to your Word document before, during, or after its creation. Plus, you have a few text watermarks that you can add with a click.
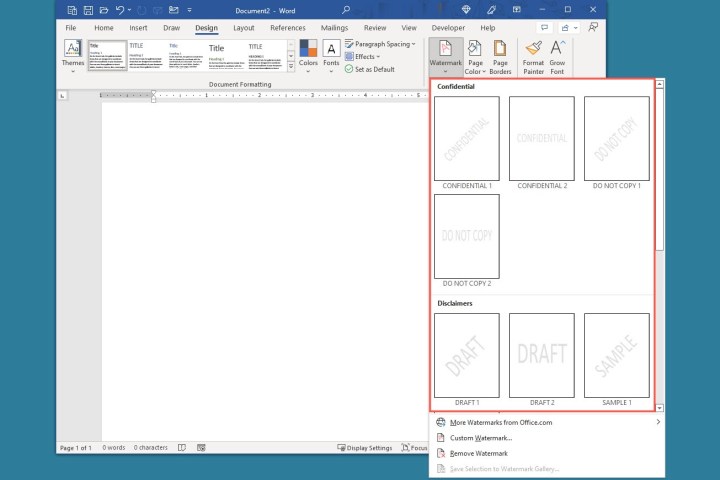
Step 1: With your Word document open, go to the Design tab.
Step 2: Select the Watermark drop-down arrow in the Page background section of the ribbon.
Step 3: Choose the watermark you want to use from one of the categories. You’ll see options for Confidential, Disclaimers, and Urgent. Each offers a different font style and placement for the watermark.
You’ll then see the watermark on each page of your Word document.
Add a custom text watermark
If you’re not fond of the quick text options, you can make a custom watermark using whatever text you like. You can also customize the font, color, and placement.
Step 1: Go to the Design tab, select the Watermark drop-down arrow, and pick Custom watermark.
Step 2: Mark the Text watermark option.
Step 3: To customize the text, use the following options:
- Language: This is the default system language, which you can change using the drop-down box.
- Text: You can pick an option from the drop-down list or select the text in the box and enter your own.
- Font: Choose a font style.
- Size: Select Auto to fit the text to the page or pick a specific font size from the list.
- Color: The font is gray by default, but you can choose a different color from the drop-down menu. To the right, check the box to make the font Semitransparent.
- Layout: Select Diagonal or Horizontal for the placement of the watermark.
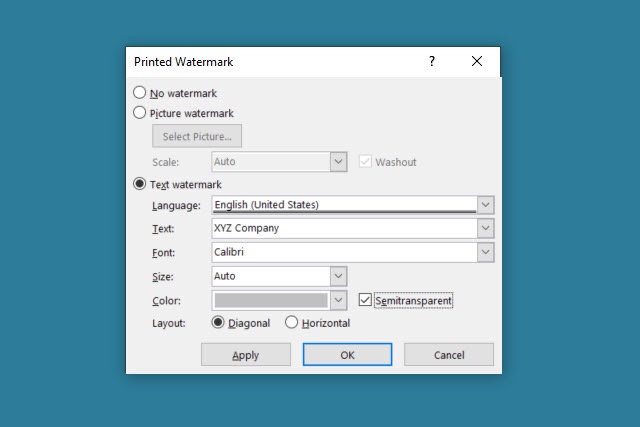
Step 4: When you finish, select Apply or OK to use the watermark on the document and Close to close the window.

Add a custom image watermark
If you prefer to use an image, you can create a custom watermark in Word with a picture of your choice.
Step 1: Go to the Design tab, select the Watermark drop-down arrow, and pick Custom watermark.
Step 2: Mark the Picture watermark option.
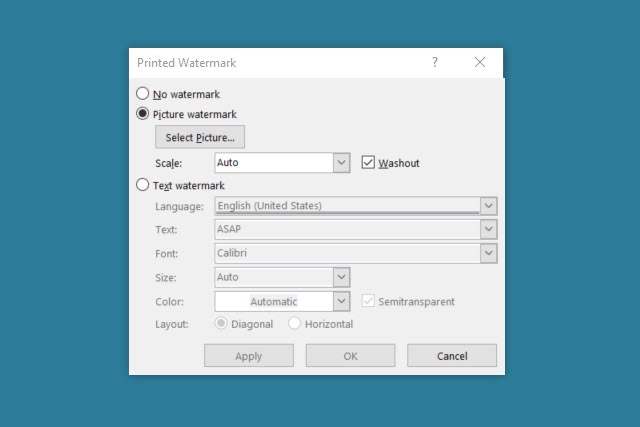
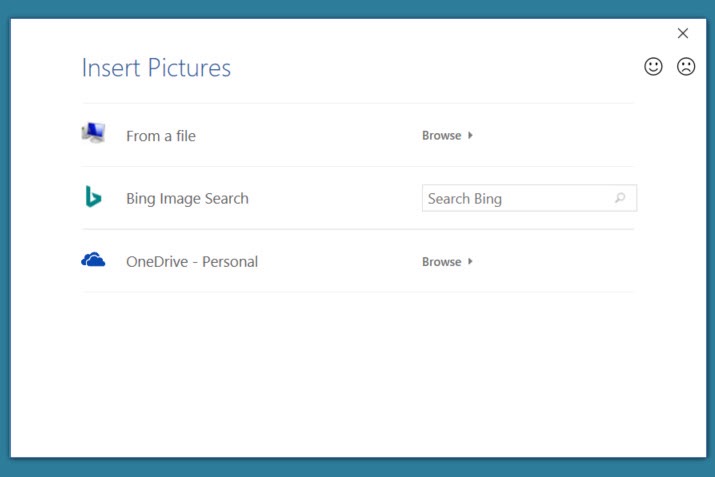
Step 3: Use the Select picture button to browse for and insert your image. You can use a picture from your computer, a Bing image search, or OneDrive.
Step 4: Next, you can scale the image using that drop-down box to pick Auto or a particular percentage. To the right, check the box for Washout to fade the appearance of the image.

Step 5: When you finish, select Apply or OK to apply the watermark to the document and Close to close the window.

Remove a watermark in Word
If you decide later that you no longer want the background image or text you’ve added to the document, removing a watermark is easy.
Step 1: Go to the Design tab.
Step 2: Select the Watermark drop-down arrow.
Step 3: Choose Remove watermark.
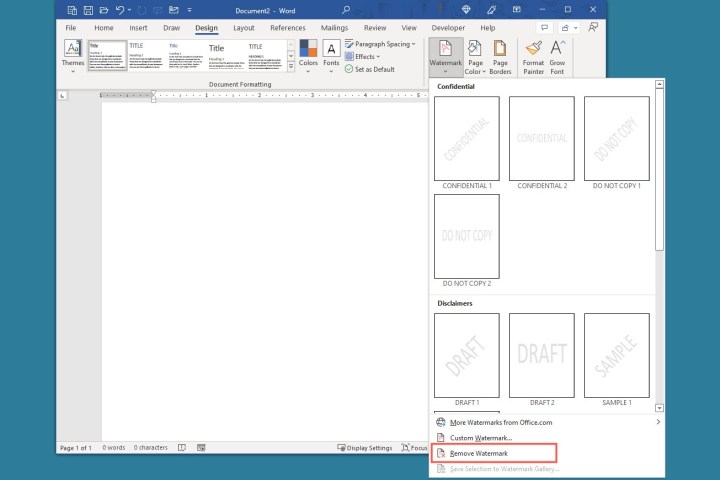
By adding that subtle, faded background image or text, you can let your readers know that the document is urgent, a sample, or a draft without taking space away or distracting from the content.
Keep this in mind the next time you want to add a watermark in Word. Then, insert a signature into the document or convert it to a PDF if needed.
Editors’ Recommendations
Watermarks are helpful visuals for letting others know your document is confidential, private, or that it shouldn’t be copied. These types of images display in the background of your document and are faded. This lets your audience read your document without distraction but still be aware of your watermark’s message.
Here, we’ll show you how to add a watermark in Word.
Add a quick text watermark in Word
You can add the watermark to your Word document before, during, or after its creation. Plus, you have a few text watermarks that you can add with a click.
Step 1: With your Word document open, go to the Design tab.
Step 2: Select the Watermark drop-down arrow in the Page background section of the ribbon.
Step 3: Choose the watermark you want to use from one of the categories. You’ll see options for Confidential, Disclaimers, and Urgent. Each offers a different font style and placement for the watermark.
You’ll then see the watermark on each page of your Word document.
Add a custom text watermark
If you’re not fond of the quick text options, you can make a custom watermark using whatever text you like. You can also customize the font, color, and placement.
Step 1: Go to the Design tab, select the Watermark drop-down arrow, and pick Custom watermark.
Step 2: Mark the Text watermark option.
Step 3: To customize the text, use the following options:
- Language: This is the default system language, which you can change using the drop-down box.
- Text: You can pick an option from the drop-down list or select the text in the box and enter your own.
- Font: Choose a font style.
- Size: Select Auto to fit the text to the page or pick a specific font size from the list.
- Color: The font is gray by default, but you can choose a different color from the drop-down menu. To the right, check the box to make the font Semitransparent.
- Layout: Select Diagonal or Horizontal for the placement of the watermark.

Step 4: When you finish, select Apply or OK to use the watermark on the document and Close to close the window.

Add a custom image watermark
If you prefer to use an image, you can create a custom watermark in Word with a picture of your choice.
Step 1: Go to the Design tab, select the Watermark drop-down arrow, and pick Custom watermark.
Step 2: Mark the Picture watermark option.

Step 3: Use the Select picture button to browse for and insert your image. You can use a picture from your computer, a Bing image search, or OneDrive.

Step 4: Next, you can scale the image using that drop-down box to pick Auto or a particular percentage. To the right, check the box for Washout to fade the appearance of the image.

Step 5: When you finish, select Apply or OK to apply the watermark to the document and Close to close the window.

Remove a watermark in Word
If you decide later that you no longer want the background image or text you’ve added to the document, removing a watermark is easy.
Step 1: Go to the Design tab.
Step 2: Select the Watermark drop-down arrow.
Step 3: Choose Remove watermark.

By adding that subtle, faded background image or text, you can let your readers know that the document is urgent, a sample, or a draft without taking space away or distracting from the content.
Keep this in mind the next time you want to add a watermark in Word. Then, insert a signature into the document or convert it to a PDF if needed.
Editors’ Recommendations
