
How to change your mouse cursor in Windows
You can learn how to change your mouse cursor in Windows in a few different ways. So, if you are looking for different cursor colors and sizes, whether for better visibility or simply based on cosmetic preference, you can follow our simple guide on how to change your mouse cursor in Windows.
Changing the cursor to a variety of built-in Windows “schemes” — which function as collections of cursors for normal operation, text selection, hyperlinks, etc. — is fairly easy, but users can also customize individual images or install themed packs.
Also, note that changing the mouse cursor on Windows 11 is just the same as on Windows 10. It’s only the navigation and finding the settings that are different.
Change your mouse cursor natively in Windows 10
The next few sections will cover how to change your mouse cursor away from the default in Windows 10.
Step 1: Click on the Search box located in the taskbar.
Step 2: Type in “mouse.”
Step 3: Select Change your mouse settings from the resulting list of options to open the primary mouse settings menu.
Step 4: Select Additional mouse options.
Step 5: You’ll then be able to look through cursor schemes. These are collections of static and animated images that completely replace the default “arrow” cursor and its associated tools. Most of them are boring but functional, and they take on the regular Windows look.
Step 6: In the Mouse properties window that appears, select the Pointers tab. The first option there is Scheme, and it’s all that most users will need.
Step 7: Click the Scheme drop-down menu, and you’ll see roughly a dozen different cursor schemes.

Change your mouse cursor scheme
Once you found a scheme following the steps above, you can change it. Here’s how.
Step 1: Click on any of the schemes to see a preview of the applicable cursors. You can move back and forth between them to compare the color and size. The inverted schemes are especially useful for those who have a hard time seeing the standard white cursor.
Step 2: When you’ve found one that looks good to you, click Apply.
Step 3: Click OK to implement the changes.
Step 4: Return to the Mouse properties menu for any additional changes in the future.
Step 5: The Enable pointer shadow option adds a cosmetic shadow to the cursor — it’s interesting, but not all that useful.

Customizing cursors
You can also browse a full list of extra cursors for more choices if you really want to customize your options.
Step 1: Navigate to the Mouse properties window as we did earlier.
Step 2: Select the Pointers tab.
Step 3: To select a custom cursor for the highlighted individual icon, click Browse.
Step 4: That will open the default cursors folder, where hundreds of different cursor options are available.
Step 5: Click one that matches the function (not the scheme) of the current cursor.
Step 6: Click Open to apply it to the current scheme.
Step 7: You can repeat step 2 as many times as it takes to get the desired result or click Use default to return to the standard cursor for the scheme in question. (Just be aware that “default” may not always mean the original cursor for that scheme, and it may be better to just hit Cancel instead if what you want is to return to the original cursor for a given scheme.)
Step 8: Repeat the process with any other individual cursors you’d like to change.
Step 9: Click Apply.
Step 10: Click OK to activate them.
Change your cursor size and color
If you are more interested in changing your cursor for accessibility reasons, you can quickly adjust the size or color without needing to mess around with different schemes or designs.
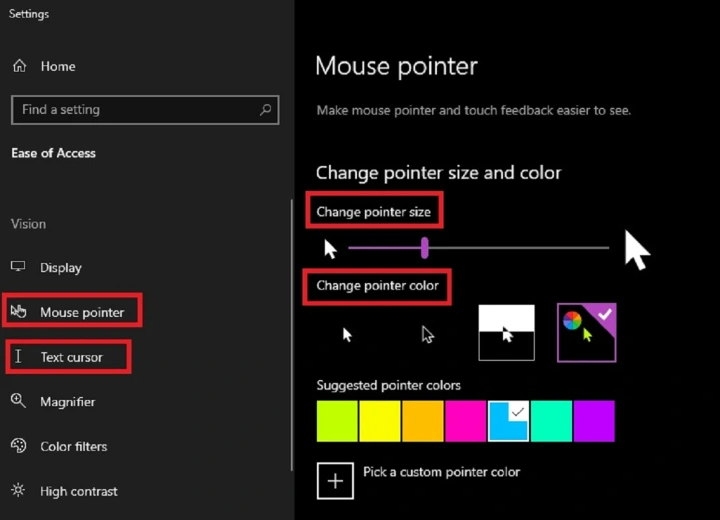
Step 1: In the Windows search box, search for “ease of access” and select Ease of access mouse settings from the resulting list.
Step 2: In the left-side menu, select Mouse pointer.
Step 3: Under Change pointer size, you can adjust the bar to a size that works best for you. Under Change pointer color, you can select from several basic color options to make the cursor more visible: White, black, inverted, or custom. With custom, you can choose from either a set of seven suggested colors or pick a custom color of your own.
Step 4: You can also adjust the appearance of your text cursor. Select Text cursor from the left side of the Ease of access section of the Settings app.
Step 5: Here, you can change the color of your text cursor and even the thickness of it.

Change your mouse settings in Windows 11
If you’re on the newer version of Windows, which is Windows 11, then we have some good news. Microsoft hasn’t changed the way of tweaking your mouse cursor. It is exactly the same as it is in Windows 10. You just need to follow these steps to get to the settings for it.
Step 1: Open the Start menu and type “mouse.”
Step 2: Click Mouse settings.
Step 3: Scroll down in the settings app and click on Additional mouse settings.
Step 4: Visit the Pointers Pointer options, Browser, and Scheme settings as we described above, and tweak as you see fit. You also can get to the mouse pointer options by clicking Mouse pointer.
Customizing the Windows interface has recently declined in popularity. However, if you’re tech-savvy or prefer more advanced features, many programs can download supplementary cursor schemes or customized cursors to the menu. These alternative options include Stardock’s CursorFX and websites like the Open Cursor Library, which have specialized features for personalized cursors. To pick your cursor from one of these programs, follow the same steps detailed above.
If you find a couple (or several, if you’re feeling fun) cursors you wish to install, you simply need to copy and paste the image files into the corresponding Cursors folder. For Windows 7, 8, or 10 users, look for the Cursors folder in the default Windows installation folder (C: > Windows > Cursors). The Browse option can transfer to any folder of your choice on your computer. That said, we think it’s best to keep the majority of your customized cursor files in the default Cursors folder or at least in one designated folder. It helps keep your information organized.
Finally, ransomware and other malware attacks are always a potential threat to your computer. Be sure to keep an eye out for these attacks whenever you transfer a cursor file (or any other software, for that matter). To try and prevent these damaging viruses, be sure to check that a website is trustworthy before downloading anything. We recommend only using credible sites or checking files with a virus scanner immediately after downloading them and before opening them on your computer.
Editors’ Recommendations
You can learn how to change your mouse cursor in Windows in a few different ways. So, if you are looking for different cursor colors and sizes, whether for better visibility or simply based on cosmetic preference, you can follow our simple guide on how to change your mouse cursor in Windows.
Changing the cursor to a variety of built-in Windows “schemes” — which function as collections of cursors for normal operation, text selection, hyperlinks, etc. — is fairly easy, but users can also customize individual images or install themed packs.
Also, note that changing the mouse cursor on Windows 11 is just the same as on Windows 10. It’s only the navigation and finding the settings that are different.

Change your mouse cursor natively in Windows 10
The next few sections will cover how to change your mouse cursor away from the default in Windows 10.
Step 1: Click on the Search box located in the taskbar.
Step 2: Type in “mouse.”
Step 3: Select Change your mouse settings from the resulting list of options to open the primary mouse settings menu.
Step 4: Select Additional mouse options.
Step 5: You’ll then be able to look through cursor schemes. These are collections of static and animated images that completely replace the default “arrow” cursor and its associated tools. Most of them are boring but functional, and they take on the regular Windows look.
Step 6: In the Mouse properties window that appears, select the Pointers tab. The first option there is Scheme, and it’s all that most users will need.
Step 7: Click the Scheme drop-down menu, and you’ll see roughly a dozen different cursor schemes.
Change your mouse cursor scheme
Once you found a scheme following the steps above, you can change it. Here’s how.
Step 1: Click on any of the schemes to see a preview of the applicable cursors. You can move back and forth between them to compare the color and size. The inverted schemes are especially useful for those who have a hard time seeing the standard white cursor.
Step 2: When you’ve found one that looks good to you, click Apply.
Step 3: Click OK to implement the changes.
Step 4: Return to the Mouse properties menu for any additional changes in the future.
Step 5: The Enable pointer shadow option adds a cosmetic shadow to the cursor — it’s interesting, but not all that useful.
Customizing cursors
You can also browse a full list of extra cursors for more choices if you really want to customize your options.
Step 1: Navigate to the Mouse properties window as we did earlier.
Step 2: Select the Pointers tab.
Step 3: To select a custom cursor for the highlighted individual icon, click Browse.
Step 4: That will open the default cursors folder, where hundreds of different cursor options are available.
Step 5: Click one that matches the function (not the scheme) of the current cursor.
Step 6: Click Open to apply it to the current scheme.
Step 7: You can repeat step 2 as many times as it takes to get the desired result or click Use default to return to the standard cursor for the scheme in question. (Just be aware that “default” may not always mean the original cursor for that scheme, and it may be better to just hit Cancel instead if what you want is to return to the original cursor for a given scheme.)
Step 8: Repeat the process with any other individual cursors you’d like to change.
Step 9: Click Apply.
Step 10: Click OK to activate them.
Change your cursor size and color
If you are more interested in changing your cursor for accessibility reasons, you can quickly adjust the size or color without needing to mess around with different schemes or designs.
Step 1: In the Windows search box, search for “ease of access” and select Ease of access mouse settings from the resulting list.
Step 2: In the left-side menu, select Mouse pointer.
Step 3: Under Change pointer size, you can adjust the bar to a size that works best for you. Under Change pointer color, you can select from several basic color options to make the cursor more visible: White, black, inverted, or custom. With custom, you can choose from either a set of seven suggested colors or pick a custom color of your own.
Step 4: You can also adjust the appearance of your text cursor. Select Text cursor from the left side of the Ease of access section of the Settings app.
Step 5: Here, you can change the color of your text cursor and even the thickness of it.
Change your mouse settings in Windows 11
If you’re on the newer version of Windows, which is Windows 11, then we have some good news. Microsoft hasn’t changed the way of tweaking your mouse cursor. It is exactly the same as it is in Windows 10. You just need to follow these steps to get to the settings for it.
Step 1: Open the Start menu and type “mouse.”
Step 2: Click Mouse settings.
Step 3: Scroll down in the settings app and click on Additional mouse settings.
Step 4: Visit the Pointers Pointer options, Browser, and Scheme settings as we described above, and tweak as you see fit. You also can get to the mouse pointer options by clicking Mouse pointer.
Customizing the Windows interface has recently declined in popularity. However, if you’re tech-savvy or prefer more advanced features, many programs can download supplementary cursor schemes or customized cursors to the menu. These alternative options include Stardock’s CursorFX and websites like the Open Cursor Library, which have specialized features for personalized cursors. To pick your cursor from one of these programs, follow the same steps detailed above.
If you find a couple (or several, if you’re feeling fun) cursors you wish to install, you simply need to copy and paste the image files into the corresponding Cursors folder. For Windows 7, 8, or 10 users, look for the Cursors folder in the default Windows installation folder (C: > Windows > Cursors). The Browse option can transfer to any folder of your choice on your computer. That said, we think it’s best to keep the majority of your customized cursor files in the default Cursors folder or at least in one designated folder. It helps keep your information organized.
Finally, ransomware and other malware attacks are always a potential threat to your computer. Be sure to keep an eye out for these attacks whenever you transfer a cursor file (or any other software, for that matter). To try and prevent these damaging viruses, be sure to check that a website is trustworthy before downloading anything. We recommend only using credible sites or checking files with a virus scanner immediately after downloading them and before opening them on your computer.
Editors’ Recommendations
Denial of responsibility! Techno Blender is an automatic aggregator of the all world’s media. In each content, the hyperlink to the primary source is specified. All trademarks belong to their rightful owners, all materials to their authors. If you are the owner of the content and do not want us to publish your materials, please contact us by email – [email protected]. The content will be deleted within 24 hours.