
How to recall an email in Gmail on mobile and desktop
Sometimes the moment you hit send in Gmail you want to recall the message. We all make mistakes. Luckily, Google gets it and, just as you can recall an Outlook message, you can unsend a Gmail. In the past, you had to manually enable it, but now it’s on by default.
Here’s how to make the most of it.
Gmail ‘Undo Send’ settings guide
Gmail’s Undo Send feature only delays the email — it doesn’t actually recall accidental messages already sent to others. In other words, if you set the Send Cancellation Period to 30 seconds. By default, the period is only 5 seconds. Here’s how to change it to give yourself more time to react.
Step 1: Sign in to Gmail on the web with your Google account.
Step 2: Select the Gear icon located in the top-right corner.
Image used with permission by copyright holder
Step 3: Select the See all settings button in the drop-down menu.
Step 4: The Undo Send option is located under the General tab. Select the Down arrow to select a delay in seconds from five to 30.
Advice: If you are worried about sending the wrong email, you probably want to set the cancellation period to at least 10 seconds, just to be safe. Five seconds isn’t very long to realize you made a mistake, much less to also react quickly enough to select the Undo button.
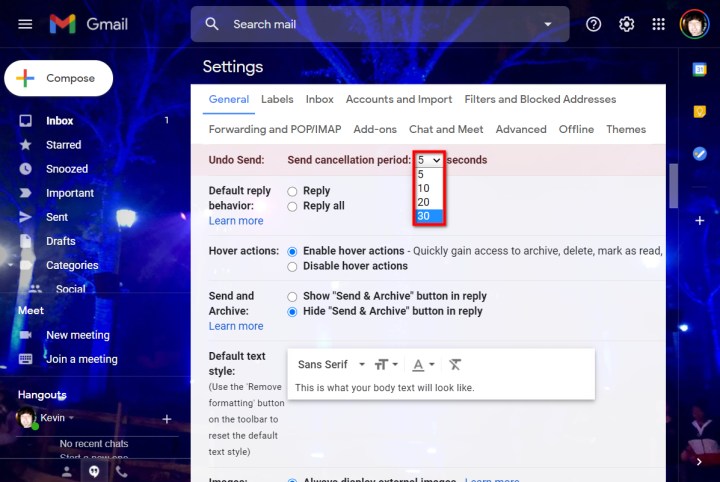
Image used with permission by copyright holder
Step 5: Navigate to the bottom of the Settings menu and select the Save changes button.

Image used with permission by copyright holder
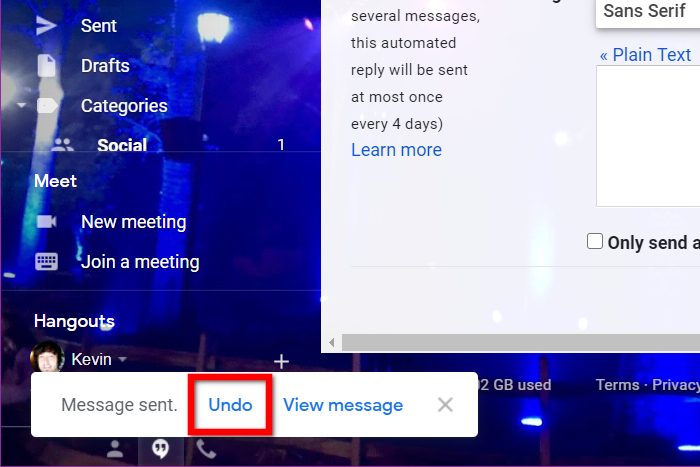
Image used with permission by copyright holder
How to recall a Gmail on the web client
Here’s how to recall your Gmail message from the web client. Try a practice run so you know what to do when it is really time.
Step 1: With the Gmail web client open, select the big Compose button. You can’t miss it.
Step 2: Create your email. If you’re practicing now, you can send an email to yourself by putting your own email address in the To field.
Step 3: Select the blue Send button.
Step 4: A Message sent pop-up appears in the bottom-left corner, as shown above. Select the Undo link to recall/unsend the email.
Step 5: Your unsent email should now be on your screen as a draft. Adjust your message accordingly and send it, or delete it instead.
How to recall a Gmail on your phone
Here are the steps to recall your email in the Gmail app on your phone. Once again, we recommend giving it a test run to make sure you can do it before you really need it.
Step 1: Craft your message. Again, you can put your own email address in the To field if this is just a practice email.
Step 2: Tap the “paper plane” send button.

.
Step 3: Near the bottom of your screen a black bar will appear. Tap ‘Cancel’ on the right side of this bar quickly to cancel the message.

.
Step 4: Your email will have reverted back to a draft. From here you can edit it before sending it out again or choose not to send the message altogether.
Unsending an email on iOS or Android is easy, and it doesn’t require adjusting any settings or options. The Send Cancellation Period is a predetermined interval that you can’t change as you would on a PC. On the Gmail mobile apps for Android and iOS, you’ll still follow the same steps outlined above in the previous section when using the Undo Send feature.
You’ll have a limited amount time to select Undo once the button appears on your screen. If you don’t select it in time, the message will be sent automatically.
Now that you know how to use Gmail’s Undo Send feature, you can not only avoid a costly mistake, but you’re also one step closer to being a Gmail power user.
Want to learn other ways to get the most out Gmail? Check out our guides on how to create folders in Gmail and how to use dark mode in Gmail on PC.
Editors’ Recommendations
Sometimes the moment you hit send in Gmail you want to recall the message. We all make mistakes. Luckily, Google gets it and, just as you can recall an Outlook message, you can unsend a Gmail. In the past, you had to manually enable it, but now it’s on by default.
Here’s how to make the most of it.
Gmail ‘Undo Send’ settings guide
Gmail’s Undo Send feature only delays the email — it doesn’t actually recall accidental messages already sent to others. In other words, if you set the Send Cancellation Period to 30 seconds. By default, the period is only 5 seconds. Here’s how to change it to give yourself more time to react.
Step 1: Sign in to Gmail on the web with your Google account.
Step 2: Select the Gear icon located in the top-right corner.

Image used with permission by copyright holder
Step 3: Select the See all settings button in the drop-down menu.
Step 4: The Undo Send option is located under the General tab. Select the Down arrow to select a delay in seconds from five to 30.
Advice: If you are worried about sending the wrong email, you probably want to set the cancellation period to at least 10 seconds, just to be safe. Five seconds isn’t very long to realize you made a mistake, much less to also react quickly enough to select the Undo button.
Image used with permission by copyright holder
Step 5: Navigate to the bottom of the Settings menu and select the Save changes button.
Image used with permission by copyright holder
Image used with permission by copyright holder
How to recall a Gmail on the web client
Here’s how to recall your Gmail message from the web client. Try a practice run so you know what to do when it is really time.
Step 1: With the Gmail web client open, select the big Compose button. You can’t miss it.
Step 2: Create your email. If you’re practicing now, you can send an email to yourself by putting your own email address in the To field.
Step 3: Select the blue Send button.
Step 4: A Message sent pop-up appears in the bottom-left corner, as shown above. Select the Undo link to recall/unsend the email.
Step 5: Your unsent email should now be on your screen as a draft. Adjust your message accordingly and send it, or delete it instead.
How to recall a Gmail on your phone
Here are the steps to recall your email in the Gmail app on your phone. Once again, we recommend giving it a test run to make sure you can do it before you really need it.
Step 1: Craft your message. Again, you can put your own email address in the To field if this is just a practice email.
Step 2: Tap the “paper plane” send button.
.
Step 3: Near the bottom of your screen a black bar will appear. Tap ‘Cancel’ on the right side of this bar quickly to cancel the message.
.
Step 4: Your email will have reverted back to a draft. From here you can edit it before sending it out again or choose not to send the message altogether.
Unsending an email on iOS or Android is easy, and it doesn’t require adjusting any settings or options. The Send Cancellation Period is a predetermined interval that you can’t change as you would on a PC. On the Gmail mobile apps for Android and iOS, you’ll still follow the same steps outlined above in the previous section when using the Undo Send feature.
You’ll have a limited amount time to select Undo once the button appears on your screen. If you don’t select it in time, the message will be sent automatically.
Now that you know how to use Gmail’s Undo Send feature, you can not only avoid a costly mistake, but you’re also one step closer to being a Gmail power user.
Want to learn other ways to get the most out Gmail? Check out our guides on how to create folders in Gmail and how to use dark mode in Gmail on PC.
Editors’ Recommendations
Denial of responsibility! Techno Blender is an automatic aggregator of the all world’s media. In each content, the hyperlink to the primary source is specified. All trademarks belong to their rightful owners, all materials to their authors. If you are the owner of the content and do not want us to publish your materials, please contact us by email – [email protected]. The content will be deleted within 24 hours.