
How to sync your iPhone with your iPad
With everything from music and TV shows to your personal photos and files stored in the cloud these days, it’s easier than ever for folks with multiple Apple devices to keep everything in sync. Long gone are the days when you had to pull out a USB to Lightning cable to load up your favorite music, photos, or even your calendar from your Mac or PC onto your iPhone or iPad. Now, you can keep everything in the cloud, and it will seamlessly sync between all your devices whenever you have a Wi-Fi or cellular data connection.
For the iPhone and iPad, Apple’s iCloud is naturally the easiest way to do this. It’s an integral part of the operating system, so it works quietly in the background to keep everything synced up with as little fuss as possible. You can also use other cloud providers, such as Google Drive and Google Photos, but those rely on third-party apps that can’t offer the same home-field advantage of Apple’s tight iCloud integration.
It’s also worth noting that Apple hasn’t eliminated the ability to sync your iPhone and iPad directly with your computer, so this is still an option if you prefer to steer clear of the cloud or you have a library of your own music that you’d like to store on your device. You can find out more about how to do that in our guide on how to sync content from a Mac to an iPhone or iPad. However, you can’t connect an iPhone and an iPad directly to each other this way — you’ll have to connect each of them to your Mac or PC and sync them from there, which is covered in the guide above.
Needless to say, using iCloud is much simpler, and we’ll show you how to set up the different features to help you keep everything in sync so you can switch between your iPhone and iPad without missing a beat.
Nadeem Sarwar / DigitalTrends
Ensure you’re signed into iCloud on both devices
To get started, you’ll need to ensure that you’re signed into the same iCloud account on both your iPhone and iPad. This should normally be the case if you’re the primary user of both devices and the person who set them up in the first place, as Apple will ask you to sign in with your Apple ID during the setup process, although it’s possible to skip that step and not sign in at all.
You also may need to switch iCloud accounts if you have multiple Apple IDs or you’re using an iPad from another family member. Note that Apple’s iPhone and iPad operating systems don’t support multiple user profiles, so if you’re trying to sync an iPad that’s normally used by someone else, you’ll have to get them to sign out of it first — they’ll need to supply their password to do so — which will remove and stop syncing the information from their iCloud account. Although it’s possible to switch back and forth between two Apple IDs, you’ll be wiping and replacing all the iCloud data each time you do this, so it’s not a practical way to share an iPad between family members and keep everything synced up.
Here’s how to ensure that you’re signed into the same iCloud account on both your iPhone and iPad.
Step 1: Open the Settings app on your iPhone or iPad.
If you see your name at the top of the settings screen, then you’re good to go! You can skip the following steps and proceed to the next section.

Step 2: If you see someone else’s name at the top of the Settings app instead of yours, select it and then scroll down and choose Sign Out at the bottom of the next screen.
You’ll likely be asked to enter the Apple ID and password of this other account to turn off the Find My feature. You’ll then be taken through several other steps to confirm that you want to sign out of iCloud and asked whether your want to keep or remove certain types of data like contacts, calendar events, and photos.
Ensure all these toggles are switched off and choose Sign Out from the top-right corner, and then Sign Out again from the confirmation prompt that pops up.
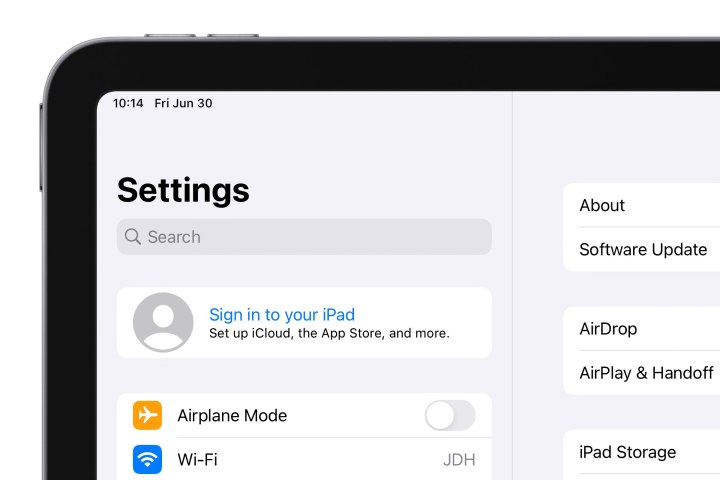
Step 3: Once you’ve signed out of another account, or if the device wasn’t signed in to an iCloud account in the first place, you’ll see Sign in to your iPad or Sign in to your iPhone at the top of the screen. Select this option and follow the instructions to sign in.
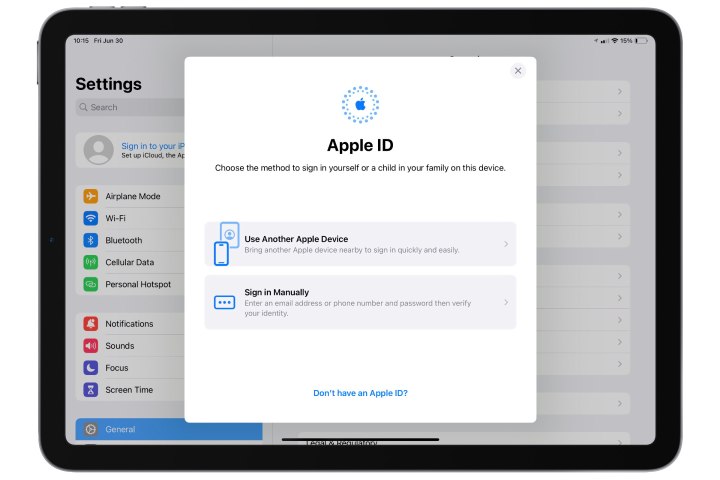
Step 4: If you have another Apple device nearby that’s already signed into your iCloud account, such as an iPhone or iPad, select Use Another Apple Device and bring it close to the one you’re trying to sign in to and follow the steps provided.
Otherwise, choose Sign in Manually and enter your Apple ID and password. If you have two-factor authentication enabled for your Apple ID, you’ll also need to confirm that you’re the one signing in by responding to a prompt on one of your other devices that’s already signed in to your Apple ID and then entering the six-digit PIN that’s shown on that device.

Dennis Brendel/Unsplash
How to sync your iPhone with your iPad
Once you’ve confirmed that you’re signed into the same iCloud account on both devices, you’re ready to sync your iPhone and iPad. Most of the iCloud sync options are enabled by default, so you’re likely already syncing things like calendars, contacts, Safari bookmarks, and the passwords stored in your iCloud Keychain. However, there are others you may need to turn on manually — and which ones to use will depend on how much iCloud storage you have available, which we’ll get to in a moment.
Here’s how to adjust what data syncs with iCloud to and from each of your devices.
Step 1: Open the Settings app on your iPhone or iPad, select your name at the top of the screen, and choose iCloud.
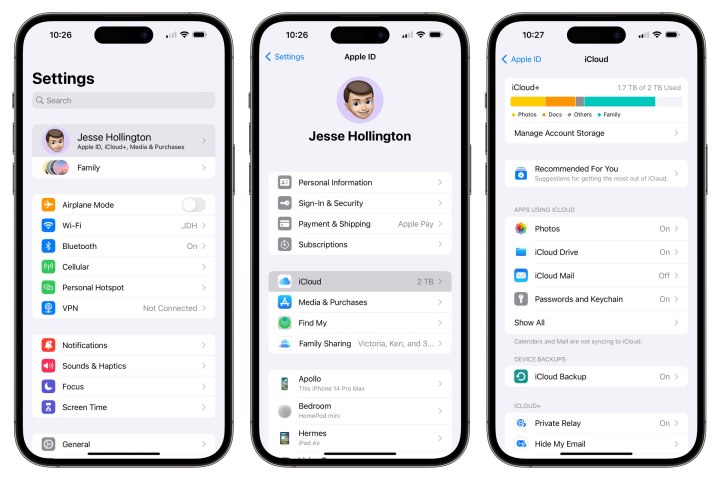
Step 2: Under the “Apps using iCloud” heading, select Show All. This will take you to a list of all of the different types of data that can be synced with iCloud.
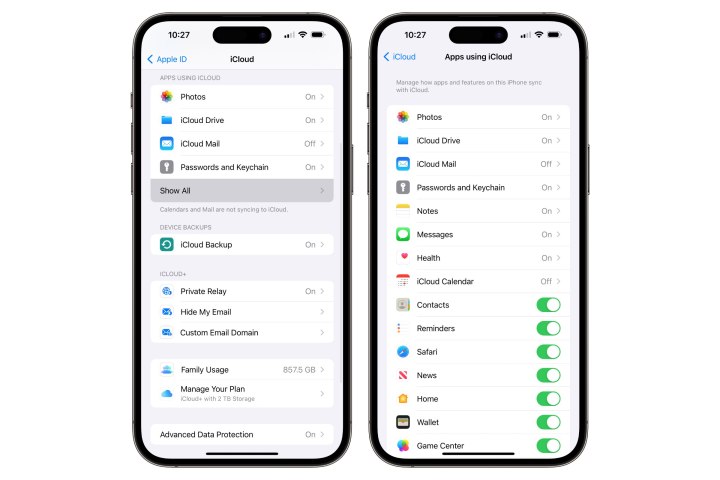
Step 3: For those entries with a toggle switch, simply choose the switch to turn syncing on or off for those apps or services.
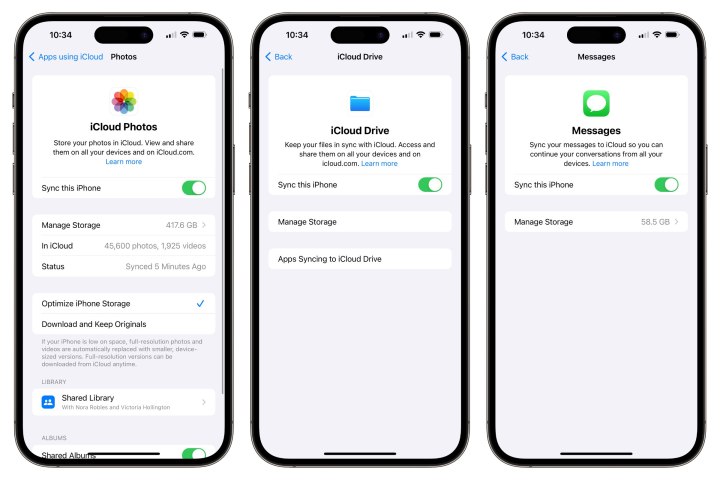
Step 4: Some services — such as Photos, iCloud Drive, iCloud Mail, Notes, and Messages — will show either On or Off instead of a toggle. Select these to see the switch to enable or disable them, along with some additional options.
Make sure you adjust these settings on both your iPhone and iPad.

Andy Boxall/Digital Trends
Turn on automatic downloads
If you want to make sure that your iPhone and iPad always have the same apps available, you can also turn on Automatic Downloads. This way, when you purchase or download an app from the App Store on one device, it will automatically be installed on the other one.
Step 1: Open the Settings app on your iPhone or iPad.
Step 2: Scroll down and select App Store.

Step 3: Under Automatic Downloads, toggle on App Downloads.
On your iPhone or an iPad with a cellular plan, be sure to also check the options under Cellular Data to ensure they line up with your data allotment and how you want to use it. You can turn off automatic app downloads over Wi-Fi entirely if you prefer, or you can require your device to ask before automatically downloading any apps, or only those over 200MB.
Get more iCloud storage
You can do this directly from the iCloud Settings on your iPhone or iPad.
Step 1: Open the Settings app on your iPhone or iPad and select your name at the top of the choose iCloud.
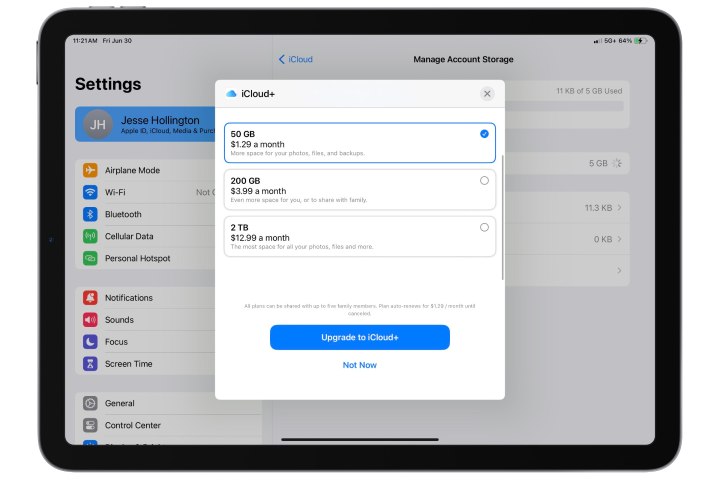
Step 2: If you only want to subscribe to an iCloud+ storage plan, select iCloud > Manage Account Storage > Change Storage Plan.
Choose the plan you’d like — 50GB, 200GB, or 2TB — and select Upgrade to iCloud+.
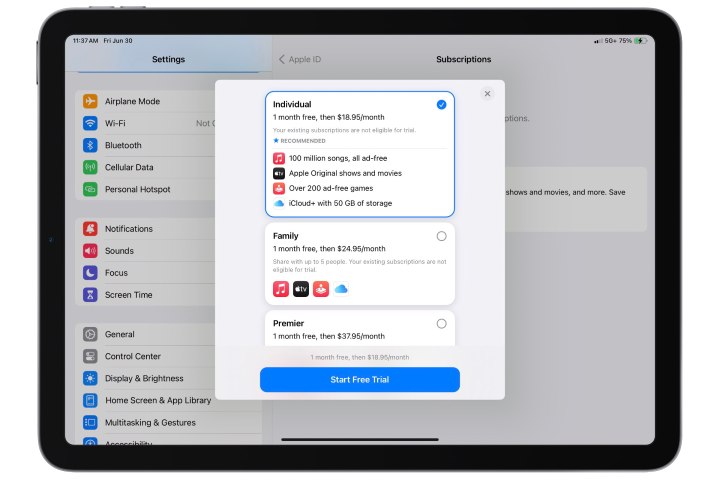
Step 3: If you’re interested in subscribing to other services like Apple Music, Apple TV+, and Apple Arcade, you may be able to get a better deal by bundling these with extra storage in an Apple One plan. For example, an Apple One Individual subscription costs $17 per month and includes Apple Music ($11), Apple TV+ ($6.99), Apple Arcade ($5), and 50GB of iCloud+ storage ($1).
To subscribe to an Apple One plan, choose Subscriptions instead and then look for the Apple One banner, select Try It Now, choose the Apple One plan you’d like to subscribe to, and select Start Free Trial. You’ll get 30 days free, after which you’ll start paying the normal monthly rate.
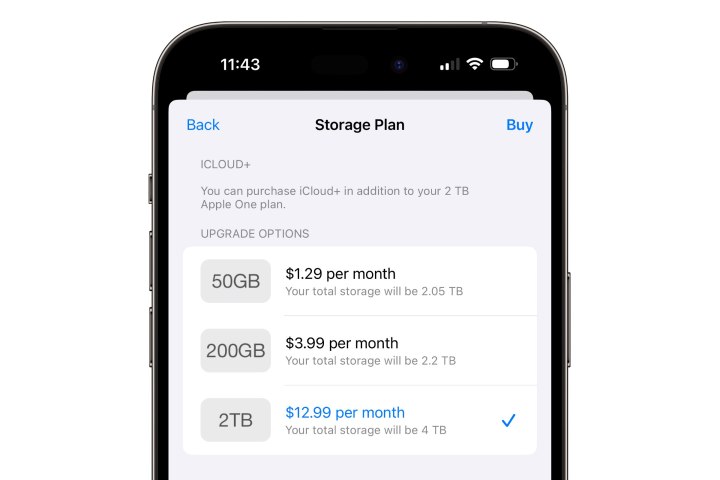
Step 4: iCloud+ storage and other benefits can also be shared with multiple family members. While the largest plan is 2TB, you can actually get up to 4TB of iCloud storage for your family by stacking a standard 2TB iCloud+ plan on top of the Apple One Premium bundle, which also includes 2TB of iCloud storage, giving you a total of 4TB of storage.

Turn on iCloud backups
Lastly, it’s also a good idea to turn on iCloud Backup so that you can easily restore your files and data in the event that you lose either your iPhone or iPad.
Step 1: Open the Settings app on your iPhone or iPad.
Step 2: Select your name from the top of the screen, and then choose iCloud.
Step 3: Select iCloud Backup.
Step 4: Toggle on the option to Back Up This iPhone (or iPad). If you’re using a 5G-capable device, you’ll also see a Back Up Over Cellular option here; make sure this is switched off unless you have a data plan that can handle it. Note that while the first iCloud backup can be quite large, subsequent backups are incremental, only uploading what’s changed since the last backup, so they should use considerably less data.
The iCloud Backup feature effectively backs up your entire device so it can be restored to the same state. However, Apple is also quite intelligent about how it handles this, so you probably won’t need to worry about subscribing to a massive storage plan even if you have a 512GB or 1TB iPhone or iPad. Instead, iCloud backs up only the data that can’t be redownloaded from elsewhere.
For example, if you’re using iCloud Photo Library or Messages in iCloud, that data is already stored in iCloud separately, so there’s no point in backing it up again. Similarly, data in third-party apps like Google Drive, Dropbox, and OneDrive is stored in their respective cloud services, so only the settings for those apps are backed up to iCloud.
Editors’ Recommendations
With everything from music and TV shows to your personal photos and files stored in the cloud these days, it’s easier than ever for folks with multiple Apple devices to keep everything in sync. Long gone are the days when you had to pull out a USB to Lightning cable to load up your favorite music, photos, or even your calendar from your Mac or PC onto your iPhone or iPad. Now, you can keep everything in the cloud, and it will seamlessly sync between all your devices whenever you have a Wi-Fi or cellular data connection.
For the iPhone and iPad, Apple’s iCloud is naturally the easiest way to do this. It’s an integral part of the operating system, so it works quietly in the background to keep everything synced up with as little fuss as possible. You can also use other cloud providers, such as Google Drive and Google Photos, but those rely on third-party apps that can’t offer the same home-field advantage of Apple’s tight iCloud integration.
It’s also worth noting that Apple hasn’t eliminated the ability to sync your iPhone and iPad directly with your computer, so this is still an option if you prefer to steer clear of the cloud or you have a library of your own music that you’d like to store on your device. You can find out more about how to do that in our guide on how to sync content from a Mac to an iPhone or iPad. However, you can’t connect an iPhone and an iPad directly to each other this way — you’ll have to connect each of them to your Mac or PC and sync them from there, which is covered in the guide above.
Needless to say, using iCloud is much simpler, and we’ll show you how to set up the different features to help you keep everything in sync so you can switch between your iPhone and iPad without missing a beat.

Nadeem Sarwar / DigitalTrends
Ensure you’re signed into iCloud on both devices
To get started, you’ll need to ensure that you’re signed into the same iCloud account on both your iPhone and iPad. This should normally be the case if you’re the primary user of both devices and the person who set them up in the first place, as Apple will ask you to sign in with your Apple ID during the setup process, although it’s possible to skip that step and not sign in at all.
You also may need to switch iCloud accounts if you have multiple Apple IDs or you’re using an iPad from another family member. Note that Apple’s iPhone and iPad operating systems don’t support multiple user profiles, so if you’re trying to sync an iPad that’s normally used by someone else, you’ll have to get them to sign out of it first — they’ll need to supply their password to do so — which will remove and stop syncing the information from their iCloud account. Although it’s possible to switch back and forth between two Apple IDs, you’ll be wiping and replacing all the iCloud data each time you do this, so it’s not a practical way to share an iPad between family members and keep everything synced up.
Here’s how to ensure that you’re signed into the same iCloud account on both your iPhone and iPad.
Step 1: Open the Settings app on your iPhone or iPad.
If you see your name at the top of the settings screen, then you’re good to go! You can skip the following steps and proceed to the next section.
Step 2: If you see someone else’s name at the top of the Settings app instead of yours, select it and then scroll down and choose Sign Out at the bottom of the next screen.
You’ll likely be asked to enter the Apple ID and password of this other account to turn off the Find My feature. You’ll then be taken through several other steps to confirm that you want to sign out of iCloud and asked whether your want to keep or remove certain types of data like contacts, calendar events, and photos.
Ensure all these toggles are switched off and choose Sign Out from the top-right corner, and then Sign Out again from the confirmation prompt that pops up.
Step 3: Once you’ve signed out of another account, or if the device wasn’t signed in to an iCloud account in the first place, you’ll see Sign in to your iPad or Sign in to your iPhone at the top of the screen. Select this option and follow the instructions to sign in.
Step 4: If you have another Apple device nearby that’s already signed into your iCloud account, such as an iPhone or iPad, select Use Another Apple Device and bring it close to the one you’re trying to sign in to and follow the steps provided.
Otherwise, choose Sign in Manually and enter your Apple ID and password. If you have two-factor authentication enabled for your Apple ID, you’ll also need to confirm that you’re the one signing in by responding to a prompt on one of your other devices that’s already signed in to your Apple ID and then entering the six-digit PIN that’s shown on that device.
Dennis Brendel/Unsplash
How to sync your iPhone with your iPad
Once you’ve confirmed that you’re signed into the same iCloud account on both devices, you’re ready to sync your iPhone and iPad. Most of the iCloud sync options are enabled by default, so you’re likely already syncing things like calendars, contacts, Safari bookmarks, and the passwords stored in your iCloud Keychain. However, there are others you may need to turn on manually — and which ones to use will depend on how much iCloud storage you have available, which we’ll get to in a moment.
Here’s how to adjust what data syncs with iCloud to and from each of your devices.
Step 1: Open the Settings app on your iPhone or iPad, select your name at the top of the screen, and choose iCloud.
Step 2: Under the “Apps using iCloud” heading, select Show All. This will take you to a list of all of the different types of data that can be synced with iCloud.
Step 3: For those entries with a toggle switch, simply choose the switch to turn syncing on or off for those apps or services.
Step 4: Some services — such as Photos, iCloud Drive, iCloud Mail, Notes, and Messages — will show either On or Off instead of a toggle. Select these to see the switch to enable or disable them, along with some additional options.
Make sure you adjust these settings on both your iPhone and iPad.
Andy Boxall/Digital Trends
Turn on automatic downloads
If you want to make sure that your iPhone and iPad always have the same apps available, you can also turn on Automatic Downloads. This way, when you purchase or download an app from the App Store on one device, it will automatically be installed on the other one.
Step 1: Open the Settings app on your iPhone or iPad.
Step 2: Scroll down and select App Store.
Step 3: Under Automatic Downloads, toggle on App Downloads.
On your iPhone or an iPad with a cellular plan, be sure to also check the options under Cellular Data to ensure they line up with your data allotment and how you want to use it. You can turn off automatic app downloads over Wi-Fi entirely if you prefer, or you can require your device to ask before automatically downloading any apps, or only those over 200MB.
Get more iCloud storage
You can do this directly from the iCloud Settings on your iPhone or iPad.
Step 1: Open the Settings app on your iPhone or iPad and select your name at the top of the choose iCloud.
Step 2: If you only want to subscribe to an iCloud+ storage plan, select iCloud > Manage Account Storage > Change Storage Plan.
Choose the plan you’d like — 50GB, 200GB, or 2TB — and select Upgrade to iCloud+.
Step 3: If you’re interested in subscribing to other services like Apple Music, Apple TV+, and Apple Arcade, you may be able to get a better deal by bundling these with extra storage in an Apple One plan. For example, an Apple One Individual subscription costs $17 per month and includes Apple Music ($11), Apple TV+ ($6.99), Apple Arcade ($5), and 50GB of iCloud+ storage ($1).
To subscribe to an Apple One plan, choose Subscriptions instead and then look for the Apple One banner, select Try It Now, choose the Apple One plan you’d like to subscribe to, and select Start Free Trial. You’ll get 30 days free, after which you’ll start paying the normal monthly rate.
Step 4: iCloud+ storage and other benefits can also be shared with multiple family members. While the largest plan is 2TB, you can actually get up to 4TB of iCloud storage for your family by stacking a standard 2TB iCloud+ plan on top of the Apple One Premium bundle, which also includes 2TB of iCloud storage, giving you a total of 4TB of storage.
Turn on iCloud backups
Lastly, it’s also a good idea to turn on iCloud Backup so that you can easily restore your files and data in the event that you lose either your iPhone or iPad.
Step 1: Open the Settings app on your iPhone or iPad.
Step 2: Select your name from the top of the screen, and then choose iCloud.
Step 3: Select iCloud Backup.
Step 4: Toggle on the option to Back Up This iPhone (or iPad). If you’re using a 5G-capable device, you’ll also see a Back Up Over Cellular option here; make sure this is switched off unless you have a data plan that can handle it. Note that while the first iCloud backup can be quite large, subsequent backups are incremental, only uploading what’s changed since the last backup, so they should use considerably less data.
The iCloud Backup feature effectively backs up your entire device so it can be restored to the same state. However, Apple is also quite intelligent about how it handles this, so you probably won’t need to worry about subscribing to a massive storage plan even if you have a 512GB or 1TB iPhone or iPad. Instead, iCloud backs up only the data that can’t be redownloaded from elsewhere.
For example, if you’re using iCloud Photo Library or Messages in iCloud, that data is already stored in iCloud separately, so there’s no point in backing it up again. Similarly, data in third-party apps like Google Drive, Dropbox, and OneDrive is stored in their respective cloud services, so only the settings for those apps are backed up to iCloud.
Editors’ Recommendations
Denial of responsibility! Techno Blender is an automatic aggregator of the all world’s media. In each content, the hyperlink to the primary source is specified. All trademarks belong to their rightful owners, all materials to their authors. If you are the owner of the content and do not want us to publish your materials, please contact us by email – [email protected]. The content will be deleted within 24 hours.