
How to Take Screenshots in Windows 10?
Are you looking for different methods of taking a screenshot in Windows 10? Well, you’ve arrived at the right place. The screenshotting method is not new to PCs and has been available for users to capture any section as and when required which is helpful for many reasons.
How to Take Screenshots in Windows 10? [7 Different Methods]
In this article, we will discuss the 7 different methods to Take Screenshots in Windows 10.
Method 1: Use the Print Screen Button to Capture Full Screen
One of the easiest ways to screenshot your PC screen is using the feature available on the Windows PC. Whether you use a desktop or laptop-type device, you will see the Print Screen key (prt sc) on the computer’s keyboard.
In the devices running with Windows 10 or above as a default OS, the Print Screen key will appear as the PrtSc button at the top right side of the top keyboard row. It would be best if you pressed this key to capture a relevant screenshot on your device. This method works for any app or program you have opened on your device.
How to use it?
Step 1: When you have decided what you want to capture as a screenshot, tap on the PrtSc key on your keyboard immediately.

Step 2: The previous step will automatically get a screenshot of the screen and store it in the clipboard of your PC. Since it will not save directly as an image, you can open another editor app, like Paint.
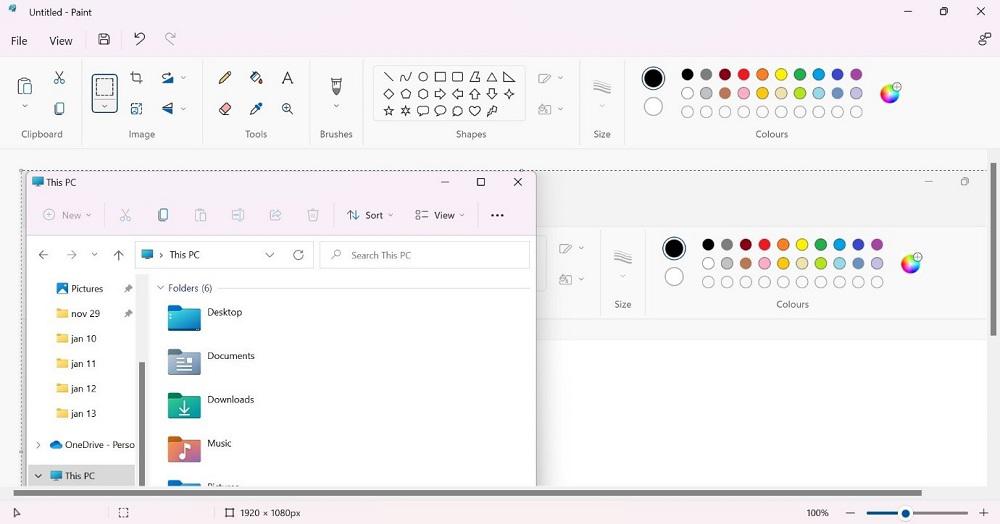
Step 3: On the clear white canvas of the Paint app, put the cursor on the page and press Ctrl + V keys. This will drop the image from the clipboard into the page.
Step 4: Click on File > Save As. Name the screenshot and choose the location to save it in. Then, press the Save button.
Method 2: Grab the Screenshot of a Specific Window
While pressing the PrtSc button helps grab a scre0enshot quickly, it captures the entire screen. But what if you plan the media in a partial window and want to capture only that particular window in the screenshot? Using the regular Print Screen key-based screenshot will have to get edited, which includes multiple steps.
You can press a set of combined keys to capture the screenshot in this situation.
How to use it?
Step 1: When you have many windows open on your device, press the Alt + Win + PrtSc keys together.
Step 2: The screenshot will be stored immediately in the folder named Videos > Captures once you press Alt + Win + PrtSc keys altogether.
Method 3: Take a Screen Clip of the Whole Screen
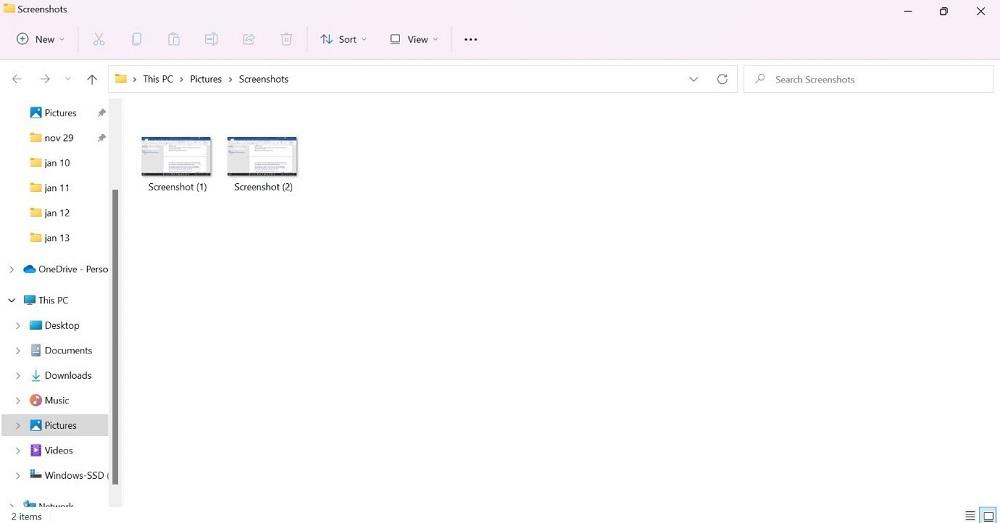
If you want to take a quick and accurate screenshot on your screen and avoid saving it into the clipboard, you can press the Windows and PrtScn keys together. This will bring up the thumbnail on the screen at the bottom-left side when the screenshot capture step is done.
You will find the screenshot in your device’s Pictures/Screenshots folder, accessible through the File Manager.
Method 4: Grab a Screenshot using the Snipping Tool
The Snipping tool is another solution available on Windows 10 PCs that makes it possible to grab screenshots on the device. The utility is available for Windows users from the Windows Vista version, including the Windows 11 update.
However, unlike the previous versions, Windows 10 and onwards allow access to this function through the Windows search bar, not the Windows Start menu.
This tool is a type of legacy software on Windows 10. So, the feature can have more upgrades in the future.
How to use it?
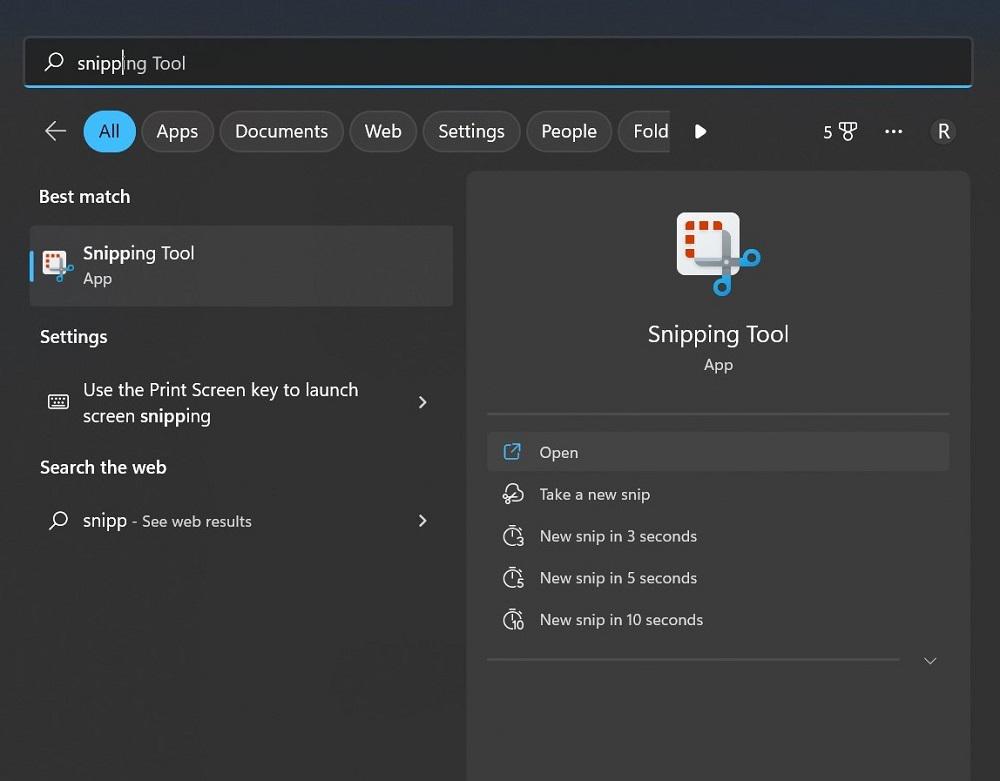
Step 1: When you need to screenshot something on the screen, tap on the Windows button (⊞ ) from the taskbar below.
Step 2: Type in “Snipping tool” in the search field. Click on the first app option that comes in the result to open it.
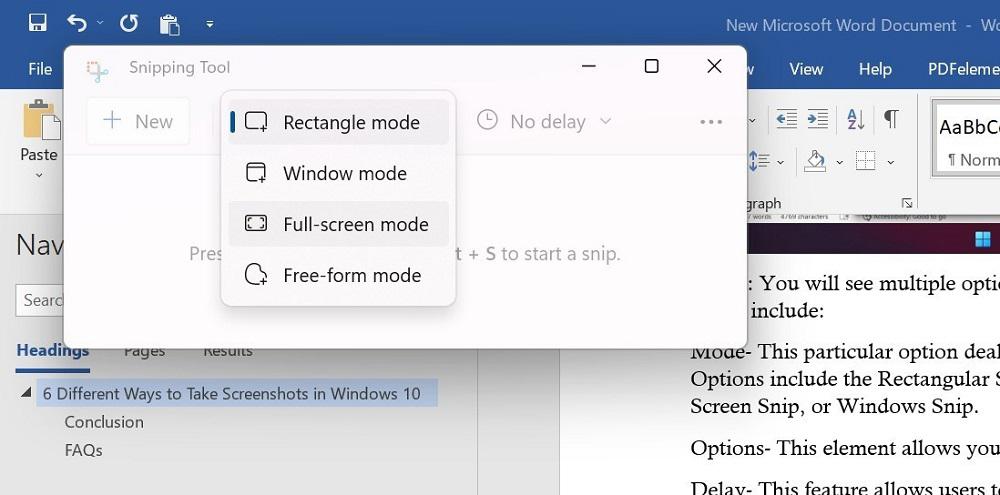
Step 3: You will see multiple options in the app when it opens on your Windows 10 PC. These include:
- Mode – This particular option deals with the style of screenshot you choose. Options include the Rectangular Snip, a default option, Free-Form Snip, Full-Screen Snip, or Windows Snip.
- Options – This element allows you to switch between the options for Snipping Tool.
- Delay – This feature allows users to delay the screen capture for 1-5 seconds.
Step 4: After setting up the features for the Snipping Tool to take the screenshot, press the New Option. The screen will appear with a white overlay showcasing the uncaptured area.
Step 5: The screenshot will appear in the Spinning Tool after you capture one.
Step 6: Tap on the File tab and choose the “Save As” option to move the screenshot to your preferred location on the hard drive. The app does not automatically save the screenshots anywhere.
Method 5: Use the Snip & Sketch Tool on Windows 10
Another method you can use to get a screenshot through Windows 10 is the Snip & Sketch app. You can find it through the Start menu or the combined keyboard shortcut.
How to use it?
Step 1: Go to the window or page you will capture. Press Win + Shift + S keyboard shortcut or click the Start menu from the taskbar > type Snip & Sketch > tap the option.
Step 2: After the tool opens, you will see many options as icons, like:
- Freeform– For drawing a custom shape that you create to screenshot.
- Rectangle– Capture a screenshot of the screen within a rectangle shape you expand or decrease with your mouse.
- Full-screen Snip– The screenshot of the entire PC screen or the screens of multiple monitors (if you are using many of them).
- Window Snip– This mode captures only the screenshot of the window you are currently using.
If you want to change your choice, tap on X to close the tool.
Step 3: After the screenshot is captured, the image will save in the clipboard. Click on it from the notification that pops up on your screen. Tap on it for markup/file sharing.
Step 4: If the popup notification does not appear, go to the Notifications bar at the right part of the screen to access the Snip & Sketch tool.
Step 5: Save the file in the Paint app to cut the screen size. Then save the file.
Method 6: Use the Game Bar to screenshot video/screen
It is possible to capture screenshots on the Windows 10 PC through the Game Bar utility. This is useful for recording videos and games on a PC screen and broadcasting.
How to use it?
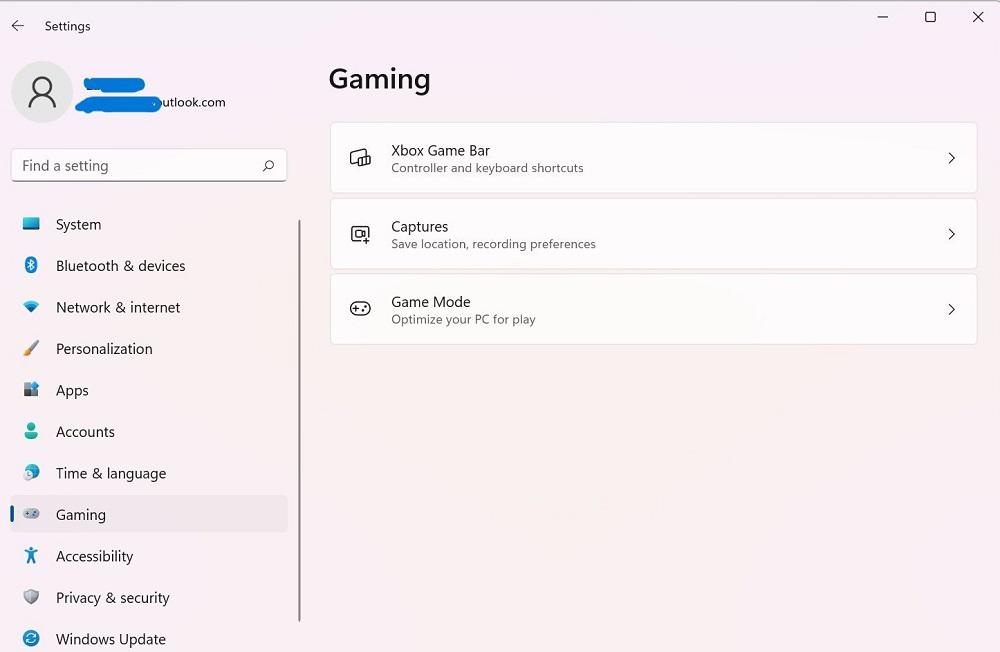
Step 1: For this app to work for screenshotting, you have to activate the Game Bar feature on your PC first.
For that, go to Settings > Gaming. Then, activate the slider for the Game Bar operation in the next window.
Step 2: On your PC, tap the Win + G keys to access Game Bar.
Step 3: Then tap on the Capture option. Or, press Win + Alt + PrtSc.
Step 4: The full-screen screenshot of the window you capture automatically saves into Videos > Captures. Click on it from File Manager to find and use it later.
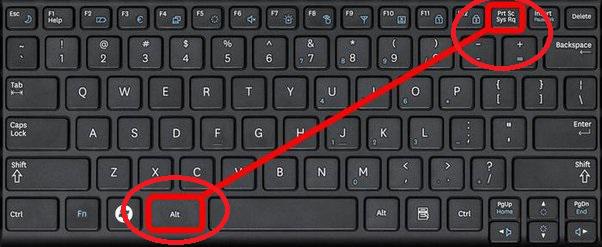
Method 7: Use the Alt + Prt Sc to Capture the Screen
Taking a screenshot in Windows 10 OS becomes easy when you choose the right shortcut without downloading any external third-party applications. Let’s check out the steps to perform this action in a matter of time.
How to use it?
Step 1: Go to the desired screen of which you’re looking to take the screenshot and hit Alt + Prt Sc (Print screen) at the same time.
Step 2: You will be required to select the desired area in which you want to take the screenshot, click and save it as required.
Step 3: An image will be copied and can be pasted simply on the Paint app.
Conclusion
Taking a screenshot on a PC isn’t a tough task, even if you aren’t a tech-savvy person. All you need to do is to follow this step-by-step guide to take screenshots of anything on your PC. Use the simple PrtSc key for this process or different tools available on the device. Follow the steps correctly to avoid errors with this function on Windows PC.
Related Articles:
Are you looking for different methods of taking a screenshot in Windows 10? Well, you’ve arrived at the right place. The screenshotting method is not new to PCs and has been available for users to capture any section as and when required which is helpful for many reasons.

How to Take Screenshots in Windows 10? [7 Different Methods]
In this article, we will discuss the 7 different methods to Take Screenshots in Windows 10.
Method 1: Use the Print Screen Button to Capture Full Screen
One of the easiest ways to screenshot your PC screen is using the feature available on the Windows PC. Whether you use a desktop or laptop-type device, you will see the Print Screen key (prt sc) on the computer’s keyboard.
In the devices running with Windows 10 or above as a default OS, the Print Screen key will appear as the PrtSc button at the top right side of the top keyboard row. It would be best if you pressed this key to capture a relevant screenshot on your device. This method works for any app or program you have opened on your device.
How to use it?
Step 1: When you have decided what you want to capture as a screenshot, tap on the PrtSc key on your keyboard immediately.
Step 2: The previous step will automatically get a screenshot of the screen and store it in the clipboard of your PC. Since it will not save directly as an image, you can open another editor app, like Paint.
Step 3: On the clear white canvas of the Paint app, put the cursor on the page and press Ctrl + V keys. This will drop the image from the clipboard into the page.
Step 4: Click on File > Save As. Name the screenshot and choose the location to save it in. Then, press the Save button.
Method 2: Grab the Screenshot of a Specific Window
While pressing the PrtSc button helps grab a scre0enshot quickly, it captures the entire screen. But what if you plan the media in a partial window and want to capture only that particular window in the screenshot? Using the regular Print Screen key-based screenshot will have to get edited, which includes multiple steps.
You can press a set of combined keys to capture the screenshot in this situation.
How to use it?
Step 1: When you have many windows open on your device, press the Alt + Win + PrtSc keys together.
Step 2: The screenshot will be stored immediately in the folder named Videos > Captures once you press Alt + Win + PrtSc keys altogether.
Method 3: Take a Screen Clip of the Whole Screen
If you want to take a quick and accurate screenshot on your screen and avoid saving it into the clipboard, you can press the Windows and PrtScn keys together. This will bring up the thumbnail on the screen at the bottom-left side when the screenshot capture step is done.
You will find the screenshot in your device’s Pictures/Screenshots folder, accessible through the File Manager.
Method 4: Grab a Screenshot using the Snipping Tool
The Snipping tool is another solution available on Windows 10 PCs that makes it possible to grab screenshots on the device. The utility is available for Windows users from the Windows Vista version, including the Windows 11 update.
However, unlike the previous versions, Windows 10 and onwards allow access to this function through the Windows search bar, not the Windows Start menu.
This tool is a type of legacy software on Windows 10. So, the feature can have more upgrades in the future.
How to use it?
Step 1: When you need to screenshot something on the screen, tap on the Windows button (⊞ ) from the taskbar below.
Step 2: Type in “Snipping tool” in the search field. Click on the first app option that comes in the result to open it.
Step 3: You will see multiple options in the app when it opens on your Windows 10 PC. These include:
- Mode – This particular option deals with the style of screenshot you choose. Options include the Rectangular Snip, a default option, Free-Form Snip, Full-Screen Snip, or Windows Snip.
- Options – This element allows you to switch between the options for Snipping Tool.
- Delay – This feature allows users to delay the screen capture for 1-5 seconds.
Step 4: After setting up the features for the Snipping Tool to take the screenshot, press the New Option. The screen will appear with a white overlay showcasing the uncaptured area.
Step 5: The screenshot will appear in the Spinning Tool after you capture one.
Step 6: Tap on the File tab and choose the “Save As” option to move the screenshot to your preferred location on the hard drive. The app does not automatically save the screenshots anywhere.
Method 5: Use the Snip & Sketch Tool on Windows 10
Another method you can use to get a screenshot through Windows 10 is the Snip & Sketch app. You can find it through the Start menu or the combined keyboard shortcut.
How to use it?
Step 1: Go to the window or page you will capture. Press Win + Shift + S keyboard shortcut or click the Start menu from the taskbar > type Snip & Sketch > tap the option.
Step 2: After the tool opens, you will see many options as icons, like:
- Freeform– For drawing a custom shape that you create to screenshot.
- Rectangle– Capture a screenshot of the screen within a rectangle shape you expand or decrease with your mouse.
- Full-screen Snip– The screenshot of the entire PC screen or the screens of multiple monitors (if you are using many of them).
- Window Snip– This mode captures only the screenshot of the window you are currently using.
If you want to change your choice, tap on X to close the tool.
Step 3: After the screenshot is captured, the image will save in the clipboard. Click on it from the notification that pops up on your screen. Tap on it for markup/file sharing.
Step 4: If the popup notification does not appear, go to the Notifications bar at the right part of the screen to access the Snip & Sketch tool.
Step 5: Save the file in the Paint app to cut the screen size. Then save the file.
Method 6: Use the Game Bar to screenshot video/screen
It is possible to capture screenshots on the Windows 10 PC through the Game Bar utility. This is useful for recording videos and games on a PC screen and broadcasting.
How to use it?
Step 1: For this app to work for screenshotting, you have to activate the Game Bar feature on your PC first.
For that, go to Settings > Gaming. Then, activate the slider for the Game Bar operation in the next window.
Step 2: On your PC, tap the Win + G keys to access Game Bar.
Step 3: Then tap on the Capture option. Or, press Win + Alt + PrtSc.
Step 4: The full-screen screenshot of the window you capture automatically saves into Videos > Captures. Click on it from File Manager to find and use it later.
Method 7: Use the Alt + Prt Sc to Capture the Screen
Taking a screenshot in Windows 10 OS becomes easy when you choose the right shortcut without downloading any external third-party applications. Let’s check out the steps to perform this action in a matter of time.
How to use it?
Step 1: Go to the desired screen of which you’re looking to take the screenshot and hit Alt + Prt Sc (Print screen) at the same time.
Step 2: You will be required to select the desired area in which you want to take the screenshot, click and save it as required.
Step 3: An image will be copied and can be pasted simply on the Paint app.
Conclusion
Taking a screenshot on a PC isn’t a tough task, even if you aren’t a tech-savvy person. All you need to do is to follow this step-by-step guide to take screenshots of anything on your PC. Use the simple PrtSc key for this process or different tools available on the device. Follow the steps correctly to avoid errors with this function on Windows PC.
Related Articles:
Denial of responsibility! Techno Blender is an automatic aggregator of the all world’s media. In each content, the hyperlink to the primary source is specified. All trademarks belong to their rightful owners, all materials to their authors. If you are the owner of the content and do not want us to publish your materials, please contact us by email – [email protected]. The content will be deleted within 24 hours.