
How to use Dante to create your own version of GPT-4
GPT-4 is one of the most capable language models, but did you know you can use it to create your own custom chatbot that specializes in something you’re interested in? With Dante you can. It’s an AI tool that you can train with your own data: PDF files, Word documents, Excel spreadsheets, Youtube videos … whatever information you want it to know.
Here’s how to use Dante to create your own GPT-4 chatbot.
Do you have to pay for Dante?
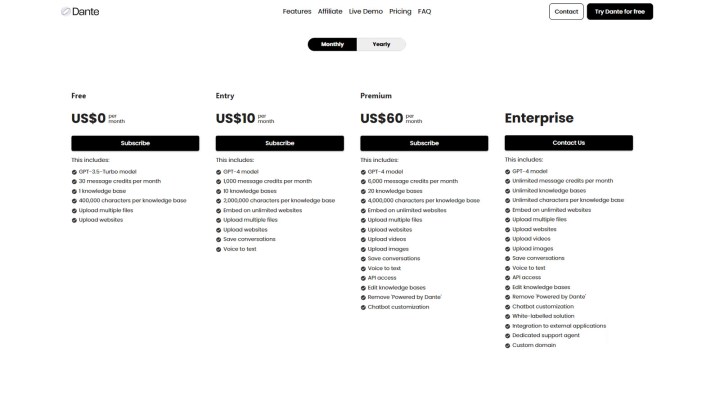
You can create a single chatbot for free with Dante and train it on any data you choose. However, you are limited to just 30 messages per month, a single knowledgebase (therefore a single custom chatbot) and the GPT-3.5 Turbo language model. If you want to create a GPT-4 language model chatbot, you’ll need to subscribe to at least the $10 per month “Entry” tier. That gives you not only the GPT-4 model to play with, but also 1,000 monthly credits, 10 knowledge bases, the ability to save conversations, and voice to text ability, among others.
How to use Dante to create a chatbot
Whether you’re building a GPT 3.5 chatbot using the free tier, or a GPT-4 model as part of a subscription, the process for creating the chatbot is the same. Here’s how to do it.
Step 1: Navigate to the Dante website and select Start building or Try Dante for free depending on your account status.

Step 2: When prompted, create an account or login.
Step 3: The main screen lets you start chatting with the default Dante chatbot. You can select whether you use the GPT 3.5-Turbo or GPT-4 model by selecting Pro or Pro+ in the top-left (Pro+ is restricted to paying subscribers, only).
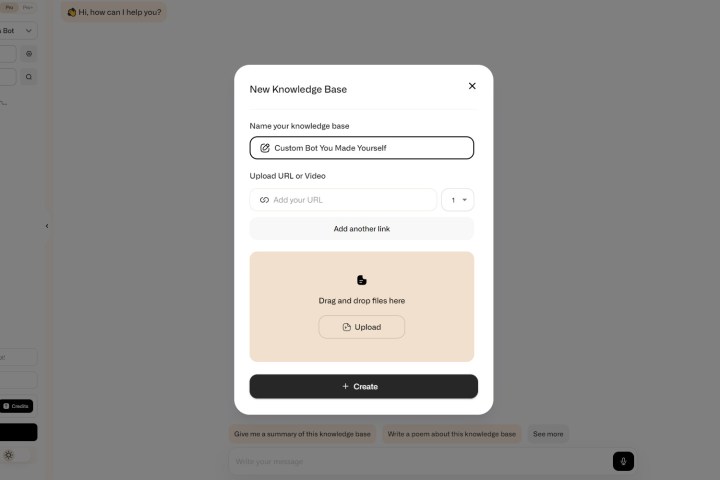
Step 4: To start creating your own chatbot, select New knowledge base from the left-hand side of the window.
Step 5: Give your knowledge base a name, and then select the data you want to use to train it. This can be videos, websites, or files. Use the URL or Video link tool, or the file uploader to supply the AI with as much information as you feel it needs to answer the kinds of questions you want to ask it.
In this example, I’m creating a chatbot to help teach me how to play a board game and its expansion. I uploaded a PDF file that contains the manual for the board game Leaving Earth, and its expansion, Outer Planets.
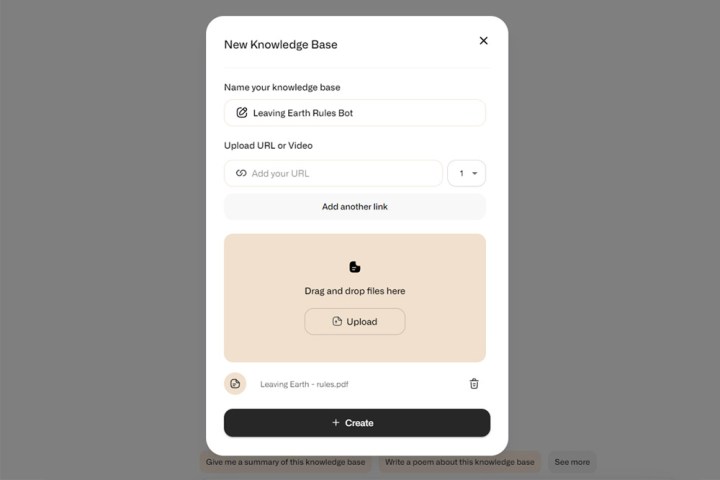
Step 6: When you’ve supplied the chatbot with all of its information, select the Create+ button.
Step 7: Once the training is completed, you’ll have your very own chatbot with its own personality crafted by you! From there you can begin chatting it like you would any other chatbot, using the prompt form at the bottom of the screen. Dante will suggest questions, and follow up questions for you, to help you learn more or get more information from the chatbot.
Keep an eye on your available credits in the bottom-left of the screen. Once you run out you won’t be able to chat with your chatbot any more. You’ll then either need to upgrade your subscription, or wait until you are allocated more credits after a set period of time.

How to re-train a Dante AI
If your new Dante-powered chatbot isn’t quite as powerful as you hoped, or you have new information to share with it, you can always retrain the chatbot. Here’s how.
Step 1: Select the cog icon next to the knowledge base/chatbot that you want to retrain.
Step 2: Select Add content.
Step 3: Using the URL link tool and file uploader, provide the chatbot with whatever data you feel it needs to learn in order to be more effective. Then select Save.

How to customize a Dante chatbot
If your chatbot has all the information it needs, but doesn’t behave quite how you’d like it to, you can tweak that too.
Step 1: Select the knowledge base you want to customize in the left-hand pane.
Step 2: Select Customize your chatbot at the bottom-left of the screen.
Step 3: Tweak the base prompt in order to adjust the personality of the chatbot. This can involve asking it to reply in a certain style, or whether you want it to respond with anything outside of the data you provide it, such as drawing on past training.
Want to take GPT-4 to new levels of capability? Try out the ChatGPT Plugins.
Editors’ Recommendations
GPT-4 is one of the most capable language models, but did you know you can use it to create your own custom chatbot that specializes in something you’re interested in? With Dante you can. It’s an AI tool that you can train with your own data: PDF files, Word documents, Excel spreadsheets, Youtube videos … whatever information you want it to know.
Here’s how to use Dante to create your own GPT-4 chatbot.
Do you have to pay for Dante?
You can create a single chatbot for free with Dante and train it on any data you choose. However, you are limited to just 30 messages per month, a single knowledgebase (therefore a single custom chatbot) and the GPT-3.5 Turbo language model. If you want to create a GPT-4 language model chatbot, you’ll need to subscribe to at least the $10 per month “Entry” tier. That gives you not only the GPT-4 model to play with, but also 1,000 monthly credits, 10 knowledge bases, the ability to save conversations, and voice to text ability, among others.
How to use Dante to create a chatbot
Whether you’re building a GPT 3.5 chatbot using the free tier, or a GPT-4 model as part of a subscription, the process for creating the chatbot is the same. Here’s how to do it.
Step 1: Navigate to the Dante website and select Start building or Try Dante for free depending on your account status.
Step 2: When prompted, create an account or login.
Step 3: The main screen lets you start chatting with the default Dante chatbot. You can select whether you use the GPT 3.5-Turbo or GPT-4 model by selecting Pro or Pro+ in the top-left (Pro+ is restricted to paying subscribers, only).
Step 4: To start creating your own chatbot, select New knowledge base from the left-hand side of the window.
Step 5: Give your knowledge base a name, and then select the data you want to use to train it. This can be videos, websites, or files. Use the URL or Video link tool, or the file uploader to supply the AI with as much information as you feel it needs to answer the kinds of questions you want to ask it.
In this example, I’m creating a chatbot to help teach me how to play a board game and its expansion. I uploaded a PDF file that contains the manual for the board game Leaving Earth, and its expansion, Outer Planets.
Step 6: When you’ve supplied the chatbot with all of its information, select the Create+ button.
Step 7: Once the training is completed, you’ll have your very own chatbot with its own personality crafted by you! From there you can begin chatting it like you would any other chatbot, using the prompt form at the bottom of the screen. Dante will suggest questions, and follow up questions for you, to help you learn more or get more information from the chatbot.
Keep an eye on your available credits in the bottom-left of the screen. Once you run out you won’t be able to chat with your chatbot any more. You’ll then either need to upgrade your subscription, or wait until you are allocated more credits after a set period of time.
How to re-train a Dante AI
If your new Dante-powered chatbot isn’t quite as powerful as you hoped, or you have new information to share with it, you can always retrain the chatbot. Here’s how.
Step 1: Select the cog icon next to the knowledge base/chatbot that you want to retrain.
Step 2: Select Add content.
Step 3: Using the URL link tool and file uploader, provide the chatbot with whatever data you feel it needs to learn in order to be more effective. Then select Save.
How to customize a Dante chatbot
If your chatbot has all the information it needs, but doesn’t behave quite how you’d like it to, you can tweak that too.
Step 1: Select the knowledge base you want to customize in the left-hand pane.
Step 2: Select Customize your chatbot at the bottom-left of the screen.
Step 3: Tweak the base prompt in order to adjust the personality of the chatbot. This can involve asking it to reply in a certain style, or whether you want it to respond with anything outside of the data you provide it, such as drawing on past training.
Want to take GPT-4 to new levels of capability? Try out the ChatGPT Plugins.
Editors’ Recommendations
Denial of responsibility! Techno Blender is an automatic aggregator of the all world’s media. In each content, the hyperlink to the primary source is specified. All trademarks belong to their rightful owners, all materials to their authors. If you are the owner of the content and do not want us to publish your materials, please contact us by email – [email protected]. The content will be deleted within 24 hours.