
Resistor Color Code Decoder: 10K, 220 Ohm, More
The humble resistor is the lowest cost component in our maker box, but it is also incredibly useful. Previously, we’ve shown how to use resistors in a project, but the focus of this guide is understanding the colored bands which wrap around the center of the resistor. These resistor color codes tell us exactly how many Ohms of current each unit handles.
How do we read a resistor color code? Why are some resistor color codes four bands and others five bands? What resistor do I need for an LED? We answer all of these questions and give you the tools to quickly calculate the correct resistor for all of your projects.
Common Resistor Color Codes and Their Uses
| Resistor Type | 4-Band Color Code | 5-Band Color Code | Common Uses |
|---|---|---|---|
| 100 Ohm | Brown-Black-Brown-Gold | Brown-Black-Black-Black-Gold | LED Light Protection |
| 220 Ohm | Red-Red-Brown-Gold | Red-Red-Black-Black-Gold | LED Light Protection |
| 330 Ohm | Orange-Orange-Brown-Gold | Orange-Orange-Black-Black-Gold | LED Light Protection |
| 1K Ohm (1 Kiloohm) | Brown-Black-Red-Gold | Brown-Black-Black-Brown-Gold | LED Protection, Voltage Divider |
| 4.7K Ohm | Yellow-Purple-Red-Gold | Yellow-Purple-Black-Brown-Gold | Pull-up/down resistor for I2C |
| 10k Ohm | Brown-Black-Orange-Gold | Brown-Black-Black-Red-Gold | Pull-up/down resistor |
| 100K Ohm | Brown-Black-Yellow-Gold | Brown-Black-Black-Orange-Gold | Bleed resistor for capacitor |
| 1 Megaohm | Brown-Black-Green-Gold | Brown-Black-Black-Yellow-Gold | Capacitive touch circuits |
Resistor Color Code: Quick Reference
Reading Resistor Color Codes Left to Right
Resistors have no polarity, so they can be used in any orientation in a circuit. But to identify the correct resistor color code values we need to understand the colored bands on the resistor.
On a typical four-band hobby level resistor, there are three colors in a group. These are the first, second significant figures and the multiplier. The final band is the resistor’s tolerance, a margin of error if you will. For the majority of hobbyists a tolerance of 5% (Gold) is perfect and common.
We only need the extra precision if we create sensitive circuits, for example audio and video projects. We can always spot the tolerance band as it is the only band printed on the “shoulder” of the resistor. Look for this band to identify the orientation of the resistor.

A five-band resistor has an additional band, a third significant figure, which affords a greater level of accuracy should a project require it. So we have three significant figures, a multiplier and the tolerance, which is singularly printed on the shoulder.

How to Read a Resistor Color Code
Let’s use a 220 Ohm resistor, which is commonly used with LED lights, as an example of how to read resistor color codes.
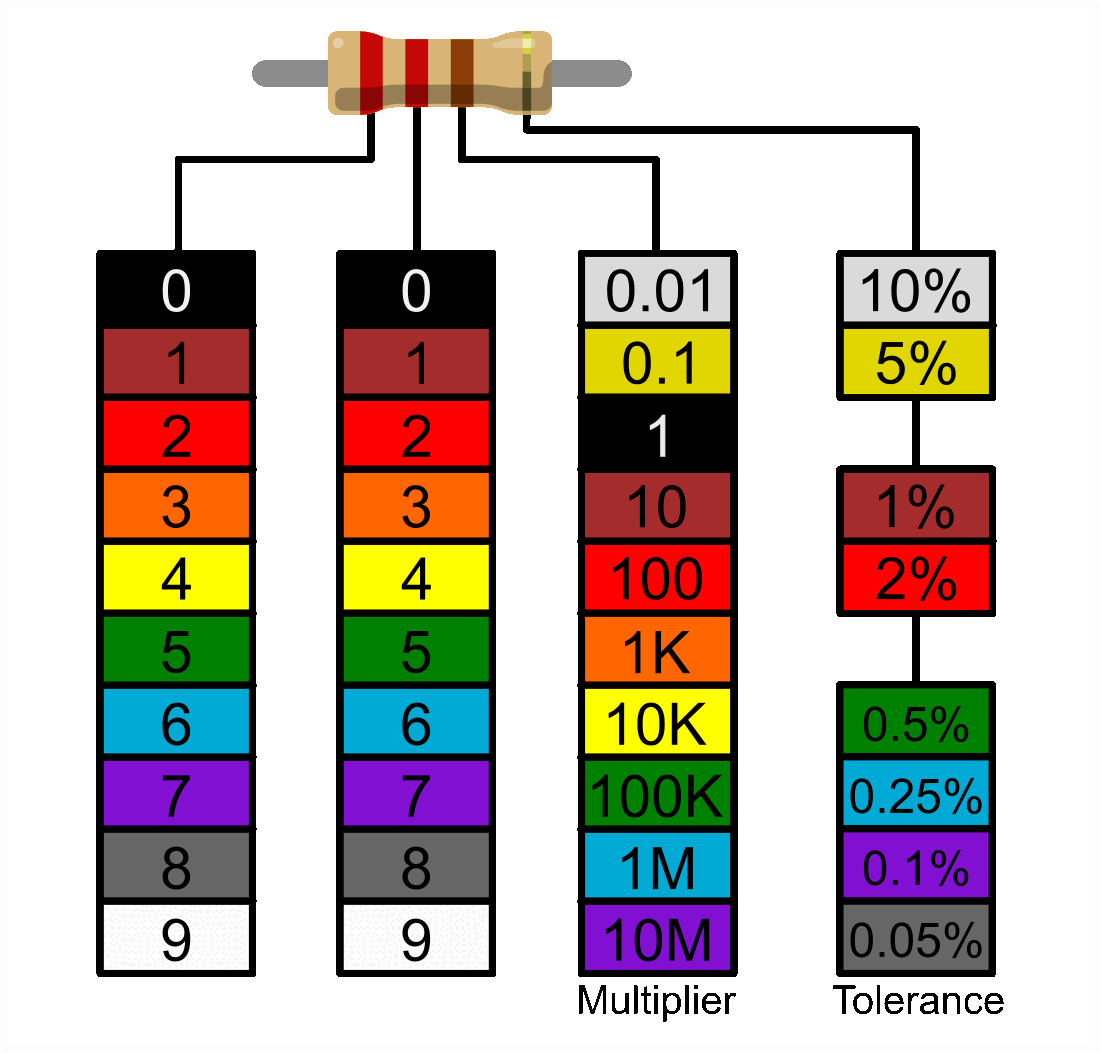
- The first significant figure is red, and using the decoder we can see that red has a value of 2.
- The second significant figure is also red, so that gives us 22.
- The multiplier is brown, and this decodes to 10. If we multiply 22 by 10 we get 220.
- The final band, tolerance, is gold. Gold is 5%, which means we can accept a resistance with a 5% margin of error.
For makers requiring greater precision there are also five band resistors which have a third significant figure. The extra figure provides clarity which can be essential in circuits sensitive to resistance for example scientific and engineering instruments.
Here is a five band 220 Ohm resistor and its resistor color code.
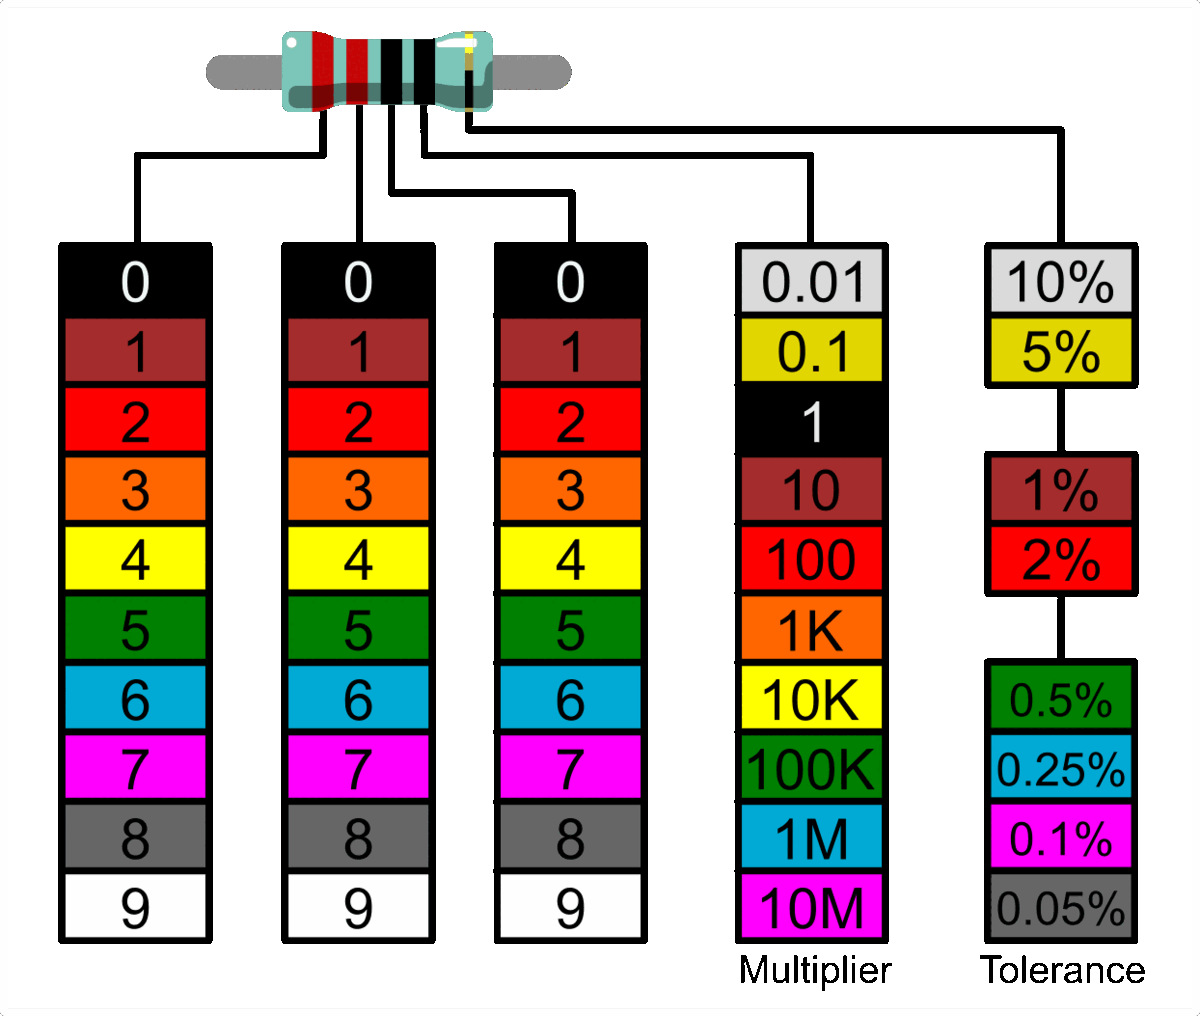
- The first significant figure is red, and using the decoder, we can see that red has a value of 2.
- The second significant figure is also red, so that gives us 22.
- The third significant figure is black, indicating 0. We now have 220.
- The multiplier is black, and this decodes to 1. If we multiply 220 by 1 we get 220.
- The final band, tolerance, is gold. Gold is 5%, which means we can accept a resistance with a 5% margin of error.
100 Ohm Resistor Color Code
The 100 Ohm resistor is commonly used for LED protection. Best used with white, blue and green LEDs at 5V. 100 Ohm resistors can also be used with other colors but expect the brightness to differ as they are not the correct value.
100 Ohm resistors can be identified via the resistor color code of Brown-Black-Brown-Gold and, for five band resistors, Brown-Black-Black-Black-Gold.
220 Ohm Resistor Color Code
The 220 Ohm resistor is one of the most common ones that hobbyists will come across, because it is often used with LEDs. Without a 220 Ohm resistor, simple LEDs would consume too much current and quickly burn out. We are using the resistor to limit the current that the LED can use. (“The light that burns twice as bright, burns half as long”). The 220 Ohm resistor can be identified via resistor color codes of Red-Red-Brown-Gold or Red-Red-Black-Black-Gold.
If we were to use a blue LED with a 3.2V forward voltage (the amount of voltage needed to get current to flow across a diode) and 10mA forward current (the maximum safe current you can continuously pass through the device without causing damage) on a 5V supply we would need a 180 Ohm resistor. Instead we can use a 220 Ohm resistor, 40 Ohms higher so our LED won’t be as bright, but it will be well protected.
330 Ohm Resistor Color Code
The 330 Ohm resistor is also quite common, being found in starter electronics kits for the Arduino and Raspberry Pi Pico. The 330 Ohm resistor is also a viable candidate for most LEDs but some will start to look dimmer than others. We can also use a 330 Ohm resistor with a buzzer to drop the tone of buzzer from “annoying” to slightly less annoying. Adafruit’s NeoPixel guide recommends protecting a GPIO pin by using a resistor (between 300 and 500 Ohms) between the data pin input and GPIO of your Raspberry Pi / Arduino.
A 330 Ohm resistor can be identified via resistor color codes of Orange-Orange-Brown-Gold or Orange-Orange-Black-Black-Gold.
1K Ohm Resistor Color Code
The 1K Ohm (1 Kiloohm) resistor is normally the maximum resistance used for LEDs. Any LED that uses a 1K resistor will be dull, but will light up. The 1K Ohm resistor is commonly used to fine tune a circuit or pull up/down a data pin. A 1K resistor, along with a 2.2K resistor can be used to form a voltage divider that can drop 5V down to around 3.4V. This is useful when using 5V components on the Raspberry Pi’s 3.3V GPIO.
A 1K Ohm resistor can be identified via resistor color codes of Brown-Black-Red-Gold or Brown-Black-Black-Brown-Gold.
4.7K Ohm Resistor Color Code
The 4.7K Ohm resistor is useful for adding a pull-up resistor to the SDA and SCL pins of an I2C device. Adafruit’s Stemma QT boards have this built in, but should we use another brand of board, we would need to add a 4.7 Kiloohm resistor to both of those pins. By doing this we guarantee that the I2C data is correctly and consistently sent to our device.
A 4.7K Ohm resistor can be identified via resistor color codes of Yellow-Purple-Red-Gold or Yellow-Purple-Black-Brown-Gold.
10K Ohm Resistor Color Code
The 10K Ohm resistor is often used as a pull-up resistor for an input pin. For example on Arduinos we can use a 10K Ohm resistor to pull-up an input pin, so that when the button is pressed, it pulls the input pin high with 5V, triggering an action in our code. We used a 10K Ohm resistor to pull-up the data pin on a DHT22 temperature sensor in our previous resistor reference.
A 10K Ohm resistor can be identified via resistor color codes of Brown-Black-Orange-Gold or Brown-Black-Black-Red-Gold.
100K Ohm Resistor Color Code
100K Ohm resistors are at the uppermost limit of what most makers need. This is a lot of resistance in a small package but it has its uses. They are typically used as bleed resistors on a capacitor, to reduce the risk of a nasty zap or to tune a sensitive audio / video circuit.
A 100K Ohm resistor can be identified using the color code of Brown-Black-Yellow-Gold or Brown-Black-Black-Orange-Gold for a five band resistor.
1M Ohm Resistor Color Code
This is a lot of resistance and most hobbyists / makers will never need it. We’ve used a 1M Ohm resistor with an Arduino to create a capacitive touch interface (our own Makey Makey). But most folks will never need one. However, the 1M Ohm resistor has color codes of Brown-Black-Green-Gold or Brown-Black-Black-Yellow-Gold.
A 1M Ohm resistor can be identified via resistor color codes of Brown-Black-Green-Gold or Brown-Black-Black-Yellow-Gold.
LED Brightness Resistor Calculator
We have a box full of LEDs, but what are the correct resistors for each color? To work this out we need to use a little math and luckily there is a calculation that we can use.

R is the resistor value that we need for our LED and, to work that out, we need to know the supply voltage (Vs), the forward voltage (Vf) and the forward current (If) of the LED. We can learn the Vf and If of an LED b referring to its datasheet. If not, here is a table of approximate values which can be used for general hobbyist circuits.
Typical LED Forward Voltages
| LED Color | Vf Range (Volts) |
|---|---|
| Red | 1.8 – 2.1 |
| Orange / Amber | 1.9 – 2.2 |
| Yellow | 1.9 – 2.2 |
| Green | 2 – 3.1 |
| Blue | 3 – 3.7 |
| White | 3 – 3.4 |
Here is a quick resistor and LED reference for 3.3 and 5V microcontrollers.
3.3V LED Resistor Values By Light Color
| White | Red | Blue | Yellow | Green | |
|---|---|---|---|---|---|
| Supply Voltage (Vs) | 3.3V | 3.3V | 3.3V | 3.3V | 3.3V |
| Forward Voltage (Vf) | 3V | 2.2V | 3V | 1.8V | 3V |
| Forward Current (If) | 20mA | 20mA | 20mA | 20mA | 20mA |
| Resistor Needed | 150 Ohm | 55 Ohm | 150 Ohm | 75 Ohm | 150 Ohm |
5V LED Resistor Values By Light Color
| White | Red | Blue | Yellow | Green | |
|---|---|---|---|---|---|
| Supply Voltage (Vs) | 5V | 5V | 5V | 5V | 5V |
| Forward Voltage (Vf) | 3V | 2.2V | 3V | 1.8V | 3V |
| Forward Current (If) | 20mA | 20mA | 20mA | 20mA | 20mA |
| Resistor Needed | 100 Ohm | 140 Ohm | 100 Ohm | 160 Ohm | 100 Ohm |
The humble resistor is the lowest cost component in our maker box, but it is also incredibly useful. Previously, we’ve shown how to use resistors in a project, but the focus of this guide is understanding the colored bands which wrap around the center of the resistor. These resistor color codes tell us exactly how many Ohms of current each unit handles.
How do we read a resistor color code? Why are some resistor color codes four bands and others five bands? What resistor do I need for an LED? We answer all of these questions and give you the tools to quickly calculate the correct resistor for all of your projects.
Common Resistor Color Codes and Their Uses
| Resistor Type | 4-Band Color Code | 5-Band Color Code | Common Uses |
|---|---|---|---|
| 100 Ohm | Brown-Black-Brown-Gold | Brown-Black-Black-Black-Gold | LED Light Protection |
| 220 Ohm | Red-Red-Brown-Gold | Red-Red-Black-Black-Gold | LED Light Protection |
| 330 Ohm | Orange-Orange-Brown-Gold | Orange-Orange-Black-Black-Gold | LED Light Protection |
| 1K Ohm (1 Kiloohm) | Brown-Black-Red-Gold | Brown-Black-Black-Brown-Gold | LED Protection, Voltage Divider |
| 4.7K Ohm | Yellow-Purple-Red-Gold | Yellow-Purple-Black-Brown-Gold | Pull-up/down resistor for I2C |
| 10k Ohm | Brown-Black-Orange-Gold | Brown-Black-Black-Red-Gold | Pull-up/down resistor |
| 100K Ohm | Brown-Black-Yellow-Gold | Brown-Black-Black-Orange-Gold | Bleed resistor for capacitor |
| 1 Megaohm | Brown-Black-Green-Gold | Brown-Black-Black-Yellow-Gold | Capacitive touch circuits |
Resistor Color Code: Quick Reference

Reading Resistor Color Codes Left to Right
Resistors have no polarity, so they can be used in any orientation in a circuit. But to identify the correct resistor color code values we need to understand the colored bands on the resistor.
On a typical four-band hobby level resistor, there are three colors in a group. These are the first, second significant figures and the multiplier. The final band is the resistor’s tolerance, a margin of error if you will. For the majority of hobbyists a tolerance of 5% (Gold) is perfect and common.
We only need the extra precision if we create sensitive circuits, for example audio and video projects. We can always spot the tolerance band as it is the only band printed on the “shoulder” of the resistor. Look for this band to identify the orientation of the resistor.
A five-band resistor has an additional band, a third significant figure, which affords a greater level of accuracy should a project require it. So we have three significant figures, a multiplier and the tolerance, which is singularly printed on the shoulder.
How to Read a Resistor Color Code
Let’s use a 220 Ohm resistor, which is commonly used with LED lights, as an example of how to read resistor color codes.
- The first significant figure is red, and using the decoder we can see that red has a value of 2.
- The second significant figure is also red, so that gives us 22.
- The multiplier is brown, and this decodes to 10. If we multiply 22 by 10 we get 220.
- The final band, tolerance, is gold. Gold is 5%, which means we can accept a resistance with a 5% margin of error.
For makers requiring greater precision there are also five band resistors which have a third significant figure. The extra figure provides clarity which can be essential in circuits sensitive to resistance for example scientific and engineering instruments.
Here is a five band 220 Ohm resistor and its resistor color code.
- The first significant figure is red, and using the decoder, we can see that red has a value of 2.
- The second significant figure is also red, so that gives us 22.
- The third significant figure is black, indicating 0. We now have 220.
- The multiplier is black, and this decodes to 1. If we multiply 220 by 1 we get 220.
- The final band, tolerance, is gold. Gold is 5%, which means we can accept a resistance with a 5% margin of error.
100 Ohm Resistor Color Code
The 100 Ohm resistor is commonly used for LED protection. Best used with white, blue and green LEDs at 5V. 100 Ohm resistors can also be used with other colors but expect the brightness to differ as they are not the correct value.
100 Ohm resistors can be identified via the resistor color code of Brown-Black-Brown-Gold and, for five band resistors, Brown-Black-Black-Black-Gold.
220 Ohm Resistor Color Code
The 220 Ohm resistor is one of the most common ones that hobbyists will come across, because it is often used with LEDs. Without a 220 Ohm resistor, simple LEDs would consume too much current and quickly burn out. We are using the resistor to limit the current that the LED can use. (“The light that burns twice as bright, burns half as long”). The 220 Ohm resistor can be identified via resistor color codes of Red-Red-Brown-Gold or Red-Red-Black-Black-Gold.
If we were to use a blue LED with a 3.2V forward voltage (the amount of voltage needed to get current to flow across a diode) and 10mA forward current (the maximum safe current you can continuously pass through the device without causing damage) on a 5V supply we would need a 180 Ohm resistor. Instead we can use a 220 Ohm resistor, 40 Ohms higher so our LED won’t be as bright, but it will be well protected.
330 Ohm Resistor Color Code
The 330 Ohm resistor is also quite common, being found in starter electronics kits for the Arduino and Raspberry Pi Pico. The 330 Ohm resistor is also a viable candidate for most LEDs but some will start to look dimmer than others. We can also use a 330 Ohm resistor with a buzzer to drop the tone of buzzer from “annoying” to slightly less annoying. Adafruit’s NeoPixel guide recommends protecting a GPIO pin by using a resistor (between 300 and 500 Ohms) between the data pin input and GPIO of your Raspberry Pi / Arduino.
A 330 Ohm resistor can be identified via resistor color codes of Orange-Orange-Brown-Gold or Orange-Orange-Black-Black-Gold.
1K Ohm Resistor Color Code
The 1K Ohm (1 Kiloohm) resistor is normally the maximum resistance used for LEDs. Any LED that uses a 1K resistor will be dull, but will light up. The 1K Ohm resistor is commonly used to fine tune a circuit or pull up/down a data pin. A 1K resistor, along with a 2.2K resistor can be used to form a voltage divider that can drop 5V down to around 3.4V. This is useful when using 5V components on the Raspberry Pi’s 3.3V GPIO.
A 1K Ohm resistor can be identified via resistor color codes of Brown-Black-Red-Gold or Brown-Black-Black-Brown-Gold.
4.7K Ohm Resistor Color Code
The 4.7K Ohm resistor is useful for adding a pull-up resistor to the SDA and SCL pins of an I2C device. Adafruit’s Stemma QT boards have this built in, but should we use another brand of board, we would need to add a 4.7 Kiloohm resistor to both of those pins. By doing this we guarantee that the I2C data is correctly and consistently sent to our device.
A 4.7K Ohm resistor can be identified via resistor color codes of Yellow-Purple-Red-Gold or Yellow-Purple-Black-Brown-Gold.
10K Ohm Resistor Color Code
The 10K Ohm resistor is often used as a pull-up resistor for an input pin. For example on Arduinos we can use a 10K Ohm resistor to pull-up an input pin, so that when the button is pressed, it pulls the input pin high with 5V, triggering an action in our code. We used a 10K Ohm resistor to pull-up the data pin on a DHT22 temperature sensor in our previous resistor reference.
A 10K Ohm resistor can be identified via resistor color codes of Brown-Black-Orange-Gold or Brown-Black-Black-Red-Gold.
100K Ohm Resistor Color Code
100K Ohm resistors are at the uppermost limit of what most makers need. This is a lot of resistance in a small package but it has its uses. They are typically used as bleed resistors on a capacitor, to reduce the risk of a nasty zap or to tune a sensitive audio / video circuit.
A 100K Ohm resistor can be identified using the color code of Brown-Black-Yellow-Gold or Brown-Black-Black-Orange-Gold for a five band resistor.
1M Ohm Resistor Color Code
This is a lot of resistance and most hobbyists / makers will never need it. We’ve used a 1M Ohm resistor with an Arduino to create a capacitive touch interface (our own Makey Makey). But most folks will never need one. However, the 1M Ohm resistor has color codes of Brown-Black-Green-Gold or Brown-Black-Black-Yellow-Gold.
A 1M Ohm resistor can be identified via resistor color codes of Brown-Black-Green-Gold or Brown-Black-Black-Yellow-Gold.
LED Brightness Resistor Calculator
We have a box full of LEDs, but what are the correct resistors for each color? To work this out we need to use a little math and luckily there is a calculation that we can use.
R is the resistor value that we need for our LED and, to work that out, we need to know the supply voltage (Vs), the forward voltage (Vf) and the forward current (If) of the LED. We can learn the Vf and If of an LED b referring to its datasheet. If not, here is a table of approximate values which can be used for general hobbyist circuits.
Typical LED Forward Voltages
| LED Color | Vf Range (Volts) |
|---|---|
| Red | 1.8 – 2.1 |
| Orange / Amber | 1.9 – 2.2 |
| Yellow | 1.9 – 2.2 |
| Green | 2 – 3.1 |
| Blue | 3 – 3.7 |
| White | 3 – 3.4 |
Here is a quick resistor and LED reference for 3.3 and 5V microcontrollers.
3.3V LED Resistor Values By Light Color
| White | Red | Blue | Yellow | Green | |
|---|---|---|---|---|---|
| Supply Voltage (Vs) | 3.3V | 3.3V | 3.3V | 3.3V | 3.3V |
| Forward Voltage (Vf) | 3V | 2.2V | 3V | 1.8V | 3V |
| Forward Current (If) | 20mA | 20mA | 20mA | 20mA | 20mA |
| Resistor Needed | 150 Ohm | 55 Ohm | 150 Ohm | 75 Ohm | 150 Ohm |
5V LED Resistor Values By Light Color
| White | Red | Blue | Yellow | Green | |
|---|---|---|---|---|---|
| Supply Voltage (Vs) | 5V | 5V | 5V | 5V | 5V |
| Forward Voltage (Vf) | 3V | 2.2V | 3V | 1.8V | 3V |
| Forward Current (If) | 20mA | 20mA | 20mA | 20mA | 20mA |
| Resistor Needed | 100 Ohm | 140 Ohm | 100 Ohm | 160 Ohm | 100 Ohm |
Denial of responsibility! Techno Blender is an automatic aggregator of the all world’s media. In each content, the hyperlink to the primary source is specified. All trademarks belong to their rightful owners, all materials to their authors. If you are the owner of the content and do not want us to publish your materials, please contact us by email – [email protected]. The content will be deleted within 24 hours.