
Running Serverless Applications in the Cloud — A Tutorial | by Haseeb Kamal | Aug, 2022
Why serverless? And how? A practical dive into AWS ECS
In this post we will design and deploy a FastAPI application on AWS.
We will architect the application using a serverless compute service coupled with a managed database service. This microservice architecture helps make a decoupled system which increases robustness. Next, we use the AWS CDK to have our entire infrastructure bundled as code. The benefits of this are numerous. In a nutshell, it makes deployments and infrastructure updates easier. It allows to commit the entire code defining the infrastructure in a VCS (version control system) such as git.
But what is serverless and why do we need it?
AWS offers several serverless compute options. With serverless computing we do not need to worry about managing and provisioning servers. Maintenance tasks such as installing patches, updates and security fixes completely go away. This frees up time and resources. We also don’t need to worry about capacity provisioning as AWS takes care of autoscaling the instances if load increases. Serverless compute options offer pay-as-you go pricing models. This means we only pay for the compute time we actually use. Depending on the use case this can reduce costs related to running our software.
Docker on EC2 and the need for ECS
Before introducing the architecture we look at how we would run a containerized application in AWS using simple virtual servers (AWS EC2).
The steps involved are:
- Build Docker image
- Deploy EC2 instance
- Manage both Docker application and EC2 instance
- Pay for EC2 instance
This seems quite straightforward.
But there are some downsides.
For one, we need to manage our EC2 instance. So installing updates and patches over time. Secondly, we need to manage the Docker application. In case the container stops working, or if the FastAPI version needs updating, we need to manually update the container. This can be a hassle since the running container needs to be stopped.
Another point is that of scale. Production systems are large-scale consisting of hundreds of containers. Running several containers at once using the above approach is infeasible. We would need to manage each container separately. For example, ensuring containers are running smoothly (health checks), and that they can communicate with each other securely. Or updating the image a container uses without jeopardizing the whole application. How do we handle the use case of scaling up the number of containers if user demand increases? Similarly, load balancing becomes crucial with so many containers as we don’t want to overwhelm a select few containers and have the others sit idle.
AWS ECS helps us with all this and much more.
AWS ECS
To keep things simple, we will only consider AWS ECS on Fargate and not EC2.
ECS — Elastic Container Service. This is a container orchestration service that allows us to run and manage containerized Docker applications. For huge workflows with perhaps hundreds of containers, it is challenging and time-consuming to manage them.
Here’s a diagram explaining ECS.

ECS consists of the following components:
- Cluster — This is simply a logical grouping of Fargate instances called capacity providers. Tasks are placed into a cluster before they are run.
- AWS Fargate — Fargate integrates with ECS and works “under the hood” to provide serverless compute services. Fargate essentially runs our Docker containers without us having to worry about managing servers.
- Service — A service allows you to specify how many tasks you wish to run, whether you want load balancing enabled etc. You can have multiple services in a cluster. For example you can have one service which handles all production traffic (production environment) and another which handles test/development traffic (test environment). Above, you can see there are two services — Service1 and Service2 running inside the cluster. Tasks run inside services.
- Task definition — This is a template file written in JSON. It acts like a blueprint and specifies what containers to run, memory and CPU specifications, what ports should be open and other configuration such as what Docker images to use. Essentially it defines the actual code to be run.
- Task — This is an instance of a task definition. It can either be PENDING, RUNNING or STOPPED. A RUNNING task would mean that all containers specified in the task definition are running i.e. your application is running.
It is also possible to run several tasks to handle large loads on the application. In the diagram above there are two instances of Task A running in Service1.
The architecture diagram is presented below:

Firstly, we use a virtual private cloud (VPC). This is a collection of ip addresses that are dedicated to our use and tied to our AWS account. An internet gateway is attached to the VPC to facilitate connections to and from the internet.
The FastAPI application will run on ECS inside a public subnet. The PostgreSQL database will run on RDS (relational database service) inside a private subnet. RDS is simply a managed database service provided by AWS meaning AWS manages the database for us.
User requests get routed to ECS since it is inside a public subnet. This is done over simple HTTP, port 80 in this tutorial. For all practical use cases this should be done over HTTPS, port 443. RDS is blocked from any public access. This is because it stores sensitive user data. However, since ECS and RDS are inside the same VPC, ECS can communicate with RDS to store and retrieve data. This is done over the default PostgreSQL port, TCP: 5432.
The complete code repo is here.
This post assumes you have the AWS CLI and CDK installed on your system.
If not please check this post for a tutorial.
Ok we can now finally get down to business and write some actual code 👩🏾💻
First stop, CDK!
CDK init
Create a new project directory called ecs
Run the following to create some boilerplate code for the CDK:
cdk init sample-app --language python
If you get an error regarding venv creation in Python, you can execute the following command to create a new virtual environment for Python:
py -m venv .venv
Then activate it with:
.\.venv\Scripts\activate

With the virtual env enabled we can install Python dependencies with:
pip3 install -r requirements.txt
Edit app.py and make sure the region and account are provided.
It should look something like this:
Next, go ahead and open ecs_stack.py. This is where we define the architecture and resources to create.
Paste in the following code:
We start by defining a vpc. You can think of this as a collection of ip addresses that are tied to your account and available for use.
Next, we define two security groups, one for the database and the other for fargate. Security groups act like stateful firewalls and by default they allow all outgoing network traffic and block all incoming traffic. We explicitly allow connections from fargate into our database server over TCP.
Next up, we create secrets. These can be anything including API keys, database credentials or other sensitive data that needs to be stored and accessed. Through AWS secrets manager they can easily be stored, retrieved and rotated for maximum security. Here, we create credentials for our database instance. We provide the username as postgres and let cdk auto-generate a password for us. The benefit here is that we are not exposing the secret in our code since we can simply pass the templatedSecret variable around to reference the sensitive password.
We create a new database instance, passing in the templatedSecret as credentials, and the security group created earlier.
Finally, we create a new fargate service. An application load balancer is created by default but the details of that are beyond scope. The most important thing here is that we provide a path to the docker image. We pass the username and password as task_image_options secrets and the endpoint of our database instance as an environment variable. This allows the docker container to be able to connect to the database. Notice how we haven’t passed anything around in plaintext! Even the database instance endpoint is autogenerated at runtime so we don’t know it beforehand but we simply pass it to fargate with rdsInstance.db_instance_endpoint_address.
Finally, we add a dependency on rdsInstance. This ensures that the database gets created before the fargate service. Otherwise, our FastAPI app would have trouble connecting.
Great! Most of the work is done.
Next up, we need to create a FastAPI app and a Dockerfile for ECS.
REST API with FastAPI
Make sure the virtual environment is activated and install the following packages one by one:
pip3 install psycopg2
pip3 install fastapi
pip3 install uvicorn[standard]
pip3 install sqlalchemy
Next, create a main.py file in the root directory.
Paste in the following code for main.py:
This is a simple REST API with two endpoints. We can store a book or retrieve a book based on the book_name. In line 30 we create a database model for book required for inserting and retrieving the database record.
Notice how can simply reference username, password and endpoint as environment variables. This works because we explicitly passed these as secrets and environment variables earlier in the CDK code.
We also need to create a Pydantic data model for FastAPI. This has the advantage of providing automatic validation of the input data when a request is made to the endpoint. For example when POST request is made to store a new book, pydantic automatically validates that the correct book fields are provided. Go ahead and create a Pydantic model in a new file called schemas.py.
It should look something like this:
Now to the fun bit!
Dockerfile
While in the root directory run pip freeze > requirements.txt to get a requirements.txt. This is needed for building our Docker image:

Create a new Dockerfile in the root directory like so:
We simply pull the official Docker image for Python:3.9, set a named work directory which we will reference later. Then we run a pip install on requirements.txt and finally copy all the code from our host machine to the Docker container. The CMD command at the end is executed when the container is run.
In this case, it starts up our FastAPI app.
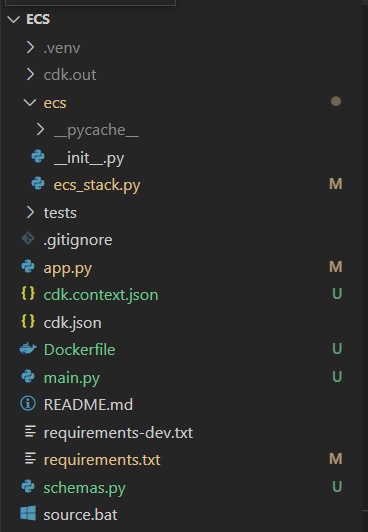
You should now have a directory structure like follows:
That’s it 😇Give yourself a pat on the back for a job well-done!
Now the most exciting moment arrives!
Deploy 🚀
Note: running the command below will initiate costs to your AWS account.
Grab a cup of coffee and run:
cdk deploy
This will initiate the creation of resources and deploy the app.
Please be patient. This step can take several minutes.
If after several minutes you do not see any output at all on the console, hit CTRL+C followed by cdk destroy. You may contact me directly/comment below for getting help troubleshooting in this case.
Et Voila 🎆
We need to get the ip address of the ECS task to interact with the server.
Since the fargate task we launched includes a load balancer, we use the DNS name of the loadbalancer. This is autogenerated by AWS. Go ahead and search for EC2 on the AWS console. On the left side navigation pane, find and select load balancers. The page that opens should have a single load balancer listed. Copy the DNS name from the description.

Paste the copied URL and hit enter on a browser. You should see:

You can also call the API endpoints with POST and GET commands using Postman or similar.
Remember to destroy the stack to prevent running charges.
Execute the following command from the terminal to destroy all created resources:
cdk destroy
Please be patient, this can take several minutes.
You can also delete the stack manually by searching for Cloudformation in the AWS console.
After the stack has been destroyed you may want to check for any RDS snapshots. Search for RDS in the console and find Snapshots from the left navigation pane. If you see any snapshots listed, go ahead and delete them all.
In this post, we looked at how to deploy a FastAPI application on AWS ECS and RDS.
We dissected and described the time and resource benefits of ECS — a serverless compute service. We also used RDS — a managed database service where AWS takes care of managing the server for us. Again, like ECS we get the benefits of not needing to manage a server.
To automate deployments we used CDK — an AWS IaC (infrastructure as code) offering. Through CDK we can define our architecture as code, easily commit it to version control, change it in the future etc. It also makes it a lot easier to change and update infrastructure in the future.
Hope you liked this rather lengthy post.
If you enjoyed this piece, consider following and subscribing here.
Why serverless? And how? A practical dive into AWS ECS

In this post we will design and deploy a FastAPI application on AWS.
We will architect the application using a serverless compute service coupled with a managed database service. This microservice architecture helps make a decoupled system which increases robustness. Next, we use the AWS CDK to have our entire infrastructure bundled as code. The benefits of this are numerous. In a nutshell, it makes deployments and infrastructure updates easier. It allows to commit the entire code defining the infrastructure in a VCS (version control system) such as git.
But what is serverless and why do we need it?
AWS offers several serverless compute options. With serverless computing we do not need to worry about managing and provisioning servers. Maintenance tasks such as installing patches, updates and security fixes completely go away. This frees up time and resources. We also don’t need to worry about capacity provisioning as AWS takes care of autoscaling the instances if load increases. Serverless compute options offer pay-as-you go pricing models. This means we only pay for the compute time we actually use. Depending on the use case this can reduce costs related to running our software.
Docker on EC2 and the need for ECS
Before introducing the architecture we look at how we would run a containerized application in AWS using simple virtual servers (AWS EC2).
The steps involved are:
- Build Docker image
- Deploy EC2 instance
- Manage both Docker application and EC2 instance
- Pay for EC2 instance
This seems quite straightforward.
But there are some downsides.
For one, we need to manage our EC2 instance. So installing updates and patches over time. Secondly, we need to manage the Docker application. In case the container stops working, or if the FastAPI version needs updating, we need to manually update the container. This can be a hassle since the running container needs to be stopped.
Another point is that of scale. Production systems are large-scale consisting of hundreds of containers. Running several containers at once using the above approach is infeasible. We would need to manage each container separately. For example, ensuring containers are running smoothly (health checks), and that they can communicate with each other securely. Or updating the image a container uses without jeopardizing the whole application. How do we handle the use case of scaling up the number of containers if user demand increases? Similarly, load balancing becomes crucial with so many containers as we don’t want to overwhelm a select few containers and have the others sit idle.
AWS ECS helps us with all this and much more.
AWS ECS
To keep things simple, we will only consider AWS ECS on Fargate and not EC2.
ECS — Elastic Container Service. This is a container orchestration service that allows us to run and manage containerized Docker applications. For huge workflows with perhaps hundreds of containers, it is challenging and time-consuming to manage them.
Here’s a diagram explaining ECS.
ECS consists of the following components:
- Cluster — This is simply a logical grouping of Fargate instances called capacity providers. Tasks are placed into a cluster before they are run.
- AWS Fargate — Fargate integrates with ECS and works “under the hood” to provide serverless compute services. Fargate essentially runs our Docker containers without us having to worry about managing servers.
- Service — A service allows you to specify how many tasks you wish to run, whether you want load balancing enabled etc. You can have multiple services in a cluster. For example you can have one service which handles all production traffic (production environment) and another which handles test/development traffic (test environment). Above, you can see there are two services — Service1 and Service2 running inside the cluster. Tasks run inside services.
- Task definition — This is a template file written in JSON. It acts like a blueprint and specifies what containers to run, memory and CPU specifications, what ports should be open and other configuration such as what Docker images to use. Essentially it defines the actual code to be run.
- Task — This is an instance of a task definition. It can either be PENDING, RUNNING or STOPPED. A RUNNING task would mean that all containers specified in the task definition are running i.e. your application is running.
It is also possible to run several tasks to handle large loads on the application. In the diagram above there are two instances of Task A running in Service1.
The architecture diagram is presented below:
Firstly, we use a virtual private cloud (VPC). This is a collection of ip addresses that are dedicated to our use and tied to our AWS account. An internet gateway is attached to the VPC to facilitate connections to and from the internet.
The FastAPI application will run on ECS inside a public subnet. The PostgreSQL database will run on RDS (relational database service) inside a private subnet. RDS is simply a managed database service provided by AWS meaning AWS manages the database for us.
User requests get routed to ECS since it is inside a public subnet. This is done over simple HTTP, port 80 in this tutorial. For all practical use cases this should be done over HTTPS, port 443. RDS is blocked from any public access. This is because it stores sensitive user data. However, since ECS and RDS are inside the same VPC, ECS can communicate with RDS to store and retrieve data. This is done over the default PostgreSQL port, TCP: 5432.
The complete code repo is here.
This post assumes you have the AWS CLI and CDK installed on your system.
If not please check this post for a tutorial.
Ok we can now finally get down to business and write some actual code 👩🏾💻
First stop, CDK!
CDK init
Create a new project directory called ecs
Run the following to create some boilerplate code for the CDK:
cdk init sample-app --language python
If you get an error regarding venv creation in Python, you can execute the following command to create a new virtual environment for Python:
py -m venv .venv
Then activate it with:
.\.venv\Scripts\activate
With the virtual env enabled we can install Python dependencies with:
pip3 install -r requirements.txt
Edit app.py and make sure the region and account are provided.
It should look something like this:
Next, go ahead and open ecs_stack.py. This is where we define the architecture and resources to create.
Paste in the following code:
We start by defining a vpc. You can think of this as a collection of ip addresses that are tied to your account and available for use.
Next, we define two security groups, one for the database and the other for fargate. Security groups act like stateful firewalls and by default they allow all outgoing network traffic and block all incoming traffic. We explicitly allow connections from fargate into our database server over TCP.
Next up, we create secrets. These can be anything including API keys, database credentials or other sensitive data that needs to be stored and accessed. Through AWS secrets manager they can easily be stored, retrieved and rotated for maximum security. Here, we create credentials for our database instance. We provide the username as postgres and let cdk auto-generate a password for us. The benefit here is that we are not exposing the secret in our code since we can simply pass the templatedSecret variable around to reference the sensitive password.
We create a new database instance, passing in the templatedSecret as credentials, and the security group created earlier.
Finally, we create a new fargate service. An application load balancer is created by default but the details of that are beyond scope. The most important thing here is that we provide a path to the docker image. We pass the username and password as task_image_options secrets and the endpoint of our database instance as an environment variable. This allows the docker container to be able to connect to the database. Notice how we haven’t passed anything around in plaintext! Even the database instance endpoint is autogenerated at runtime so we don’t know it beforehand but we simply pass it to fargate with rdsInstance.db_instance_endpoint_address.
Finally, we add a dependency on rdsInstance. This ensures that the database gets created before the fargate service. Otherwise, our FastAPI app would have trouble connecting.
Great! Most of the work is done.
Next up, we need to create a FastAPI app and a Dockerfile for ECS.
REST API with FastAPI
Make sure the virtual environment is activated and install the following packages one by one:
pip3 install psycopg2
pip3 install fastapi
pip3 install uvicorn[standard]
pip3 install sqlalchemy
Next, create a main.py file in the root directory.
Paste in the following code for main.py:
This is a simple REST API with two endpoints. We can store a book or retrieve a book based on the book_name. In line 30 we create a database model for book required for inserting and retrieving the database record.
Notice how can simply reference username, password and endpoint as environment variables. This works because we explicitly passed these as secrets and environment variables earlier in the CDK code.
We also need to create a Pydantic data model for FastAPI. This has the advantage of providing automatic validation of the input data when a request is made to the endpoint. For example when POST request is made to store a new book, pydantic automatically validates that the correct book fields are provided. Go ahead and create a Pydantic model in a new file called schemas.py.
It should look something like this:
Now to the fun bit!
Dockerfile
While in the root directory run pip freeze > requirements.txt to get a requirements.txt. This is needed for building our Docker image:
Create a new Dockerfile in the root directory like so:
We simply pull the official Docker image for Python:3.9, set a named work directory which we will reference later. Then we run a pip install on requirements.txt and finally copy all the code from our host machine to the Docker container. The CMD command at the end is executed when the container is run.
In this case, it starts up our FastAPI app.
You should now have a directory structure like follows:
That’s it 😇Give yourself a pat on the back for a job well-done!
Now the most exciting moment arrives!
Deploy 🚀
Note: running the command below will initiate costs to your AWS account.
Grab a cup of coffee and run:
cdk deploy
This will initiate the creation of resources and deploy the app.
Please be patient. This step can take several minutes.
If after several minutes you do not see any output at all on the console, hit CTRL+C followed by cdk destroy. You may contact me directly/comment below for getting help troubleshooting in this case.
Et Voila 🎆
We need to get the ip address of the ECS task to interact with the server.
Since the fargate task we launched includes a load balancer, we use the DNS name of the loadbalancer. This is autogenerated by AWS. Go ahead and search for EC2 on the AWS console. On the left side navigation pane, find and select load balancers. The page that opens should have a single load balancer listed. Copy the DNS name from the description.
Paste the copied URL and hit enter on a browser. You should see:
You can also call the API endpoints with POST and GET commands using Postman or similar.
Remember to destroy the stack to prevent running charges.
Execute the following command from the terminal to destroy all created resources:
cdk destroy
Please be patient, this can take several minutes.
You can also delete the stack manually by searching for Cloudformation in the AWS console.
After the stack has been destroyed you may want to check for any RDS snapshots. Search for RDS in the console and find Snapshots from the left navigation pane. If you see any snapshots listed, go ahead and delete them all.
In this post, we looked at how to deploy a FastAPI application on AWS ECS and RDS.
We dissected and described the time and resource benefits of ECS — a serverless compute service. We also used RDS — a managed database service where AWS takes care of managing the server for us. Again, like ECS we get the benefits of not needing to manage a server.
To automate deployments we used CDK — an AWS IaC (infrastructure as code) offering. Through CDK we can define our architecture as code, easily commit it to version control, change it in the future etc. It also makes it a lot easier to change and update infrastructure in the future.
Hope you liked this rather lengthy post.
If you enjoyed this piece, consider following and subscribing here.
Denial of responsibility! Techno Blender is an automatic aggregator of the all world’s media. In each content, the hyperlink to the primary source is specified. All trademarks belong to their rightful owners, all materials to their authors. If you are the owner of the content and do not want us to publish your materials, please contact us by email – [email protected]. The content will be deleted within 24 hours.