
📢 Sentiment Analysis on Google Sheets with VADER using Python and Google Cloud Functions | by Trent Y., MBA | Aug, 2022
A Cloud Functions recipe for sentiment analysis
TLDR
We will be discussing how to set up a basic workflow to perform simple sentiment analysis on text in Google Sheets. Specifically, we will be:
- Using Python and the Google Sheets API to read comments data in a spreadsheet
- Applying VADER (Hutto & Gilbert, 2014), an open-source sentiment analyser from the nltk package to perform sentiment analysis
- Writing the results to another tab in your Google Spreadsheet
- BONUS: deploying the Python code to Google Cloud Functions so that you can run your Python code online from Google Sheets directly, instead of your local machine.
This step-by-step guide uses very basic examples to help those starting out with Python and sentiment analysis. I’ve commented my Python code extensively to hopefully make this easy-to-follow.
Context
There are already loads of awesome tutorials out there explaining how to perform sentiment analysis using Python, but there aren’t many that go into detail with how you can push your sentiment analysis code to Google Cloud Functions. Many tutorials for setting up Cloud Functions were very generic, using “hello world!” stock examples. Google Cloud documentation can also be confusing for beginners who want to learn.
With the above in mind, this article is very light on performing in-depth sentiment analysis (we’ll look at polarity scores and compound scores but skip tokenization, visualizing your results etc) and leans more heavily on how you set this all up.
The goal is to help you deploy your first sentiment analysis model live on Google Cloud.
💪Lets dive in!
Customer reviews and user feedback — these types of open-ended qualitative text data are often encountered when working with social media data or in user experience research. Much insight can be drawn from them, for example, whether a brand was liked or disliked, whether a user would use the product again, and also why someone would recommend something or not.
We can gauge whether their sentiment was positive, neutral or negative when we read the words being used. But imagine having to manually read and analyse hundreds of user reviews — this would be an incredibly time-consuming process for a person to do 😪!
What is sentiment analysis
To put it simply: sentiment analysis is a natural language processing method to determine whether corpus data is positive, negative or neutral. This is sometimes referred to as “opinion mining”. Large datasets for reviews or comments can be analysed and classified very quickly which can significantly help to save time and generate additional insights.
💡 Imagine you have been given thousands of customer reviews for a specific product. Sentiment analysis can help to classify those comments into positive, neutral and negative as well as pull out frequent words that have been used in positive vs negative comments, thus surfacing the features that users love and the features users felt were missing from the product. This type of information is invaluable, especially when we consider that it is coming from actual users of the product.
Limitations of sentiment analysis
There has been many advancements in the field of NLP in recent years. Some examples include:
- BERT, a bi-directional model developed by Google that can help it better understand the relationship between sentences by considering context from either the left or right side of words.
- Microsoft developed the MT-NLG model with NVIDIA resulting in improved reading comprehension, common-sense reasoning and natural language inference.
- More recently, in a bid to ensure language doesn’t become a barrier in the Metaverse and beyond, Meta AI is developing innovations like the NLLB-200 model, capable of translating over 200 different languages, including rare ones. It can also translate non-English text into another non-English language immediately, without having to translate the source text into English first, resulting in increased translation accuracy when compared to English-centric models.
Yet, if the end goal is to enable machines to derive meaning and understand the human language in the way humans can, then there is still a fair bit to go 🤖!
For example, sometimes we say things that we don’t actually mean 🤔. Additionally, non-trivial examples like sarcasm, irony, and cross-cultural references are nuances that NLP models (and lets be honest, even humans!) still struggle with.
In short: sentiment analysis is not yet 100% perfect.
Fortunately, our exercise is a rather basic one which doesn’t require a trillion-parameter language model 😲!
We have been given a hundred rows of customer feedback in a Google Sheet to analyse. The feedback relate to a specific product and we need to determine roughly, whether comments are positive, neutral or negative.
NLP Packages in R and Python
There are many NLP packages available depending on the programming language of choice. Some packages for R include Rsentiment, syuzhet or sentimentR. In Python, TextBlob and VADER (Hutto & Gilbert, 2014) via the nltk package are available. nltk stands for Natural Language Tool Kit.
In this Python exercise, we’ll learn to create a simple example using VADER.
But, what is VADER?
No, not the Star Wars villain. VADER stands for Valence Aware Dictionary and Sentiment Reasoner — an open-source, lexical, rules-based, sentiment analysis model. Developed by C. J. Hutto & E. E. Gilbert (2014), it is a relatively fast unsupervised method which is capable of analysing unlabelled text corpus and doesn’t require model training.
Amongst its many capabilities include the ability to properly handle text with negations, valence shifters, punctuation and even some urban slang and emojis 🤯🔥🔥!
You can read more about it via its official Github repo here.
You’ll need to ensure the following pre-requisites are completed before proceeding further:
👉 #1 You have signed up to Google Cloud.
Google Cloud Platform (GCP) has a free tier. As long as you keep resources to the minimum and don’t go over the thresholds outlined, you should be ok. Google also offers new sign-ups a $300 credit to spend — but this is really not needed for this basic exercise.
👉 #2 You have created a project in Google Cloud.
You need to ensure you have enabled billing in your project otherwise you will not be able to proceed. As long as you remain within the thresholds of the free tier, you should not be charged. You can always keep an eye on your billing in the project dashboard and shut down resources (or the project itself) if you no longer need them:

👉 You have enabled the required APIs
- Google Sheets API
- Secret Manager API
- Cloud Functions API
And if you haven’t already done so, you will be prompted to enable the following APIs when running Cloud Functions:
- Cloud Run Admin API
- Cloud Logging API
- Cloud Build API
- Cloud Pub/Sub API
- Artifact Registry API
To enable these APIs in your GCP project, use the search bar or head over to your left navigation menu in GCP, and get to APIs and services > Library:

Then search for the APIs and enable them:

👉 #3 You have created a Service Account.
We’ll need credentials to authenticate against when using these APIs. To do this, head to the left navigation menu in GCP, select APIs and services > Credentials:
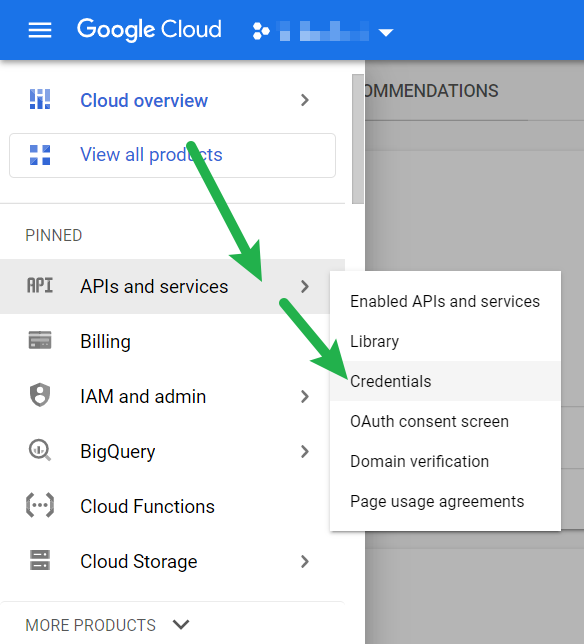
Select “Create Credentials” at the top, and then Service Account:
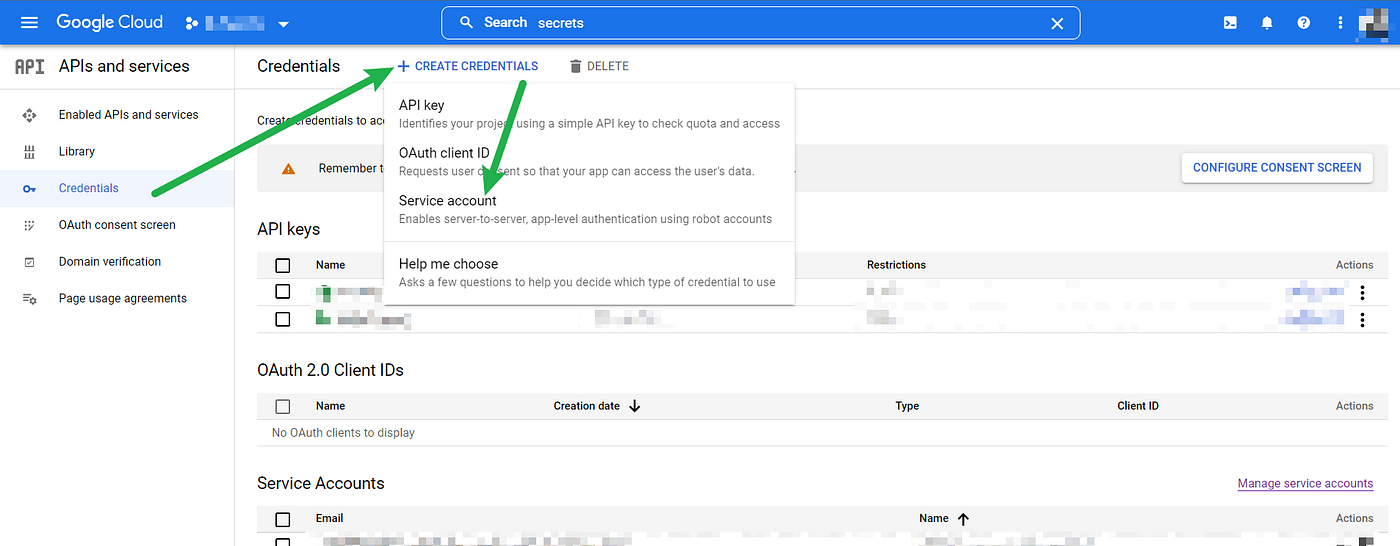
Give your Service Account a name. This will automatically be used to populate the ID and generate an iam.gserviceaccount.com email address.
⚠️ Note down this email address as you will need it later!
You can skip step 2 and 3 in the screenshot below for now:

Once done, this should bring you back to the main screen. Find the Service Account you’ve just created and click on the pencil edit icon for it at the end:

On the next screen, click on “Keys”, then “Add Key”, from the dropdown select “Create a New Key” and then from the popup choose “JSON” and save it somewhere on your desktop:

👉 #4 You have saved your keys in Secret Manager.
Instead of referencing your keys directly in the code which is unsafe, we will use Google’s Secret Manager to securely store and access credentials when using the APIs.
Search for “Secret Manager” in the top search bar then click on Secret Manager:

Then select “Create Secret”:

Give your secret a name, upload the JSON file you created earlier from your desktop and then select “Create Secret”:

Once completed, in this resulting screen, tick the secret you’ve just created and click “Add Principle”. Use the iam.gserviceaccount.com email address that was generated when you created your Service Account earlier, and ensure that its role is set as “Secret Manager Secret Accessor”:

👉 #5 You have added the service account email address to your Google Sheet in question.
Go into the Google Sheet that contains the data you want to analyse and assign this email address as an Editor to that sheet. You can uncheck the “Notify” box, then click Share.

✅ APIs enabled.
✅ Credentials created.
🚀You’re all set for the next step!
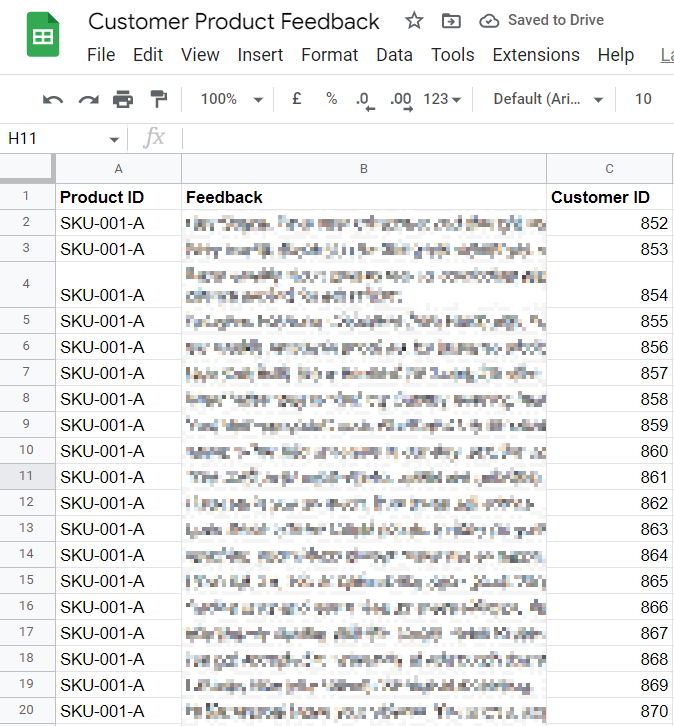
Imagine you received feedback from 100 customers and the data lives in a Google Sheet with 3 columns: the product ID, the customer feedback and the customer ID like this:
Python & VS Code
👨💻 We’re going to assume you’re working locally to begin with, and we’re using Python 3. I use RStudio (now Posit) exclusively when coding in R but as this is a Python exercise, I’m using VS Code as my preferred IDE when installing packages and programming in Python.
The following steps assumes you use VS Code.
Install Cloud Code extension
If we’re working on our local machine and dealing with authentication when using Google Cloud APIs, we’ll need the official Cloud Code extension installed in VS Code. Instructions here.

⚠️ Note: make sure you login to Google Cloud from VS Code afterwards!
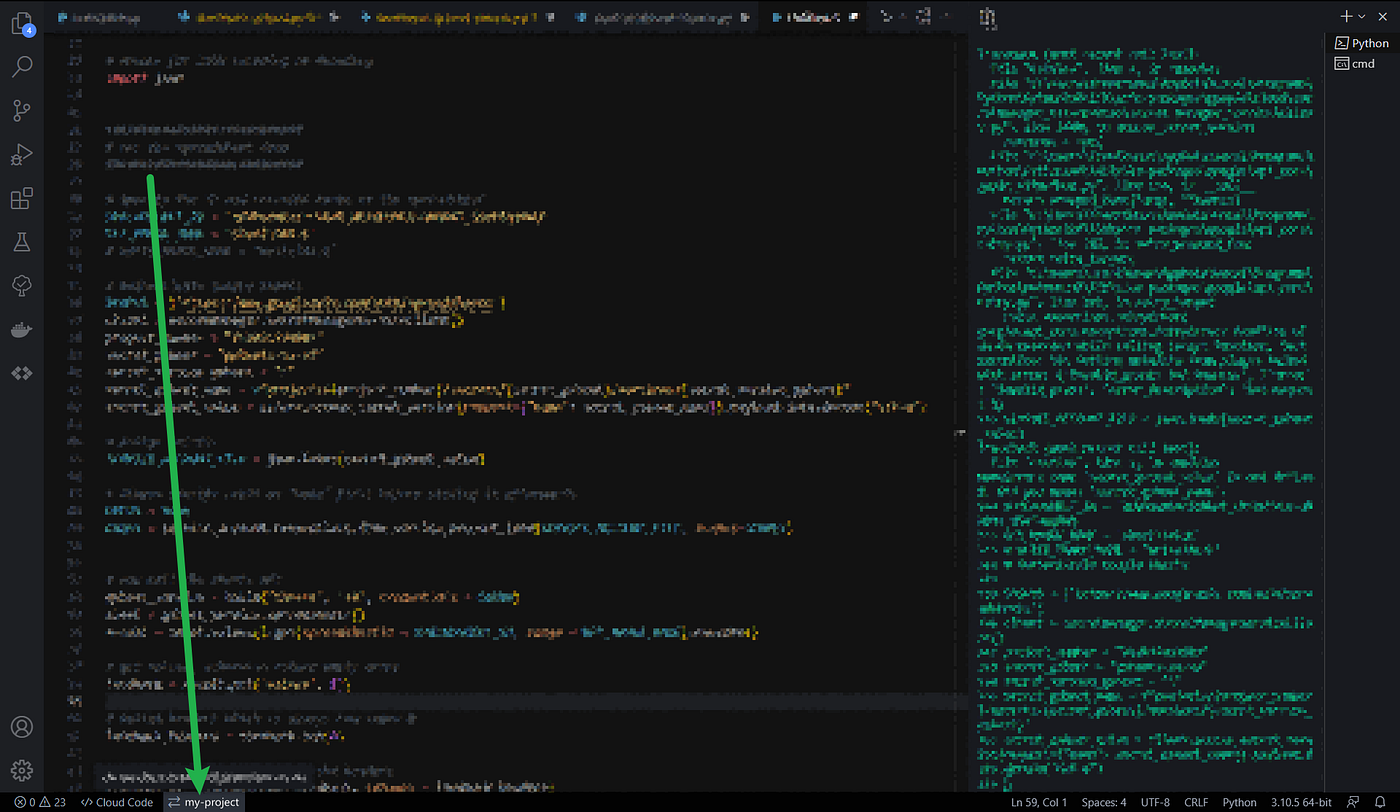
You can see whether you’re logged-in or not at the bottom of your screen. If you’re not logged-in, click this to login:
Install packages
The Google API Client contains all the relevant discovery based APIs that we will be using in Python. Install the package:
pip3 install google-api-python-client
We’ll also need the google.auth package:
pip3 install google-auth
And as discussed earlier, we’re going to use Google Cloud Secret Manager to keep our credentials secure so let’s install that too:
pip3 install google-cloud-secret-manager
We’ll use the gspread package to make working with Google Sheets a bit easier:
pip3 install gspread
And of course, gspread_dataframe:
pip3 install gspread-dataframe
🐍 Let’s now use Python and import the packages we’ve just installed, call the Google Sheets API, get our feedback data from the spreadsheet and save it as a dataframe 👇
Import packages
##########################
# Load packages
########################### Google Credentials
from googleapiclient.discovery import build
from google.oauth2 import service_account
import google.auth
from google.cloud import secretmanager# Python API for Google Sheets
import gspread
from gspread_dataframe import set_with_dataframe
We’ll also import NumPy, pandas, copy and json — these do not need to be installed like the others as they are in Python as standard:
# Standard Python packages
import pandas as pd
import numpy as np# to create deep copy
import copy# for JSON encoding or decoding
import json
Important variables
Get the values for the following variables ready. We’ll need them to call the GSheets API in a bit:
👉 SPREADSHEET_ID
👉 GET_RANGE_NAME
👉 project_number
👉 secret_gsheet
👉 secret_version_gsheet
SPREADSHEET_ID
This refers to the alpha numeric string at the end of your Google Sheet URL as shown in this screenshot:

GET_RANGE_NAME
This is a string value that refers to the range in the spreadsheet where the data is in. If your data is in Sheet 1 as per the screenshot below, then your range name would be: Sheet1!A1:C

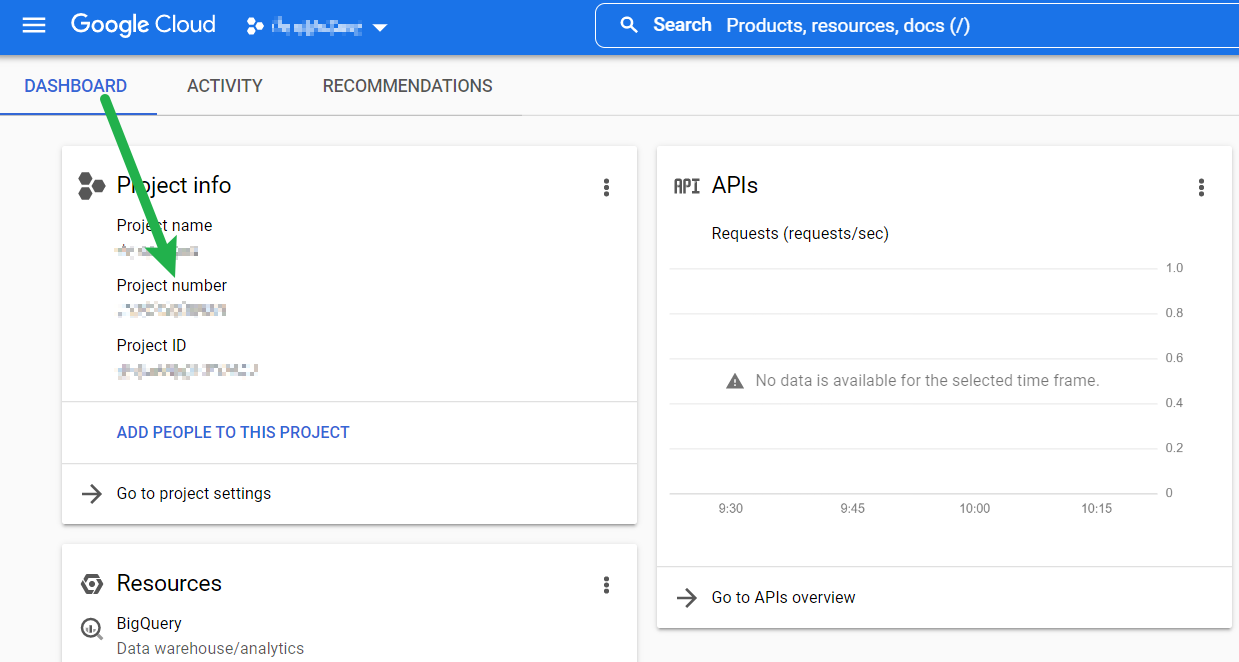
project_number
This is a string that refers to the number assigned to the project you created in Google Cloud for this exercise. You can find this by going to your Google Cloud dashboard and selecting your project:
secret_gsheet
This is a string which refers to the name you have given to your secret for this gsheet exercise in Secret Manager:

secret_version_gsheet
This is a string which refers to the version number of your secret. You can find this by clicking into your secret in Secret Manager:

📞 Calling the Google Sheet API
Let’s get the data from Google Sheets and save in a dataframe.
⚠️ Note: you must login to Google Cloud via VS Code first before you can run this. Remember to also update the values of the variables discussed above.
Notes:
✏️ Line 20: When we assigned the secret to SERVICE_ACCOUNT_FILE, we used json.loads(). As we are not referring to an actual JSON file (because we’re now using Secret Manager), we need to use json.loads() to convert secret_gsheet_value from a JSON string to a Python Dictionary.
✏️ Line 24: Again, as we are no longer working directly with a JSON file, we used service_account.Credentials.from_service_account_info()instead of service_account.Credentials.from_service_account_file().
Let’s now begin basic sentiment analysis on our feedback data.
Install sentiment analysis package
We’ll be trying out VADER (Hutto & Gilbert, 2014) from the Python nltk package. Install it:
pip3 install nltk
Import sentiment analysis package
Import the package we’ve just installed. We’re not doing tokenization in this exercise so the below is sufficient for now:
import nltk
from nltk.corpus import stopwords
from nltk.sentiment.vader import SentimentIntensityAnalyzer
Run sentiment analysis
Let’s now begin basic sentiment analysis on our feedback data.
Notes:
✏️ Lines 8–13: To allow for more accurate analysis, stopwords need to be removed from the feedback corpus so that unimportant words are not taken into consideration during analysis. Common stopwords in English are words like “the”, “and”, “is”.
✏️ Line 25: VADER outputs polarity scores for negative, neutral and positive based on the text it has analysed.
✏️ Line 32: VADER also outputs compound scores from the polarity scores. This is essentially the negative, neutral and positive scores added together, and then normalised to a scale where +1 means highly positive and -1 is highly negative.
✏️ Line 40: Compound scores can help us label whether a piece of feedback is positive, neutral or negative. By creating a basic logic on the compound scores, we can return values that are easier to understand (i.e. “positive”, instead of “0.89″).
You can customise this logic and have more labels if you desire (e.g. having 5 labels instead of 3: “very positive”, “positive”, “neutral”, “negative”, “very negative”).
Now that we have our analysis results, lets write onto a new tab in the same spreadsheet. We’ll save our data to Sheet2 like this:

And this is how we do it using gspread and gspread_dataframe👇
Notes:
✏️️ Lines 7 & 10: We reference the CREDS and SPREADSHEET_ID variables already referenced earlier when we first called the Google Sheets API.
✏️ Line 13: We specify where the data should be written to. For example if you want it to be written to a tab called “Sheet2” then that is where it will be saved in the Google sheet.
⚠️If you change the names of your tabs in the actual sheet, remember to update the values in your code, otherwise your code will not work.
👏 We’ve done well progressing this far! But unfortunately this code is still currently sat in your local machine 💻 — which means it can only be run from your computer.
By deploying our code onto the cloud ☁️ in Google Cloud Functions, we’ll be able to run the code anywhere. I’ll outline how you can add this code directly into the Google Cloud interface itself in this section.
FYI: it is possible to deploy directly from your IDE but this is beyond the scope of this article (which is long enough as it is already!)
Configure Cloud Functions
Head over to Cloud Functions by searching for it in the search bar in your Google Cloud dashboard for your project:

Click on “Create Function” on the resulting screen which will bring you here:

- Environment: Leave it as 1st gen for now.
- Function name: Give your function a name. The example here is called
my-sentiment-function. - Region: Choose a region that is nearest.
- Trigger type: We are creating a basic HTTP trigger. Tick the “Require HTTPS” box and you can leave the authentication to unauthenticated for now, just for this exercise.
Click “Save”.

- Memory Allocated: The example uses 512mb but you can change this if you wish
- Timeout: This is set as 300 seconds but you can change this also
- Runtime Service Account: Select the Service Account you created earlier from the dropdown
- Max no. of instances: Leaving this as 1 for now.
You can skip the other tabs for now and click “Next” which bring you to the the following screen:

There are a couple of important points here to review.
Runtime
We’re using the latest Python 3 — so select Python 3.10.
main.py
Cloud Functions requires the code to be in a file called main.py
If you are uploading your code then this is critical to ensure your filename is called main.py. But since we are updating our code directly using the inline editor in the interface (circled in the screenshot), this is not an issue for this exercise.
For Python, Cloud Functions uses the Flask framework. So we’d expect the code in main.py to be something like this:
We need to name our function. In the above example, we’ve just called it my_function.
The request argument in the function should return something that can be turned into a Flask response. This response can be a simple string, or even a JSON string. In the example above, we’ve simply returned the string “Yay! Done!”
About best practice
Technically you can do anything in a single function as long as it returns a suitable response. However, as best practice, we should try to ensure that a function only does 1 thing as shown in the example above. This is cleaner and helps to reduce code complexity. Our code that we wrote earlier will need to be refactored and broken down into smaller, properly defined, individual functions if we are to do this properly.
But that doesn’t mean that doing multiple things in one function will render your Cloud Function totally useless. It just means your code becomes difficult to maintain and debug.
⚠️ Know that the longer and more complex your function is, the longer it will take for Google Cloud to execute.
In the interest of keeping this already long post short and with the intention that this example is meant to be a basic quick-and-dirty prototype, the code we wrote earlier can be updated for Cloud Functions in this way:
Notes:
✏️ Line 5: All packages to be loaded have been moved to the top
✏️ Line 22: the rest of the code is within the defined function we named my_sentiment_function.
✏️ Line 149: If this executes fine, we’ll get the response “Yay! Done!” in our browser.
The above code should be placed into the inline editor for main.py. Don’t forget to specify the start of the cloud function as the entry point. Our function is called my_sentiment_function so this is used as the entry point:

requirements.txt
We’ll need to specify the packages that will need installing in requirements.txt. We’ll only need the following:

Notice that we didn’t add Flask, copy and json in here. That’s because they are already available in the environment.
⚠️ If you add these to requirements.txt anyway, Cloud Functions will fail to deploy, even if everything else was installed correctly.
google-api-python-client already contains the google discovery APIs like googleapiclient.discovery so there is no need to add the latter into requirements.txt again.
Now deploy!
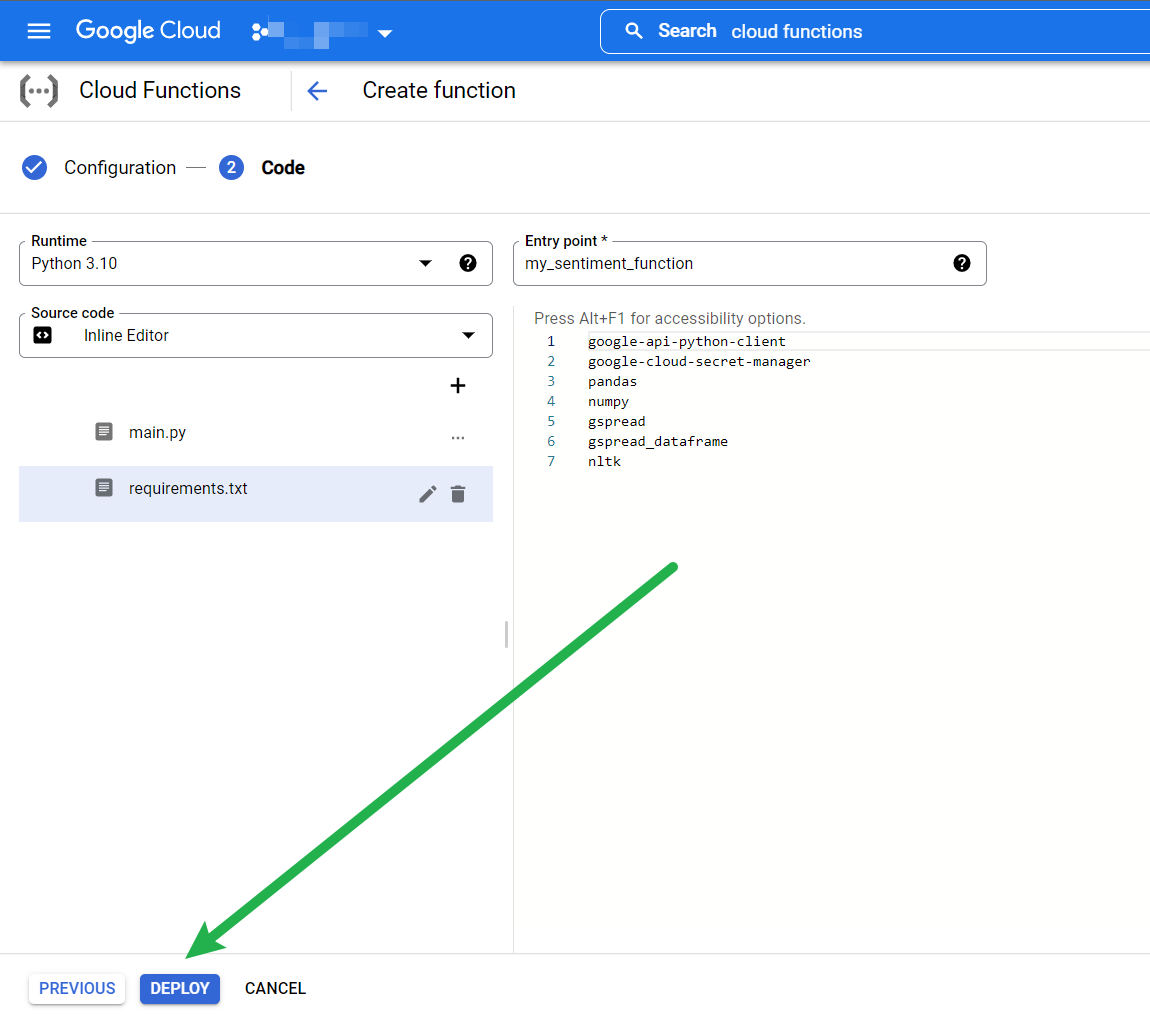
After a few minutes, if you’ve done everything as above, you should see the green tick✅ indicating that your function has successfully deployed 🙌🥳!

Let’s quickly test this actually works!
- Click on your function then go to the tab called “Trigger”. This function is triggered via HTTP so you have been assigned a URL by Google Cloud Functions.
- Click on the URL to trigger your function:

3. A new browser tab should open.
Outcome:
❌If it fails, you’ll get an error message and you can look into the “Logs” tab and check for errors to see why it failed. The errors are pretty well described so you should be able to figure your way around.
✅ If it works, you’ll get your “Yay! Done!” success message in the browser:

To test this fully, remember that we’ve configured our code to read the data from Sheet1 and then write the sentiment analysis results into Sheet2.
- So go ahead and delete everything in Sheet2.
- Copy the URL given to you by Cloud Functions and enter it in the browser again. Triggering the function again should update Sheet2!
Therefore, if you add new customer feedback or change them in Sheet1, simply clicking on your Cloud Function URL will output results from the Sentiment Analysis into Sheet2!
Returning as JSON
If you don’t want to return “Yay! Done!”, and want the function to return the sentiment dataframe we created earlier as JSON instead, replace the return statement with:
from flask import Responsereturn Response(sentiment_df.to_json(orient="records"), mimetype='application/json')
And that’s the end of this quick-and-dirty example of how to get your basic Python sentiment analysis code deployed live via Google Cloud Functions. Thanks for reading this far 🤗!
Now that you’ve figured out how all of this works, you might want to look further into:
- Performing deeper sentiment analysis — try some sentence and word tokenization to begin with.
- Look at improving the code and make it cleaner.
- Pay attention to Cloud security — we’ve avoided hardcoding our credentials in our code and used a basic method with Google Secret Manager. But you can look into further improvements like limiting permissions, restricting keys to specific APIs only, allowing only authenticated access, deleting unauthenticated functions when you’re done experimenting and much more.
- Keep an eye on your cloud resources: this exercise should not take you over your free tier but if you’re analysing a lot of sentiment data then you will need to watch your resources. Shut down resources you don’t use, delete sample projects you no longer need, etc.
⚠️ Don’t forget to delete this cloud function when you’re done!
👉 Get the full Python codes from my Github repo here.
Hutto, C.J. & Gilbert, E.E., 2014. VADER: A Parsimonious Rule-based Model for Sentiment Analysis of Social Media Text. In: Proceedings of the International AAAI Conference on Web and Social Media, 8(1), pp. 216–225.
nltk is an open-source Python toolkit under the Apache 2.0 License.
VADER is open-sourced under the MIT License.
A Cloud Functions recipe for sentiment analysis

TLDR
We will be discussing how to set up a basic workflow to perform simple sentiment analysis on text in Google Sheets. Specifically, we will be:
- Using Python and the Google Sheets API to read comments data in a spreadsheet
- Applying VADER (Hutto & Gilbert, 2014), an open-source sentiment analyser from the nltk package to perform sentiment analysis
- Writing the results to another tab in your Google Spreadsheet
- BONUS: deploying the Python code to Google Cloud Functions so that you can run your Python code online from Google Sheets directly, instead of your local machine.
This step-by-step guide uses very basic examples to help those starting out with Python and sentiment analysis. I’ve commented my Python code extensively to hopefully make this easy-to-follow.
Context
There are already loads of awesome tutorials out there explaining how to perform sentiment analysis using Python, but there aren’t many that go into detail with how you can push your sentiment analysis code to Google Cloud Functions. Many tutorials for setting up Cloud Functions were very generic, using “hello world!” stock examples. Google Cloud documentation can also be confusing for beginners who want to learn.
With the above in mind, this article is very light on performing in-depth sentiment analysis (we’ll look at polarity scores and compound scores but skip tokenization, visualizing your results etc) and leans more heavily on how you set this all up.
The goal is to help you deploy your first sentiment analysis model live on Google Cloud.
💪Lets dive in!
Customer reviews and user feedback — these types of open-ended qualitative text data are often encountered when working with social media data or in user experience research. Much insight can be drawn from them, for example, whether a brand was liked or disliked, whether a user would use the product again, and also why someone would recommend something or not.
We can gauge whether their sentiment was positive, neutral or negative when we read the words being used. But imagine having to manually read and analyse hundreds of user reviews — this would be an incredibly time-consuming process for a person to do 😪!
What is sentiment analysis
To put it simply: sentiment analysis is a natural language processing method to determine whether corpus data is positive, negative or neutral. This is sometimes referred to as “opinion mining”. Large datasets for reviews or comments can be analysed and classified very quickly which can significantly help to save time and generate additional insights.
💡 Imagine you have been given thousands of customer reviews for a specific product. Sentiment analysis can help to classify those comments into positive, neutral and negative as well as pull out frequent words that have been used in positive vs negative comments, thus surfacing the features that users love and the features users felt were missing from the product. This type of information is invaluable, especially when we consider that it is coming from actual users of the product.
Limitations of sentiment analysis
There has been many advancements in the field of NLP in recent years. Some examples include:
- BERT, a bi-directional model developed by Google that can help it better understand the relationship between sentences by considering context from either the left or right side of words.
- Microsoft developed the MT-NLG model with NVIDIA resulting in improved reading comprehension, common-sense reasoning and natural language inference.
- More recently, in a bid to ensure language doesn’t become a barrier in the Metaverse and beyond, Meta AI is developing innovations like the NLLB-200 model, capable of translating over 200 different languages, including rare ones. It can also translate non-English text into another non-English language immediately, without having to translate the source text into English first, resulting in increased translation accuracy when compared to English-centric models.
Yet, if the end goal is to enable machines to derive meaning and understand the human language in the way humans can, then there is still a fair bit to go 🤖!
For example, sometimes we say things that we don’t actually mean 🤔. Additionally, non-trivial examples like sarcasm, irony, and cross-cultural references are nuances that NLP models (and lets be honest, even humans!) still struggle with.
In short: sentiment analysis is not yet 100% perfect.
Fortunately, our exercise is a rather basic one which doesn’t require a trillion-parameter language model 😲!
We have been given a hundred rows of customer feedback in a Google Sheet to analyse. The feedback relate to a specific product and we need to determine roughly, whether comments are positive, neutral or negative.
NLP Packages in R and Python
There are many NLP packages available depending on the programming language of choice. Some packages for R include Rsentiment, syuzhet or sentimentR. In Python, TextBlob and VADER (Hutto & Gilbert, 2014) via the nltk package are available. nltk stands for Natural Language Tool Kit.
In this Python exercise, we’ll learn to create a simple example using VADER.
But, what is VADER?
No, not the Star Wars villain. VADER stands for Valence Aware Dictionary and Sentiment Reasoner — an open-source, lexical, rules-based, sentiment analysis model. Developed by C. J. Hutto & E. E. Gilbert (2014), it is a relatively fast unsupervised method which is capable of analysing unlabelled text corpus and doesn’t require model training.
Amongst its many capabilities include the ability to properly handle text with negations, valence shifters, punctuation and even some urban slang and emojis 🤯🔥🔥!
You can read more about it via its official Github repo here.
You’ll need to ensure the following pre-requisites are completed before proceeding further:
👉 #1 You have signed up to Google Cloud.
Google Cloud Platform (GCP) has a free tier. As long as you keep resources to the minimum and don’t go over the thresholds outlined, you should be ok. Google also offers new sign-ups a $300 credit to spend — but this is really not needed for this basic exercise.
👉 #2 You have created a project in Google Cloud.
You need to ensure you have enabled billing in your project otherwise you will not be able to proceed. As long as you remain within the thresholds of the free tier, you should not be charged. You can always keep an eye on your billing in the project dashboard and shut down resources (or the project itself) if you no longer need them:
👉 You have enabled the required APIs
- Google Sheets API
- Secret Manager API
- Cloud Functions API
And if you haven’t already done so, you will be prompted to enable the following APIs when running Cloud Functions:
- Cloud Run Admin API
- Cloud Logging API
- Cloud Build API
- Cloud Pub/Sub API
- Artifact Registry API
To enable these APIs in your GCP project, use the search bar or head over to your left navigation menu in GCP, and get to APIs and services > Library:
Then search for the APIs and enable them:
👉 #3 You have created a Service Account.
We’ll need credentials to authenticate against when using these APIs. To do this, head to the left navigation menu in GCP, select APIs and services > Credentials:
Select “Create Credentials” at the top, and then Service Account:
Give your Service Account a name. This will automatically be used to populate the ID and generate an iam.gserviceaccount.com email address.
⚠️ Note down this email address as you will need it later!
You can skip step 2 and 3 in the screenshot below for now:
Once done, this should bring you back to the main screen. Find the Service Account you’ve just created and click on the pencil edit icon for it at the end:
On the next screen, click on “Keys”, then “Add Key”, from the dropdown select “Create a New Key” and then from the popup choose “JSON” and save it somewhere on your desktop:
👉 #4 You have saved your keys in Secret Manager.
Instead of referencing your keys directly in the code which is unsafe, we will use Google’s Secret Manager to securely store and access credentials when using the APIs.
Search for “Secret Manager” in the top search bar then click on Secret Manager:
Then select “Create Secret”:
Give your secret a name, upload the JSON file you created earlier from your desktop and then select “Create Secret”:
Once completed, in this resulting screen, tick the secret you’ve just created and click “Add Principle”. Use the iam.gserviceaccount.com email address that was generated when you created your Service Account earlier, and ensure that its role is set as “Secret Manager Secret Accessor”:
👉 #5 You have added the service account email address to your Google Sheet in question.
Go into the Google Sheet that contains the data you want to analyse and assign this email address as an Editor to that sheet. You can uncheck the “Notify” box, then click Share.
✅ APIs enabled.
✅ Credentials created.
🚀You’re all set for the next step!
Imagine you received feedback from 100 customers and the data lives in a Google Sheet with 3 columns: the product ID, the customer feedback and the customer ID like this:
Python & VS Code
👨💻 We’re going to assume you’re working locally to begin with, and we’re using Python 3. I use RStudio (now Posit) exclusively when coding in R but as this is a Python exercise, I’m using VS Code as my preferred IDE when installing packages and programming in Python.
The following steps assumes you use VS Code.
Install Cloud Code extension
If we’re working on our local machine and dealing with authentication when using Google Cloud APIs, we’ll need the official Cloud Code extension installed in VS Code. Instructions here.
⚠️ Note: make sure you login to Google Cloud from VS Code afterwards!
You can see whether you’re logged-in or not at the bottom of your screen. If you’re not logged-in, click this to login:
Install packages
The Google API Client contains all the relevant discovery based APIs that we will be using in Python. Install the package:
pip3 install google-api-python-client
We’ll also need the google.auth package:
pip3 install google-auth
And as discussed earlier, we’re going to use Google Cloud Secret Manager to keep our credentials secure so let’s install that too:
pip3 install google-cloud-secret-manager
We’ll use the gspread package to make working with Google Sheets a bit easier:
pip3 install gspread
And of course, gspread_dataframe:
pip3 install gspread-dataframe
🐍 Let’s now use Python and import the packages we’ve just installed, call the Google Sheets API, get our feedback data from the spreadsheet and save it as a dataframe 👇
Import packages
##########################
# Load packages
########################### Google Credentials
from googleapiclient.discovery import build
from google.oauth2 import service_account
import google.auth
from google.cloud import secretmanager# Python API for Google Sheets
import gspread
from gspread_dataframe import set_with_dataframe
We’ll also import NumPy, pandas, copy and json — these do not need to be installed like the others as they are in Python as standard:
# Standard Python packages
import pandas as pd
import numpy as np# to create deep copy
import copy# for JSON encoding or decoding
import json
Important variables
Get the values for the following variables ready. We’ll need them to call the GSheets API in a bit:
👉 SPREADSHEET_ID
👉 GET_RANGE_NAME
👉 project_number
👉 secret_gsheet
👉 secret_version_gsheet
SPREADSHEET_ID
This refers to the alpha numeric string at the end of your Google Sheet URL as shown in this screenshot:
GET_RANGE_NAME
This is a string value that refers to the range in the spreadsheet where the data is in. If your data is in Sheet 1 as per the screenshot below, then your range name would be: Sheet1!A1:C
project_number
This is a string that refers to the number assigned to the project you created in Google Cloud for this exercise. You can find this by going to your Google Cloud dashboard and selecting your project:
secret_gsheet
This is a string which refers to the name you have given to your secret for this gsheet exercise in Secret Manager:
secret_version_gsheet
This is a string which refers to the version number of your secret. You can find this by clicking into your secret in Secret Manager:
📞 Calling the Google Sheet API
Let’s get the data from Google Sheets and save in a dataframe.
⚠️ Note: you must login to Google Cloud via VS Code first before you can run this. Remember to also update the values of the variables discussed above.
Notes:
✏️ Line 20: When we assigned the secret to SERVICE_ACCOUNT_FILE, we used json.loads(). As we are not referring to an actual JSON file (because we’re now using Secret Manager), we need to use json.loads() to convert secret_gsheet_value from a JSON string to a Python Dictionary.
✏️ Line 24: Again, as we are no longer working directly with a JSON file, we used service_account.Credentials.from_service_account_info()instead of service_account.Credentials.from_service_account_file().
Let’s now begin basic sentiment analysis on our feedback data.
Install sentiment analysis package
We’ll be trying out VADER (Hutto & Gilbert, 2014) from the Python nltk package. Install it:
pip3 install nltk
Import sentiment analysis package
Import the package we’ve just installed. We’re not doing tokenization in this exercise so the below is sufficient for now:
import nltk
from nltk.corpus import stopwords
from nltk.sentiment.vader import SentimentIntensityAnalyzer
Run sentiment analysis
Let’s now begin basic sentiment analysis on our feedback data.
Notes:
✏️ Lines 8–13: To allow for more accurate analysis, stopwords need to be removed from the feedback corpus so that unimportant words are not taken into consideration during analysis. Common stopwords in English are words like “the”, “and”, “is”.
✏️ Line 25: VADER outputs polarity scores for negative, neutral and positive based on the text it has analysed.
✏️ Line 32: VADER also outputs compound scores from the polarity scores. This is essentially the negative, neutral and positive scores added together, and then normalised to a scale where +1 means highly positive and -1 is highly negative.
✏️ Line 40: Compound scores can help us label whether a piece of feedback is positive, neutral or negative. By creating a basic logic on the compound scores, we can return values that are easier to understand (i.e. “positive”, instead of “0.89″).
You can customise this logic and have more labels if you desire (e.g. having 5 labels instead of 3: “very positive”, “positive”, “neutral”, “negative”, “very negative”).
Now that we have our analysis results, lets write onto a new tab in the same spreadsheet. We’ll save our data to Sheet2 like this:
And this is how we do it using gspread and gspread_dataframe👇
Notes:
✏️️ Lines 7 & 10: We reference the CREDS and SPREADSHEET_ID variables already referenced earlier when we first called the Google Sheets API.
✏️ Line 13: We specify where the data should be written to. For example if you want it to be written to a tab called “Sheet2” then that is where it will be saved in the Google sheet.
⚠️If you change the names of your tabs in the actual sheet, remember to update the values in your code, otherwise your code will not work.
👏 We’ve done well progressing this far! But unfortunately this code is still currently sat in your local machine 💻 — which means it can only be run from your computer.
By deploying our code onto the cloud ☁️ in Google Cloud Functions, we’ll be able to run the code anywhere. I’ll outline how you can add this code directly into the Google Cloud interface itself in this section.
FYI: it is possible to deploy directly from your IDE but this is beyond the scope of this article (which is long enough as it is already!)
Configure Cloud Functions
Head over to Cloud Functions by searching for it in the search bar in your Google Cloud dashboard for your project:
Click on “Create Function” on the resulting screen which will bring you here:
- Environment: Leave it as 1st gen for now.
- Function name: Give your function a name. The example here is called
my-sentiment-function. - Region: Choose a region that is nearest.
- Trigger type: We are creating a basic HTTP trigger. Tick the “Require HTTPS” box and you can leave the authentication to unauthenticated for now, just for this exercise.
Click “Save”.
- Memory Allocated: The example uses 512mb but you can change this if you wish
- Timeout: This is set as 300 seconds but you can change this also
- Runtime Service Account: Select the Service Account you created earlier from the dropdown
- Max no. of instances: Leaving this as 1 for now.
You can skip the other tabs for now and click “Next” which bring you to the the following screen:
There are a couple of important points here to review.
Runtime
We’re using the latest Python 3 — so select Python 3.10.
main.py
Cloud Functions requires the code to be in a file called main.py
If you are uploading your code then this is critical to ensure your filename is called main.py. But since we are updating our code directly using the inline editor in the interface (circled in the screenshot), this is not an issue for this exercise.
For Python, Cloud Functions uses the Flask framework. So we’d expect the code in main.py to be something like this:
We need to name our function. In the above example, we’ve just called it my_function.
The request argument in the function should return something that can be turned into a Flask response. This response can be a simple string, or even a JSON string. In the example above, we’ve simply returned the string “Yay! Done!”
About best practice
Technically you can do anything in a single function as long as it returns a suitable response. However, as best practice, we should try to ensure that a function only does 1 thing as shown in the example above. This is cleaner and helps to reduce code complexity. Our code that we wrote earlier will need to be refactored and broken down into smaller, properly defined, individual functions if we are to do this properly.
But that doesn’t mean that doing multiple things in one function will render your Cloud Function totally useless. It just means your code becomes difficult to maintain and debug.
⚠️ Know that the longer and more complex your function is, the longer it will take for Google Cloud to execute.
In the interest of keeping this already long post short and with the intention that this example is meant to be a basic quick-and-dirty prototype, the code we wrote earlier can be updated for Cloud Functions in this way:
Notes:
✏️ Line 5: All packages to be loaded have been moved to the top
✏️ Line 22: the rest of the code is within the defined function we named my_sentiment_function.
✏️ Line 149: If this executes fine, we’ll get the response “Yay! Done!” in our browser.
The above code should be placed into the inline editor for main.py. Don’t forget to specify the start of the cloud function as the entry point. Our function is called my_sentiment_function so this is used as the entry point:
requirements.txt
We’ll need to specify the packages that will need installing in requirements.txt. We’ll only need the following:
Notice that we didn’t add Flask, copy and json in here. That’s because they are already available in the environment.
⚠️ If you add these to requirements.txt anyway, Cloud Functions will fail to deploy, even if everything else was installed correctly.
google-api-python-client already contains the google discovery APIs like googleapiclient.discovery so there is no need to add the latter into requirements.txt again.
Now deploy!
After a few minutes, if you’ve done everything as above, you should see the green tick✅ indicating that your function has successfully deployed 🙌🥳!
Let’s quickly test this actually works!
- Click on your function then go to the tab called “Trigger”. This function is triggered via HTTP so you have been assigned a URL by Google Cloud Functions.
- Click on the URL to trigger your function:
3. A new browser tab should open.
Outcome:
❌If it fails, you’ll get an error message and you can look into the “Logs” tab and check for errors to see why it failed. The errors are pretty well described so you should be able to figure your way around.
✅ If it works, you’ll get your “Yay! Done!” success message in the browser:
To test this fully, remember that we’ve configured our code to read the data from Sheet1 and then write the sentiment analysis results into Sheet2.
- So go ahead and delete everything in Sheet2.
- Copy the URL given to you by Cloud Functions and enter it in the browser again. Triggering the function again should update Sheet2!
Therefore, if you add new customer feedback or change them in Sheet1, simply clicking on your Cloud Function URL will output results from the Sentiment Analysis into Sheet2!
Returning as JSON
If you don’t want to return “Yay! Done!”, and want the function to return the sentiment dataframe we created earlier as JSON instead, replace the return statement with:
from flask import Responsereturn Response(sentiment_df.to_json(orient="records"), mimetype='application/json')
And that’s the end of this quick-and-dirty example of how to get your basic Python sentiment analysis code deployed live via Google Cloud Functions. Thanks for reading this far 🤗!
Now that you’ve figured out how all of this works, you might want to look further into:
- Performing deeper sentiment analysis — try some sentence and word tokenization to begin with.
- Look at improving the code and make it cleaner.
- Pay attention to Cloud security — we’ve avoided hardcoding our credentials in our code and used a basic method with Google Secret Manager. But you can look into further improvements like limiting permissions, restricting keys to specific APIs only, allowing only authenticated access, deleting unauthenticated functions when you’re done experimenting and much more.
- Keep an eye on your cloud resources: this exercise should not take you over your free tier but if you’re analysing a lot of sentiment data then you will need to watch your resources. Shut down resources you don’t use, delete sample projects you no longer need, etc.
⚠️ Don’t forget to delete this cloud function when you’re done!
👉 Get the full Python codes from my Github repo here.
Hutto, C.J. & Gilbert, E.E., 2014. VADER: A Parsimonious Rule-based Model for Sentiment Analysis of Social Media Text. In: Proceedings of the International AAAI Conference on Web and Social Media, 8(1), pp. 216–225.
nltk is an open-source Python toolkit under the Apache 2.0 License.
VADER is open-sourced under the MIT License.
Denial of responsibility! Techno Blender is an automatic aggregator of the all world’s media. In each content, the hyperlink to the primary source is specified. All trademarks belong to their rightful owners, all materials to their authors. If you are the owner of the content and do not want us to publish your materials, please contact us by email – [email protected]. The content will be deleted within 24 hours.