
4 Essential Parts of Multiprocessing in Python | Python Multiprocessing
Code like a pro!
Effective Python
After many requests, some planning, and getting the time to deliver a practical summary — I am pleased to share a guide that will allow you to start using parallel processing in your Python code!
Parallel processing can speed up your code and handle many jobs to execute per sample of datasets. Following this paradigm, Multiprocessing in Python allows you to run multiple processes simultaneously. We discuss four vital components of the Multiprocessing package in Python: Process, Lock, Queue, and Pool (Figure 1).
· Introduction
· What is multiprocessing, and why use it?
· Multiprocessing in Python
· Using the multiprocessing library — Process, Lock, Queue, Pool
∘ 1. Process
∘ 2. Lock
∘ 3. Queue
∘ 4. Pool
· Tips on how to get started with multiprocessing
· Tips on Best Practices for Using Multiprocessing
· Conclusion
· Supplemental Material
Data scientists are often tasked with a set of data points to process using various transformation techniques. In other words, given a dataset, we aim to preprocess the data via filtering, transforming, cleaning, scaling, and more. Additionally, the resulting data must often be post-processed for salience and understanding or to analyze and visualize the results. Hence, the same job must be performed N times for N data samples — as experienced data scientists can contest, the steps before and after modeling serve as additional bottlenecks. Want to learn how to mitigate time expenses by leveraging the full power of CPUs? What if I said it was easy using the Multiprocessing Python package?
Let us learn how to speed up our run times in Python with a few additional lines of code! But, first, let us run the set of processes in parallel! All the knowledge you need to get started spans four components of the Multiprocessing package — Process, Lock, Queue, and Pool (Figure 1).
We begin by defining multiprocessing while emphasizing its use case. Following this, we discuss multiprocessing specific to Python programming. Then, the four components needed to get started are described and exemplified via definitions, sample code, and visuals; tips for employing best practices follow. Finally, upon concluding, we review supplemental resources for those looking to take the learning to the next level. The complete code is on Github.
Multiprocessing refers to running multiple processes simultaneously, which can be incredibly useful for speeding up your code and handling large datasets and tasks. For example, running an operation in parallel can divide a job into several smaller parts that can be processed simultaneously. Typical single processor execution, the time costs of N x M, where M is the time per single process (i.e., units of time), down to (N / C ) x M, where C is the number of CPU cores. Considering N can grow extremely large in the modern-day big data paradigm, we can reduce the time. This can be especially helpful when your computer has multiple cores or processors. Additionally, multiprocessing can improve the performance of I/O-intensive tasks by spreading them out over various processes (Figure 2).

While multiprocessing can be incredibly useful, it’s important to note some potential dangers associated with using it. For example, if two processes try to access the same resource simultaneously, this can lead to data corruption or inconsistency. Therefore, locks are essential to protect shared resources between processes. At the same time, an effective programmer will understand the capacity of hardware and, hence, leverage it to its fullest potential (Figure 3).
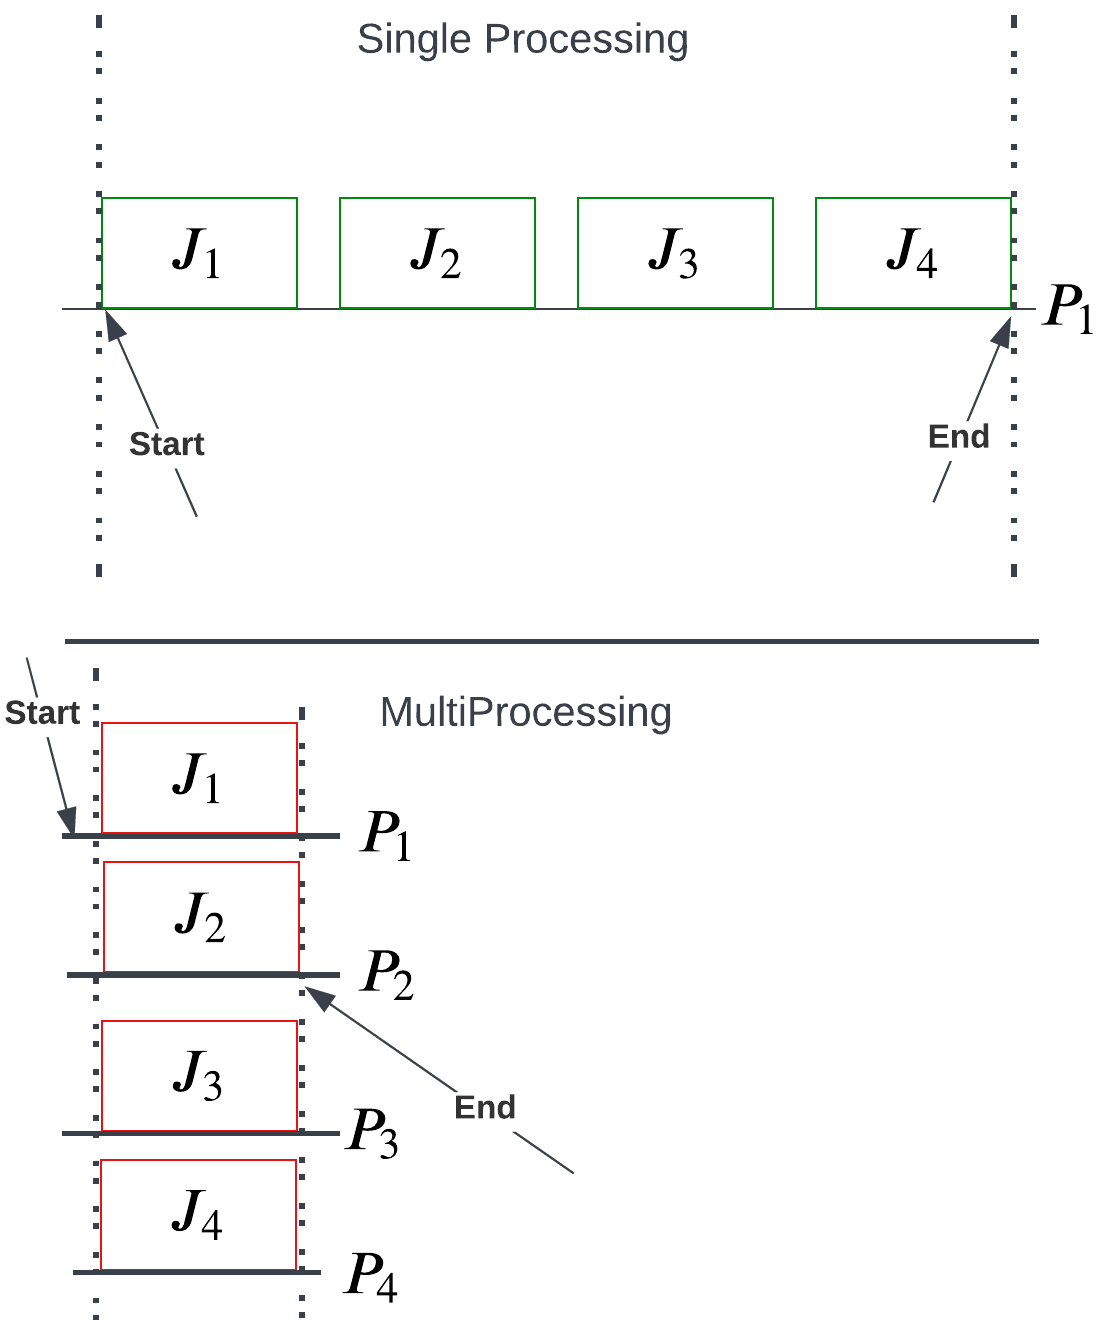
For those that learn best visually, let us depict the comparison for single versus multiprocessing another way: as a function of processor and job (Figure 4).
Multiprocessing leverages multiple CPU cores to speed up computing loads. Python employs a Global Interpreter Lock (i.e., GIL), a paradigm to avoid memory leaks and unwanted race conditions via the reference counting scheme implemented for memory management. Where GIL, like most implementation strategies, has its pros and cons, let us consider one central flaw: it restricts Python bytecode from running on a single thread from the same core. Besides that, GIL is subject to a future blog. For now, know that in core Python, parallel programming is disabled deliberately.
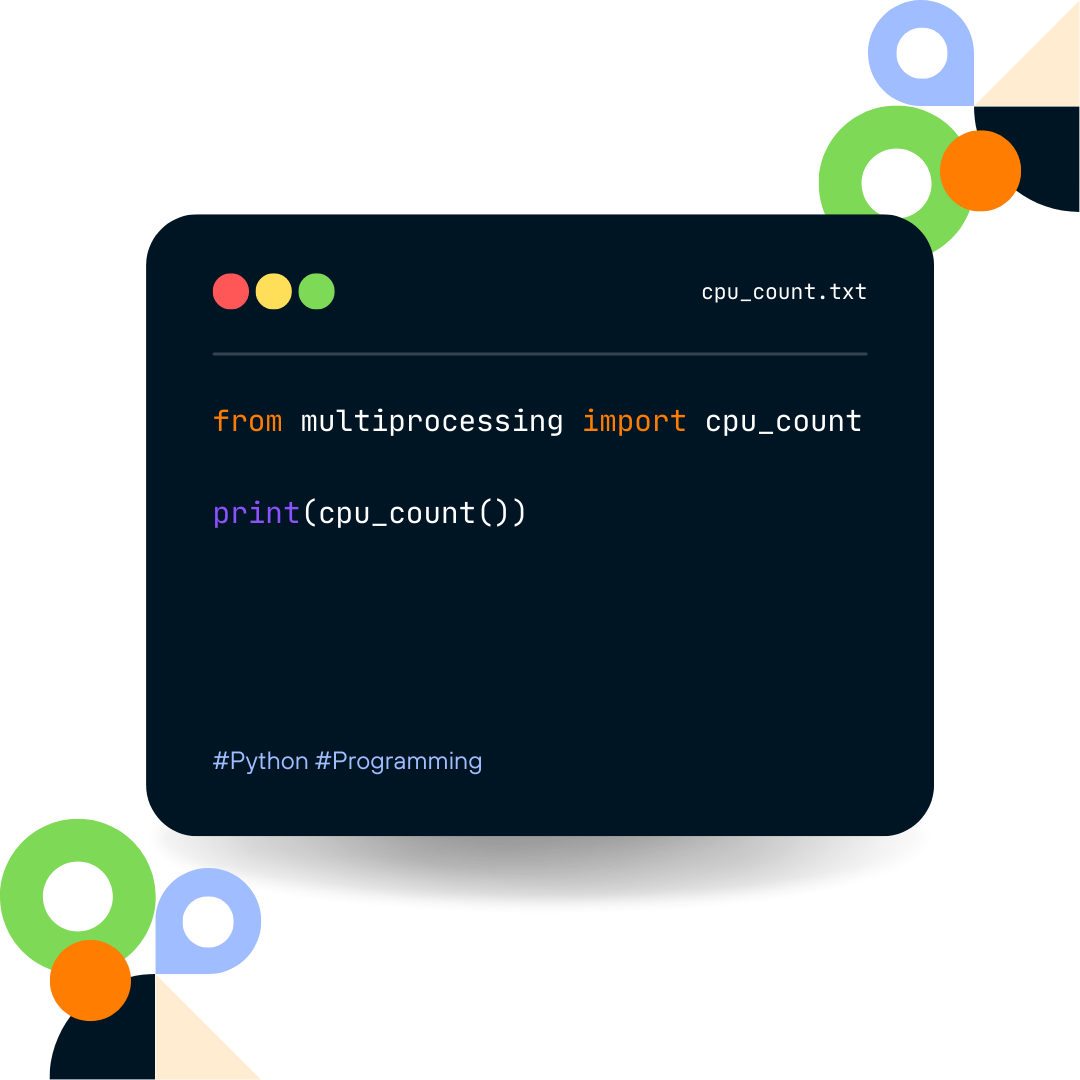
Python provides several tools for implementing multiprocessing via the package with that very name, which includes Process, Lock, Queue, and Pool. We’ll discuss each of these components and give examples of how they can be used next. For starters, let us import the package and determine the number of cores available on the system (Figure 5).
Each of Python’s four essential components of multiprocessing serves a specific purpose. Here is a brief overview of each one.
1. Process
This is the basic unit of execution in Python. Every process has its copy of the Python interpreter and its memory space, allowing multiple jobs to get executed simultaneously without conflicts.
The Process class is handled as follows: (1) the current process gets copied via forked; (2) the creation of a new process identifier; (3) the task runs as an independent child process.
Specifically, and as the following example shows, the Process is managed via two functions, start() and join().
Example and hands-on learning.
Let us first define a function that simply sleeps for sleep_sec with a default value set to half of a second.
import timedef sleep(sleep_sec=0.5):
print(f'Sleeping for {sleep_sec} seconds')
time.sleep(sleep_sec)
print('Finished sleeping')
Next, let’s create multiple processes using the Multiprocessing package.
import multiprocessing
p1 = multiprocessing.Process(target=task)
p2 = multiprocessing.Process(target=task)
The target argument to the Process() specifies the target function that the process runs. But these processes do not run immediately until started.
p1.start()
p2.start()
Putting it all together, we have the following:
import multiprocessing
import timedef sleep(sleep_sec=0.5):
print(f'Sleeping for {sleep_sec} seconds')
time.sleep(sleep_sec)
print('Finished sleeping')
if __name__ == "__main__":
start_time = time.perf_counter()
# Creates two processes
p1 = multiprocessing.Process(target=sleep)
p2 = multiprocessing.Process(target=sleep)
# Starts both processes
p1.start()
p2.start()
finish_time = time.perf_counter()
print(f"Program finished in {(finish_time - start_time):.3f} seconds")
Print statements will be set as quotes as follows:
The program finished in 0.013 sec
Sleeping for 0.5 seconds
Sleeping for 0.5 seconds
Finished sleeping
Finished sleeping
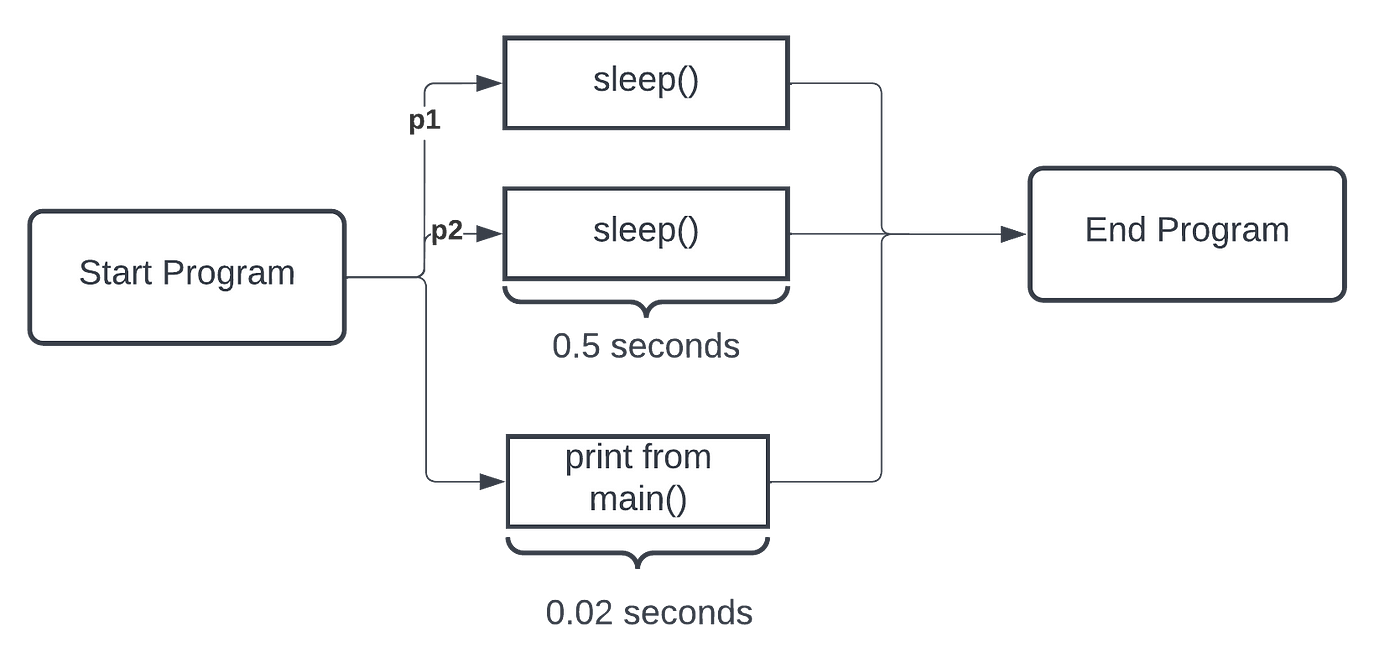
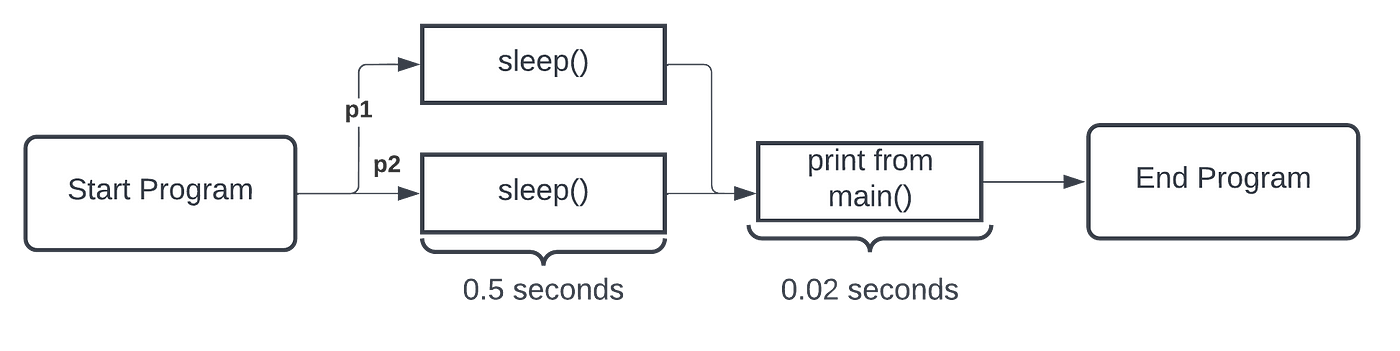
Notice that, although two calls to sleep were executed, one would expect that the program would at least take 1 second (i.e., sleeping twice for half a second). Furthermore, the print statement at the program’s end came before those executed before via function call. Why is this? Well, the answer is simple. As mentioned above, start() and join() are methods that the Process() class use together. Where we did start(), we never join(). Let us examine the program flow using a schematic (Figure 6).
Before fixing this, let us highlight a vital note about multiprocessing in Python.
ℹ️ The main program (i.e.,if __name__ == "__main__") must encapsulate our execution; else, the multiprocessing module complains. This safety construct guarantees Python finishes analyzing the program before the sub-process is created.
Now, back to our program that seemed to run out of order, which was not the case, but it was not set to wait. We need to call the join() function on the two processes to make them run before the time prints. This is because three processes are going on: p1, p2, and the main process. The main process is the one that keeps track of and prints the time to execute. We should make the line of finish_time run no earlier than the processes p1 and p2 are finished. We just need to add this snippet of code immediately after the start() function calls:
p1.join()
p2.join()
The join() method forces other processes to wait until the processes calling this are complete. Here’s the output with the join statements added:
Sleeping for 0.5 seconds
Sleeping for 0.5 seconds
Finished sleeping
Finished sleeping
Program finished in 0.5688213340181392 seconds
Let us see the updated program flow (Figure 7).
With similar reasoning, we can make more processes run. The following is the complete code modified from above to have 10 processes:
import multiprocessing
import timedef sleep(sleep_sec=0.5):
print(f'Sleeping for {sleep_sec} seconds')
time.sleep(sleep_sec)
print('Finished sleeping')
if __name__ == "__main__":
start_time = time.perf_counter()
processes = []
# Creates 10 processes then starts them
for i in range(10):
p = multiprocessing.Process(target=sleep, args=(1.0,))
p.start()
processes.append(p)
# Joins all the processes
for p in processes:
p.join()
finish_time = time.perf_counter()
print(f"Program finished in {finish_time - start_time):.3f} seconds")
Sleeping for 1.0 seconds
Sleeping for 1.0 seconds
Sleeping for 1.0 seconds
Sleeping for 1.0 seconds
Sleeping for 1.0 seconds
Sleeping for 1.0 seconds
Sleeping for 1.0 seconds
Sleeping for 1.0 seconds
Sleeping for 1.0 seconds
Sleeping for 1.0 seconds
Finished sleeping
Finished sleeping
Finished sleeping
Finished sleeping
Finished sleeping
Finished sleeping
Finished sleeping
Finished sleeping
Finished sleeping
Finished sleeping
Program finished in 1.019 secondsProcess finished with exit code 0
If we were to run the above code snippet, which calls sleep(1.0) ten times: without multicore processing, we would expect the code to take at least ten seconds.
ℹ️ Referring to the complete code above: notice that input arguments can be passed via keyword args, which expects a tuple. Also, notice that we loop and store each process in a list, which is better practice for there could be variable processes, opposed to hard-coding p1, p2, ..., p10.
2. Lock
As mentioned, a process is a running instance of a program, encapsulating every Python program (i.e., each is a new instance of the Python interpreter). MainProcess is the process name when python <file>.py run as a script — an aspect we looked at above through schematics. Also, we learned child processes could be spawned off and run concurrently via aProcess instance. Often, these concurrent programs share data or resources between processes. A mutual exclusion lock protects the shared resources and prevents race conditions.
The most commonly used mechanism for ensuring mutual exclusion is a mutual exclusion lock or mutex, or simply lock. A mutex is a special type of object that has support in the underlying hardware. The basic idea is that each critical section is protected by a lock.
— PAGE 53, AN INTRODUCTION TO PARALLEL PROGRAMMING, 2020.
Lock is used for protecting shared resources between processes. They allow multiple jobs to access a resource without conflicts. In addition, Lock is essential for ensuring that data is consistent between jobs.
Lock allows code to claim certainty that no other process can execute the similar code until the lock has been released. So, the purpose of the class Lock is two-fold: (1) to claim the lock via the acquire() function; (2) to release the lock via the release() function.
Let us build on the lesson of Process above. Here is the complete code to run:
# example of a mutual exclusion (mutex) lock for processes
import time
from random import random
from multiprocessing import Process
from multiprocessing import Lock# work function
def sleep(lock, identifier, value):
# acquire the lock
with lock:
print(f'>process {identifier} got the lock, sleeping for {value:.3f}')
time.sleep(value)
# entry point
if __name__ == '__main__':
# create the shared lock
lock = Lock()
# create a number of processes with different sleep times
processes = [Process(target=sleep, args=(lock, i, random())) for i in range(10)]
# start the processes
for process in processes:
process.start()
# wait for all processes to finish
for process in processes:
process.join()
The output is as follows.
>process 0 got the lock, sleeping for 0.297
>process 1 got the lock, sleeping for 0.908
>process 2 got the lock, sleeping for 0.223
>process 3 got the lock, sleeping for 0.016
>process 4 got the lock, sleeping for 0.323
>process 5 got the lock, sleeping for 0.796
>process 6 got the lock, sleeping for 0.664
>process 7 got the lock, sleeping for 0.337
>process 8 got the lock, sleeping for 0.068
>process 9 got the lock, sleeping for 0.116Process finished with exit code 0
What if we were to run the same code again:
>process 0 got the lock, sleeping for 0.223
>process 1 got the lock, sleeping for 0.175
>process 2 got the lock, sleeping for 0.148
>process 3 got the lock, sleeping for 0.773
>process 4 got the lock, sleeping for 0.180
>process 5 got the lock, sleeping for 0.294
>process 7 got the lock, sleeping for 0.864
>process 6 got the lock, sleeping for 0.687
>process 8 got the lock, sleeping for 0.813
>process 9 got the lock, sleeping for 0.735Process finished with exit code 0
Notice on the second run that ID5 goes before ID7 and returns to ID6. How could this be?
We can develop an example to demonstrate how to use the mutex lock by breaking the sample code above into pieces.
First, we can define a target task function that takes a lock as an argument and uses the lock to protect a critical section.
The critical section involves reporting a message and blocking for a fraction of a second.
# work function
def sleep(lock, identifier, value):
# acquire the lock
with lock:
print(f'>process {identifier} got the lock, sleeping for {value:.3f}')
time.sleep(value)
Next, we can then create one instance of Lock for processes to share.
...
# create the shared lock
lock = Lock()
We can then create many processes configured to execute our task() function and compete to execute the critical section.
Each process will receive the shared lock, an integer ID between 0 and 9, and a random time to sleep in seconds between 0 and 1 as inputs.
As done for the complete code in the previous section, we can implement this via a list comprehension, creating a list of ten configured Process instances.
...
# create a number of processes with different sleep times
processes = [Process(target=task, args=(lock, i, random())) for i in range(10)]
Next, we can start all of the processes.
...
# start the processes
for process in processes:
process.start()
Finally, we can wait for all new child processes to terminate.
...
# wait for all processes to finish
for process in processes:
process.join()
Tying this together, the complete example of using a lock is listed below.
The code starts with ten processes configured to execute our custom function.
The child processes are then started, and the main process blocks until all child processes finish.
Each child process attempts to acquire the lock within the sleep() function. Only one method can acquire the lock at a time, and once they do, they report a message including their id and how long they will sleep. The process then blocks for a fraction of a second before releasing the lock.
3. Queue
Allow processes to communicate with each other. For example, data can be placed on a queue and processed by another processor when it becomes available, allowing us to break up a task into smaller parts that can be processed simultaneously.
from multiprocessing import Queuecolors = ['red', 'green', 'blue', 'black']
cnt = 1
# instantiating a queue object
queue = Queue()
print('pushing items to queue:')
for color in colors:
print('item no: ', cnt, ' ', color)
queue.put(color)
cnt += 1
print('\npopping items from queue:')
cnt = 0
while not queue.empty():
print('item no: ', cnt, ' ', queue.get())
cnt += 1
pushing items to queue:
item no: 1 red
item no: 2 green
item no: 3 blue
item no: 4 blackpopping items from queue:
item no: 0 red
item no: 1 green
item no: 2 blue
item no: 3 black
4. Pool
A pool is a collection of processes used to execute tasks in parallel. Pools help divide an enormous task into smaller parts that multiple processors can handle.
from multiprocessing import Poolimport time
work = (["A", 5], ["B", 2], ["C", 1], ["D", 3])
def work_log(work_data):
print(" Process %s waiting %s seconds" % (work_data[0], work_data[1]))
time.sleep(int(work_data[1]))
print(" Process %s Finished." % work_data[0])
def pool_handler():
p = Pool(4)
p.map(work_log, work)
if __name__ == '__main__':
pool_handler()
Output:
Process A waiting 5 seconds
Process B waiting 2 seconds
Process C waiting 1 seconds
Process D waiting 3 seconds
Process C Finished.
Process B Finished.
Process D Finished.
Process A Finished.
Notice that we can now set the number of workers to execute in parallel:
def pool_handler():
p = Pool(4)
p.map(work_log, work)
With the Pool set to have nworkers=4 and the list has 4 elements, which means each component is executed simultaneously. Hence, notice the print statement shows the ordering of each finishing being the same order in seconds set to sleep.
If you’re new to multiprocessing in Python, here are a few tips to help you get started:
- Familiarize yourself with the basics of Python process management. The documentation for the Process module can help you understand how to start and control processes.
- Make sure you know the basics of locking. The lock module provides all the tools you need for protecting shared resources between processes.
- Using queues to communicate between processes makes passing data back and forth between jobs easy.
- Experiment! The best way to learn how to use multiprocessing is to experiment with different techniques and see what works best for your needs.
When using multiprocessing in your projects, remember a few best practices. Here are a few tips to help you get the most out of multiprocessing:
1. Use CPU-intensive tasks: Not all jobs are suitable for running in parallel. However, CPU-intensive jobs are ideal for multiprocessing because they can split into smaller parts and run simultaneously.
2. Limit the use of shared resources: As mentioned earlier, two processes trying to access the same resource can lead to data corruption or inconsistency. It’s essential to limit the use of shared resources between processes to avoid any potential conflicts.
3. Use locks carefully: Locks are essential for protecting shared resources between processes, but it’s important to use them carefully. You can easily create deadlocks or other synchronization problems if you’re not careful.
4. Use queues for communication: Queues allow processes to communicate with each other, which can be helpful for tasks that require coordination between multiple tasks.
5. Test your code thoroughly: It’s always a good idea to test it before deploying it in a production environment. Multiprocessing can introduce new and unforeseen issues, so it’s essential to catch any potential problems before they cause problems in your application.
Multiprocessing in Python can be a powerful tool for speeding up your code. By dividing tasks between multiple processors, you can often achieve faster results than if you were to run the same job on a single processor. In this article, we looked at four essential Python multiprocessing components. We also discussed some best practices for using multiprocessing effectively.
In the future, we will explore use cases of multiprocessing in Python, such as message passing and shared memory concepts. Hence, we will return to the Queue and introduce other data structures that allow this to be implemented relatively quickly.
Please comment with suggestions for future blogs, whether multiprocessing or another topic.
Memory management is covered in a past three-part series on Smart Pointers:
Want to Connect? Follow Dr. Robinson on LinkedIn, Twitter, Facebook, and Instagram. Visit my homepage for papers, blogs, email signups, and more!
Code like a pro!
Effective Python

After many requests, some planning, and getting the time to deliver a practical summary — I am pleased to share a guide that will allow you to start using parallel processing in your Python code!
Parallel processing can speed up your code and handle many jobs to execute per sample of datasets. Following this paradigm, Multiprocessing in Python allows you to run multiple processes simultaneously. We discuss four vital components of the Multiprocessing package in Python: Process, Lock, Queue, and Pool (Figure 1).
· Introduction
· What is multiprocessing, and why use it?
· Multiprocessing in Python
· Using the multiprocessing library — Process, Lock, Queue, Pool
∘ 1. Process
∘ 2. Lock
∘ 3. Queue
∘ 4. Pool
· Tips on how to get started with multiprocessing
· Tips on Best Practices for Using Multiprocessing
· Conclusion
· Supplemental Material
Data scientists are often tasked with a set of data points to process using various transformation techniques. In other words, given a dataset, we aim to preprocess the data via filtering, transforming, cleaning, scaling, and more. Additionally, the resulting data must often be post-processed for salience and understanding or to analyze and visualize the results. Hence, the same job must be performed N times for N data samples — as experienced data scientists can contest, the steps before and after modeling serve as additional bottlenecks. Want to learn how to mitigate time expenses by leveraging the full power of CPUs? What if I said it was easy using the Multiprocessing Python package?
Let us learn how to speed up our run times in Python with a few additional lines of code! But, first, let us run the set of processes in parallel! All the knowledge you need to get started spans four components of the Multiprocessing package — Process, Lock, Queue, and Pool (Figure 1).
We begin by defining multiprocessing while emphasizing its use case. Following this, we discuss multiprocessing specific to Python programming. Then, the four components needed to get started are described and exemplified via definitions, sample code, and visuals; tips for employing best practices follow. Finally, upon concluding, we review supplemental resources for those looking to take the learning to the next level. The complete code is on Github.
Multiprocessing refers to running multiple processes simultaneously, which can be incredibly useful for speeding up your code and handling large datasets and tasks. For example, running an operation in parallel can divide a job into several smaller parts that can be processed simultaneously. Typical single processor execution, the time costs of N x M, where M is the time per single process (i.e., units of time), down to (N / C ) x M, where C is the number of CPU cores. Considering N can grow extremely large in the modern-day big data paradigm, we can reduce the time. This can be especially helpful when your computer has multiple cores or processors. Additionally, multiprocessing can improve the performance of I/O-intensive tasks by spreading them out over various processes (Figure 2).
While multiprocessing can be incredibly useful, it’s important to note some potential dangers associated with using it. For example, if two processes try to access the same resource simultaneously, this can lead to data corruption or inconsistency. Therefore, locks are essential to protect shared resources between processes. At the same time, an effective programmer will understand the capacity of hardware and, hence, leverage it to its fullest potential (Figure 3).
For those that learn best visually, let us depict the comparison for single versus multiprocessing another way: as a function of processor and job (Figure 4).
Multiprocessing leverages multiple CPU cores to speed up computing loads. Python employs a Global Interpreter Lock (i.e., GIL), a paradigm to avoid memory leaks and unwanted race conditions via the reference counting scheme implemented for memory management. Where GIL, like most implementation strategies, has its pros and cons, let us consider one central flaw: it restricts Python bytecode from running on a single thread from the same core. Besides that, GIL is subject to a future blog. For now, know that in core Python, parallel programming is disabled deliberately.
Python provides several tools for implementing multiprocessing via the package with that very name, which includes Process, Lock, Queue, and Pool. We’ll discuss each of these components and give examples of how they can be used next. For starters, let us import the package and determine the number of cores available on the system (Figure 5).
Each of Python’s four essential components of multiprocessing serves a specific purpose. Here is a brief overview of each one.
1. Process
This is the basic unit of execution in Python. Every process has its copy of the Python interpreter and its memory space, allowing multiple jobs to get executed simultaneously without conflicts.
The Process class is handled as follows: (1) the current process gets copied via forked; (2) the creation of a new process identifier; (3) the task runs as an independent child process.
Specifically, and as the following example shows, the Process is managed via two functions, start() and join().
Example and hands-on learning.
Let us first define a function that simply sleeps for sleep_sec with a default value set to half of a second.
import timedef sleep(sleep_sec=0.5):
print(f'Sleeping for {sleep_sec} seconds')
time.sleep(sleep_sec)
print('Finished sleeping')
Next, let’s create multiple processes using the Multiprocessing package.
import multiprocessing
p1 = multiprocessing.Process(target=task)
p2 = multiprocessing.Process(target=task)
The target argument to the Process() specifies the target function that the process runs. But these processes do not run immediately until started.
p1.start()
p2.start()
Putting it all together, we have the following:
import multiprocessing
import timedef sleep(sleep_sec=0.5):
print(f'Sleeping for {sleep_sec} seconds')
time.sleep(sleep_sec)
print('Finished sleeping')
if __name__ == "__main__":
start_time = time.perf_counter()
# Creates two processes
p1 = multiprocessing.Process(target=sleep)
p2 = multiprocessing.Process(target=sleep)
# Starts both processes
p1.start()
p2.start()
finish_time = time.perf_counter()
print(f"Program finished in {(finish_time - start_time):.3f} seconds")
Print statements will be set as quotes as follows:
The program finished in 0.013 sec
Sleeping for 0.5 seconds
Sleeping for 0.5 seconds
Finished sleeping
Finished sleeping
Notice that, although two calls to sleep were executed, one would expect that the program would at least take 1 second (i.e., sleeping twice for half a second). Furthermore, the print statement at the program’s end came before those executed before via function call. Why is this? Well, the answer is simple. As mentioned above, start() and join() are methods that the Process() class use together. Where we did start(), we never join(). Let us examine the program flow using a schematic (Figure 6).
Before fixing this, let us highlight a vital note about multiprocessing in Python.
ℹ️ The main program (i.e.,if __name__ == "__main__") must encapsulate our execution; else, the multiprocessing module complains. This safety construct guarantees Python finishes analyzing the program before the sub-process is created.
Now, back to our program that seemed to run out of order, which was not the case, but it was not set to wait. We need to call the join() function on the two processes to make them run before the time prints. This is because three processes are going on: p1, p2, and the main process. The main process is the one that keeps track of and prints the time to execute. We should make the line of finish_time run no earlier than the processes p1 and p2 are finished. We just need to add this snippet of code immediately after the start() function calls:
p1.join()
p2.join()
The join() method forces other processes to wait until the processes calling this are complete. Here’s the output with the join statements added:
Sleeping for 0.5 seconds
Sleeping for 0.5 seconds
Finished sleeping
Finished sleeping
Program finished in 0.5688213340181392 seconds
Let us see the updated program flow (Figure 7).
With similar reasoning, we can make more processes run. The following is the complete code modified from above to have 10 processes:
import multiprocessing
import timedef sleep(sleep_sec=0.5):
print(f'Sleeping for {sleep_sec} seconds')
time.sleep(sleep_sec)
print('Finished sleeping')
if __name__ == "__main__":
start_time = time.perf_counter()
processes = []
# Creates 10 processes then starts them
for i in range(10):
p = multiprocessing.Process(target=sleep, args=(1.0,))
p.start()
processes.append(p)
# Joins all the processes
for p in processes:
p.join()
finish_time = time.perf_counter()
print(f"Program finished in {finish_time - start_time):.3f} seconds")
Sleeping for 1.0 seconds
Sleeping for 1.0 seconds
Sleeping for 1.0 seconds
Sleeping for 1.0 seconds
Sleeping for 1.0 seconds
Sleeping for 1.0 seconds
Sleeping for 1.0 seconds
Sleeping for 1.0 seconds
Sleeping for 1.0 seconds
Sleeping for 1.0 seconds
Finished sleeping
Finished sleeping
Finished sleeping
Finished sleeping
Finished sleeping
Finished sleeping
Finished sleeping
Finished sleeping
Finished sleeping
Finished sleeping
Program finished in 1.019 secondsProcess finished with exit code 0
If we were to run the above code snippet, which calls sleep(1.0) ten times: without multicore processing, we would expect the code to take at least ten seconds.
ℹ️ Referring to the complete code above: notice that input arguments can be passed via keyword args, which expects a tuple. Also, notice that we loop and store each process in a list, which is better practice for there could be variable processes, opposed to hard-coding p1, p2, ..., p10.
2. Lock
As mentioned, a process is a running instance of a program, encapsulating every Python program (i.e., each is a new instance of the Python interpreter). MainProcess is the process name when python <file>.py run as a script — an aspect we looked at above through schematics. Also, we learned child processes could be spawned off and run concurrently via aProcess instance. Often, these concurrent programs share data or resources between processes. A mutual exclusion lock protects the shared resources and prevents race conditions.
The most commonly used mechanism for ensuring mutual exclusion is a mutual exclusion lock or mutex, or simply lock. A mutex is a special type of object that has support in the underlying hardware. The basic idea is that each critical section is protected by a lock.
— PAGE 53, AN INTRODUCTION TO PARALLEL PROGRAMMING, 2020.
Lock is used for protecting shared resources between processes. They allow multiple jobs to access a resource without conflicts. In addition, Lock is essential for ensuring that data is consistent between jobs.
Lock allows code to claim certainty that no other process can execute the similar code until the lock has been released. So, the purpose of the class Lock is two-fold: (1) to claim the lock via the acquire() function; (2) to release the lock via the release() function.
Let us build on the lesson of Process above. Here is the complete code to run:
# example of a mutual exclusion (mutex) lock for processes
import time
from random import random
from multiprocessing import Process
from multiprocessing import Lock# work function
def sleep(lock, identifier, value):
# acquire the lock
with lock:
print(f'>process {identifier} got the lock, sleeping for {value:.3f}')
time.sleep(value)
# entry point
if __name__ == '__main__':
# create the shared lock
lock = Lock()
# create a number of processes with different sleep times
processes = [Process(target=sleep, args=(lock, i, random())) for i in range(10)]
# start the processes
for process in processes:
process.start()
# wait for all processes to finish
for process in processes:
process.join()
The output is as follows.
>process 0 got the lock, sleeping for 0.297
>process 1 got the lock, sleeping for 0.908
>process 2 got the lock, sleeping for 0.223
>process 3 got the lock, sleeping for 0.016
>process 4 got the lock, sleeping for 0.323
>process 5 got the lock, sleeping for 0.796
>process 6 got the lock, sleeping for 0.664
>process 7 got the lock, sleeping for 0.337
>process 8 got the lock, sleeping for 0.068
>process 9 got the lock, sleeping for 0.116Process finished with exit code 0
What if we were to run the same code again:
>process 0 got the lock, sleeping for 0.223
>process 1 got the lock, sleeping for 0.175
>process 2 got the lock, sleeping for 0.148
>process 3 got the lock, sleeping for 0.773
>process 4 got the lock, sleeping for 0.180
>process 5 got the lock, sleeping for 0.294
>process 7 got the lock, sleeping for 0.864
>process 6 got the lock, sleeping for 0.687
>process 8 got the lock, sleeping for 0.813
>process 9 got the lock, sleeping for 0.735Process finished with exit code 0
Notice on the second run that ID5 goes before ID7 and returns to ID6. How could this be?
We can develop an example to demonstrate how to use the mutex lock by breaking the sample code above into pieces.
First, we can define a target task function that takes a lock as an argument and uses the lock to protect a critical section.
The critical section involves reporting a message and blocking for a fraction of a second.
# work function
def sleep(lock, identifier, value):
# acquire the lock
with lock:
print(f'>process {identifier} got the lock, sleeping for {value:.3f}')
time.sleep(value)
Next, we can then create one instance of Lock for processes to share.
...
# create the shared lock
lock = Lock()
We can then create many processes configured to execute our task() function and compete to execute the critical section.
Each process will receive the shared lock, an integer ID between 0 and 9, and a random time to sleep in seconds between 0 and 1 as inputs.
As done for the complete code in the previous section, we can implement this via a list comprehension, creating a list of ten configured Process instances.
...
# create a number of processes with different sleep times
processes = [Process(target=task, args=(lock, i, random())) for i in range(10)]
Next, we can start all of the processes.
...
# start the processes
for process in processes:
process.start()
Finally, we can wait for all new child processes to terminate.
...
# wait for all processes to finish
for process in processes:
process.join()
Tying this together, the complete example of using a lock is listed below.
The code starts with ten processes configured to execute our custom function.
The child processes are then started, and the main process blocks until all child processes finish.
Each child process attempts to acquire the lock within the sleep() function. Only one method can acquire the lock at a time, and once they do, they report a message including their id and how long they will sleep. The process then blocks for a fraction of a second before releasing the lock.
3. Queue
Allow processes to communicate with each other. For example, data can be placed on a queue and processed by another processor when it becomes available, allowing us to break up a task into smaller parts that can be processed simultaneously.
from multiprocessing import Queuecolors = ['red', 'green', 'blue', 'black']
cnt = 1
# instantiating a queue object
queue = Queue()
print('pushing items to queue:')
for color in colors:
print('item no: ', cnt, ' ', color)
queue.put(color)
cnt += 1
print('\npopping items from queue:')
cnt = 0
while not queue.empty():
print('item no: ', cnt, ' ', queue.get())
cnt += 1
pushing items to queue:
item no: 1 red
item no: 2 green
item no: 3 blue
item no: 4 blackpopping items from queue:
item no: 0 red
item no: 1 green
item no: 2 blue
item no: 3 black
4. Pool
A pool is a collection of processes used to execute tasks in parallel. Pools help divide an enormous task into smaller parts that multiple processors can handle.
from multiprocessing import Poolimport time
work = (["A", 5], ["B", 2], ["C", 1], ["D", 3])
def work_log(work_data):
print(" Process %s waiting %s seconds" % (work_data[0], work_data[1]))
time.sleep(int(work_data[1]))
print(" Process %s Finished." % work_data[0])
def pool_handler():
p = Pool(4)
p.map(work_log, work)
if __name__ == '__main__':
pool_handler()
Output:
Process A waiting 5 seconds
Process B waiting 2 seconds
Process C waiting 1 seconds
Process D waiting 3 seconds
Process C Finished.
Process B Finished.
Process D Finished.
Process A Finished.
Notice that we can now set the number of workers to execute in parallel:
def pool_handler():
p = Pool(4)
p.map(work_log, work)
With the Pool set to have nworkers=4 and the list has 4 elements, which means each component is executed simultaneously. Hence, notice the print statement shows the ordering of each finishing being the same order in seconds set to sleep.
If you’re new to multiprocessing in Python, here are a few tips to help you get started:
- Familiarize yourself with the basics of Python process management. The documentation for the Process module can help you understand how to start and control processes.
- Make sure you know the basics of locking. The lock module provides all the tools you need for protecting shared resources between processes.
- Using queues to communicate between processes makes passing data back and forth between jobs easy.
- Experiment! The best way to learn how to use multiprocessing is to experiment with different techniques and see what works best for your needs.
When using multiprocessing in your projects, remember a few best practices. Here are a few tips to help you get the most out of multiprocessing:
1. Use CPU-intensive tasks: Not all jobs are suitable for running in parallel. However, CPU-intensive jobs are ideal for multiprocessing because they can split into smaller parts and run simultaneously.
2. Limit the use of shared resources: As mentioned earlier, two processes trying to access the same resource can lead to data corruption or inconsistency. It’s essential to limit the use of shared resources between processes to avoid any potential conflicts.
3. Use locks carefully: Locks are essential for protecting shared resources between processes, but it’s important to use them carefully. You can easily create deadlocks or other synchronization problems if you’re not careful.
4. Use queues for communication: Queues allow processes to communicate with each other, which can be helpful for tasks that require coordination between multiple tasks.
5. Test your code thoroughly: It’s always a good idea to test it before deploying it in a production environment. Multiprocessing can introduce new and unforeseen issues, so it’s essential to catch any potential problems before they cause problems in your application.
Multiprocessing in Python can be a powerful tool for speeding up your code. By dividing tasks between multiple processors, you can often achieve faster results than if you were to run the same job on a single processor. In this article, we looked at four essential Python multiprocessing components. We also discussed some best practices for using multiprocessing effectively.
In the future, we will explore use cases of multiprocessing in Python, such as message passing and shared memory concepts. Hence, we will return to the Queue and introduce other data structures that allow this to be implemented relatively quickly.
Please comment with suggestions for future blogs, whether multiprocessing or another topic.
Memory management is covered in a past three-part series on Smart Pointers:
Want to Connect? Follow Dr. Robinson on LinkedIn, Twitter, Facebook, and Instagram. Visit my homepage for papers, blogs, email signups, and more!
Denial of responsibility! Techno Blender is an automatic aggregator of the all world’s media. In each content, the hyperlink to the primary source is specified. All trademarks belong to their rightful owners, all materials to their authors. If you are the owner of the content and do not want us to publish your materials, please contact us by email – [email protected]. The content will be deleted within 24 hours.