
4 Types of SQL JOIN Every Data Scientist Should Know: Visual Representation | by Zoumana Keita | Aug, 2022
Complete guide to creating tables, and running all four types of SQL JOINS.
Relational databases try to model real-life entities and their relationships. However, as a data practitioner, you will be dealing with more than one table when interacting with those databases. Efficient interaction with those tables requires a better understanding of the joint statements because each one gives a different result.
This article will first build your understanding of each JOIN clause before walking you through hands-on practice. Before that, we will be creating from scratch the relevant tables.
To better understand the process, we will need the following two tables created. This section aims to create those tables and populate them with some sample data.
Create Tables
Creating a table is straightforward, and both tables are created as follows in our database. This section is not mandatory to understanding the rest of the article.
→ Student Table
- Each row
StudentTablewill represent a single student’s information.
→ Teaching Assistant Table
Each row of theTeachingAssistantTablewill represent a single teacher’s information.
Populate Tables
Now that our tables are created, we can finally populate them with new data using the INSERT INTO [table name] VALUES statement.
→ Student Table
→ Teaching Assistant Table
Below are the final representations of the two tables.

If you have been on the SQL journey, you might have already heard of Joins, but why do we use them? TheJOINstatement is an important clause in relational databases such as Oracle, Microsoft SQL, MySQL, PostgreSQL, just to name a few. It is used to create a single table that is the combination of two or more tables, based on some logical relationships between those tables.
Now that you know what it is used for, let’s explore the [X] types of JOIN.
1. Inner Join
Let’s start with this simple example. We want to know which Students are also Teachers. In other words, where are the matching rows in both Student and Teacher tables, meaning their intersections. We can observe that both of our tables contain Ibrahim, Mamadou, and Fatim.
Here is whereINNER JOIN comes in handy. It only looks at the intersections between two tables based on the column specified in theONclause. For instance, the following instruction gets all the intersected rows based on the Email column.
SELECT *
FROM StudentTable st
JOIN TeachingAssistantTable tat ON st.Email = tat.Email;
SELECT* means “get all the columns” from all the tables.FROM StudentTable stcreates st as an alias of the StudentTable, meaning that whenever we want to use TeacherTable, can usestinstead. The same applies toTeachingAssistantTable tatJOIN TeachingAssistantTable tat ON st.Email = tat.Emailmeans only get the rows having the same Email from both tables.
This is the graphical result we get from the previous SQL command.

The join does not only apply to key columns as we can see for Email but any column the user decides to use in the ONclause. For instance, it could be:ON st.Student = tat.Teacher which would generate the table where student name equals teacher’s name.
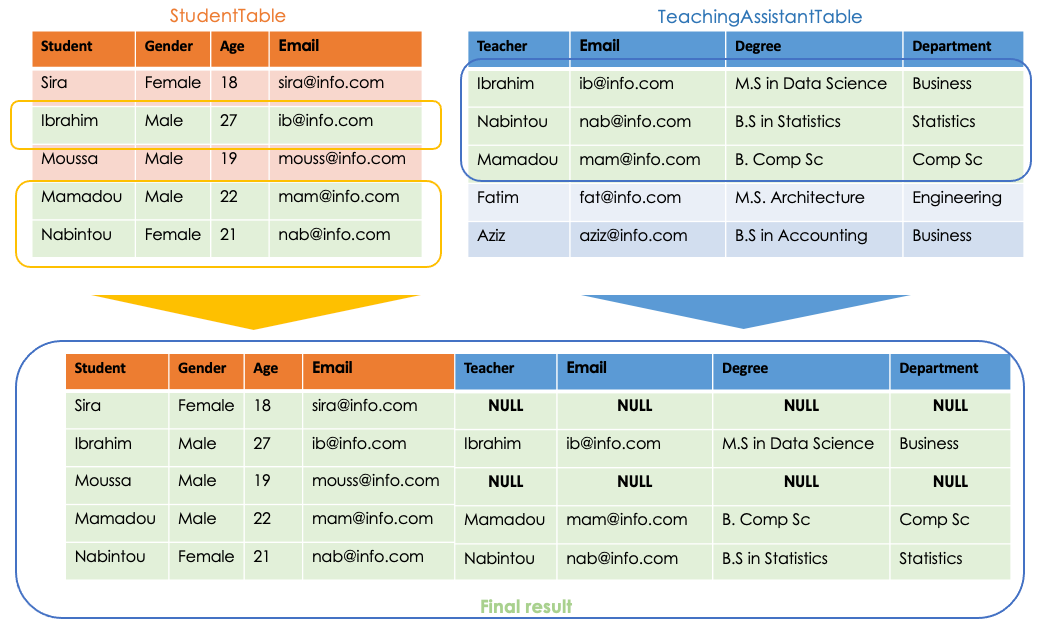
2. Left Outer Join / Left Join
This type of join deals with joining two types of table: the primary table and the secondary table. The primary table is the one on the LEFT of the equality sign. It works like this:
- Identify the column specified in the ON clause.
- Take all the rows from the primary table, without any distinction.
- All the rows in the secondary table that do not match the primary table based on the column in the ON clause are discarded (replaced with NULL).
SELECT *
FROM StudentTable st LEFT JOIN TeachingAssistantTable tat
ON st.Email = tat.Email;
This is the graphical result we get from the LEFT JOIN.
3. Right Outer Join / Right Join
This join is very similar to the previous one. The only difference is that it considers the table on the right to be the primary table, and the one on the left to be the secondary table.
SELECT *
FROM StudentTable st RIGHT JOIN TeachingAssistantTable tat
ON st.Email = tat.Email;
This is the graphical result we get from the RIGHT JOIN.

4. Full outer join
A full outer join is the combination of the left and right joins. In this statement, there is no room for discarding rows from any of the two tables, they are all taken into consideration. It works as follows:
- Perform a right outer join on the original tables and consider the result as temporary table 1.
- Run a left outer join on the original tables and consider the result as temporary table 2.
- Concatenate temporary tables 1 and 2 as the final result.
SELECT *
FROM StudentTable st FULL OUTER JOIN TeachingAssistantTable tat
ON st.Email = tat.Email;

From all the previous final results, we notice that we selected all the columns from all the tables, which creates duplicate values for columns such as Email, Student, and Teacher. However, we can specify in the SELECT clause the columns we want in the final result. For instance, the following instruction returns all the columns in the Student Name, its Email, Gender, Age, and Degree.
SELECT st.Student, st.Gender, st.Email, st.Age, tat.Degree
FROM StudentTable st INNER JOIN TeachingAssistantTable tat
ON st.Email = tat.Email;

This article has covered the four main join cases in SQL. The versatility of SQL can provide you with the skills to assist businesses in analyzing data and taking smart decisions.
If you like reading my stories and wish to support my writing, consider becoming a Medium member to unlock unlimited access to stories on Medium.
Feel free to follow me on Medium, Twitter, or say Hi on LinkedIn. It is always a pleasure to discuss AI, ML, Data Science, NLP, and MLOps stuff!
Complete guide to creating tables, and running all four types of SQL JOINS.
Relational databases try to model real-life entities and their relationships. However, as a data practitioner, you will be dealing with more than one table when interacting with those databases. Efficient interaction with those tables requires a better understanding of the joint statements because each one gives a different result.
This article will first build your understanding of each JOIN clause before walking you through hands-on practice. Before that, we will be creating from scratch the relevant tables.
To better understand the process, we will need the following two tables created. This section aims to create those tables and populate them with some sample data.
Create Tables
Creating a table is straightforward, and both tables are created as follows in our database. This section is not mandatory to understanding the rest of the article.
→ Student Table
- Each row
StudentTablewill represent a single student’s information.
→ Teaching Assistant Table
Each row of theTeachingAssistantTablewill represent a single teacher’s information.
Populate Tables
Now that our tables are created, we can finally populate them with new data using the INSERT INTO [table name] VALUES statement.
→ Student Table
→ Teaching Assistant Table
Below are the final representations of the two tables.
If you have been on the SQL journey, you might have already heard of Joins, but why do we use them? TheJOINstatement is an important clause in relational databases such as Oracle, Microsoft SQL, MySQL, PostgreSQL, just to name a few. It is used to create a single table that is the combination of two or more tables, based on some logical relationships between those tables.
Now that you know what it is used for, let’s explore the [X] types of JOIN.
1. Inner Join
Let’s start with this simple example. We want to know which Students are also Teachers. In other words, where are the matching rows in both Student and Teacher tables, meaning their intersections. We can observe that both of our tables contain Ibrahim, Mamadou, and Fatim.
Here is whereINNER JOIN comes in handy. It only looks at the intersections between two tables based on the column specified in theONclause. For instance, the following instruction gets all the intersected rows based on the Email column.
SELECT *
FROM StudentTable st
JOIN TeachingAssistantTable tat ON st.Email = tat.Email;
SELECT* means “get all the columns” from all the tables.FROM StudentTable stcreates st as an alias of the StudentTable, meaning that whenever we want to use TeacherTable, can usestinstead. The same applies toTeachingAssistantTable tatJOIN TeachingAssistantTable tat ON st.Email = tat.Emailmeans only get the rows having the same Email from both tables.
This is the graphical result we get from the previous SQL command.
The join does not only apply to key columns as we can see for Email but any column the user decides to use in the ONclause. For instance, it could be:ON st.Student = tat.Teacher which would generate the table where student name equals teacher’s name.
2. Left Outer Join / Left Join
This type of join deals with joining two types of table: the primary table and the secondary table. The primary table is the one on the LEFT of the equality sign. It works like this:
- Identify the column specified in the ON clause.
- Take all the rows from the primary table, without any distinction.
- All the rows in the secondary table that do not match the primary table based on the column in the ON clause are discarded (replaced with NULL).
SELECT *
FROM StudentTable st LEFT JOIN TeachingAssistantTable tat
ON st.Email = tat.Email;
This is the graphical result we get from the LEFT JOIN.
3. Right Outer Join / Right Join
This join is very similar to the previous one. The only difference is that it considers the table on the right to be the primary table, and the one on the left to be the secondary table.
SELECT *
FROM StudentTable st RIGHT JOIN TeachingAssistantTable tat
ON st.Email = tat.Email;
This is the graphical result we get from the RIGHT JOIN.
4. Full outer join
A full outer join is the combination of the left and right joins. In this statement, there is no room for discarding rows from any of the two tables, they are all taken into consideration. It works as follows:
- Perform a right outer join on the original tables and consider the result as temporary table 1.
- Run a left outer join on the original tables and consider the result as temporary table 2.
- Concatenate temporary tables 1 and 2 as the final result.
SELECT *
FROM StudentTable st FULL OUTER JOIN TeachingAssistantTable tat
ON st.Email = tat.Email;
From all the previous final results, we notice that we selected all the columns from all the tables, which creates duplicate values for columns such as Email, Student, and Teacher. However, we can specify in the SELECT clause the columns we want in the final result. For instance, the following instruction returns all the columns in the Student Name, its Email, Gender, Age, and Degree.
SELECT st.Student, st.Gender, st.Email, st.Age, tat.Degree
FROM StudentTable st INNER JOIN TeachingAssistantTable tat
ON st.Email = tat.Email;
This article has covered the four main join cases in SQL. The versatility of SQL can provide you with the skills to assist businesses in analyzing data and taking smart decisions.
If you like reading my stories and wish to support my writing, consider becoming a Medium member to unlock unlimited access to stories on Medium.
Feel free to follow me on Medium, Twitter, or say Hi on LinkedIn. It is always a pleasure to discuss AI, ML, Data Science, NLP, and MLOps stuff!
Denial of responsibility! Techno Blender is an automatic aggregator of the all world’s media. In each content, the hyperlink to the primary source is specified. All trademarks belong to their rightful owners, all materials to their authors. If you are the owner of the content and do not want us to publish your materials, please contact us by email – [email protected]. The content will be deleted within 24 hours.