
Azure Container App, a Data Analytics WebApp with Python Flask, Plotly Dash & Docker
Building an Azure Container App : A Data Analytics App with Python Flask, Plotly Dash, and Docker
Deploying scalable data analytics web applications: harnessing Flask, Dash, and Azure container apps for enhanced flexibility
When it comes to developing data analytics web applications in Python, frameworks such as Plotly’s Dash and Streamlit are among the most popular today. But how do we deploy these frameworks for real applications, going beyond tutorials, while keeping scalability, efficiency, and cost in mind, and leveraging the latest cloud computing solutions?
In this article, we’ll cover the deployment of containerized applications using a Flask back-end with a Plotly Dash front-end, containerized with Docker, and deployed to Microsoft Azure’s Container App services. Instead of purely relying on the out-of-the-box Dash solution, we’ll deploy a custom Flask server. This approach adds flexibility to the application, enabling the use of Dash alongside other frameworks and overcoming some of the limitations of open-source Dash compared to Dash Enterprise.
Code sample for this tutorial is available on Github.
Microsoft Azure Container App Service
Azure Container Apps provide cost-effective, scalable, and fully managed app services utilizing a Kubernetes-based platform. A containerized application image, such as one created with Docker, can easily be deployed with a minimal amount of management required to run the application on the cloud. Most of the heavy lifting is managed by Azure, offering scalability at a manageable cost.
The scalable cost option is ideal for intranet-based applications where most of the consumption occurs internally, with users interacting with the application in a manner similar to how they would with PowerBI or Tableau services. However, unlike PowerBI or Tableau, hosting a data web application offers the advantage of not requiring user license costs, along with the flexibility to overcome limitations of these dashboarding tools. When combined with the ease of development in Python, powered by frameworks such as Plotly Dash, it presents a strong alternative to other dashboarding solutions.
Plotly Dash
Plotly is a popular data visualization framework, available in multiple programming languages such as Python, R, JavaScript, and Matlab. Dash, developed by Plotly, is a framework for building highly interactive data applications. It employs a Python Flask server and utilizes React for building interactive web applications, enabling users to develop data applications entirely in Python. Additionally, it offers the flexibility to integrate custom HTML/CSS/JavaScript elements as needed.
Although alternatives like Streamlit exist for building data analytics applications in Python, this article will specifically cover Dash due to its use of Python Flask for backend services. Dash’s utilization of Flask provides significant flexibility, allowing for various applications to coexist on the same website. For example, certain sections of an app could be built using pure HTML/CSS/JavaScript or React, while others might incorporate embedded PowerBI reports.
Dash is available in two flavors: open source and enterprise. We will focus on the open-source version, addressing its limitations such as security management, which can be enhanced through the use of a custom Flask server.
Flask
Python’s Flask library is a lightweight yet powerful web framework. Its lightweight design is particularly suited for data analytics professionals who may not have extensive web development experience and prefer to start with a minimalistic framework.
Flask also powers the backend server for Dash. When developers create a Dash application, a Flask server is automatically initiated. However, in this article, we’ll explore deploying a custom Flask server. This approach maximizes the flexibility of Flask, extending beyond the use of Dash in our application. It enables the entire web application to utilize other frameworks in addition to Dash and facilitates the construction of authentication pipelines. Such features are not included in the open-source version of Dash without this customization but are available in the Enterprise version.
Local App Development
Local Development Prerequisites
There are a few prerequisites for setting up the local development environment. While not all of them are strictly required, it is highly recommended to follow the guidelines provided below. It’s important to note that this tutorial was created using a Windows 11 machine. Some modifications may be necessary for other operating systems.
- Download Python. This tutorial uses Python 3.10.11. Its highly recommended to add Python to PATH during or after installation.
- Download Azure CLI. This will be used to connect to Azure locally via terminal.
- Download Docker.
- Download VS Code.
- VS Code Azure Extension.
- VS Code Azure Container Apps Extension.
- VS Code Docker Extension.
App Structure
Below is the outline of the demo app’s structure, designed to host multiple applications within the web application, all powered by a Flask server.
AZURE_DATA_ANALYTICS_WEBAPP/
|---|main.py
|---|figures.py
|---|assets/
|---|static/
|------|css/
|------|js/
|------|img/
|---|templates/
|------|home.html
|---|requirements.txt
|---|Dockerfile
|---|.dockerignore
|---|.gitignore
|---|.env
|---|.venv
|---|README.md
Python Local Environment Setup
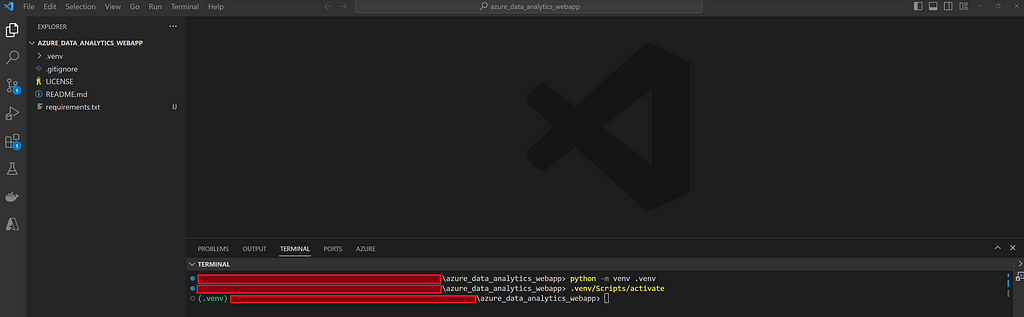
We’ll begin by creating a Python virtual environment named .venv in the VS Code terminal using the commands provided below. Be sure to include .venv in both the .gitignore and .dockerignore files, as these should not be uploaded or deployed.
python -m venv .venv
.venv/Scripts/activate
pip install --upgrade pip
pip install -r requirements.txt
The requirements for the project are listed in the requirements.txt file as follows:
# requirements.txt

# Web App Framework Requiremed Files:
Flask==3.0.2
plotly==5.19.0
dash==2.15.0
gunicorn==21.2.0

# Azure required files:
azure-identity==1.15.0
azure-keyvault-secrets==4.7.0

# Other Utilities:
python-dotenv==1.0.1
numpy==1.26.4
pandas==2.2.0
Flask Server
The main entry point to the application will be main.py, where we will initialize and run the application. In this file, we will define the Flask server, which will serve as the backend server for the entire application.
At this stage, we don’t have any Dash apps integrated; there’s just a single route defined at the index page of our application that renders the home.html file. A route is a URL pattern that handles and executes HTTP requests matching that pattern. In our case, we have a home route. Upon accessing the main directory of the web application ("/"), the home.html file will be rendered.
# main.py

from flask import Flask, render_template

# Initialize Flask server:
# Let Flask know where the templates folder is located
# via template_folder parameter
server = Flask(__name__, template_folder = "templates")

# Define Routes:
@server.route("/")
def home():
    """
        Index URL to render home.html
    """
    return render_template("home.html")

# Run the App:
if __name__ == "__main__":
    server.run(host = "0.0.0.0", port = 5000, debug = True)
    # Set debug to False during production
<!-- templates/home.html file -->

<!DOCTYPE html>
<html>
<head>
    <title>Azure Data Analytics Web Application</title>
</head>
<body>
    <h1>Azure Container App Data Analytics Application
     with Python Flask, Plotly Dash & Docker
    </h1>
</body>
</html>
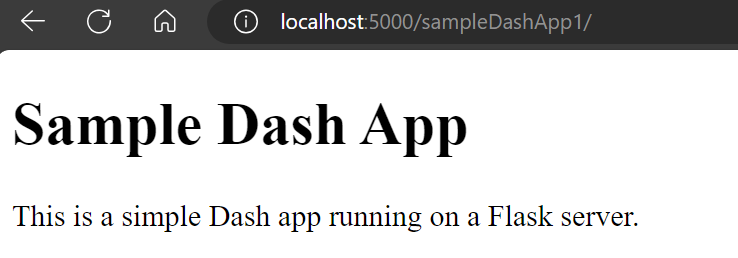
Note that Flask expects HTML templates to be stored under the templatesfolder. Flask utilizes Jinja to parametrize the HTML templates.
We are now ready to run our application locally for the first time. Please note that the debug mode is currently set to true, as shown above. Remember to set this to false for production deployment. To run the app locally, execute the command provided below and then visit http://localhost:5000/ in your browser.
python main.py

We should note that when running locally, as in the above example, the application does not use HTTPS. However, Azure Container App significantly simplifies development work by handling most of the heavy lifting related to SSL/TLS termination.
It’s also important to mention that the local execution of the application utilizes the default Flask HTTP server. For production deployment, however, we bind the application to a Gunicorn server while creating the Docker image. Gunicorn, a Python WSGI HTTP server for Unix, is better suited for production environments. The installation of Gunicorn is included in the requirements.txt file.
Dash App
Now, we will modify the main.py file to add an instance of a Dash app. In this step, we initialize the Dash app by providing the Flask server, specifying the base URL pathname for routing to the app, and indicating which assets folder to use. The assets folder can store images and custom style CSS files for the Dash app.
# main.py
from flask import Flask, render_template
from dash import Dash, html
# Initialize Flask server:
server = Flask(__name__, template_folder = "templates")
# Define Routes:
@server.route("/")
def home():
"""
Redirecting to home page.
"""
return render_template("home.html")
# Dash Apps:
app1 = Dash(__name__, server = server,
url_base_pathname = "/sampleDashApp1/",
assets_folder = "assets")
app1.layout = html.Div([
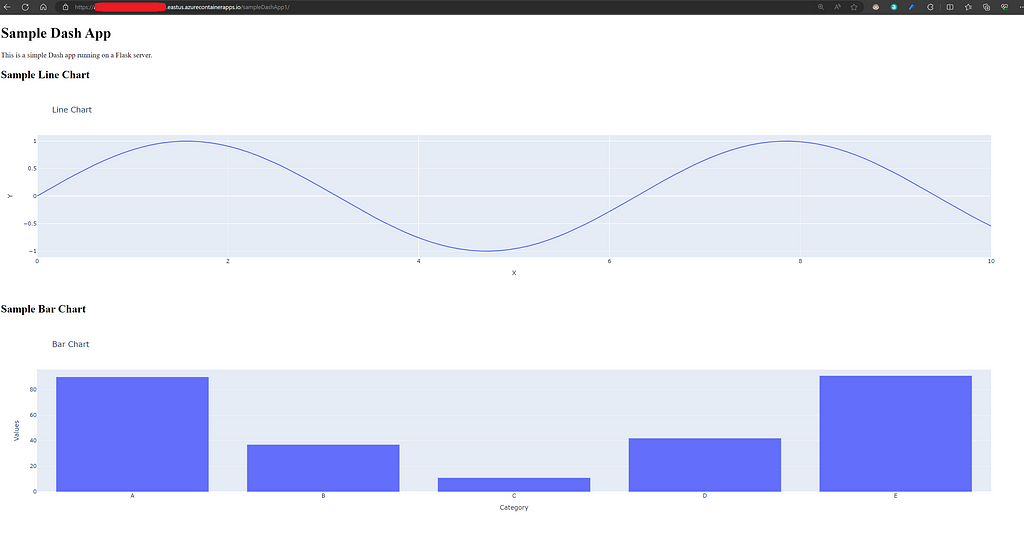
html.H1("Sample Dash App"),
html.P("This is a simple Dash app running on a Flask server.")
])
# Run the App:
if __name__ == "__main__":
server.run(host = "0.0.0.0", port = 5000, debug = True)
# Set debug to False during production
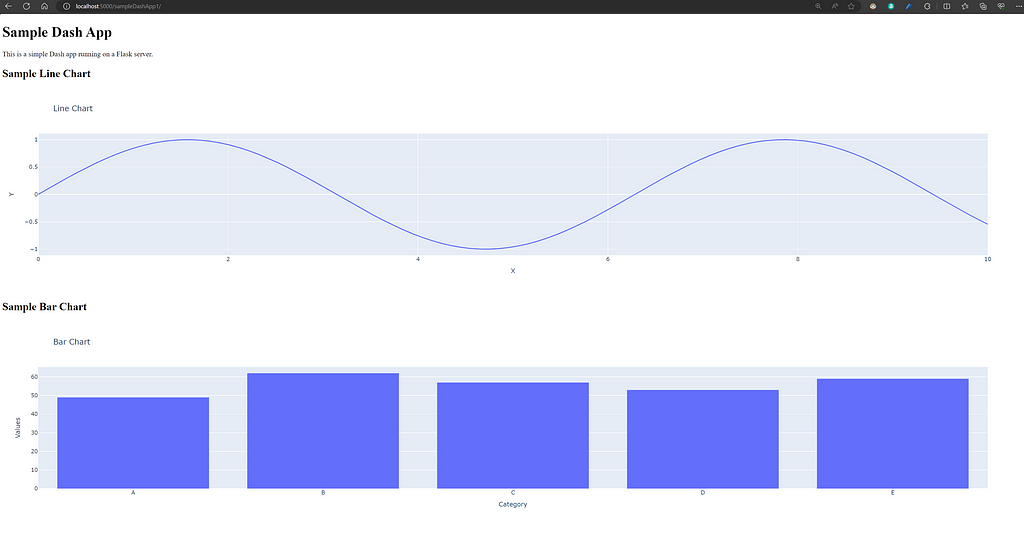
Dash supports most HTML tags, which can be specified directly in Python, as illustrated in the example above. So far, we’ve added H1 header and P paragraph tags. Furthermore, Dash allows the addition of other elements, such as Dash Core Components. This feature enables us to incorporate widgets as well as plots from the Plotly library.
Adding Plotly Figures
We will define some sample Plotly charts in the figures.py file and subsequently incorporate them into the Dash app.
# figures.py

import plotly.express as px
import pandas as pd
import numpy as np

def line_chart():
    """
        Sample Plotly Line Chart
    """
    df = pd.DataFrame({
        "X": np.linspace(0, 10, 100),
        "Y": np.sin(np.linspace(0, 10, 100))
    })

    fig = px.line(df, x = "X", y = "Y", title = "Line Chart")

    return fig

def bar_chart():
    """
        Sample Plotly Bar Chart
    """

    df = pd.DataFrame({
        "Category": ["A", "B", "C", "D", "E"],
        "Values": np.random.randint(10, 100, size = 5)
    })

    fig = px.bar(df, x = "Category", y = "Values", title = "Bar Chart")

    return fig
If we modify the main.py file to import bar_chart and line_chart from the figures.py file, we can then add these plots as graph elements to our Dash app, as shown below.
# main.py file

# ...Rest of the code

from figures import line_chart, bar_chart

# Dash Apps:
app1 = Dash(__name__, server = server,
  url_base_pathname = "/sampleDashApp1/",
  assets_folder = "assets")

app1.layout = html.Div([
    html.H1("Sample Dash App"),
    html.P("This is a simple Dash app running on a Flask server."),
    html.H2("Sample Line Chart"),
    dcc.Graph(figure=line_chart()),
    html.H2("Sample Bar Chart"),
    dcc.Graph(figure=bar_chart())
])

# ... Rest of the code
Building and Running Docker Image Locally
We have now established a skeleton code for our application and are ready to build our Docker image. First, we need to enable virtualization from the motherboard’s BIOS settings, which is essential for creating virtual machines that Docker relies on. Secondly, the Docker software and the VS Code Docker Extension need to be installed.
Once the above steps are completed, we create a Dockerfile in our main directory and enter the following:
# Dockerfile

# Set Python image to use:
FROM python:3.11-slim-bullseye

# Keeps Python from generating .pyc files in the container:
ENV PYTHONDONTWRITEBYTECODE=1
# Turns off buffering for easier container logging:
ENV PYTHONUNBUFFERED=1

# Install requirements:
RUN python -m pip install --upgrade pip
COPY requirements.txt .
RUN python -m pip install -r requirements.txt

# Set Working directory and copy files:
WORKDIR /app
COPY . /app

# Creates a non-root user with an explicit UID
# and adds permission to access the /app folder:
RUN adduser -u 5678 --disabled-password --gecos "" appuser && chown -R appuser /app
USER appuser

# Expose port 5000:
EXPOSE 5000

# Bind to use Gunicorn server
# and specify main entry point main.py/server object:
CMD ["gunicorn", "--bind", "0.0.0.0:5000", "main:server"]
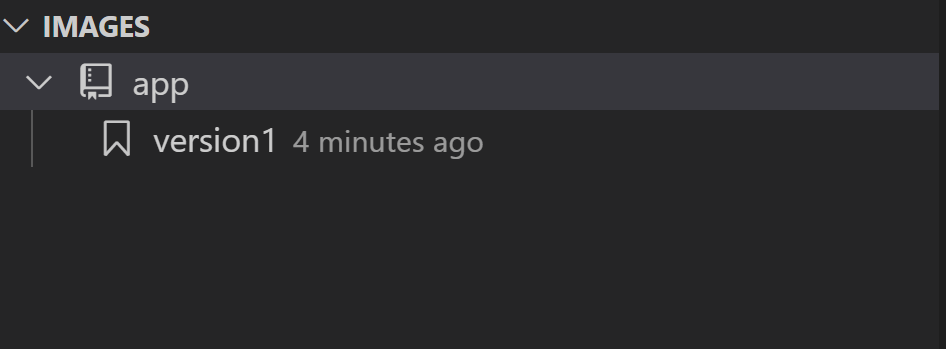
To build the Docker image, we execute the following command in the terminal:
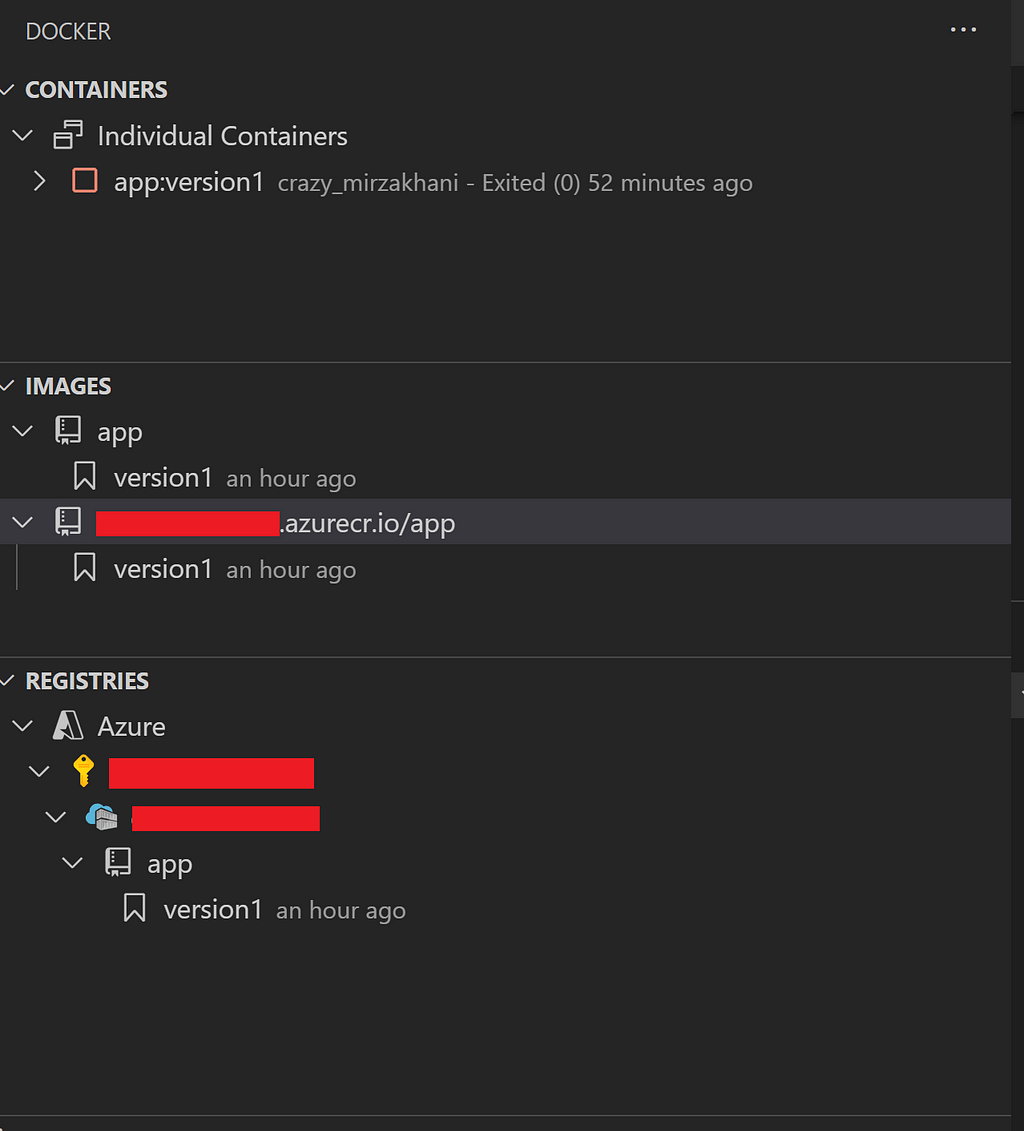
docker build --no-cache -t app:version1 .
With this step completed, we should see a Docker image created, visible in the VS Code Docker extension. In this instance, we have specified the name of the app as ‘app’ and the version of the image as ‘version1’.
Now we are ready to run the app locally. To create and start a local Docker container, we execute the following command in the terminal:
docker run --env-file ./.env -p 5000:5000 app:version1
This will start the Docker container locally, allowing us to navigate to the app in the browser at http://localhost:5000/. In the Docker run command mentioned above, we instruct Docker to use the .env file located in the main directory as the environmental variables file. This file is where we store app configuration variables and any secrets. It's crucial to note that the .env file must be included in both .gitignore and .dockerignore files, as we do not want sensitive information to be uploaded to Git or included in the Docker container. On Azure Container Apps, these parameters can be provided separately as environmental variables.
For our basic Azure deployment case, there is no need to provide any environmental variables at this stage.

Below is the content of the .dockerignore file:
**/__pycache__

**/.vscode
**/.venv
**/.env
**/.git
**/.gitignore

LICENSE
README.md
Azure Setup & Deployment
Now that we have a working application locally and have successfully created a Docker image, we are ready to set up Azure and deploy the Container App.
To proceed with the steps outlined below, it is necessary to have the Azure CLI (a terminal application for communicating with Azure) installed, along with the VS Code Azure Container Apps extension.
Setup Azure Subscription

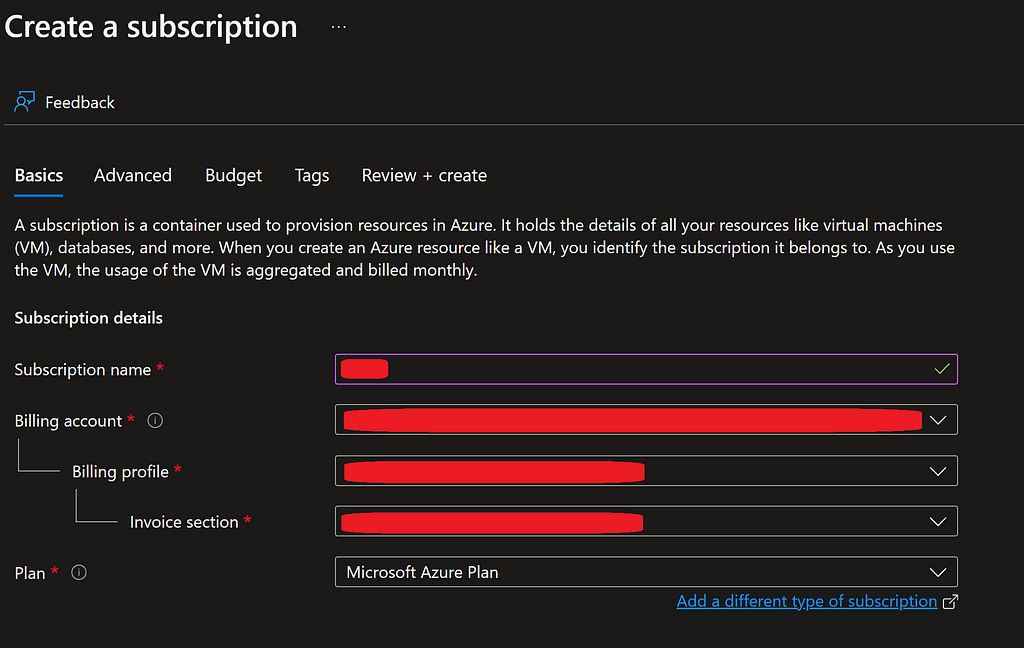
Once we have created an Azure account, the first step is to create a Subscription. A Subscription on Azure contains a collection of Azure resources linked to a billing account. For first-time Azure users or students, there are credits available ranging from $100 to $200. In this tutorial, however, we will focus on setting up a paid account.
After signing up and logging into Azure, we navigate to ‘Subscriptions’, which will be tied to our billing account. Here, we need to provide a name for the subscription and proceed with its creation.
Note: Special care should be taken to monitor billing, especially during the learning period. It’s advisable to set budgets and alerts to manage costs effectively.
Setup Azure Resource Group
Azure manages a collection of cloud resources under what is known as an Azure Resource Group. We’ll need to create one of these groups to facilitate the creation of the necessary cloud resources.
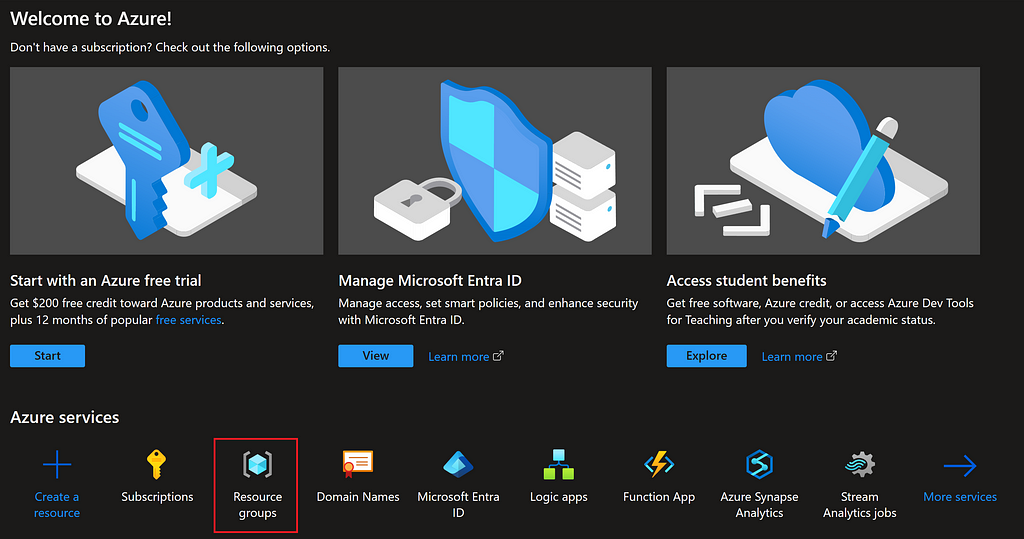
From the main Azure page, we can navigate to ‘Resource Groups’ to create a new one.
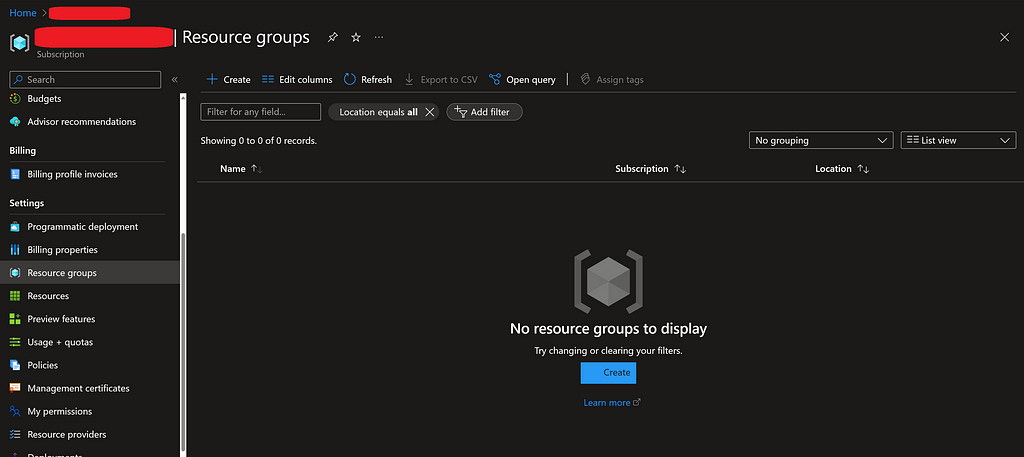
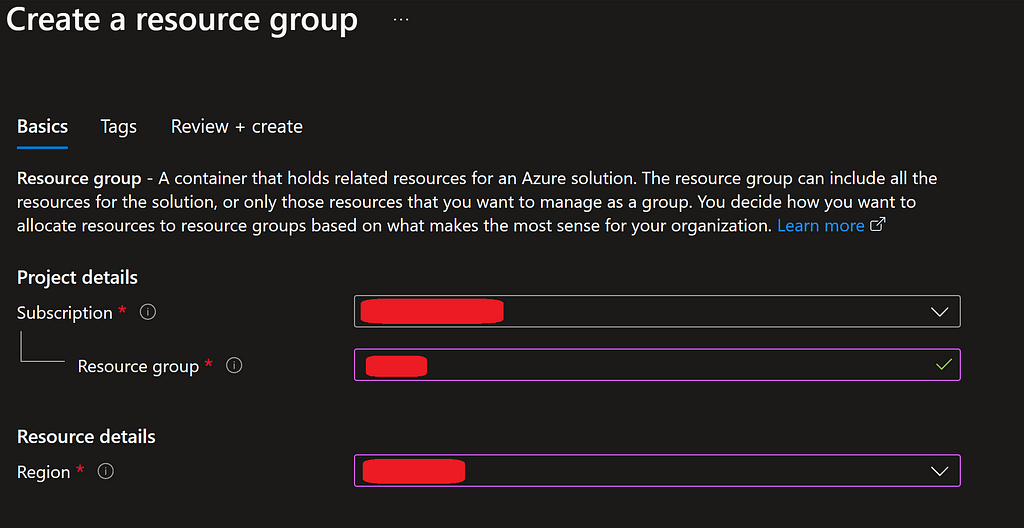
This Resource Group will be associated with the Subscription we created in the previous step. We will need to provide a name for the Resource Group and select a region. The region should be chosen based on the closest geographical area to where the application will be primarily used.
Setup Azure Container Registry
Azure offers a container registry service known as Azure Container Registry, which allows us to host our Docker container images. This container registry serves as a repository for images, enabling version control over the container images. It also facilitates their deployment across various cloud container services, not limited to Azure Container Apps alone. With this service, different versions of the app image can be stored and deployed as needed.
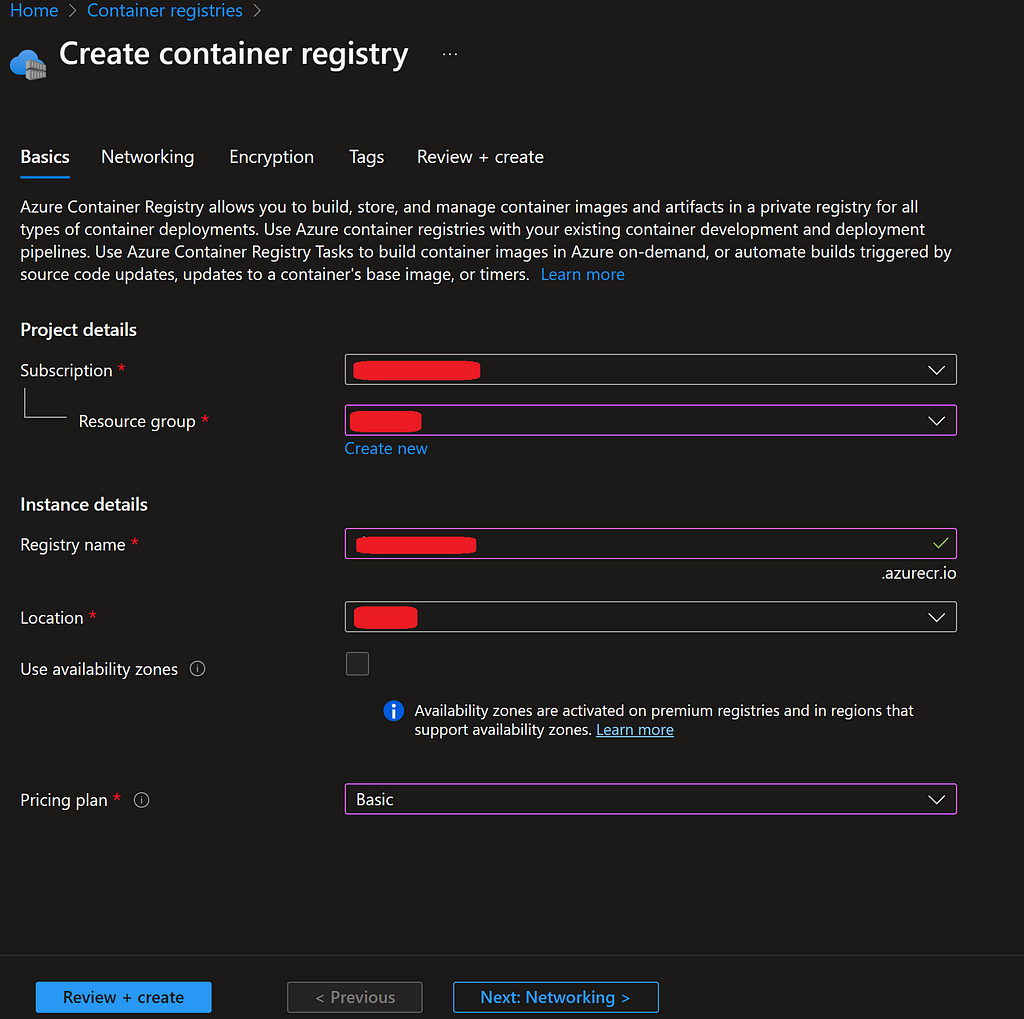
From the search bar in the Azure portal, we type ‘Container Registries’ and click the create button. This resource will be hosted under the Resource Group we created in the previous step. We should choose the same region as before and select the Basic plan option for the lowest cost.
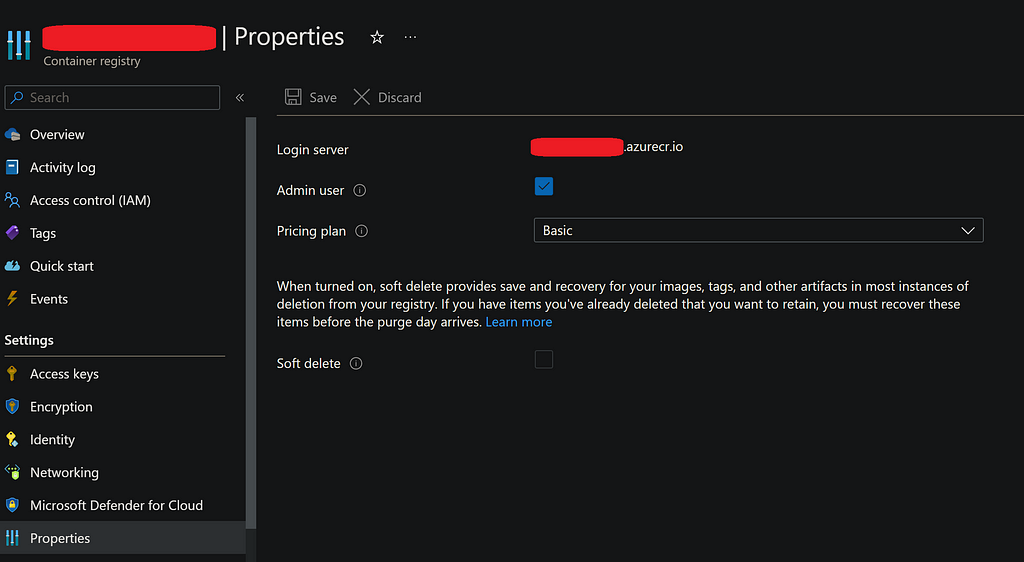
There is one important setting that needs to be enabled on the Container Registry to allow us to deploy images to Azure Container App within the Azure portal. Go to the Properties of the Container Registry, enable the ‘Admin user’, and then save the changes.
Deploy Docker Image to Azure Container Registry
Now that we have our local Docker image ready and the Azure Container Registry setup complete, we are prepared to upload the container image to Azure.
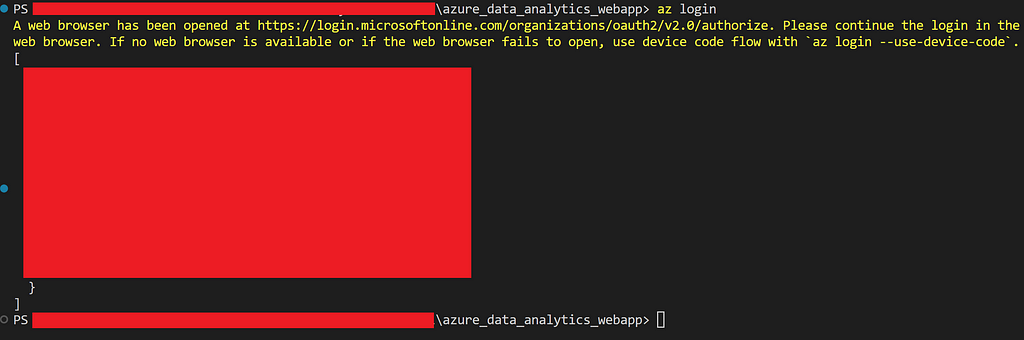
In the VS Code terminal, we log in to Azure using the Azure CLI (which must be installed):
az login
This action will open a pop-up window in your browser, prompting you to sign in to Azure. Once completed, we are now authenticated with Azure.
The next step is to log in to the Container Registry using the terminal and Azure CLI. This can be done by executing the following command:
az acr login --name <azureContainerRegistryName>

Once we have successfully logged in to the Container Registry, our next steps are to first tag the image and then push it to the Azure Container App.
Note that ‘app:version1’ represents the name and version of our app, which we assigned when creating the Docker image in the previous steps.
docker tag app:version1 <azureContainerRegistryName>.azurecr.io/app:version1
docker push <azureContainerRegistryName>.azurecr.io/app:version1
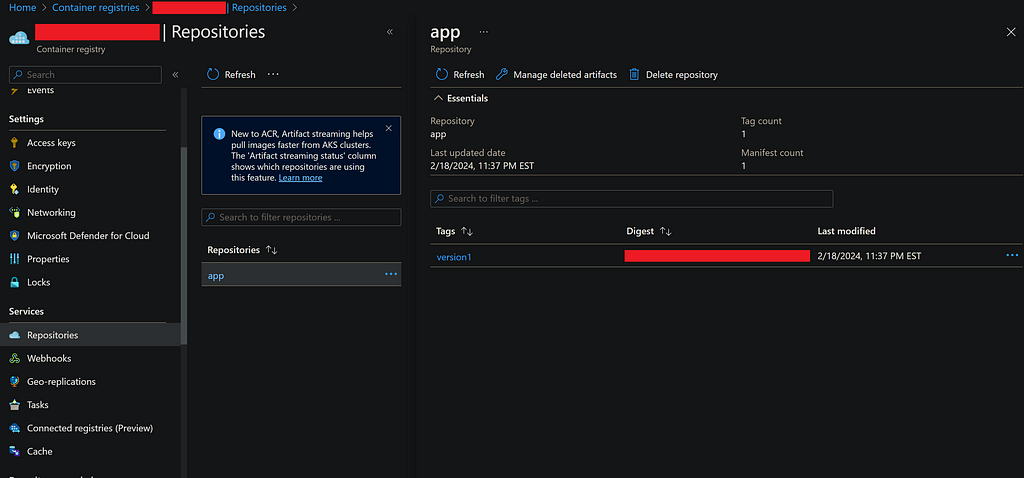
With this step completed, we should be able to view the image under the ‘Repositories’ section of the Container Registry, as described above.
It’s important to note that the above steps could also have been accomplished using the VS Code Docker Extension, as an alternative to utilizing the Azure CLI.
Setup Azure Container Apps Environment & Container App
The Azure Container Apps Environment is a resource that can manage a collection of container apps. While we cannot create a Container Apps Environment directly, it can be set up when we create an initial Container App.
To do this, we search for ‘Container Apps’ in the Azure search bar and click ‘Create’. The first step here is to create a Container Apps Environment, as highlighted in the red square box in the image below.
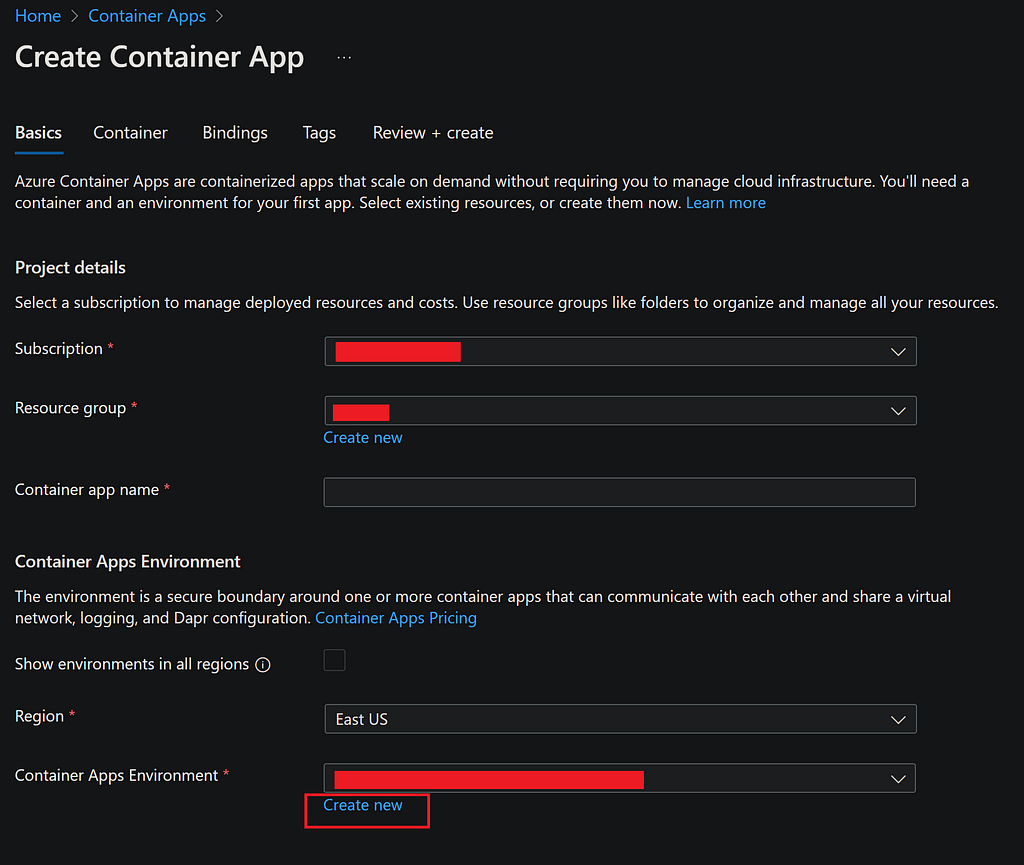
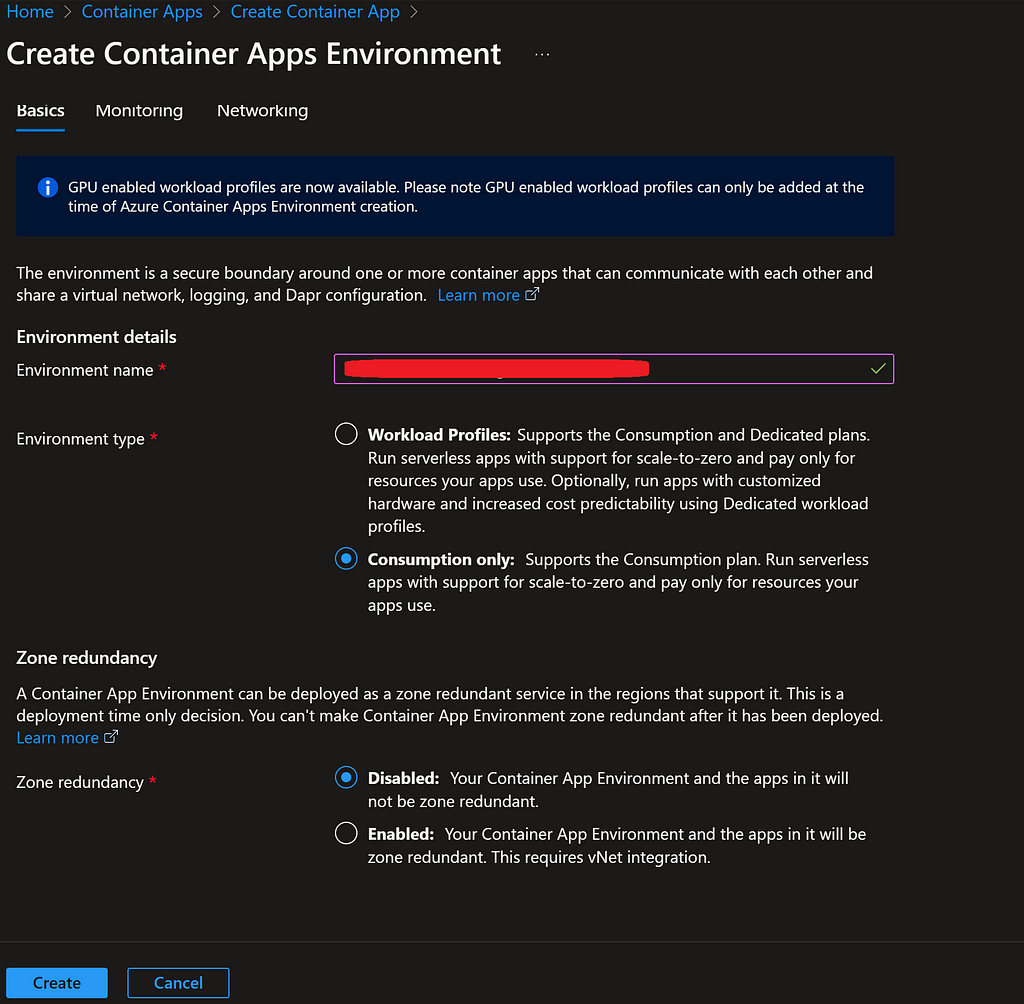
We select the consumption plan to pay only for what we use and for providing a simplified setup process.
After creating the Container Apps Environment, we return to the setup page for the Container App to continue building the app. Within the Container setup page, we select Azure Container Registry and locate the image we have previously uploaded.
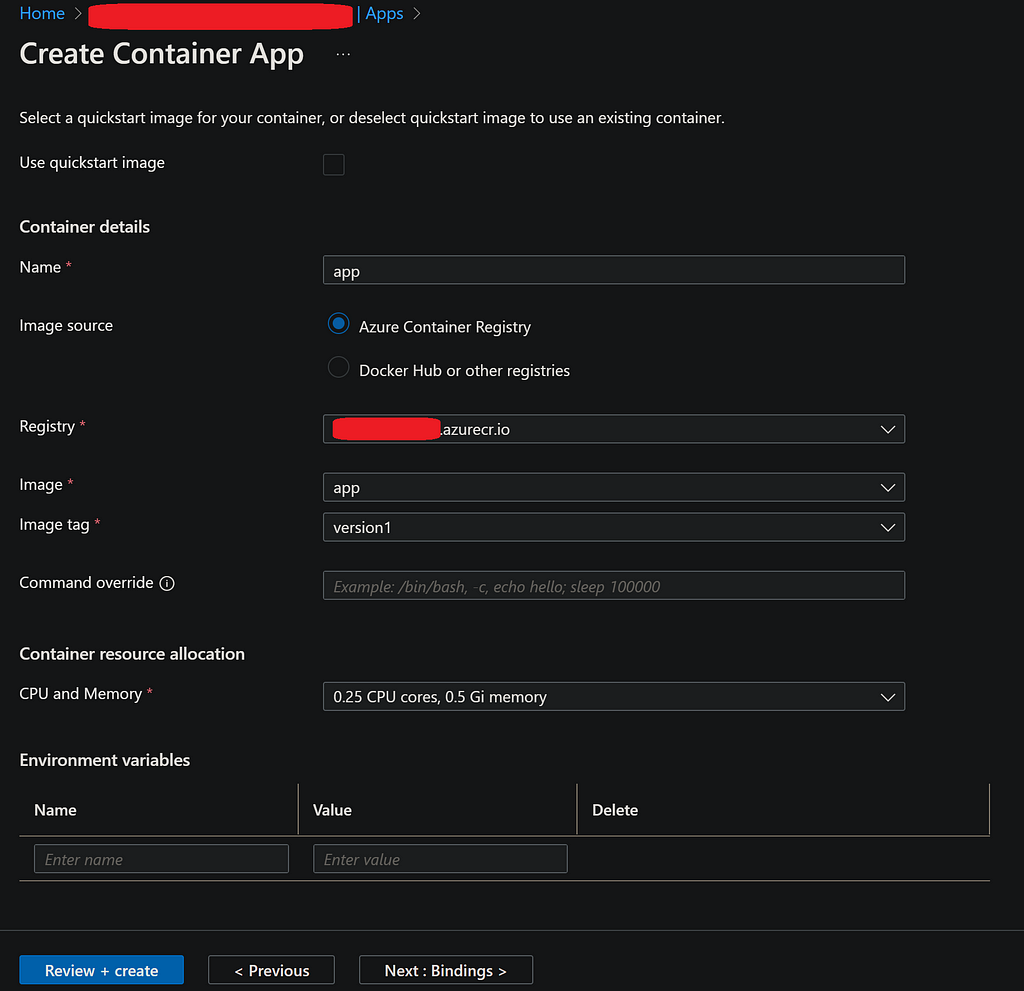
For CPU and memory, we opt for the lowest amount as this is a demo app. If there are any environmental variables specified in the .env file for our local environment, we must enter them in this section. Alternatively, these environmental variables can be directed to Azure KeyVault.
We can skip the Bindings section for this tutorial and proceed to Ingress. In this section, we define how Azure Container App handles traffic. We enable Ingress and set traffic to be accepted from anywhere if the application is to be accessible on the web. For internal applications, the company’s VNet should be used.
Additionally, we set the port of the application to be 5000, which is the same as the Flask server’s port set during code development.
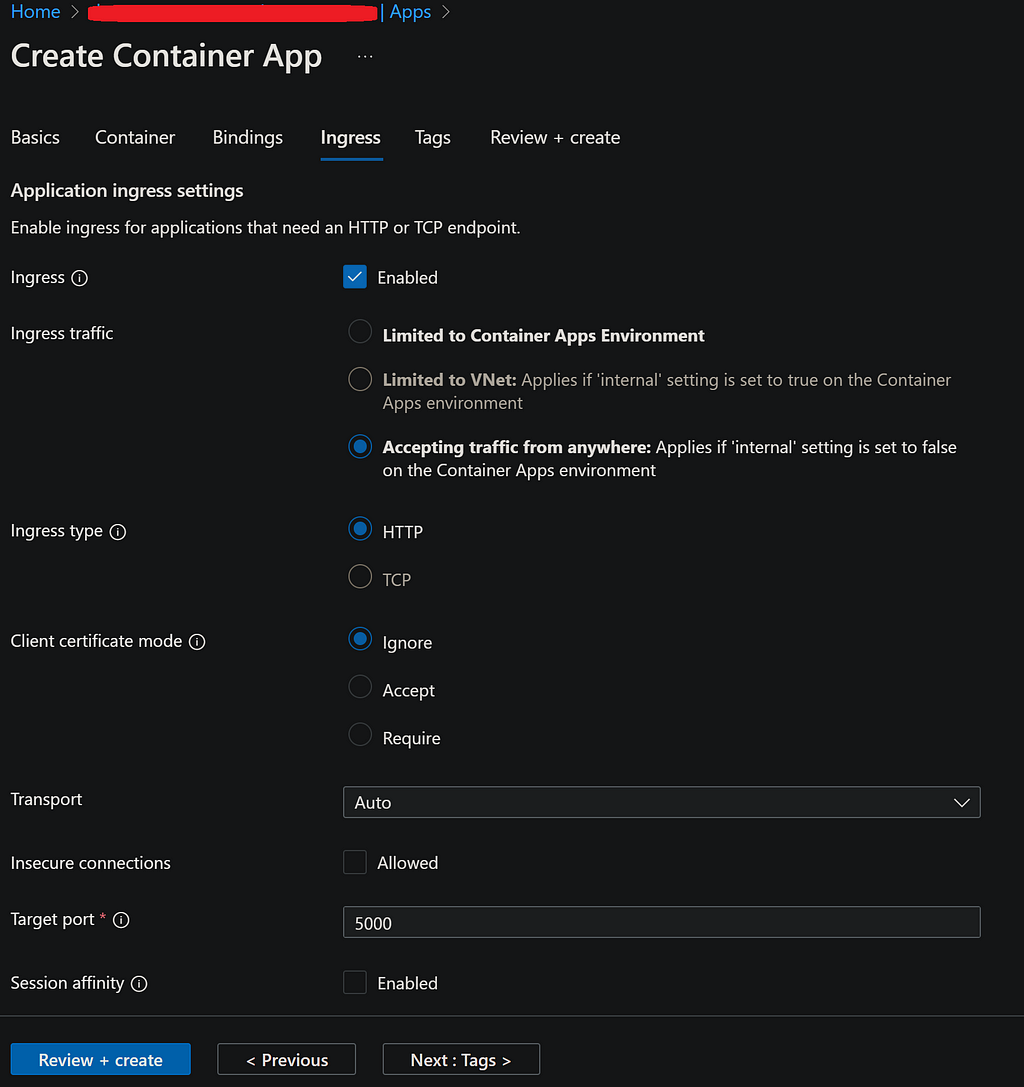
After configuring all of these settings, we are ready to create our application! Click on ‘Review + create’.
Once the setup is complete, navigate to the Container App page to find the URL of the application.
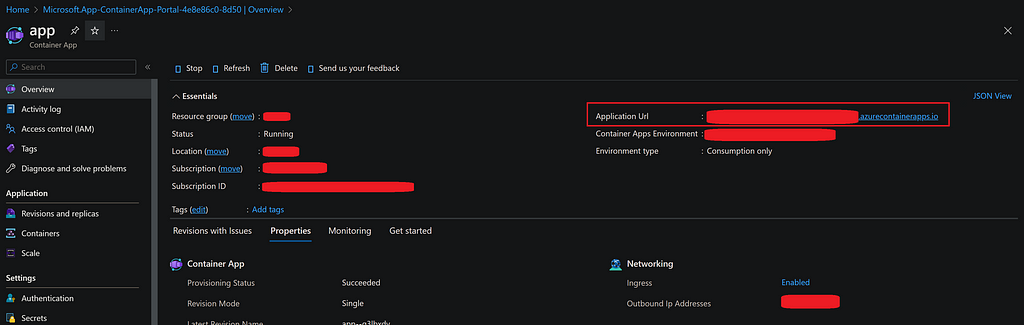
And that’s it! Our application is now up and running on Azure!
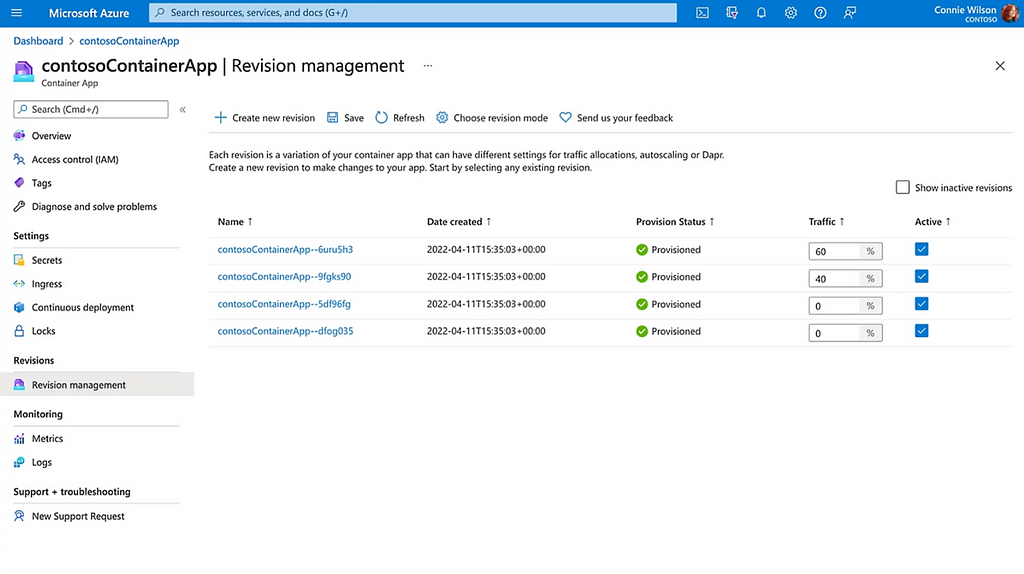
Manage Revisions
Now that we have deployed the first version of our application, we’ll cover managing revisions.
Once we have made changes to the code base and ready with a revision, we run Docker deploy as before with a new version name.
docker build --no-cache -t app:version2 .
And upload to Azure Container Registry:
az acr login --name <azureContainerRegistryName>
docker tag app:version2 <azureContainerRegistryName>.azurecr.io/app:version2
docker push <azureContainerRegistryName>.azurecr.io/app:version2
From here on, we have two options. Either to use terminal and Azure CLI or go to Azure Container App page and manage revisions from there. Here we will cover revision management from Azure.
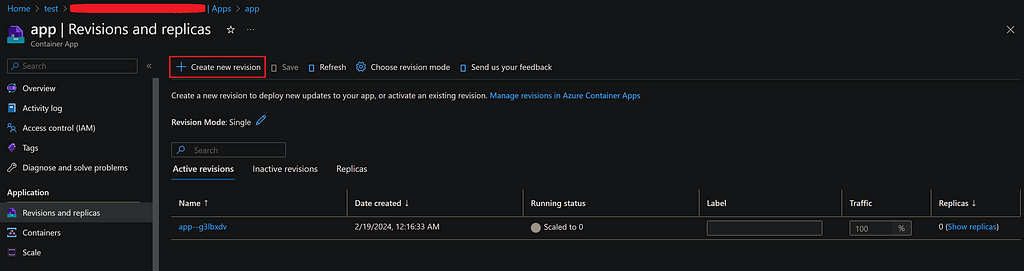
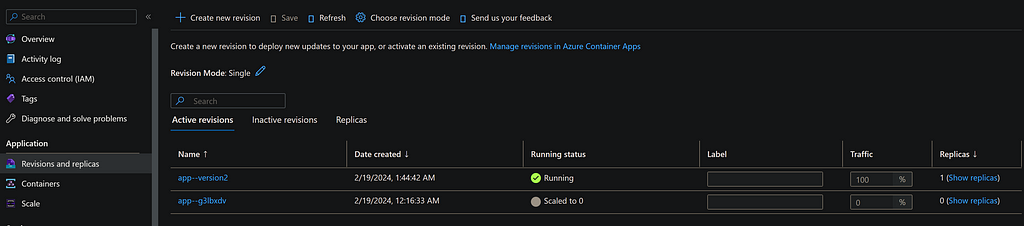
Hit “Create new revision” and provide a suffix to the new revision. Here we’ll name it “version2”. Than click on “app” check-box and select edit.
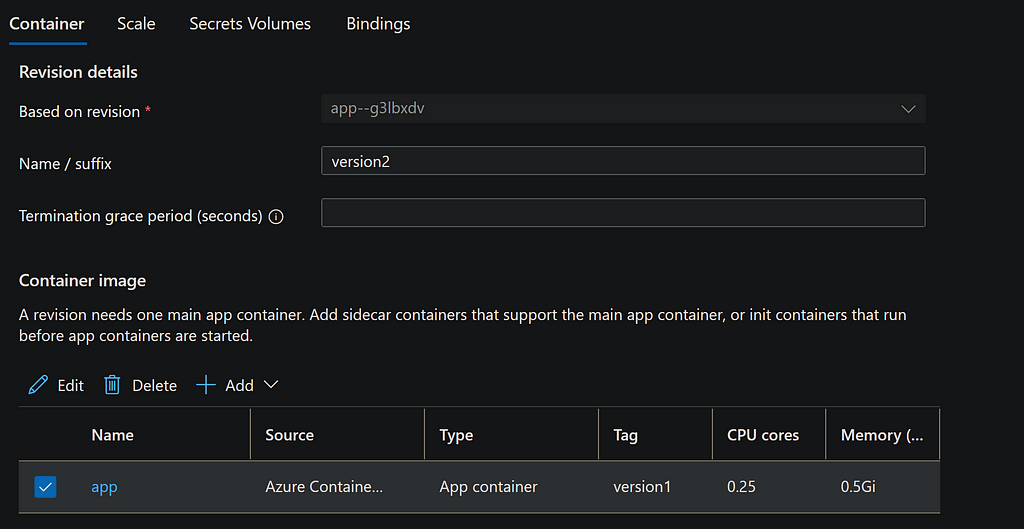
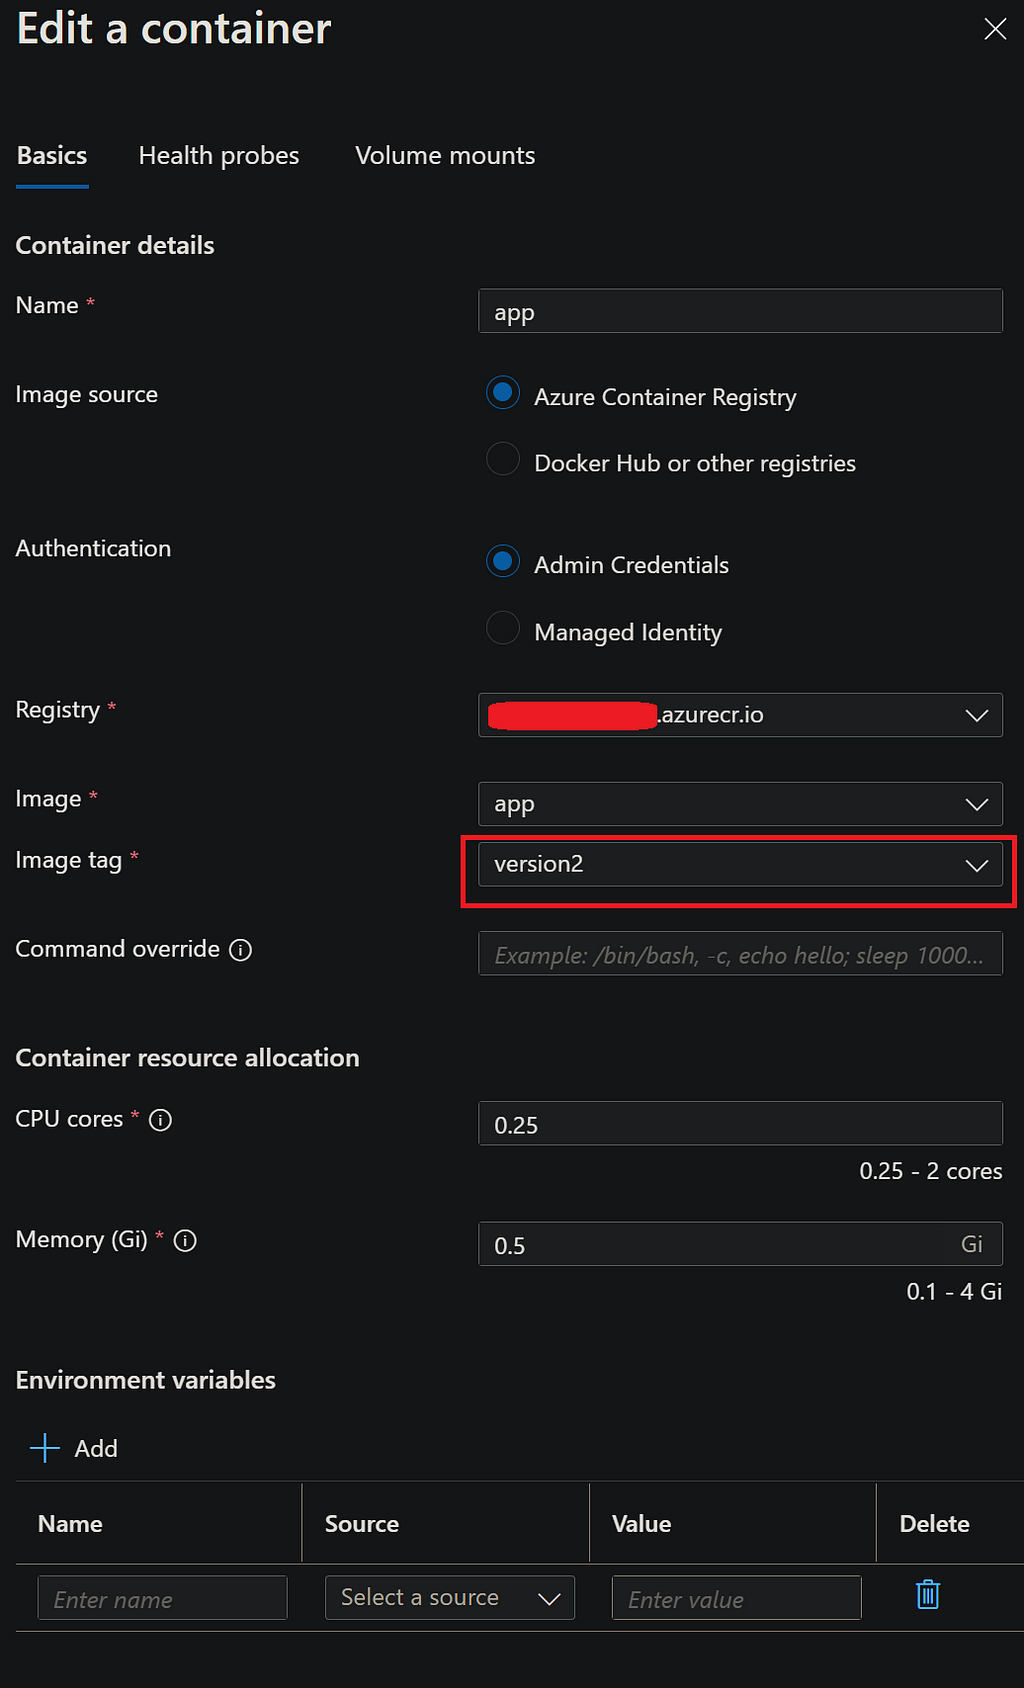
In edit container section, select the new version of the image from Azure Container Registry and save. Once complete, press create and new revision will be created.
When we come back to Revisions, we see the new container revision is taking 100% of the traffic. Although the old revision still remains and can be de-activated via Azure CLI.
Further Considerations
We have successfully deployed a Container App to Azure using Python Flask & Dash. However, this application is far from ready for production release.
For internal applications, an authentication process needs to be considered. Using Azure Active Directory and the Python MSAL library, it is possible to define roles and access lists for users within a company’s directory and control the authentication flow with a Flask server. The Dash Enterprise version enables this integration in a much easier way. However, the Enterprise version might not be an option for everyone. We must remind again that the choice of using a custom Flask server in our Dash application was made to overcome the lack of authentication support in the open-source version. Adding Microsoft Active Directory authentication pipeline will be covered in a future article.
At this stage, the app is only using some demo plots and synthetic data. With the app being deployed on Azure, we have many options to serve our data to the app. The first option is to utilize Azure Data Lake Storage for a cost-effective file-based storage solution. While this option provides storage at a very low cost, it puts the burden of computation on the web app. Another alternative is to utilize Azure Databricks and its SQL Endpoint to offload heavy data computations to a cloud cluster. These topics will be covered again in another tutorial.
References
Azure Container App, a Data Analytics WebApp with Python Flask, Plotly Dash & Docker was originally published in Towards Data Science on Medium, where people are continuing the conversation by highlighting and responding to this story.
Building an Azure Container App : A Data Analytics App with Python Flask, Plotly Dash, and Docker
Deploying scalable data analytics web applications: harnessing Flask, Dash, and Azure container apps for enhanced flexibility

When it comes to developing data analytics web applications in Python, frameworks such as Plotly’s Dash and Streamlit are among the most popular today. But how do we deploy these frameworks for real applications, going beyond tutorials, while keeping scalability, efficiency, and cost in mind, and leveraging the latest cloud computing solutions?
In this article, we’ll cover the deployment of containerized applications using a Flask back-end with a Plotly Dash front-end, containerized with Docker, and deployed to Microsoft Azure’s Container App services. Instead of purely relying on the out-of-the-box Dash solution, we’ll deploy a custom Flask server. This approach adds flexibility to the application, enabling the use of Dash alongside other frameworks and overcoming some of the limitations of open-source Dash compared to Dash Enterprise.
Code sample for this tutorial is available on Github.
Microsoft Azure Container App Service
Azure Container Apps provide cost-effective, scalable, and fully managed app services utilizing a Kubernetes-based platform. A containerized application image, such as one created with Docker, can easily be deployed with a minimal amount of management required to run the application on the cloud. Most of the heavy lifting is managed by Azure, offering scalability at a manageable cost.
The scalable cost option is ideal for intranet-based applications where most of the consumption occurs internally, with users interacting with the application in a manner similar to how they would with PowerBI or Tableau services. However, unlike PowerBI or Tableau, hosting a data web application offers the advantage of not requiring user license costs, along with the flexibility to overcome limitations of these dashboarding tools. When combined with the ease of development in Python, powered by frameworks such as Plotly Dash, it presents a strong alternative to other dashboarding solutions.
Plotly Dash
Plotly is a popular data visualization framework, available in multiple programming languages such as Python, R, JavaScript, and Matlab. Dash, developed by Plotly, is a framework for building highly interactive data applications. It employs a Python Flask server and utilizes React for building interactive web applications, enabling users to develop data applications entirely in Python. Additionally, it offers the flexibility to integrate custom HTML/CSS/JavaScript elements as needed.
Although alternatives like Streamlit exist for building data analytics applications in Python, this article will specifically cover Dash due to its use of Python Flask for backend services. Dash’s utilization of Flask provides significant flexibility, allowing for various applications to coexist on the same website. For example, certain sections of an app could be built using pure HTML/CSS/JavaScript or React, while others might incorporate embedded PowerBI reports.
Dash is available in two flavors: open source and enterprise. We will focus on the open-source version, addressing its limitations such as security management, which can be enhanced through the use of a custom Flask server.
Flask
Python’s Flask library is a lightweight yet powerful web framework. Its lightweight design is particularly suited for data analytics professionals who may not have extensive web development experience and prefer to start with a minimalistic framework.
Flask also powers the backend server for Dash. When developers create a Dash application, a Flask server is automatically initiated. However, in this article, we’ll explore deploying a custom Flask server. This approach maximizes the flexibility of Flask, extending beyond the use of Dash in our application. It enables the entire web application to utilize other frameworks in addition to Dash and facilitates the construction of authentication pipelines. Such features are not included in the open-source version of Dash without this customization but are available in the Enterprise version.
Local App Development
Local Development Prerequisites
There are a few prerequisites for setting up the local development environment. While not all of them are strictly required, it is highly recommended to follow the guidelines provided below. It’s important to note that this tutorial was created using a Windows 11 machine. Some modifications may be necessary for other operating systems.
- Download Python. This tutorial uses Python 3.10.11. Its highly recommended to add Python to PATH during or after installation.
- Download Azure CLI. This will be used to connect to Azure locally via terminal.
- Download Docker.
- Download VS Code.
- VS Code Azure Extension.
- VS Code Azure Container Apps Extension.
- VS Code Docker Extension.
App Structure
Below is the outline of the demo app’s structure, designed to host multiple applications within the web application, all powered by a Flask server.
AZURE_DATA_ANALYTICS_WEBAPP/
|---|main.py
|---|figures.py
|---|assets/
|---|static/
|------|css/
|------|js/
|------|img/
|---|templates/
|------|home.html
|---|requirements.txt
|---|Dockerfile
|---|.dockerignore
|---|.gitignore
|---|.env
|---|.venv
|---|README.md
Python Local Environment Setup
We’ll begin by creating a Python virtual environment named .venv in the VS Code terminal using the commands provided below. Be sure to include .venv in both the .gitignore and .dockerignore files, as these should not be uploaded or deployed.
python -m venv .venv
.venv/Scripts/activate
pip install --upgrade pip
pip install -r requirements.txt
The requirements for the project are listed in the requirements.txt file as follows:
# requirements.txt

# Web App Framework Requiremed Files:
Flask==3.0.2
plotly==5.19.0
dash==2.15.0
gunicorn==21.2.0

# Azure required files:
azure-identity==1.15.0
azure-keyvault-secrets==4.7.0

# Other Utilities:
python-dotenv==1.0.1
numpy==1.26.4
pandas==2.2.0
Flask Server
The main entry point to the application will be main.py, where we will initialize and run the application. In this file, we will define the Flask server, which will serve as the backend server for the entire application.
At this stage, we don’t have any Dash apps integrated; there’s just a single route defined at the index page of our application that renders the home.html file. A route is a URL pattern that handles and executes HTTP requests matching that pattern. In our case, we have a home route. Upon accessing the main directory of the web application ("/"), the home.html file will be rendered.
# main.py

from flask import Flask, render_template

# Initialize Flask server:
# Let Flask know where the templates folder is located
# via template_folder parameter
server = Flask(__name__, template_folder = "templates")

# Define Routes:
@server.route("/")
def home():
    """
        Index URL to render home.html
    """
    return render_template("home.html")

# Run the App:
if __name__ == "__main__":
    server.run(host = "0.0.0.0", port = 5000, debug = True)
    # Set debug to False during production
<!-- templates/home.html file -->

<!DOCTYPE html>
<html>
<head>
    <title>Azure Data Analytics Web Application</title>
</head>
<body>
    <h1>Azure Container App Data Analytics Application
     with Python Flask, Plotly Dash & Docker
    </h1>
</body>
</html>
Note that Flask expects HTML templates to be stored under the templatesfolder. Flask utilizes Jinja to parametrize the HTML templates.
We are now ready to run our application locally for the first time. Please note that the debug mode is currently set to true, as shown above. Remember to set this to false for production deployment. To run the app locally, execute the command provided below and then visit http://localhost:5000/ in your browser.
python main.py
We should note that when running locally, as in the above example, the application does not use HTTPS. However, Azure Container App significantly simplifies development work by handling most of the heavy lifting related to SSL/TLS termination.
It’s also important to mention that the local execution of the application utilizes the default Flask HTTP server. For production deployment, however, we bind the application to a Gunicorn server while creating the Docker image. Gunicorn, a Python WSGI HTTP server for Unix, is better suited for production environments. The installation of Gunicorn is included in the requirements.txt file.
Dash App
Now, we will modify the main.py file to add an instance of a Dash app. In this step, we initialize the Dash app by providing the Flask server, specifying the base URL pathname for routing to the app, and indicating which assets folder to use. The assets folder can store images and custom style CSS files for the Dash app.
# main.py

from flask import Flask, render_template
from dash import Dash, html

# Initialize Flask server:
server = Flask(__name__, template_folder = "templates")

# Define Routes:
@server.route("/")
def home():
    """
        Redirecting to home page.
    """
    return render_template("home.html")

# Dash Apps:
app1 = Dash(__name__, server = server,
  url_base_pathname = "/sampleDashApp1/",
  assets_folder = "assets")

app1.layout = html.Div([
    html.H1("Sample Dash App"),
    html.P("This is a simple Dash app running on a Flask server.")
])

# Run the App:
if __name__ == "__main__":
    server.run(host = "0.0.0.0", port = 5000, debug = True)
    # Set debug to False during production
Dash supports most HTML tags, which can be specified directly in Python, as illustrated in the example above. So far, we’ve added H1 header and P paragraph tags. Furthermore, Dash allows the addition of other elements, such as Dash Core Components. This feature enables us to incorporate widgets as well as plots from the Plotly library.
Adding Plotly Figures
We will define some sample Plotly charts in the figures.py file and subsequently incorporate them into the Dash app.
# figures.py

import plotly.express as px
import pandas as pd
import numpy as np

def line_chart():
    """
        Sample Plotly Line Chart
    """
    df = pd.DataFrame({
        "X": np.linspace(0, 10, 100),
        "Y": np.sin(np.linspace(0, 10, 100))
    })

    fig = px.line(df, x = "X", y = "Y", title = "Line Chart")

    return fig

def bar_chart():
    """
        Sample Plotly Bar Chart
    """

    df = pd.DataFrame({
        "Category": ["A", "B", "C", "D", "E"],
        "Values": np.random.randint(10, 100, size = 5)
    })

    fig = px.bar(df, x = "Category", y = "Values", title = "Bar Chart")

    return fig
If we modify the main.py file to import bar_chart and line_chart from the figures.py file, we can then add these plots as graph elements to our Dash app, as shown below.
# main.py file

# ...Rest of the code

from figures import line_chart, bar_chart

# Dash Apps:
app1 = Dash(__name__, server = server,
  url_base_pathname = "/sampleDashApp1/",
  assets_folder = "assets")

app1.layout = html.Div([
    html.H1("Sample Dash App"),
    html.P("This is a simple Dash app running on a Flask server."),
    html.H2("Sample Line Chart"),
    dcc.Graph(figure=line_chart()),
    html.H2("Sample Bar Chart"),
    dcc.Graph(figure=bar_chart())
])

# ... Rest of the code
Building and Running Docker Image Locally
We have now established a skeleton code for our application and are ready to build our Docker image. First, we need to enable virtualization from the motherboard’s BIOS settings, which is essential for creating virtual machines that Docker relies on. Secondly, the Docker software and the VS Code Docker Extension need to be installed.
Once the above steps are completed, we create a Dockerfile in our main directory and enter the following:
# Dockerfile

# Set Python image to use:
FROM python:3.11-slim-bullseye

# Keeps Python from generating .pyc files in the container:
ENV PYTHONDONTWRITEBYTECODE=1
# Turns off buffering for easier container logging:
ENV PYTHONUNBUFFERED=1

# Install requirements:
RUN python -m pip install --upgrade pip
COPY requirements.txt .
RUN python -m pip install -r requirements.txt

# Set Working directory and copy files:
WORKDIR /app
COPY . /app

# Creates a non-root user with an explicit UID
# and adds permission to access the /app folder:
RUN adduser -u 5678 --disabled-password --gecos "" appuser && chown -R appuser /app
USER appuser

# Expose port 5000:
EXPOSE 5000

# Bind to use Gunicorn server
# and specify main entry point main.py/server object:
CMD ["gunicorn", "--bind", "0.0.0.0:5000", "main:server"]
To build the Docker image, we execute the following command in the terminal:
docker build --no-cache -t app:version1 .
With this step completed, we should see a Docker image created, visible in the VS Code Docker extension. In this instance, we have specified the name of the app as ‘app’ and the version of the image as ‘version1’.
Now we are ready to run the app locally. To create and start a local Docker container, we execute the following command in the terminal:
docker run --env-file ./.env -p 5000:5000 app:version1
This will start the Docker container locally, allowing us to navigate to the app in the browser at http://localhost:5000/. In the Docker run command mentioned above, we instruct Docker to use the .env file located in the main directory as the environmental variables file. This file is where we store app configuration variables and any secrets. It's crucial to note that the .env file must be included in both .gitignore and .dockerignore files, as we do not want sensitive information to be uploaded to Git or included in the Docker container. On Azure Container Apps, these parameters can be provided separately as environmental variables.
For our basic Azure deployment case, there is no need to provide any environmental variables at this stage.
Below is the content of the .dockerignore file:
**/__pycache__

**/.vscode
**/.venv
**/.env
**/.git
**/.gitignore

LICENSE
README.md
Azure Setup & Deployment
Now that we have a working application locally and have successfully created a Docker image, we are ready to set up Azure and deploy the Container App.
To proceed with the steps outlined below, it is necessary to have the Azure CLI (a terminal application for communicating with Azure) installed, along with the VS Code Azure Container Apps extension.
Setup Azure Subscription
Once we have created an Azure account, the first step is to create a Subscription. A Subscription on Azure contains a collection of Azure resources linked to a billing account. For first-time Azure users or students, there are credits available ranging from $100 to $200. In this tutorial, however, we will focus on setting up a paid account.
After signing up and logging into Azure, we navigate to ‘Subscriptions’, which will be tied to our billing account. Here, we need to provide a name for the subscription and proceed with its creation.
Note: Special care should be taken to monitor billing, especially during the learning period. It’s advisable to set budgets and alerts to manage costs effectively.
Setup Azure Resource Group
Azure manages a collection of cloud resources under what is known as an Azure Resource Group. We’ll need to create one of these groups to facilitate the creation of the necessary cloud resources.
From the main Azure page, we can navigate to ‘Resource Groups’ to create a new one.
This Resource Group will be associated with the Subscription we created in the previous step. We will need to provide a name for the Resource Group and select a region. The region should be chosen based on the closest geographical area to where the application will be primarily used.
Setup Azure Container Registry
Azure offers a container registry service known as Azure Container Registry, which allows us to host our Docker container images. This container registry serves as a repository for images, enabling version control over the container images. It also facilitates their deployment across various cloud container services, not limited to Azure Container Apps alone. With this service, different versions of the app image can be stored and deployed as needed.
From the search bar in the Azure portal, we type ‘Container Registries’ and click the create button. This resource will be hosted under the Resource Group we created in the previous step. We should choose the same region as before and select the Basic plan option for the lowest cost.
There is one important setting that needs to be enabled on the Container Registry to allow us to deploy images to Azure Container App within the Azure portal. Go to the Properties of the Container Registry, enable the ‘Admin user’, and then save the changes.
Deploy Docker Image to Azure Container Registry
Now that we have our local Docker image ready and the Azure Container Registry setup complete, we are prepared to upload the container image to Azure.
In the VS Code terminal, we log in to Azure using the Azure CLI (which must be installed):
az login
This action will open a pop-up window in your browser, prompting you to sign in to Azure. Once completed, we are now authenticated with Azure.
The next step is to log in to the Container Registry using the terminal and Azure CLI. This can be done by executing the following command:
az acr login --name <azureContainerRegistryName>
Once we have successfully logged in to the Container Registry, our next steps are to first tag the image and then push it to the Azure Container App.
Note that ‘app:version1’ represents the name and version of our app, which we assigned when creating the Docker image in the previous steps.
docker tag app:version1 <azureContainerRegistryName>.azurecr.io/app:version1
docker push <azureContainerRegistryName>.azurecr.io/app:version1
With this step completed, we should be able to view the image under the ‘Repositories’ section of the Container Registry, as described above.
It’s important to note that the above steps could also have been accomplished using the VS Code Docker Extension, as an alternative to utilizing the Azure CLI.
Setup Azure Container Apps Environment & Container App
The Azure Container Apps Environment is a resource that can manage a collection of container apps. While we cannot create a Container Apps Environment directly, it can be set up when we create an initial Container App.
To do this, we search for ‘Container Apps’ in the Azure search bar and click ‘Create’. The first step here is to create a Container Apps Environment, as highlighted in the red square box in the image below.
We select the consumption plan to pay only for what we use and for providing a simplified setup process.
After creating the Container Apps Environment, we return to the setup page for the Container App to continue building the app. Within the Container setup page, we select Azure Container Registry and locate the image we have previously uploaded.
For CPU and memory, we opt for the lowest amount as this is a demo app. If there are any environmental variables specified in the .env file for our local environment, we must enter them in this section. Alternatively, these environmental variables can be directed to Azure KeyVault.
We can skip the Bindings section for this tutorial and proceed to Ingress. In this section, we define how Azure Container App handles traffic. We enable Ingress and set traffic to be accepted from anywhere if the application is to be accessible on the web. For internal applications, the company’s VNet should be used.
Additionally, we set the port of the application to be 5000, which is the same as the Flask server’s port set during code development.
After configuring all of these settings, we are ready to create our application! Click on ‘Review + create’.
Once the setup is complete, navigate to the Container App page to find the URL of the application.
And that’s it! Our application is now up and running on Azure!
Manage Revisions
Now that we have deployed the first version of our application, we’ll cover managing revisions.
Once we have made changes to the code base and ready with a revision, we run Docker deploy as before with a new version name.
docker build --no-cache -t app:version2 .
And upload to Azure Container Registry:
az acr login --name <azureContainerRegistryName>
docker tag app:version2 <azureContainerRegistryName>.azurecr.io/app:version2
docker push <azureContainerRegistryName>.azurecr.io/app:version2
From here on, we have two options. Either to use terminal and Azure CLI or go to Azure Container App page and manage revisions from there. Here we will cover revision management from Azure.
Hit “Create new revision” and provide a suffix to the new revision. Here we’ll name it “version2”. Than click on “app” check-box and select edit.
In edit container section, select the new version of the image from Azure Container Registry and save. Once complete, press create and new revision will be created.
When we come back to Revisions, we see the new container revision is taking 100% of the traffic. Although the old revision still remains and can be de-activated via Azure CLI.
Further Considerations
We have successfully deployed a Container App to Azure using Python Flask & Dash. However, this application is far from ready for production release.
For internal applications, an authentication process needs to be considered. Using Azure Active Directory and the Python MSAL library, it is possible to define roles and access lists for users within a company’s directory and control the authentication flow with a Flask server. The Dash Enterprise version enables this integration in a much easier way. However, the Enterprise version might not be an option for everyone. We must remind again that the choice of using a custom Flask server in our Dash application was made to overcome the lack of authentication support in the open-source version. Adding Microsoft Active Directory authentication pipeline will be covered in a future article.
At this stage, the app is only using some demo plots and synthetic data. With the app being deployed on Azure, we have many options to serve our data to the app. The first option is to utilize Azure Data Lake Storage for a cost-effective file-based storage solution. While this option provides storage at a very low cost, it puts the burden of computation on the web app. Another alternative is to utilize Azure Databricks and its SQL Endpoint to offload heavy data computations to a cloud cluster. These topics will be covered again in another tutorial.
References
Azure Container App, a Data Analytics WebApp with Python Flask, Plotly Dash & Docker was originally published in Towards Data Science on Medium, where people are continuing the conversation by highlighting and responding to this story.
Denial of responsibility! Techno Blender is an automatic aggregator of the all world’s media. In each content, the hyperlink to the primary source is specified. All trademarks belong to their rightful owners, all materials to their authors. If you are the owner of the content and do not want us to publish your materials, please contact us by email – [email protected]. The content will be deleted within 24 hours.