
Building a Deep Neural Network from Scratch using Numpy | by Riccardo Andreoni | Sep, 2022
Modern Deep Learning libraries are powerful tools but they may lead practitioners to take for granted neural networks’ functioning principles
In this project, I build a deep neural network without the aid of any deep learning library (Tensorflow, Keras, Pytorch). The reason for imposing myself on this task is that, nowadays, it is effortless to build deep and complex neural networks using the high-level tools provided by multiple python libraries. Undoubtedly, this is a great advantage for Machine Learning professionals: we can create powerful models with just a few lines of code. However, this approach has the massive downside of leaving the functioning of those networks unclear as they happen “under the hood”.
Building a Deep Neural Network from scratch is a great exercise for anyone who wants to solidify their understanding of these amazing tools.
The article will cover both the theoretical and practical parts. The theoretical part is mandatory to understand the implementation. For the theory, we need basic knowledge of algebra and calculus, while for the coding part only built-in Python functions and Numpy will be used.
This approach differs from other implementations for the strategy of storing the cached values. Also, differently from most implementations, this code allows us to compare infinite possible network architectures as the number of layers and activation units is defined by the user.
In this application, I create a Deep Neural Network to solve the famous MNIST classification problem.
The MNIST dataset is a large database of handwritten digits. The dataset contains 70,000 small images (28 x 28 pixels), each one of them being labeled.

In this section, I will outline the theoretical part of the application. I will define all the matrices for each step of the forward propagation and backpropagation, with particular attention to clarifying all the matrix dimensions.
Input
The input consists of m training images of shape 28×28 pixels. Consequently, each image is represented by a 1-dimensional array of size 784. In order to speed up the computations, I will take advantage of the vectorization technique. I will store the entire training set in a single matrix X. Each column of X represents a training example:
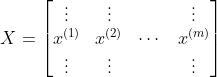
The dimensions are:

Forward Propagation
To clarify the explanation, let’s assume building a neural network composed of:
- input layer
- 1 hidden layer of size 10 with ReLu activation function
- 1 hidden layer of size 10 with Softmax activation function
- output layer
All the matrices and computation can be easily extended to a fully connected network of any architecture.
The forward propagation, for each layer, is composed of 2 steps:
- application of weights and biases
- computation of the activation function
For hidden layer 1 we use matrix multiplication and matrix addition to apply the weights and biases:

Then, we need to compute the selected activation function:

Following the matrix multiplication rules, the dimensions are:


The same is done for layer 2:


And the matrix dimensions are:


In general, for any layer l the two steps are carried out through these simple equations:


At the end of forward propagation, reaching layer L, we compute the prediction:

Backpropagation
The purpose of backpropagation is to compute the partial derivative of the loss function with respect to the weights of each layer of the network. Once we know the derivatives, we can apply gradient descent optimization to tune their values.
The first step of backpropagation is to compute the error of the predictions. Considering layer 2 as the final layer, we have:

where:


Now we can compute the derivatives of the loss function with respect to the weights and biases of layer 2:


The dimensions are as follows:


Once we know all the derivatives of the final layers, the backpropagation process consists in traveling backward through the network’s layers and computing the partial derivatives as follows:


Parameter Update
Knowing the gradients of the loss function, we know in which direction to move to reach an optimum. As a consequence, we update the parameters:


This section presents all the functions used to implement the deep neural network. The complete code can be found on my GitHub repository.
In the above linked GitHub repository, you will find 5 files:
- “README.md”: it’s a markdown file presenting the project
- “train.csv”: it’s a CSV file containing the training set of the MNIST dataset
- “test.csv”: it’s a CSV file containing the test set of the MNIST dataset
- “main.py”: it’s a Python script from where we will run the neural network
- “utils.py”: it’s a Python file in which we define the function needed to build the neural network
We will mainly focus on the “utils.py” file since it’s where most of the network implementation is.
The first function is init_params. It takes as input the dimensions of the layers and it returns a dictionary containing all the weights and biases randomly initialized:
Next, I define all the activation functions and their derivatives. In this application, we will use the ReLu and the Softmax activations.
Now the fun begins. The forward_prop function takes as input the inputs X and the parameters of the network (weights and biases) and it returns a dictionary containing the activations of each layer. The output dictionary contains also the Z matrices of each layer as a sort of cache. The reason for this is that the Z matrices are later needed during the backpropagation phase.
The back_prop function is probably the core of the entire implementation. It scans the network starting from the final layer to the first one and it computes the gradient of the loss function with respect to each weight and bias of each layer.
The gradients computed during the backpropagation step are later used to update the weights and biases. The update_params function handles this task.
The next two auxiliary functions get_predictions and get_accuracy are needed respectively to select the prediction from the final layer (i.e. select the category with the highest Softmax score) and to compute the accuracy of the predictions.
Finally, I wrap up all the above functions in the gradient_descent_optimization function:
The first network architecture I want to try consists in:
- input layer of size 784
- hidden layer #1 of size 10 and ReLu activation
- hidden layer #2 of size 10 and Softmax activation
- output layer of size 1
That layer is represented in my Python code with the list [784, 10, 10] . There’s no need to include the output layer in the list since it has no weights associated. From now on, all the networks will be represented by the python list that describes their architecture.
After training the network for 1000 iterations the accuracy converges to a value around 88%.

It is not terrible, considering the network size, but it is far from the result we aim to achieve for this task. A deeper and wider network, [784, 256, 128, 64, 10] , trained for 500 iterations, achieves 97% accuracy.

The training time per iteration increases considerably for the second network since the additional layers and neurons make it computationally more demanding.
In order to achieve better result for image classification, usually different types of network are used: Convolutional Neural Networks.
Feel free to modify the code in my GitHub repository and explore how the results vary when the number of layers and units change.
Modern Deep Learning libraries are powerful tools but they may lead practitioners to take for granted neural networks’ functioning principles

In this project, I build a deep neural network without the aid of any deep learning library (Tensorflow, Keras, Pytorch). The reason for imposing myself on this task is that, nowadays, it is effortless to build deep and complex neural networks using the high-level tools provided by multiple python libraries. Undoubtedly, this is a great advantage for Machine Learning professionals: we can create powerful models with just a few lines of code. However, this approach has the massive downside of leaving the functioning of those networks unclear as they happen “under the hood”.
Building a Deep Neural Network from scratch is a great exercise for anyone who wants to solidify their understanding of these amazing tools.
The article will cover both the theoretical and practical parts. The theoretical part is mandatory to understand the implementation. For the theory, we need basic knowledge of algebra and calculus, while for the coding part only built-in Python functions and Numpy will be used.
This approach differs from other implementations for the strategy of storing the cached values. Also, differently from most implementations, this code allows us to compare infinite possible network architectures as the number of layers and activation units is defined by the user.
In this application, I create a Deep Neural Network to solve the famous MNIST classification problem.
The MNIST dataset is a large database of handwritten digits. The dataset contains 70,000 small images (28 x 28 pixels), each one of them being labeled.
In this section, I will outline the theoretical part of the application. I will define all the matrices for each step of the forward propagation and backpropagation, with particular attention to clarifying all the matrix dimensions.
Input
The input consists of m training images of shape 28×28 pixels. Consequently, each image is represented by a 1-dimensional array of size 784. In order to speed up the computations, I will take advantage of the vectorization technique. I will store the entire training set in a single matrix X. Each column of X represents a training example:
The dimensions are:
Forward Propagation
To clarify the explanation, let’s assume building a neural network composed of:
- input layer
- 1 hidden layer of size 10 with ReLu activation function
- 1 hidden layer of size 10 with Softmax activation function
- output layer
All the matrices and computation can be easily extended to a fully connected network of any architecture.
The forward propagation, for each layer, is composed of 2 steps:
- application of weights and biases
- computation of the activation function
For hidden layer 1 we use matrix multiplication and matrix addition to apply the weights and biases:
Then, we need to compute the selected activation function:
Following the matrix multiplication rules, the dimensions are:
The same is done for layer 2:
And the matrix dimensions are:
In general, for any layer l the two steps are carried out through these simple equations:
At the end of forward propagation, reaching layer L, we compute the prediction:
Backpropagation
The purpose of backpropagation is to compute the partial derivative of the loss function with respect to the weights of each layer of the network. Once we know the derivatives, we can apply gradient descent optimization to tune their values.
The first step of backpropagation is to compute the error of the predictions. Considering layer 2 as the final layer, we have:
where:
Now we can compute the derivatives of the loss function with respect to the weights and biases of layer 2:
The dimensions are as follows:
Once we know all the derivatives of the final layers, the backpropagation process consists in traveling backward through the network’s layers and computing the partial derivatives as follows:
Parameter Update
Knowing the gradients of the loss function, we know in which direction to move to reach an optimum. As a consequence, we update the parameters:
This section presents all the functions used to implement the deep neural network. The complete code can be found on my GitHub repository.
In the above linked GitHub repository, you will find 5 files:
- “README.md”: it’s a markdown file presenting the project
- “train.csv”: it’s a CSV file containing the training set of the MNIST dataset
- “test.csv”: it’s a CSV file containing the test set of the MNIST dataset
- “main.py”: it’s a Python script from where we will run the neural network
- “utils.py”: it’s a Python file in which we define the function needed to build the neural network
We will mainly focus on the “utils.py” file since it’s where most of the network implementation is.
The first function is init_params. It takes as input the dimensions of the layers and it returns a dictionary containing all the weights and biases randomly initialized:
Next, I define all the activation functions and their derivatives. In this application, we will use the ReLu and the Softmax activations.
Now the fun begins. The forward_prop function takes as input the inputs X and the parameters of the network (weights and biases) and it returns a dictionary containing the activations of each layer. The output dictionary contains also the Z matrices of each layer as a sort of cache. The reason for this is that the Z matrices are later needed during the backpropagation phase.
The back_prop function is probably the core of the entire implementation. It scans the network starting from the final layer to the first one and it computes the gradient of the loss function with respect to each weight and bias of each layer.
The gradients computed during the backpropagation step are later used to update the weights and biases. The update_params function handles this task.
The next two auxiliary functions get_predictions and get_accuracy are needed respectively to select the prediction from the final layer (i.e. select the category with the highest Softmax score) and to compute the accuracy of the predictions.
Finally, I wrap up all the above functions in the gradient_descent_optimization function:
The first network architecture I want to try consists in:
- input layer of size 784
- hidden layer #1 of size 10 and ReLu activation
- hidden layer #2 of size 10 and Softmax activation
- output layer of size 1
That layer is represented in my Python code with the list [784, 10, 10] . There’s no need to include the output layer in the list since it has no weights associated. From now on, all the networks will be represented by the python list that describes their architecture.
After training the network for 1000 iterations the accuracy converges to a value around 88%.
It is not terrible, considering the network size, but it is far from the result we aim to achieve for this task. A deeper and wider network, [784, 256, 128, 64, 10] , trained for 500 iterations, achieves 97% accuracy.
The training time per iteration increases considerably for the second network since the additional layers and neurons make it computationally more demanding.
In order to achieve better result for image classification, usually different types of network are used: Convolutional Neural Networks.
Feel free to modify the code in my GitHub repository and explore how the results vary when the number of layers and units change.
Denial of responsibility! Techno Blender is an automatic aggregator of the all world’s media. In each content, the hyperlink to the primary source is specified. All trademarks belong to their rightful owners, all materials to their authors. If you are the owner of the content and do not want us to publish your materials, please contact us by email – [email protected]. The content will be deleted within 24 hours.