
Calibrate your Samsung TV or monitor like a pro using your phone’s camera
Although many Samsung smart TVs and Smart Monitors offer great image quality, the default image presets they ship with sometimes fall short. That is why Samsung leveraged the power of SmartThings and smartphone cameras to create the powerful Smart Calibration tool.
With this tool, you can use the rear-facing camera on your Galaxy device or iPhone to calibrate the display on your Samsung smart TV or Smart Monitor and optimize image quality for your particular device. Here’s all you need to know to use this feature.
SmartThings Smart Calibration explained step-by-step
Before you can use the Smart Calibration tool on your smartphone, you need to make sure that your TV or Smart Monitor is synced with your SmartThings mobile app and is connected to the same Wi-Fi network as your phone.
Next, it’s worth noting that Smart Calibration is available for select Samsung TVs and Smart Monitor, 2019 and later iPhones, and 2019 and later Galaxy S, Galaxy Note, and Galaxy Z smartphones. It’s not available for lower-cost Galaxy A phones or any Galaxy tablets due to their weak cameras (relative to flagship phones).
In addition, some Samsung TVs support only the “Basic” calibration mode, while others support both “Basic” and “Professional.” We’ll explain the difference between the two later.
Finally, the Smart Calibration tool won’t change how every image preset works on your TV. It only calibrates the “Movie” picture preset for users to enjoy content as intended by creators and movie producers.
Now, let’s get started with the calibration process.
- Open “All settings” on your Samsung TV or Smart Monitor.
- Access “Picture” and go to “Expert Settings,” then scroll all the way down and select “Smart Calibration.”
- A QR code will appear on your TV. Scan it with your phone’s camera and tap “Open SmartThings.” If necessary, select “Allow” on your TV to grant permission for your mobile device and TV to connect.
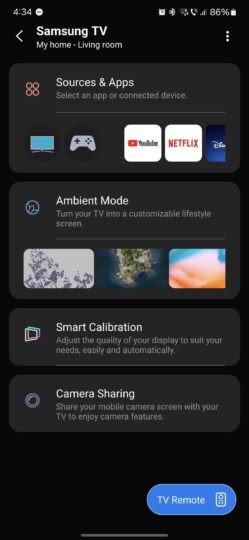
- The SmartThings app should open automatically on your phone. Close the virtual remote if needed, and select the “Smart Calibration” option.
- Next, select whether you want to run the Smart Calibration tool in “Basic Mode” or “Professional Mode.” Basic Mode takes less time, while Professional Mode is more accurate, can take up to 15 minutes to complete, and is compatible only with select TVs and monitors. Note: For this guide, we are using “Professional Mode.”
- In the Professional Mode settings screen, select your desired luminosity, gamma type, pattern size, and HDR options, then choose “Auto” and tap “Next.” (Alternatively, you can select “Manual” if you also have tools for calibrating your phone’s cameras).
- Lastly, tap “I’m Ready,” point the smartphone’s camera at the center of the screen at a distance of 1-3cm, and tap “Start.”
Note that the Professional Mode calibration will take up to 15 minutes to complete, and Samsung recommends using a tripod to keep your phone still during the TV’s or Smart Monitor’s calibration process.
Once the calibration is complete, you can review the full Calibration Report to see how the Smart Calibration tool has modified your TV screen or monitor’s settings. To apply the new settings, tap “Next,” select “Apply to Calibrated,” and tap “Done.”
You can use these Smart Calibrated settings on your TV or monitor by selecting the new picture preset called “Movie (Calibrated).”
Although many Samsung smart TVs and Smart Monitors offer great image quality, the default image presets they ship with sometimes fall short. That is why Samsung leveraged the power of SmartThings and smartphone cameras to create the powerful Smart Calibration tool.
With this tool, you can use the rear-facing camera on your Galaxy device or iPhone to calibrate the display on your Samsung smart TV or Smart Monitor and optimize image quality for your particular device. Here’s all you need to know to use this feature.
SmartThings Smart Calibration explained step-by-step
Before you can use the Smart Calibration tool on your smartphone, you need to make sure that your TV or Smart Monitor is synced with your SmartThings mobile app and is connected to the same Wi-Fi network as your phone.
Next, it’s worth noting that Smart Calibration is available for select Samsung TVs and Smart Monitor, 2019 and later iPhones, and 2019 and later Galaxy S, Galaxy Note, and Galaxy Z smartphones. It’s not available for lower-cost Galaxy A phones or any Galaxy tablets due to their weak cameras (relative to flagship phones).
In addition, some Samsung TVs support only the “Basic” calibration mode, while others support both “Basic” and “Professional.” We’ll explain the difference between the two later.
Finally, the Smart Calibration tool won’t change how every image preset works on your TV. It only calibrates the “Movie” picture preset for users to enjoy content as intended by creators and movie producers.
Now, let’s get started with the calibration process.
- Open “All settings” on your Samsung TV or Smart Monitor.
- Access “Picture” and go to “Expert Settings,” then scroll all the way down and select “Smart Calibration.”
- A QR code will appear on your TV. Scan it with your phone’s camera and tap “Open SmartThings.” If necessary, select “Allow” on your TV to grant permission for your mobile device and TV to connect.
- The SmartThings app should open automatically on your phone. Close the virtual remote if needed, and select the “Smart Calibration” option.
- Next, select whether you want to run the Smart Calibration tool in “Basic Mode” or “Professional Mode.” Basic Mode takes less time, while Professional Mode is more accurate, can take up to 15 minutes to complete, and is compatible only with select TVs and monitors. Note: For this guide, we are using “Professional Mode.”
- In the Professional Mode settings screen, select your desired luminosity, gamma type, pattern size, and HDR options, then choose “Auto” and tap “Next.” (Alternatively, you can select “Manual” if you also have tools for calibrating your phone’s cameras).
- Lastly, tap “I’m Ready,” point the smartphone’s camera at the center of the screen at a distance of 1-3cm, and tap “Start.”
Note that the Professional Mode calibration will take up to 15 minutes to complete, and Samsung recommends using a tripod to keep your phone still during the TV’s or Smart Monitor’s calibration process.
Once the calibration is complete, you can review the full Calibration Report to see how the Smart Calibration tool has modified your TV screen or monitor’s settings. To apply the new settings, tap “Next,” select “Apply to Calibrated,” and tap “Done.”
You can use these Smart Calibrated settings on your TV or monitor by selecting the new picture preset called “Movie (Calibrated).”
Denial of responsibility! Techno Blender is an automatic aggregator of the all world’s media. In each content, the hyperlink to the primary source is specified. All trademarks belong to their rightful owners, all materials to their authors. If you are the owner of the content and do not want us to publish your materials, please contact us by email – [email protected]. The content will be deleted within 24 hours.