
cGAN: Conditional Generative Adversarial Network — How to Gain Control Over GAN Outputs | by Saul Dobilas | Aug, 2022
Neural Networks
An explanation of cGAN architecture with a detailed Python example
Have you experimented with Generative Adversarial Networks (GANs) yet? If so, you may have encountered a situation where you wanted your GAN to generate a specific type of data but did not have sufficient control over GANs outputs.
For example, assume you used a broad spectrum of flower images to train a GAN capable of producing fake pictures of flowers. While you can use your model to generate an image of a random flower, you cannot instruct it to create an image of, say, a tulip or a sunflower.
Conditional GAN (cGAN) allows us to condition the network with additional information such as class labels. It means that during the training, we pass images to the network with their actual labels (rose, tulip, sunflower etc.) for it to learn the difference between them. That way, we gain the ability to ask our model to generate images of specific flowers.
In this article, I will take you through the following:
- The place of Conditional GAN (cGAN) within the universe of Machine Learning algorithms
- An overview of cGAN and cDCGAN architecture and its components
- Python example showing you how to build a Conditional DCGAN from scratch with Keras / Tensorflow
While most types of Neural Networks are Supervised, some, like Autoencoders, are Self-Supervised. Because of this and their unique approach to Machine Learning, I have given Neural Networks their own category in my ML Universe chart.
Since Conditional GAN is a type of GAN, you will find it under the Generative Adversarial Networks subcategory. Click👇 on the interactive chart below to locate cGAN and to reveal other algorithms hiding under each branch of ML.
How do we condition a GAN?
Let’s first remind ourselves of a basic Generative Adversarial Network architecture.
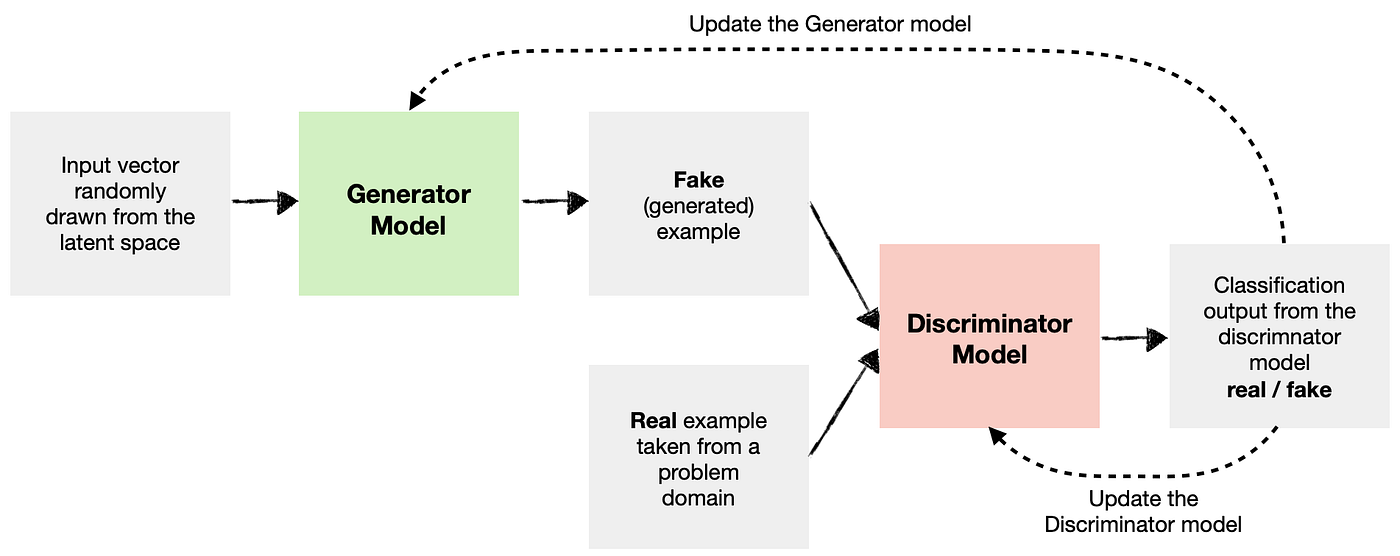
As you can see, we have two main components:
- Generator Model — generates new data (i.e., fake data) similar to that of the problem domain.
- Discriminator Model — tries to identify whether the provided example is fake (comes from a generator ) or real (comes from the actual data domain).
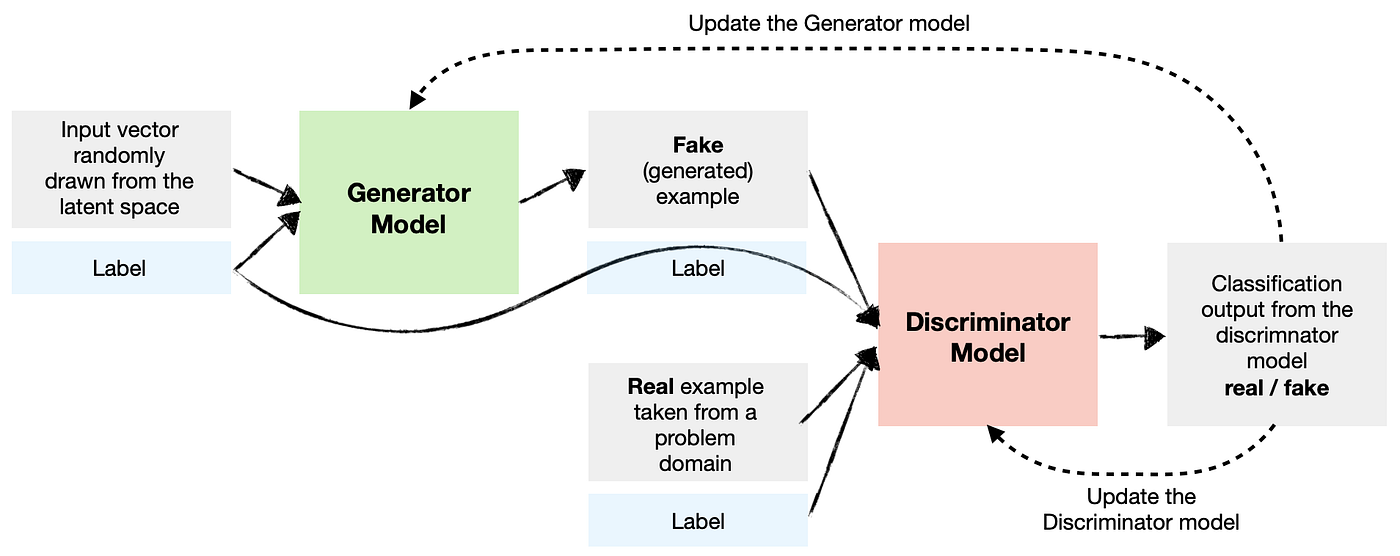
In the case of a Conditional GAN, we want to condition both the Generator and the Discriminator so they know which type they are dealing with.
Say we use our GAN to create synthetic data containing house prices in London and Madrid. To make it conditional, we need to tell the Generator which city to generate the data for each time. We also need to inform the Discriminator whether the example passed to it is for London or Madrid.
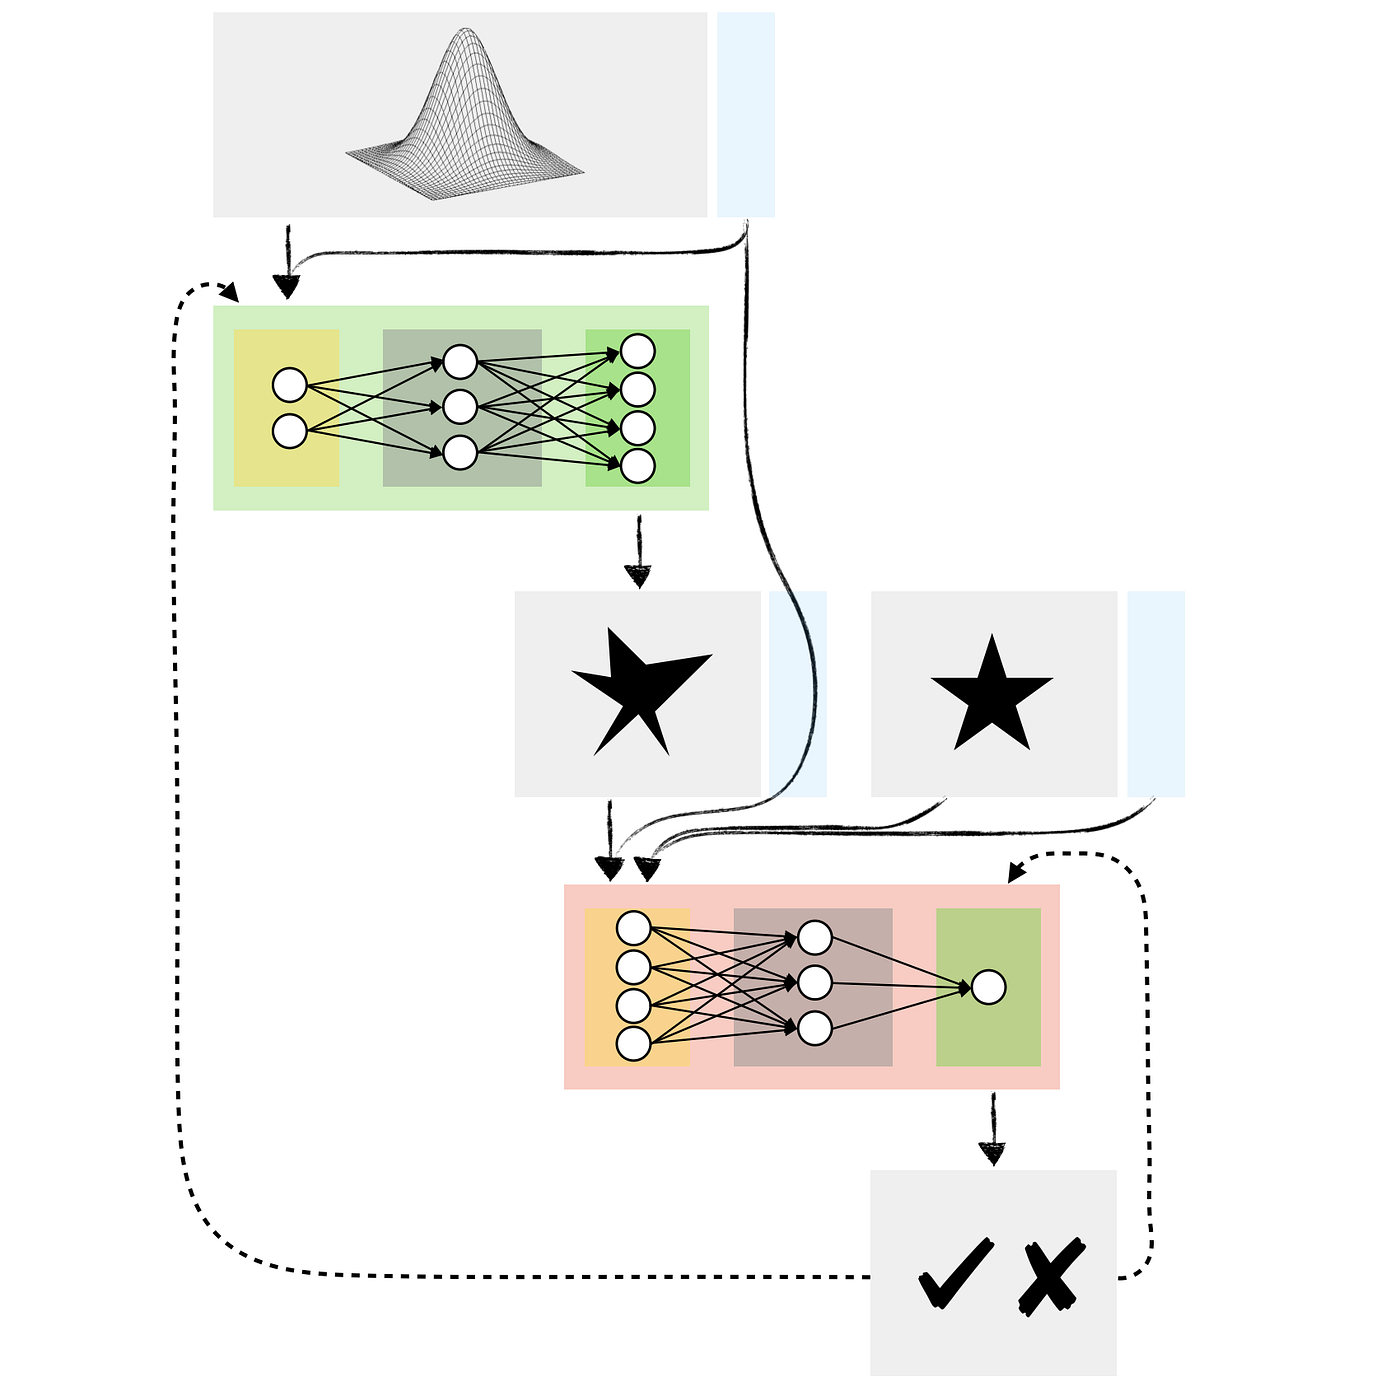
So the Conditional GAN model architecture would look like this:
Note that we can condition GANs on many types of inputs. For example, we could also condition the network on other images where we want to create a GAN for image-to-image translation (e.g., turning the daytime image into a nighttime one).
Conditional Deep Convolutional GAN (cDCGAN)
As with the earlier flower example, we may want to condition a Deep Convolution GAN so we can ask the model to generate a specific type of image.
Below is a model architecture diagram for a Conditional DCGAN. Note that the high-level architecture is essentially the same as in the previous example, except the Generator and Discriminator contain additional layers, such as Convolutions and Transposed Convolutions.
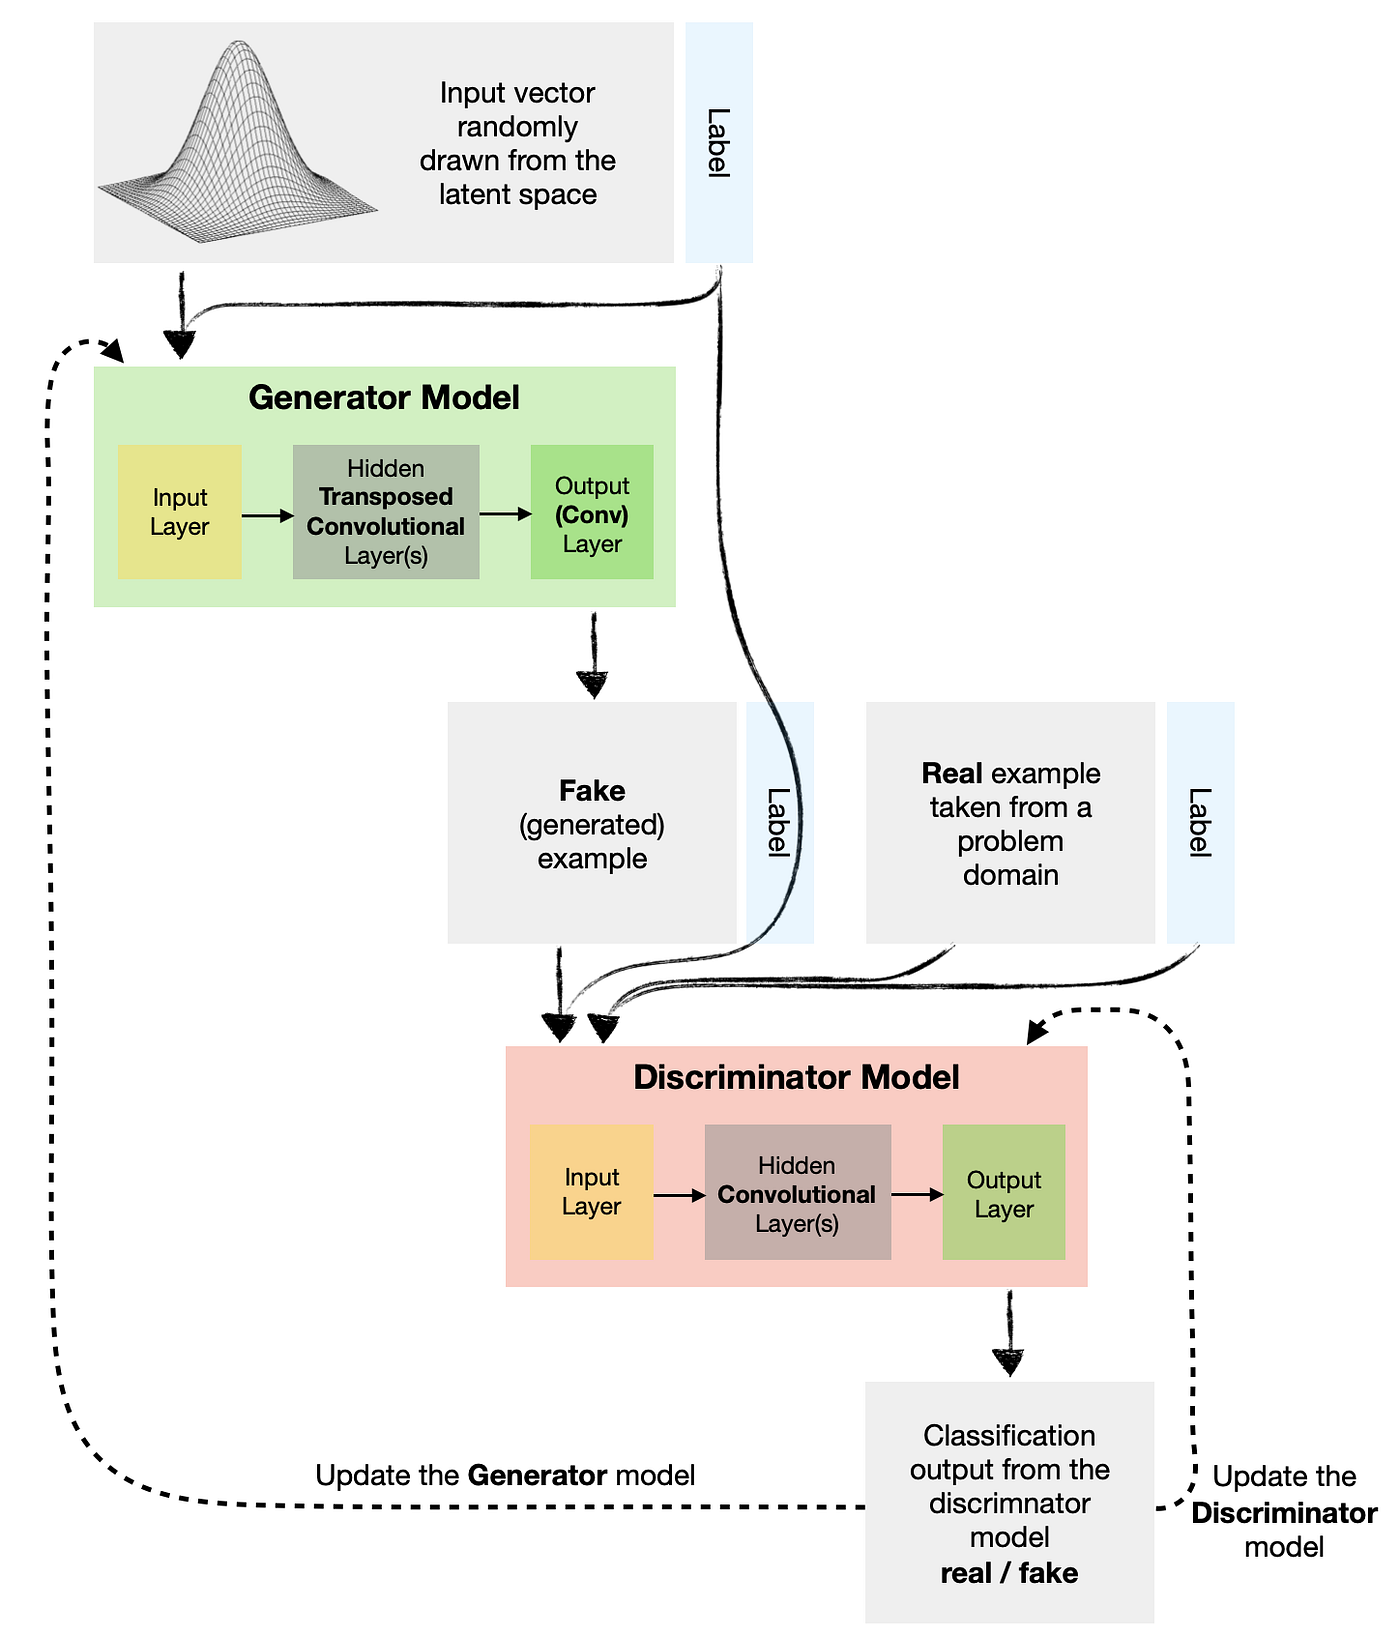
In this example, I will show you how to build a cDCGAN demonstrated in the above diagram. It will enable us to generate “fake” handwritten digits similar to those in the MNIST dataset.
Since we are building a conditional GAN, we will be able to specify which digit (0–9) we want the Generator to produce each time.
Setup
We will need to get the following data and libraries:
Let’s import the libraries:
The above code prints package versions used in this example:
Tensorflow/Keras: 2.7.0
numpy: 1.21.4
matplotlib: 3.5.1
graphviz: 0.19.1
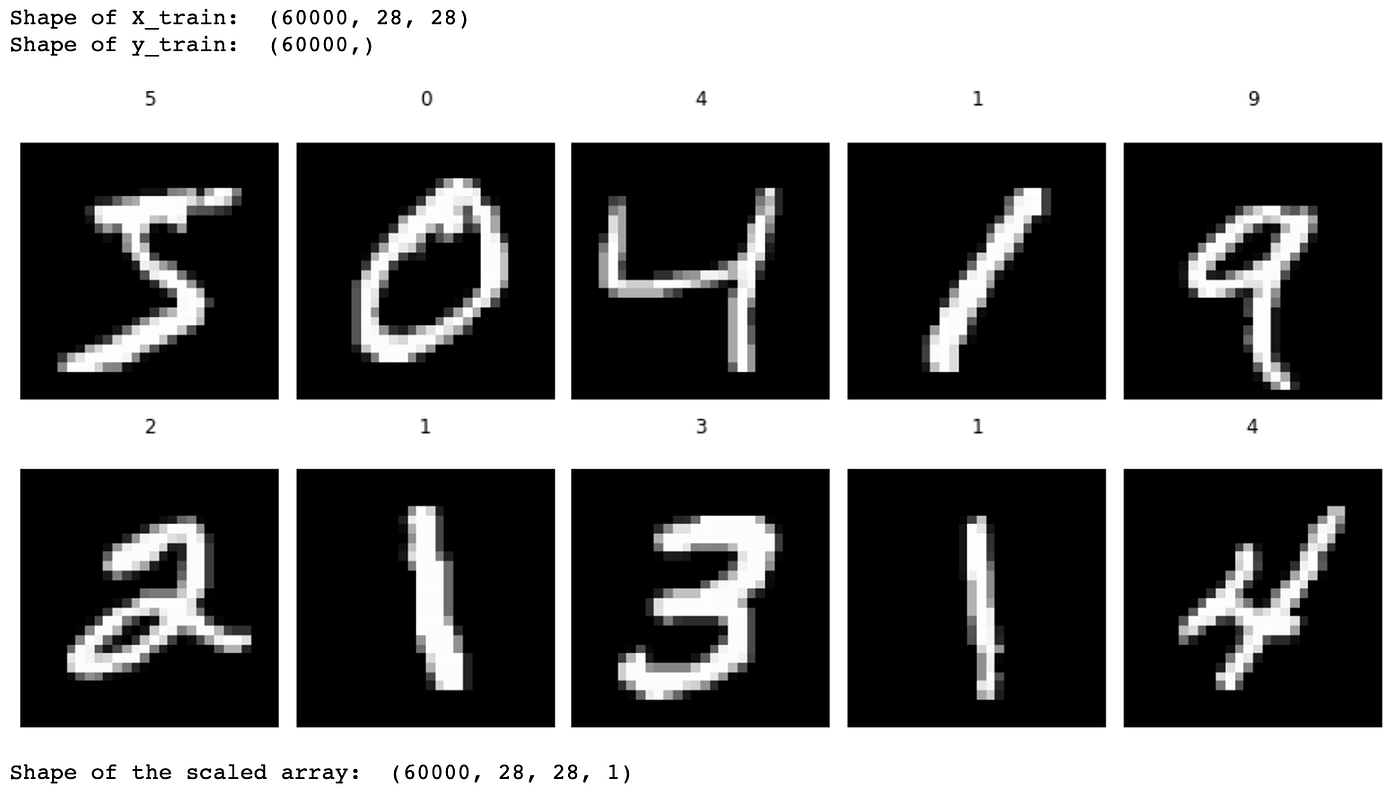
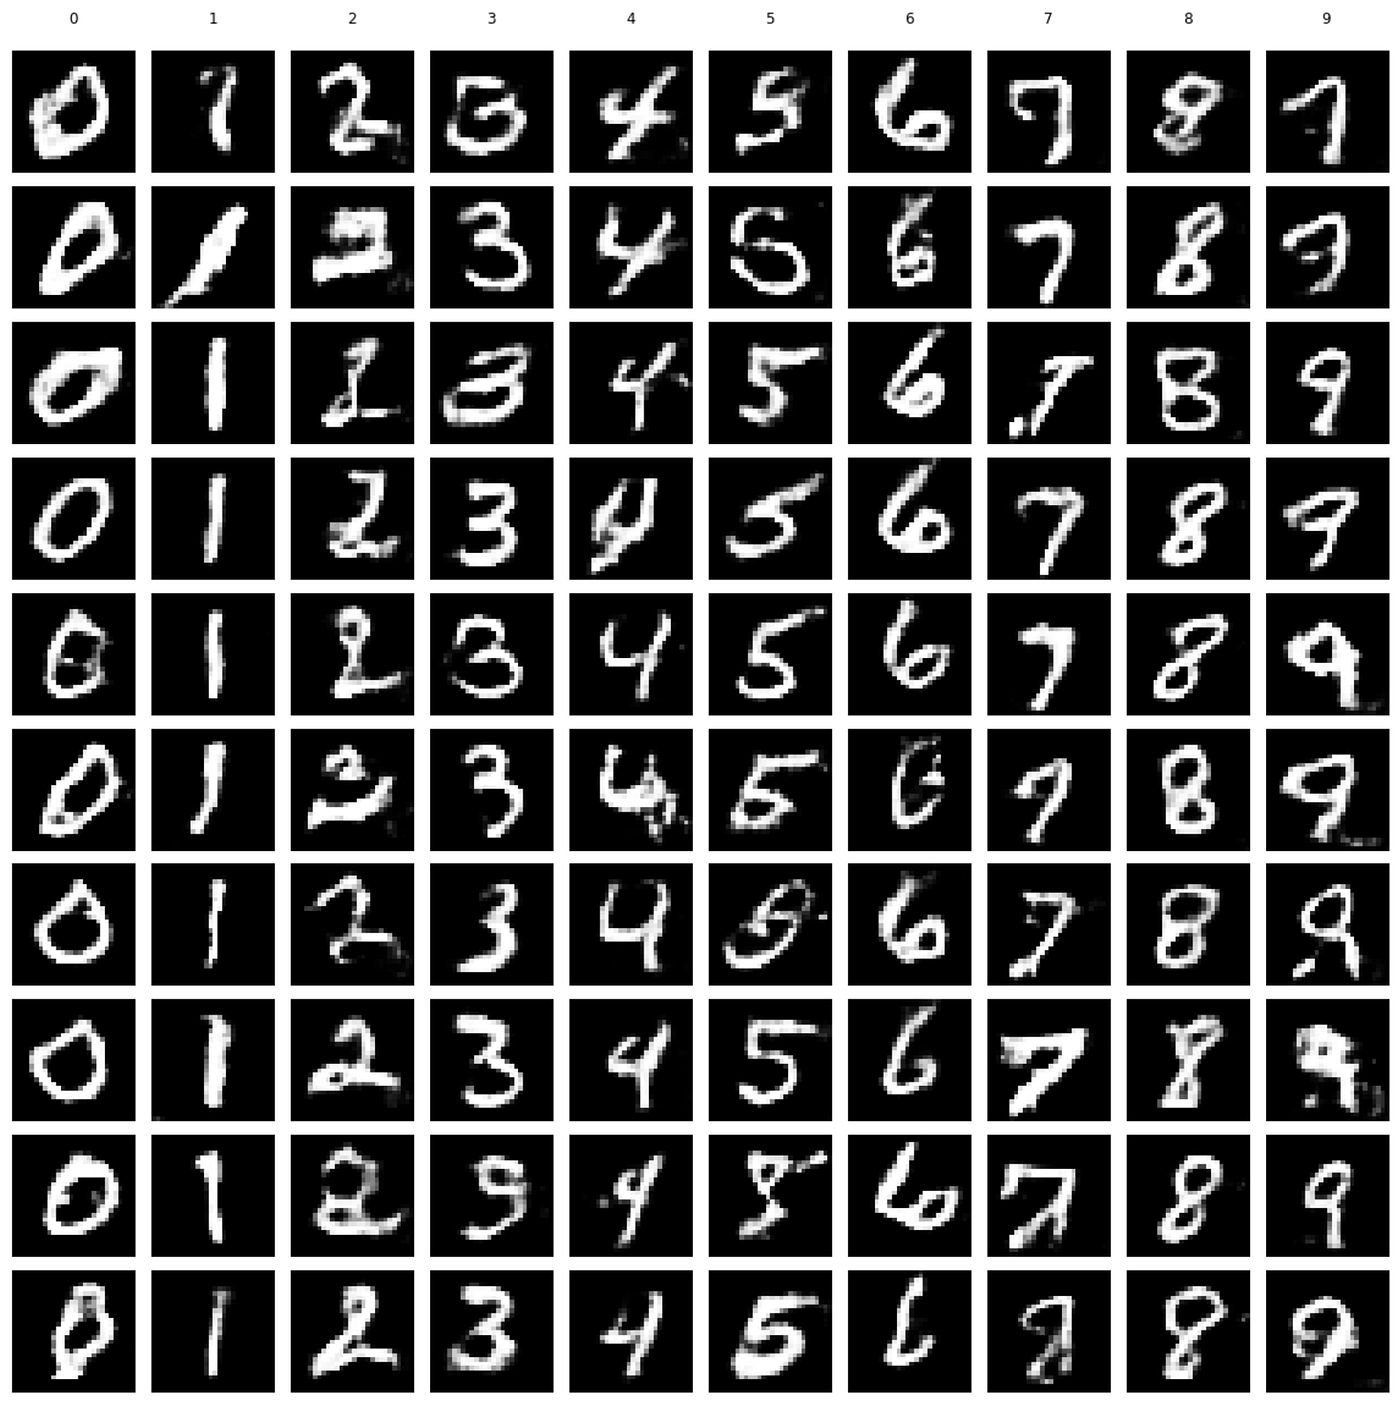
Next, we load the MNIST digit data, which is available in Keras datasets.
The above code displays the first ten digits with their labels.
Creating a Conditional DCGAN model
With data preparation completed, let’s define and assemble our models. Note that we will use Keras Functional API, which gives us more flexibility than the Sequential API, allowing us to create complex network architectures.
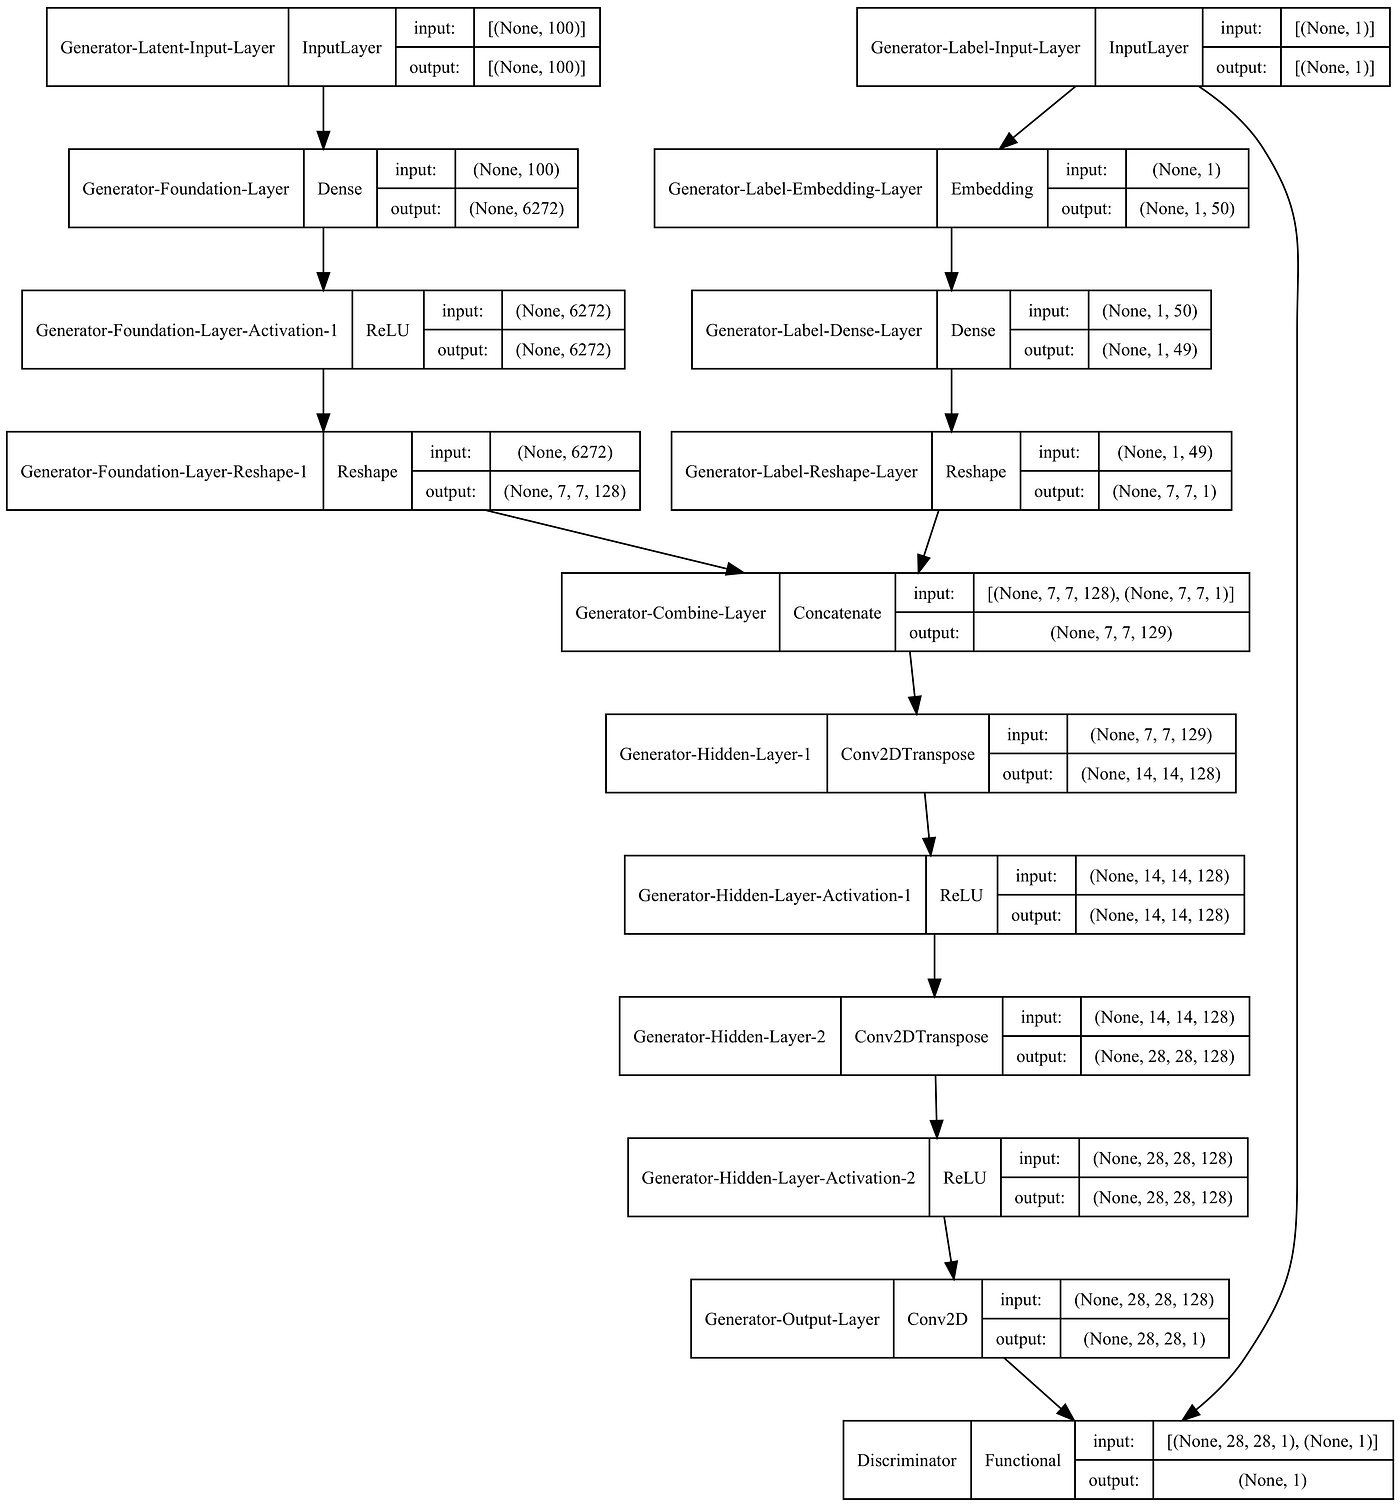
We will start with the Generator:

We have two inputs to a Generator model. The first is a 100-node latent vector, which is a seed for our model, and the second is a label (0–9).
The latent vector and the label are reshaped and concatenated before they go through the rest of the network, where Transposed Convolutional layers upscale the data to the desired size (28 x 28 pixels).
Next, let’s define a Discriminator model:

The Discriminator also has two separate inputs. One is a label, while the other is an image — either a real one from the MNSIT dataset or a fake one created by the Generator model.
The inputs are combined and passed through the network. The Convolutional and MaxPooling layers extract features and reduce the size before the prediction (real/fake) is made in the output layer.
Let’s combine the Generator and the Discriminator to create a Conditional Deep Convolutional Adversarial Network (cDCGAN). One crucial detail in the code below is that we make the Discriminator model non-trainable. We do this because we want to train the Discriminator separately using a combination of real and fake (generated) data. You will see how we do that later.
Note how the Generator and the Discriminator use the same label as input.
Preparing inputs for the Generator and the Discriminator
We will create three simple functions that will aid us in sampling / generating data for the two models.
- The first function samples real images and labels from the training data;
- The second function draws random vectors from the latent space, as well as random labels to be used as inputs into the Generator;
- Finally, the third function passes latent variables and labels into the Generator model to generate fake examples.
Model training and evaluation
The final two functions will help us train the models and display interim results (at specified intervals), so we can observe how the Generator improves over time.
Let’s create a function to display interim results first:
Finally, let’s define the training function:
Now we can call our training function, get some tea and let the computer do the rest 😃
train(gen_model, dis_model, gan_model, data, y_train, latent_dim)
Results
As the Generator and the Discriminator compete to outsmart each other, we can track their progress.
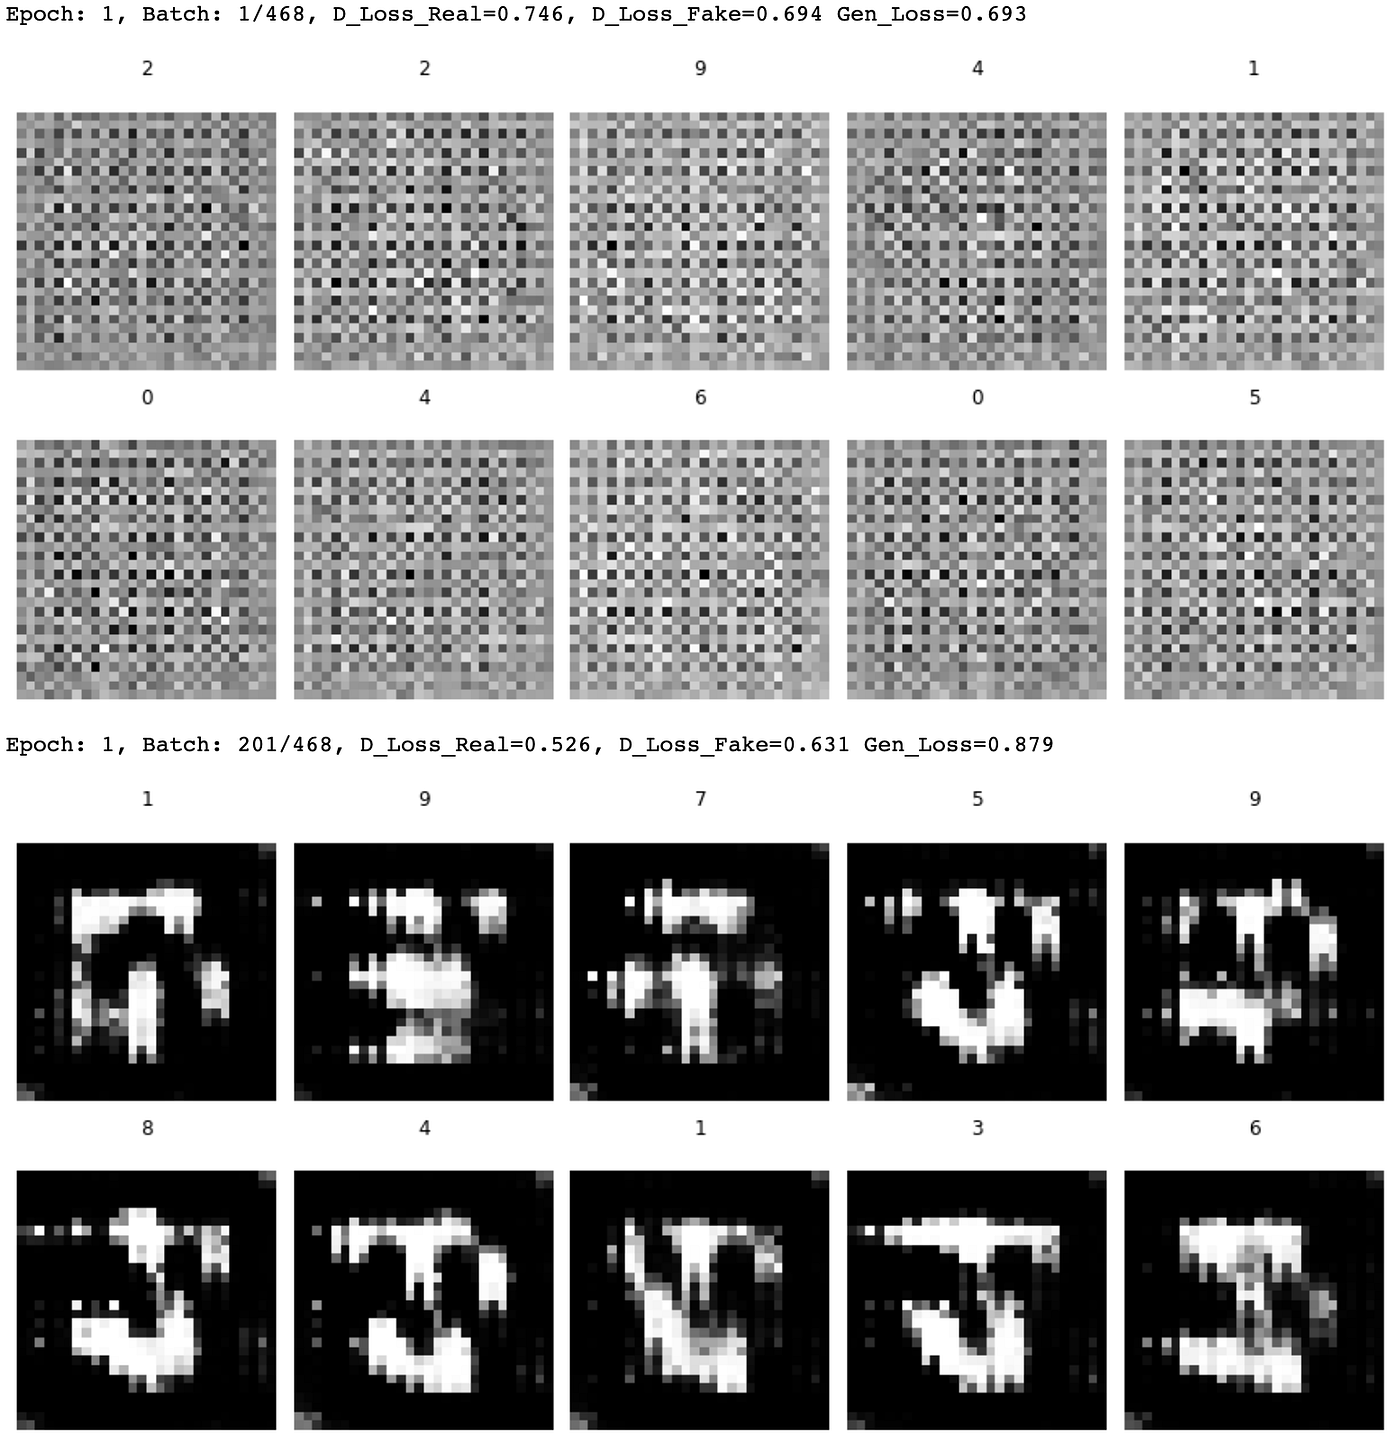
Here are some early attempts by the Generator to create handwritten digits:
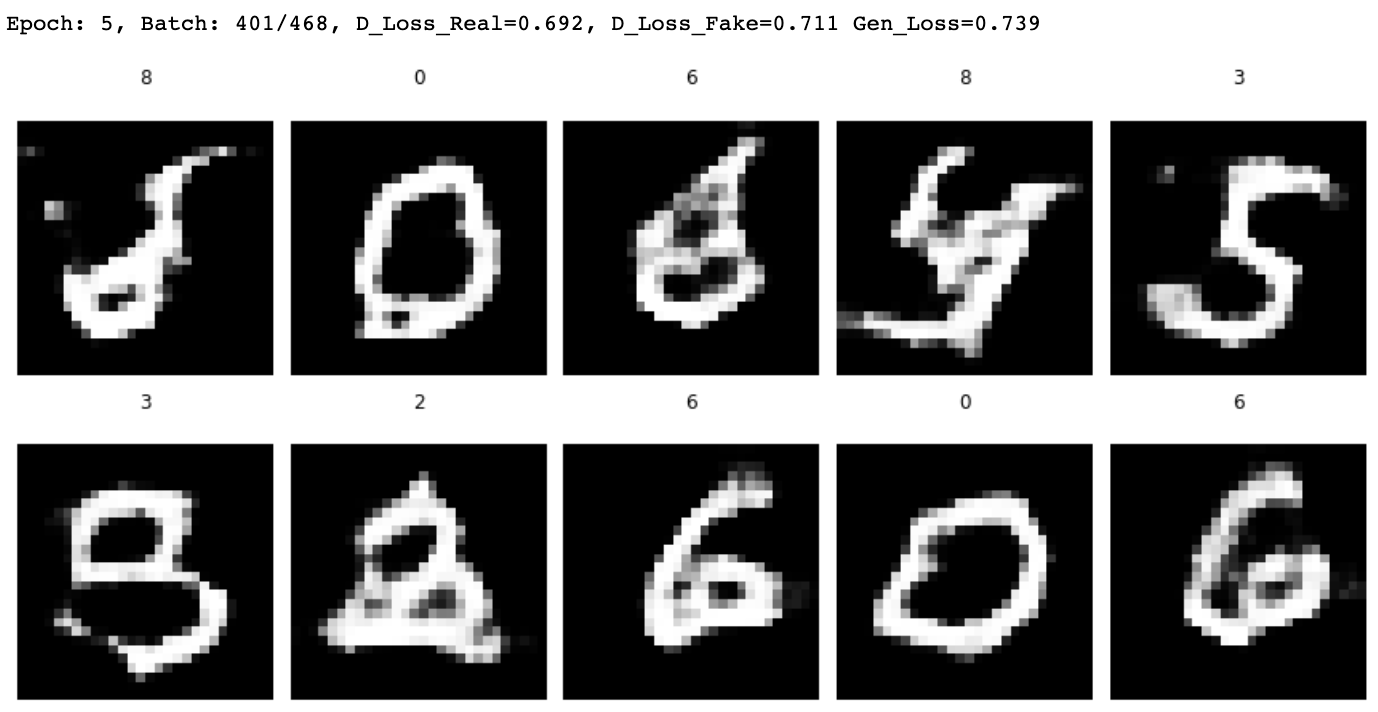
Some progress by Epoch 5:
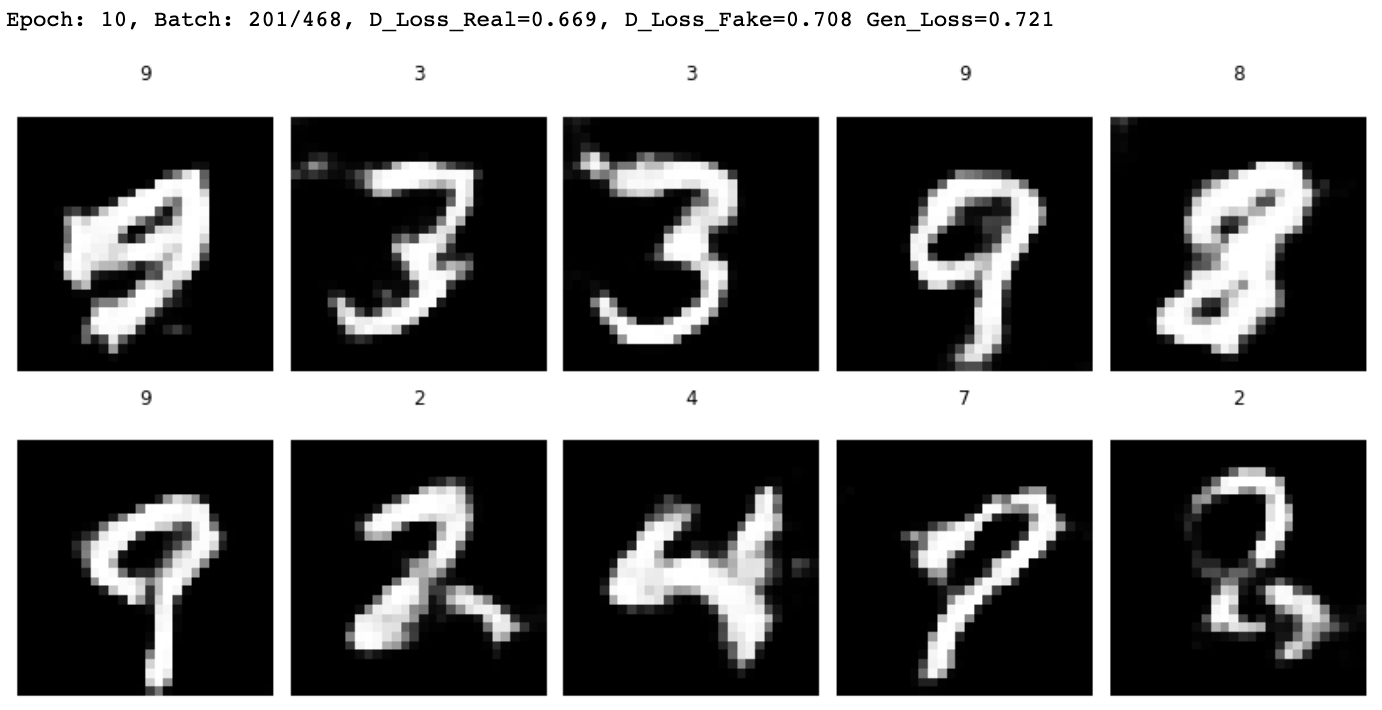
The Generator continues to get better throughout training with fake images by Epoch 10 looking like this:
Once the model training is complete, we can save the Generator part for future use.
Here is an example of how we can load the model and get it to generate images with specific labels:
As you can see, the results are not perfect, but we can improve them further by training the model for longer.
I hope my explanation and examples were sufficiently clear. Either way, please do not hesitate to leave a comment if you have any questions or suggestions. The complete Jupyter Notebook with the above Python code can be found on my GitHub repository.
Also, please feel free to check out my other GAN and Neural Network articles on Medium/TDS:
If you would like to receive my upcoming articles on Machine Learning and Neural Networks, please subscribe with your email, and they will land in your inbox as soon as I publish them.
Cheers! 🤓
Saul Dobilas
Neural Networks
An explanation of cGAN architecture with a detailed Python example
Have you experimented with Generative Adversarial Networks (GANs) yet? If so, you may have encountered a situation where you wanted your GAN to generate a specific type of data but did not have sufficient control over GANs outputs.
For example, assume you used a broad spectrum of flower images to train a GAN capable of producing fake pictures of flowers. While you can use your model to generate an image of a random flower, you cannot instruct it to create an image of, say, a tulip or a sunflower.
Conditional GAN (cGAN) allows us to condition the network with additional information such as class labels. It means that during the training, we pass images to the network with their actual labels (rose, tulip, sunflower etc.) for it to learn the difference between them. That way, we gain the ability to ask our model to generate images of specific flowers.
In this article, I will take you through the following:
- The place of Conditional GAN (cGAN) within the universe of Machine Learning algorithms
- An overview of cGAN and cDCGAN architecture and its components
- Python example showing you how to build a Conditional DCGAN from scratch with Keras / Tensorflow
While most types of Neural Networks are Supervised, some, like Autoencoders, are Self-Supervised. Because of this and their unique approach to Machine Learning, I have given Neural Networks their own category in my ML Universe chart.
Since Conditional GAN is a type of GAN, you will find it under the Generative Adversarial Networks subcategory. Click👇 on the interactive chart below to locate cGAN and to reveal other algorithms hiding under each branch of ML.
How do we condition a GAN?
Let’s first remind ourselves of a basic Generative Adversarial Network architecture.
As you can see, we have two main components:
- Generator Model — generates new data (i.e., fake data) similar to that of the problem domain.
- Discriminator Model — tries to identify whether the provided example is fake (comes from a generator ) or real (comes from the actual data domain).
In the case of a Conditional GAN, we want to condition both the Generator and the Discriminator so they know which type they are dealing with.
Say we use our GAN to create synthetic data containing house prices in London and Madrid. To make it conditional, we need to tell the Generator which city to generate the data for each time. We also need to inform the Discriminator whether the example passed to it is for London or Madrid.
So the Conditional GAN model architecture would look like this:
Note that we can condition GANs on many types of inputs. For example, we could also condition the network on other images where we want to create a GAN for image-to-image translation (e.g., turning the daytime image into a nighttime one).
Conditional Deep Convolutional GAN (cDCGAN)
As with the earlier flower example, we may want to condition a Deep Convolution GAN so we can ask the model to generate a specific type of image.
Below is a model architecture diagram for a Conditional DCGAN. Note that the high-level architecture is essentially the same as in the previous example, except the Generator and Discriminator contain additional layers, such as Convolutions and Transposed Convolutions.
In this example, I will show you how to build a cDCGAN demonstrated in the above diagram. It will enable us to generate “fake” handwritten digits similar to those in the MNIST dataset.
Since we are building a conditional GAN, we will be able to specify which digit (0–9) we want the Generator to produce each time.
Setup
We will need to get the following data and libraries:
Let’s import the libraries:
The above code prints package versions used in this example:
Tensorflow/Keras: 2.7.0
numpy: 1.21.4
matplotlib: 3.5.1
graphviz: 0.19.1
Next, we load the MNIST digit data, which is available in Keras datasets.
The above code displays the first ten digits with their labels.
Creating a Conditional DCGAN model
With data preparation completed, let’s define and assemble our models. Note that we will use Keras Functional API, which gives us more flexibility than the Sequential API, allowing us to create complex network architectures.
We will start with the Generator:
We have two inputs to a Generator model. The first is a 100-node latent vector, which is a seed for our model, and the second is a label (0–9).
The latent vector and the label are reshaped and concatenated before they go through the rest of the network, where Transposed Convolutional layers upscale the data to the desired size (28 x 28 pixels).
Next, let’s define a Discriminator model:
The Discriminator also has two separate inputs. One is a label, while the other is an image — either a real one from the MNSIT dataset or a fake one created by the Generator model.
The inputs are combined and passed through the network. The Convolutional and MaxPooling layers extract features and reduce the size before the prediction (real/fake) is made in the output layer.
Let’s combine the Generator and the Discriminator to create a Conditional Deep Convolutional Adversarial Network (cDCGAN). One crucial detail in the code below is that we make the Discriminator model non-trainable. We do this because we want to train the Discriminator separately using a combination of real and fake (generated) data. You will see how we do that later.
Note how the Generator and the Discriminator use the same label as input.
Preparing inputs for the Generator and the Discriminator
We will create three simple functions that will aid us in sampling / generating data for the two models.
- The first function samples real images and labels from the training data;
- The second function draws random vectors from the latent space, as well as random labels to be used as inputs into the Generator;
- Finally, the third function passes latent variables and labels into the Generator model to generate fake examples.
Model training and evaluation
The final two functions will help us train the models and display interim results (at specified intervals), so we can observe how the Generator improves over time.
Let’s create a function to display interim results first:
Finally, let’s define the training function:
Now we can call our training function, get some tea and let the computer do the rest 😃
train(gen_model, dis_model, gan_model, data, y_train, latent_dim)
Results
As the Generator and the Discriminator compete to outsmart each other, we can track their progress.
Here are some early attempts by the Generator to create handwritten digits:
Some progress by Epoch 5:
The Generator continues to get better throughout training with fake images by Epoch 10 looking like this:
Once the model training is complete, we can save the Generator part for future use.
Here is an example of how we can load the model and get it to generate images with specific labels:
As you can see, the results are not perfect, but we can improve them further by training the model for longer.
I hope my explanation and examples were sufficiently clear. Either way, please do not hesitate to leave a comment if you have any questions or suggestions. The complete Jupyter Notebook with the above Python code can be found on my GitHub repository.
Also, please feel free to check out my other GAN and Neural Network articles on Medium/TDS:
If you would like to receive my upcoming articles on Machine Learning and Neural Networks, please subscribe with your email, and they will land in your inbox as soon as I publish them.
Cheers! 🤓
Saul Dobilas
Denial of responsibility! Techno Blender is an automatic aggregator of the all world’s media. In each content, the hyperlink to the primary source is specified. All trademarks belong to their rightful owners, all materials to their authors. If you are the owner of the content and do not want us to publish your materials, please contact us by email – [email protected]. The content will be deleted within 24 hours.