
Compute the Distance Matrix of a Set of Sites from Their Coordinates in Python
Easily estimate the distance between any pair of sites from their geographical coordinates as a stepping stone to solving routing problems effectively
👁️ This is article #4 of the series covering the project “An Intelligent Decision Support System for Tourism in Python”, I encourage you to check it out to get a general overview of the whole project. If you’re only interested in creating distance matrices, this article is all you need, it’s self-contained. If you also want to apply the distance matrix to practical problems, the series will be of interest to you.
The present article continues our journey right where sprint 3 left off. Here, in sprint 4, we take a brief detour from modeling and develop a class with geospatial functionality that will be very handy when we attempt to solve general Traveling Salesman Problems, i.e., problems for arbitrary sites for which we may not even have distance data readily available. We stated this “requirement” in the previous sprint, and we’ll build a subsystem to satisfy it in this one.
Table of contents
1. Previous sprint recap
2. Reading the input data
3. Creating a distance matrix from location data
- 3.1. Should I go the extra mile to gain an extra yard?
- 3.2. Geolocation utilities with geopy
- 3.3. Getting to the points
- 3.4. From coordinates to distance matrix
4. Wrap it up! (inside a class)
- 4.1. GeoAnalyzer class design
- 4.2. Class usage demo
5. Conclusion (or planning for next sprint)
1. Previous sprint recap
In the previous article, the one of sprint 3, we carried out a proof-of-concept whereby we demonstrated that we can solve the Traveling Salesman Problem (TSP) for a list of sites, provided we had the distances between each possible pair of sites, as a distance matrix. This distance matrix was given because, in that sprint, the focus was on model building, not data processing. However, once the model was ready, we noted that we needed a way to solve general TSP problems, that is, TSP problems for an arbitrary set of sites. This generalization is required to create a truly useful MVP. As such, we concluded the natural next step is to find a way to automatically obtain a distance matrix from the coordinates of our sites of interest, a step that we’ll cover in this article.
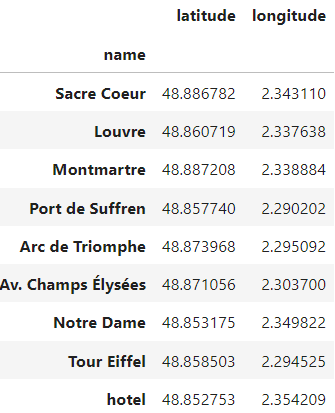
In doing so, our new basic input will be much simpler, just the geographical coordinates of the sites we want to visit:
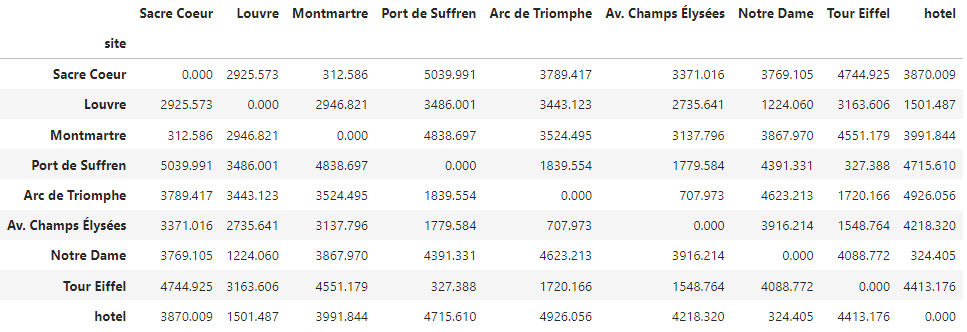
and the output will be the dataframe we used as input for the TSP model, the distance matrix for the input sites:
For consistency, we’ll use the same Paris sites we have considered so far. In the next article, we’ll integrate this functionality with the optimization model of the Traveling Salesman Problem, arriving at a more versatile MVP.
🎯 Keeping the final goal in mind
Let’s take a step back and briefly recapitulate why we’re doing this. The original real-life problem we are aspiring to solve is what we can call the Traveling Tourist Problem (TTP), that is, the problem of creating optimal trip plans for the general tourist, given both her “personal” data (preferences, budgets, etc.) and the trip “environment” data (distances, prices, modes of transport, etc.).
Since this real-life problem was deemed too complex, we simplified it to its essentialist version in sprint 1, to bootstrap the design of a solution. This “essentialist problem” turned out to be the Traveling Salesman Problem (TSP), where we considered the points to visit to be the “sites of interest” for the tourist in a city. With the functionality developed in this article, we are one step closer to a general solution of the TTP, with the TSP as the core of the solution.
2. Reading the input data
Our basic input is now the geographical coordinates of the sites we want to visit on the trip. We will treat the ‘hotel’ as a different kind of site, since the hotel is not, in itself, a “site of interest”, but a place we must visit to get some sleep on multi-day trips. Our choice of hotel could be different on a different trip, or under different circumstances, while the sites of interest in a city are more or less “constant” places that many travel guides agree on. The usefulness of this distinction will become more apparent when we’re ready to explore more advanced applications.
Hence, I’ve stored the coordinates of our hotel in a CSV file, location_hotel.csv, and the coordinates for the "sites of interest" in a separate CSV file, sites_coordinates.csv. Both CSVs have the same structure, so we read and combine them into one dataframe containing all our sites:
import pandas as pd

print(f"version pandas: {pd.__version__}")

DATA_FOLDER = ("https://raw.githubusercontent.com/carlosjuribe/"
               "traveling-tourist-problem/main/data")
FILE_LOCATION_HOTEL = "location_hotel.csv"
FILE_LOCATION_SITES = "sites_coordinates.csv"

df_sites = pd.concat([
    pd.read_csv(f"{DATA_FOLDER}/{FILE_LOCATION_SITES}", index_col='site'),
    pd.read_csv(f"{DATA_FOLDER}/{FILE_LOCATION_HOTEL}", index_col='site')
])

display(df_sites)
ℹ️ How to quickly prepare your own location data
If you want to follow along this article using your own list of sites, you have to replicate the steps I took to obtain the coordinates:
1. Go to Google Maps and search for each site in your list.
2. Each site will appear as a point on the map. Right-click on each one. The first element that appears is a pair of numbers: the latitude and longitude of the point you clicked on.
3. Click on those numbers, they will be saved in your clipboard, ready to be pasted in a file together with the name you choose for that point.
4. Repeat 1 to 3 for all your sites and you’ll have a file equivalent to sites_coordinates.csv.
This process works fine for a small set of sites, but if you have hundreds, or even tens, of sites, it becomes very tedious. In [a future article] we’ll create a way to automate this manual work, which is called geolocation.
3. Creating a distance matrix from location data
To build a distance matrix, we need to obtain the distance between any pair of locations. Sounds simple, but “distance” really depends on the context. Do we consider the number reported by mapping applications, like Google Maps, that take into account the streets network, bridges, parks, etc.? If so, do we take the distance that a pedestrian would walk, or that a car would drive? Or maybe just the good old length of a straight line connecting the two points? Clearly, we have many possible distances to choose from, with varying degrees of accuracy. The first question we have to answer is: how should we define “distance” in the particular context of our problem, and at this stage?
3.1. Should I go the extra mile to gain an extra yard?
It’s natural to feel tempted to use accurate data. In the end, we all know that accuracy is intrinsically valuable, and hence we are inclined to pursue accurate data, the more, the better. But we must also remember that more accurate data entails more complex code and dependencies, and thus more development time and maintenance. As we’re following an agile approach, we don’t let the best be the enemy of the good, so we will start as simple as we can, and then add complexity gradually, only if it is justified.
At this point of having to find distances between locations, we could do as many do, and jump straight to third-party API-based solutions that require app keys, credentials, or even credit card numbers for cloud providers. That approach is fine, but often times it is inefficient, as we can forget that accurate information brings added value, but also comes with added costs.
👁️ There ain’t no such thing as “free accuracy”
Remembering that in general we always “pay a price” for accessing accurate data (which is closely related to the concept of Value of Information) is another reason why taking an agile approach to the problem is a leaner course of action. By starting with simple assumptions on the “required level of accuracy”, and verifying their validity on our own problem data, we are ensuring that, if we eventually need to increase the accuracy of our data, we will be “paying a price” that is worth the (expected) improved results.
So let’s start very simple. We have coordinates. First idea: these coordinates are spread over parcels of the Earth very small compared to the radius of the Earth, so we could treat the latitudes as Y coordinates and the longitudes as X coordinates on a 2D plane, and then just compute the Euclidean distance (fancy term for the usual “straight line”).
- Pros: a simple formula for distance, no new dependencies or data, spatial relationships between locations are conserved.
- Cons: latitudes and longitudes are dimensionless numbers, so the numbers we’d get when solving the problem would not be actual distances. This means that some info we care about, like total distance traveled, would not be available, even if we can obtain the optimal tour.
The cons trump the pros, so we need a more complex approach (but still simple). Second idea: treat the coordinates as what they are, points on the Earth, but approximate the Earth as a sphere. A sphere does not have the familiar Euclidean geometry, so we will need a non-trivial formula that considers this spherical geometry when calculating the “straight line” distance between two points. So now it’s just a matter of implementing that formula using the radius of the Earth. We could do that, but we’ll instead rely on a famous library that already does that, and even better.
3.2. Geolocation utilities with geopy
If this article series were especially focused on geospatial data science, it would be valuable to take the time to explain and implement the formula for the great-circle distance, a nice baseline option to compute “straight-line” distances between points on a sphere. However, this article series is about the creation of an optimization-based tourism planning system, so instead of crafting our own formulas for geospatial utilities, we will rely on Geopy to do the heavy lifting for us. That way, we maintain focus on reaching a solution quickly.
Install it by running in an Anaconda prompt (or inside the conda environment we created in the first article, if you created it) the following:
conda install -y -c conda-forge geopy=2.3.0
Now, let’s do a demonstration with geopy for just two locations.
3.3. Getting to the points
Given the coordinates of two points, the geodesic function of geopy computes the distance of the geodesic connecting them across the Earth's surface. In Geometry, the geodesic is the path of minimal distance between points on a given metric space. In our familiar Euclidean space, straight lines are the geodesics. In a spherical space, great-circles are. The underlying "space" that Geopy's geodesic function considers is an accurate ellipsoid model of the Earth.
👁 A great-circle is great, but an ellipse is even greater
Earlier I said we would consider the Earth to be a sphere, because it was the simplest workable approximation. In reality, the Earth isn’t a sphere, but an ellipsoid, a solid with a more complex geometry. Now that geopy will spare us from coding our own functions for non-Euclidean geometries, we can upgrade our approximation of the Earth and employ the more accurate ellipsoidal distance between two points, instead of the great-circle distance. A better Earth model for the same lines of code. This indeed is free accuracy, so why not take it?
Here’s a function that computes the ellipsoidal distance between point 1 and point 2, in meters:
from geopy.distance import geodesic

def ellipsoidal_distance(p1, p2) -> float:
    """ Calculate distance (in meters) between p1 and p2, where
    each point is represented as a tuple (lat, lon) """
    return geodesic(p1, p2).meters
What is the distance between the Eiffel Tour and the Louvre?
p1 = df_sites.loc['Tour Eiffel']
p2 = df_sites.loc['Louvre']

ellipsoidal_distance(p1, p2)  # output: 3173.119635531859
3173 meters, around 3.2 km. Google Maps says it’s 3.5 km. The computed distance is 8.6 % lower than the “real” distance. Our legs only care about absolute errors in distance, though, which in this case amounts to just 330 extra meters to walk, compared to the estimated distance. Doesn’t seem like a significant error for a tourist who expects to be walking around all day in a big city.
And between the Eiffel Tour and Port de Suffren?
ellipsoidal_distance(
    df_sites.loc['Tour Eiffel'],
    df_sites.loc['Port de Suffren']
)  # output: 328.3147101635456
328 meters, this time 6% lower (just 22 meters shorter) than the 350 meters Google Maps provides. Not that bad for applying a formula. As we would expect, the closer the points are, the less chance there is for streets to zigzag and turns to appear, and hence the lower the error incurred by the ellipsoid model. Looks good enough for our present purposes.
Now we must apply this function to all pairs of locations, thus getting the distance matrix the TSP model needs.
3.4. From coordinates to distance matrix
This is the easy part, where we just have to loop over all the sites twice and compute and store the distance between each pair. The below function does that. Note that the distance metric is passed as an optional argument, being the ellipsoidal distance we used before the default. We leave the door open to better distance metrics to be passed in the future.
def compute_distance_matrix(df_sites, dist_metric=ellipsoidal_distance):
    """ Creates an N x N distance matrix from a dataframe of N locations
    with a latitute column and a longitude column """
    df_dist_matrix = pd.DataFrame(index=df_sites.index,
                                  columns=df_sites.index)

    for orig, orig_loc in df_sites.iterrows():  # for each origin
        for dest, dest_loc in df_sites.iterrows():  # for each destination
            df_dist_matrix.at[orig, dest] = dist_metric(orig_loc, dest_loc)
    return df_dist_matrix


df_distances = compute_distance_matrix(df_sites)

display(df_distances)
And there we have it! As expected, the diagonal of the matrix is zero, and the matrix is symmetric. The index and columns of the output dataframe contain the names of the input sites.
Functionality demonstrated. Now we can do better to facilitate the use of this function. Let’s wrap up this functionality inside a class in a convenient manner, for easy re-use, and more importantly, for easier integration with the optimization model of the TSP we built in the previous sprint.
4. Wrap it up! (inside a class)
4.1. GeoAnalyzer class design
Let’s create a new class, GeoAnalyzer, dedicated to the geospatial utilities that may arise in routing problems. As such, our function compute_distance_matrix fits in naturally as a method. The main parts of this class will be, for now:
- A dataframe having site locations, the attribute _df_locations.
- The pure function ellipsoidal_distance.
- The method get_distance_matrix, being equivalent to the previous function compute_distance_matrix, but using the instance attribute _df_locations to compute the distances.
Since the user may want to add new locations to the list of locations at any point in his analysis, we include the method add_locations that accepts a dataframe of geographical coordinates and appends it to the previously existing one.
Below you can find the definition of GeoAnalyzer. Note there are other convenience methods and properties not mentioned here.
from typing import Tuple

import pandas as pd
from geopy.distance import geodesic


class GeoAnalyzer:
    """ Utils for geolocation information and processing """
    _GeoPoint = Tuple[float, float]

    def __init__(self):
        """ Use method `add_locations` to store some locations inside
        and start using the geo-utilities """
        self._df_locations = pd.DataFrame(columns=['latitude', 'longitude'])

    #####################   distances   #####################
    @staticmethod
    def ellipsoidal_distance(point1: _GeoPoint, point2: _GeoPoint) -> float:
        """ Calculate ellipsoidal distance (in meters) between point1
        and point2 where each point is represented as a tuple (lat, lon)
        """
        return geodesic(point1, point2).meters
    #########################################################

    @property
    def locations(self):
        return self._df_locations

    @property
    def num_locations(self):
        return len(self._df_locations)

    def add_locations(self, df_locations: pd.DataFrame):
        """ Geo-location data needed for analysis.
        Parameters
        ----------
        df_locations : pd.DataFrame
            Dataframe of geographical coordinates with the first column
            named 'latitude' and the second column named 'longitude'
        """
        df_updated = pd.concat([self._df_locations, df_locations.copy()])
        # drop duplicates just in case the user adds repeated locations
        self._df_locations = df_updated.drop_duplicates()

    def get_distance_matrix(self) -> pd.DataFrame:
        """ Computes the distance matrix as a dataframe based on the
        provided location data """
        df_locations = self._df_locations
        dist_metric = self.ellipsoidal_distance  # only distance available

        # initialize matrix df
        df_dist_matrix = pd.DataFrame(index=df_locations.index,
                                      columns=df_locations.index)
        # for each origin and destination pair, compute distance
        for orig, orig_loc in df_locations.iterrows():
            for dest, dest_loc in df_locations.iterrows():
                df_dist_matrix.at[orig, dest] = dist_metric(orig_loc,
                                                            dest_loc)
        # a bit of metadata doesn't hurt
        df_dist_matrix.distance_metric = dist_metric.__name__
        return df_dist_matrix

    def __repr__(self):
        """ Display number of currently considered locations """
        return f"{self.__class__.__name__}(n_locs={self.num_locations})"
4.2. Class usage demo
Let’s explore a bit the main functionality of the class. We create an instance and add our sites of interest from Paris:
geo_analyzer = GeoAnalyzer()
geo_analyzer.add_locations(df_sites)
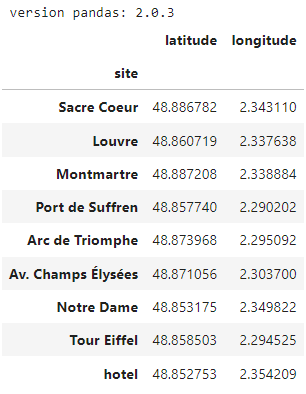
We check the representation of our instance at this point, which informs us that we’ve provided 9 locations, which we can check the details of with the attribute locations:
display(geo_analyzer)
display(geo_analyzer.locations)
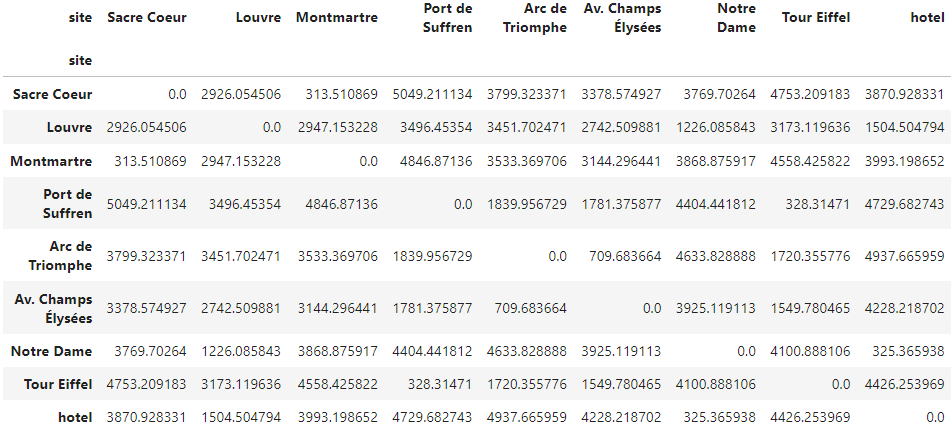
Of course, we can extract the distance matrix from the object, which by now it’s quite familiar:
df_distances = geo_analyzer.get_distance_matrix()

display(df_distances)
And lastly, in case we’re curious about where these values come from, we can check it from the dataframe itself:
print(f"Distance metric used: {df_distances.distance_metric}")
# [Out]: Distance metric used: ellipsoidal_distance
This would be more valuable if more distance metrics were available, something that we will see in future sprints.
5. Conclusion (or planning for next sprint)
The end result of our work has been a class, GeoAnalyzer, with convenient methods that will help us generalize the Traveling Salesman Problem to arbitrary sets of sites. That generalization will be the precise goal of our next sprint, in which we will create an estimator-like class for the TSP that hides away the model-building steps covered in sprint 2 and takes as input the geo-coordinates of the sites to be visited. The GeoAnalyzer class will be a key component of this new estimator class, enabling a true general use of the TSP optimization model we have built. This new estimator class, combining the flexibility of GeoAnalyzer with the generality of the TSP model, will become the core of our solution to the more general Traveling Tourist Problem we aspire to solve. Continue to the next sprint for the real deal!
Feel free to follow me, ask me questions, give me feedback, or contact me on LinkedIn. Thanks for reading! 📈😊
Compute the Distance Matrix of a Set of Sites from Their Coordinates in Python was originally published in Towards Data Science on Medium, where people are continuing the conversation by highlighting and responding to this story.
Easily estimate the distance between any pair of sites from their geographical coordinates as a stepping stone to solving routing problems effectively

👁️ This is article #4 of the series covering the project “An Intelligent Decision Support System for Tourism in Python”, I encourage you to check it out to get a general overview of the whole project. If you’re only interested in creating distance matrices, this article is all you need, it’s self-contained. If you also want to apply the distance matrix to practical problems, the series will be of interest to you.
The present article continues our journey right where sprint 3 left off. Here, in sprint 4, we take a brief detour from modeling and develop a class with geospatial functionality that will be very handy when we attempt to solve general Traveling Salesman Problems, i.e., problems for arbitrary sites for which we may not even have distance data readily available. We stated this “requirement” in the previous sprint, and we’ll build a subsystem to satisfy it in this one.
Table of contents
1. Previous sprint recap
2. Reading the input data
3. Creating a distance matrix from location data
- 3.1. Should I go the extra mile to gain an extra yard?
- 3.2. Geolocation utilities with geopy
- 3.3. Getting to the points
- 3.4. From coordinates to distance matrix
4. Wrap it up! (inside a class)
- 4.1. GeoAnalyzer class design
- 4.2. Class usage demo
5. Conclusion (or planning for next sprint)
1. Previous sprint recap
In the previous article, the one of sprint 3, we carried out a proof-of-concept whereby we demonstrated that we can solve the Traveling Salesman Problem (TSP) for a list of sites, provided we had the distances between each possible pair of sites, as a distance matrix. This distance matrix was given because, in that sprint, the focus was on model building, not data processing. However, once the model was ready, we noted that we needed a way to solve general TSP problems, that is, TSP problems for an arbitrary set of sites. This generalization is required to create a truly useful MVP. As such, we concluded the natural next step is to find a way to automatically obtain a distance matrix from the coordinates of our sites of interest, a step that we’ll cover in this article.
In doing so, our new basic input will be much simpler, just the geographical coordinates of the sites we want to visit:
and the output will be the dataframe we used as input for the TSP model, the distance matrix for the input sites:
For consistency, we’ll use the same Paris sites we have considered so far. In the next article, we’ll integrate this functionality with the optimization model of the Traveling Salesman Problem, arriving at a more versatile MVP.
🎯 Keeping the final goal in mind
Let’s take a step back and briefly recapitulate why we’re doing this. The original real-life problem we are aspiring to solve is what we can call the Traveling Tourist Problem (TTP), that is, the problem of creating optimal trip plans for the general tourist, given both her “personal” data (preferences, budgets, etc.) and the trip “environment” data (distances, prices, modes of transport, etc.).
Since this real-life problem was deemed too complex, we simplified it to its essentialist version in sprint 1, to bootstrap the design of a solution. This “essentialist problem” turned out to be the Traveling Salesman Problem (TSP), where we considered the points to visit to be the “sites of interest” for the tourist in a city. With the functionality developed in this article, we are one step closer to a general solution of the TTP, with the TSP as the core of the solution.
2. Reading the input data
Our basic input is now the geographical coordinates of the sites we want to visit on the trip. We will treat the ‘hotel’ as a different kind of site, since the hotel is not, in itself, a “site of interest”, but a place we must visit to get some sleep on multi-day trips. Our choice of hotel could be different on a different trip, or under different circumstances, while the sites of interest in a city are more or less “constant” places that many travel guides agree on. The usefulness of this distinction will become more apparent when we’re ready to explore more advanced applications.
Hence, I’ve stored the coordinates of our hotel in a CSV file, location_hotel.csv, and the coordinates for the "sites of interest" in a separate CSV file, sites_coordinates.csv. Both CSVs have the same structure, so we read and combine them into one dataframe containing all our sites:
import pandas as pd

print(f"version pandas: {pd.__version__}")

DATA_FOLDER = ("https://raw.githubusercontent.com/carlosjuribe/"
               "traveling-tourist-problem/main/data")
FILE_LOCATION_HOTEL = "location_hotel.csv"
FILE_LOCATION_SITES = "sites_coordinates.csv"

df_sites = pd.concat([
    pd.read_csv(f"{DATA_FOLDER}/{FILE_LOCATION_SITES}", index_col='site'),
    pd.read_csv(f"{DATA_FOLDER}/{FILE_LOCATION_HOTEL}", index_col='site')
])

display(df_sites)
ℹ️ How to quickly prepare your own location data
If you want to follow along this article using your own list of sites, you have to replicate the steps I took to obtain the coordinates:
1. Go to Google Maps and search for each site in your list.
2. Each site will appear as a point on the map. Right-click on each one. The first element that appears is a pair of numbers: the latitude and longitude of the point you clicked on.
3. Click on those numbers, they will be saved in your clipboard, ready to be pasted in a file together with the name you choose for that point.
4. Repeat 1 to 3 for all your sites and you’ll have a file equivalent to sites_coordinates.csv.
This process works fine for a small set of sites, but if you have hundreds, or even tens, of sites, it becomes very tedious. In [a future article] we’ll create a way to automate this manual work, which is called geolocation.
3. Creating a distance matrix from location data
To build a distance matrix, we need to obtain the distance between any pair of locations. Sounds simple, but “distance” really depends on the context. Do we consider the number reported by mapping applications, like Google Maps, that take into account the streets network, bridges, parks, etc.? If so, do we take the distance that a pedestrian would walk, or that a car would drive? Or maybe just the good old length of a straight line connecting the two points? Clearly, we have many possible distances to choose from, with varying degrees of accuracy. The first question we have to answer is: how should we define “distance” in the particular context of our problem, and at this stage?
3.1. Should I go the extra mile to gain an extra yard?
It’s natural to feel tempted to use accurate data. In the end, we all know that accuracy is intrinsically valuable, and hence we are inclined to pursue accurate data, the more, the better. But we must also remember that more accurate data entails more complex code and dependencies, and thus more development time and maintenance. As we’re following an agile approach, we don’t let the best be the enemy of the good, so we will start as simple as we can, and then add complexity gradually, only if it is justified.
At this point of having to find distances between locations, we could do as many do, and jump straight to third-party API-based solutions that require app keys, credentials, or even credit card numbers for cloud providers. That approach is fine, but often times it is inefficient, as we can forget that accurate information brings added value, but also comes with added costs.
👁️ There ain’t no such thing as “free accuracy”
Remembering that in general we always “pay a price” for accessing accurate data (which is closely related to the concept of Value of Information) is another reason why taking an agile approach to the problem is a leaner course of action. By starting with simple assumptions on the “required level of accuracy”, and verifying their validity on our own problem data, we are ensuring that, if we eventually need to increase the accuracy of our data, we will be “paying a price” that is worth the (expected) improved results.
So let’s start very simple. We have coordinates. First idea: these coordinates are spread over parcels of the Earth very small compared to the radius of the Earth, so we could treat the latitudes as Y coordinates and the longitudes as X coordinates on a 2D plane, and then just compute the Euclidean distance (fancy term for the usual “straight line”).
- Pros: a simple formula for distance, no new dependencies or data, spatial relationships between locations are conserved.
- Cons: latitudes and longitudes are dimensionless numbers, so the numbers we’d get when solving the problem would not be actual distances. This means that some info we care about, like total distance traveled, would not be available, even if we can obtain the optimal tour.
The cons trump the pros, so we need a more complex approach (but still simple). Second idea: treat the coordinates as what they are, points on the Earth, but approximate the Earth as a sphere. A sphere does not have the familiar Euclidean geometry, so we will need a non-trivial formula that considers this spherical geometry when calculating the “straight line” distance between two points. So now it’s just a matter of implementing that formula using the radius of the Earth. We could do that, but we’ll instead rely on a famous library that already does that, and even better.
3.2. Geolocation utilities with geopy
If this article series were especially focused on geospatial data science, it would be valuable to take the time to explain and implement the formula for the great-circle distance, a nice baseline option to compute “straight-line” distances between points on a sphere. However, this article series is about the creation of an optimization-based tourism planning system, so instead of crafting our own formulas for geospatial utilities, we will rely on Geopy to do the heavy lifting for us. That way, we maintain focus on reaching a solution quickly.
Install it by running in an Anaconda prompt (or inside the conda environment we created in the first article, if you created it) the following:
conda install -y -c conda-forge geopy=2.3.0
Now, let’s do a demonstration with geopy for just two locations.
3.3. Getting to the points
Given the coordinates of two points, the geodesic function of geopy computes the distance of the geodesic connecting them across the Earth's surface. In Geometry, the geodesic is the path of minimal distance between points on a given metric space. In our familiar Euclidean space, straight lines are the geodesics. In a spherical space, great-circles are. The underlying "space" that Geopy's geodesic function considers is an accurate ellipsoid model of the Earth.
👁 A great-circle is great, but an ellipse is even greater
Earlier I said we would consider the Earth to be a sphere, because it was the simplest workable approximation. In reality, the Earth isn’t a sphere, but an ellipsoid, a solid with a more complex geometry. Now that geopy will spare us from coding our own functions for non-Euclidean geometries, we can upgrade our approximation of the Earth and employ the more accurate ellipsoidal distance between two points, instead of the great-circle distance. A better Earth model for the same lines of code. This indeed is free accuracy, so why not take it?
Here’s a function that computes the ellipsoidal distance between point 1 and point 2, in meters:
from geopy.distance import geodesic

def ellipsoidal_distance(p1, p2) -> float:
    """ Calculate distance (in meters) between p1 and p2, where
    each point is represented as a tuple (lat, lon) """
    return geodesic(p1, p2).meters
What is the distance between the Eiffel Tour and the Louvre?
p1 = df_sites.loc['Tour Eiffel']
p2 = df_sites.loc['Louvre']

ellipsoidal_distance(p1, p2)  # output: 3173.119635531859
3173 meters, around 3.2 km. Google Maps says it’s 3.5 km. The computed distance is 8.6 % lower than the “real” distance. Our legs only care about absolute errors in distance, though, which in this case amounts to just 330 extra meters to walk, compared to the estimated distance. Doesn’t seem like a significant error for a tourist who expects to be walking around all day in a big city.
And between the Eiffel Tour and Port de Suffren?
ellipsoidal_distance(
    df_sites.loc['Tour Eiffel'],
    df_sites.loc['Port de Suffren']
)  # output: 328.3147101635456
328 meters, this time 6% lower (just 22 meters shorter) than the 350 meters Google Maps provides. Not that bad for applying a formula. As we would expect, the closer the points are, the less chance there is for streets to zigzag and turns to appear, and hence the lower the error incurred by the ellipsoid model. Looks good enough for our present purposes.
Now we must apply this function to all pairs of locations, thus getting the distance matrix the TSP model needs.
3.4. From coordinates to distance matrix
This is the easy part, where we just have to loop over all the sites twice and compute and store the distance between each pair. The below function does that. Note that the distance metric is passed as an optional argument, being the ellipsoidal distance we used before the default. We leave the door open to better distance metrics to be passed in the future.
def compute_distance_matrix(df_sites, dist_metric=ellipsoidal_distance):
    """ Creates an N x N distance matrix from a dataframe of N locations
    with a latitute column and a longitude column """
    df_dist_matrix = pd.DataFrame(index=df_sites.index,
                                  columns=df_sites.index)

    for orig, orig_loc in df_sites.iterrows():  # for each origin
        for dest, dest_loc in df_sites.iterrows():  # for each destination
            df_dist_matrix.at[orig, dest] = dist_metric(orig_loc, dest_loc)
    return df_dist_matrix


df_distances = compute_distance_matrix(df_sites)

display(df_distances)
And there we have it! As expected, the diagonal of the matrix is zero, and the matrix is symmetric. The index and columns of the output dataframe contain the names of the input sites.
Functionality demonstrated. Now we can do better to facilitate the use of this function. Let’s wrap up this functionality inside a class in a convenient manner, for easy re-use, and more importantly, for easier integration with the optimization model of the TSP we built in the previous sprint.
4. Wrap it up! (inside a class)
4.1. GeoAnalyzer class design
Let’s create a new class, GeoAnalyzer, dedicated to the geospatial utilities that may arise in routing problems. As such, our function compute_distance_matrix fits in naturally as a method. The main parts of this class will be, for now:
- A dataframe having site locations, the attribute _df_locations.
- The pure function ellipsoidal_distance.
- The method get_distance_matrix, being equivalent to the previous function compute_distance_matrix, but using the instance attribute _df_locations to compute the distances.
Since the user may want to add new locations to the list of locations at any point in his analysis, we include the method add_locations that accepts a dataframe of geographical coordinates and appends it to the previously existing one.
Below you can find the definition of GeoAnalyzer. Note there are other convenience methods and properties not mentioned here.
from typing import Tuple

import pandas as pd
from geopy.distance import geodesic


class GeoAnalyzer:
    """ Utils for geolocation information and processing """
    _GeoPoint = Tuple[float, float]

    def __init__(self):
        """ Use method `add_locations` to store some locations inside
        and start using the geo-utilities """
        self._df_locations = pd.DataFrame(columns=['latitude', 'longitude'])

    #####################   distances   #####################
    @staticmethod
    def ellipsoidal_distance(point1: _GeoPoint, point2: _GeoPoint) -> float:
        """ Calculate ellipsoidal distance (in meters) between point1
        and point2 where each point is represented as a tuple (lat, lon)
        """
        return geodesic(point1, point2).meters
    #########################################################

    @property
    def locations(self):
        return self._df_locations

    @property
    def num_locations(self):
        return len(self._df_locations)

    def add_locations(self, df_locations: pd.DataFrame):
        """ Geo-location data needed for analysis.
        Parameters
        ----------
        df_locations : pd.DataFrame
            Dataframe of geographical coordinates with the first column
            named 'latitude' and the second column named 'longitude'
        """
        df_updated = pd.concat([self._df_locations, df_locations.copy()])
        # drop duplicates just in case the user adds repeated locations
        self._df_locations = df_updated.drop_duplicates()

    def get_distance_matrix(self) -> pd.DataFrame:
        """ Computes the distance matrix as a dataframe based on the
        provided location data """
        df_locations = self._df_locations
        dist_metric = self.ellipsoidal_distance  # only distance available

        # initialize matrix df
        df_dist_matrix = pd.DataFrame(index=df_locations.index,
                                      columns=df_locations.index)
        # for each origin and destination pair, compute distance
        for orig, orig_loc in df_locations.iterrows():
            for dest, dest_loc in df_locations.iterrows():
                df_dist_matrix.at[orig, dest] = dist_metric(orig_loc,
                                                            dest_loc)
        # a bit of metadata doesn't hurt
        df_dist_matrix.distance_metric = dist_metric.__name__
        return df_dist_matrix

    def __repr__(self):
        """ Display number of currently considered locations """
        return f"{self.__class__.__name__}(n_locs={self.num_locations})"
4.2. Class usage demo
Let’s explore a bit the main functionality of the class. We create an instance and add our sites of interest from Paris:
geo_analyzer = GeoAnalyzer()
geo_analyzer.add_locations(df_sites)
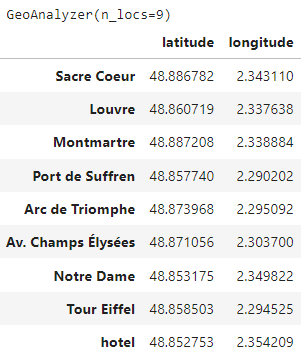
We check the representation of our instance at this point, which informs us that we’ve provided 9 locations, which we can check the details of with the attribute locations:
display(geo_analyzer)
display(geo_analyzer.locations)
Of course, we can extract the distance matrix from the object, which by now it’s quite familiar:
df_distances = geo_analyzer.get_distance_matrix()

display(df_distances)
And lastly, in case we’re curious about where these values come from, we can check it from the dataframe itself:
print(f"Distance metric used: {df_distances.distance_metric}")
# [Out]: Distance metric used: ellipsoidal_distance
This would be more valuable if more distance metrics were available, something that we will see in future sprints.
5. Conclusion (or planning for next sprint)
The end result of our work has been a class, GeoAnalyzer, with convenient methods that will help us generalize the Traveling Salesman Problem to arbitrary sets of sites. That generalization will be the precise goal of our next sprint, in which we will create an estimator-like class for the TSP that hides away the model-building steps covered in sprint 2 and takes as input the geo-coordinates of the sites to be visited. The GeoAnalyzer class will be a key component of this new estimator class, enabling a true general use of the TSP optimization model we have built. This new estimator class, combining the flexibility of GeoAnalyzer with the generality of the TSP model, will become the core of our solution to the more general Traveling Tourist Problem we aspire to solve. Continue to the next sprint for the real deal!
Feel free to follow me, ask me questions, give me feedback, or contact me on LinkedIn. Thanks for reading! 📈😊
Compute the Distance Matrix of a Set of Sites from Their Coordinates in Python was originally published in Towards Data Science on Medium, where people are continuing the conversation by highlighting and responding to this story.
Denial of responsibility! Techno Blender is an automatic aggregator of the all world’s media. In each content, the hyperlink to the primary source is specified. All trademarks belong to their rightful owners, all materials to their authors. If you are the owner of the content and do not want us to publish your materials, please contact us by email – [email protected]. The content will be deleted within 24 hours.