
Configure AWS Glue Job Using Python-Based AWS CDK
AWS Glue is a serverless data integration service that makes it easier to discover, prepare, move, and integrate data from multiple sources for analytics, machine learning (ML), and application development. This article will go into the best practices of application development and deployment on Cloud mandate using Infrastructure as code (IaC).
Out of the various technologies available in the market for writing IaC, AWS CDK leverages popular programming languages (Python, Typescript, Java, Go, etc.) and is widely adopted by the developers. In this article, I will show how we can use Python-based CDK constructs to set up a Glue job that loads data from Amazon S3 to AWS Glue catalog tables.
Prerequisites
- An AWS account
- An AWS profile configured with the user having an administrator access policy.
- NPM and Python installed
Product Versions
- CDK: v2.26 or later
- Python: v3.9.7
- Glue: v2.0 or later
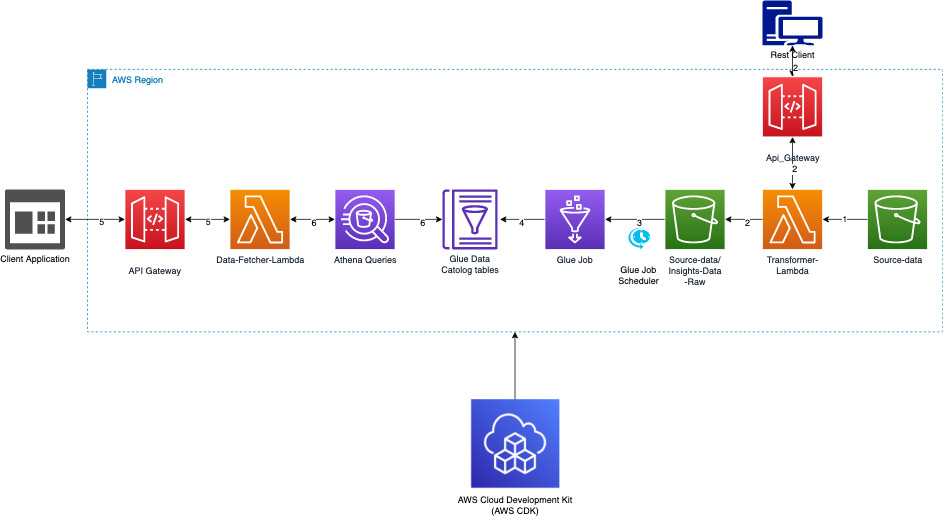
Target Architecture
The following architecture diagram shows the components involved in this solution and the interactions between them:
The steps numbered in the diagram are explained in detail below:
- Data files are loaded into a CSV format in the source-data S3 bucket.
- Transformer-Lambda when invoked from the REST client converts data from CSV to parquet format and uploads to the “Insights-Data-Raw” folder in the source-data S3 bucket.
- Glue trigger will kick-off the Glue job as scheduled.
- The Glue job will transform, aggregate, and load data from the parquet files into the glue data catalog tables.
- Client application will invoke query API, which will invoke
Data-Fetcher-Lambda. Data-Fetcher-Lambdawill fetch data from the Glue catalog tables using Athena.
Component Details
Transformer Lambda
The code snippet given below in Python shows how a CSV file is downloaded from a folder in the S3 bucket and after conversion to the parquet format is loaded back to a different folder in the same S3 bucket. This lambda function downloads and reads a CSV file from path stored in the environment variable called SOURCE_BUCKET. It uses the pandas library to create a data-frame with the data content in the CSV file and then write the data into the parquet file. The parquet file is then uploaded to the S3 bucket to be consumed by the Glue job later:
import logging
import os
import boto3
from botocore.exceptions import ClientError
import pandas as pd
logger = logging.getLogger()
logger.setLevel(logging.INFO)
def lambda_handler(event, context):
payload = event['body']
path = payload.get('file-path')
bucket_name = os.getenv('SOURCE_BUCKET','source-data-us-west-2-<account_number>')
s3_client = boto3.client('s3')
file_name = path.split("https://feeds.dzone.com/")[-1]
local_tmp_path = f'/tmp/{file_name}'
content="inference"
try:
s3_client.download_file(bucket_name, path, local_tmp_path)
except ClientError as e:
logger.info(f"Unable to download the image to /tmp location : Error Code : {e.response['Error']['Code']} , error Message: {e.response['Error']['Message']}")
return "FAILED"
df = pd.read_csv(local_tmp_path)
print('df',df)
try:
src_file_name = file_name.split('.')[0] #removing the json file extension
parquet_file_name = f"/tmp/{src_file_name}_{content}.parquet"
logger.info(f"Getting src_filename")
data_dt_val = src_file_name.split("-")[0].split("_")[-1] # Fetching the date value from file name
logger.info(f"Data_date value{data_dt_val}")
target_file_location = f's3://{bucket_name}/dashboard-data/dashboard-raw/{content}/data_dt={data_dt_val}{parquet_file_name}'
logger.info(f"parque_file_path :::{target_file_location}")
df.to_parquet(target_file_location)
logger.info(f"writing to parquet file regular")
return {"message":"Parquet file created"}
except Exception as e:
logger.info(f"Unable to write parquet file for the following reason {str(e)}")
return {"message":str(e)}Glue Database
A Glue database helps to logically group the clue catalog tables. The below code snippet shows the creation of a Glue database in the account provided as a catalog_id. The account number is obtained from environment variable CDK_DEFAULT_ACCOUNT:
dashboard_database = glue.CfnDatabase(self, "dashboard_db",
                        catalog_id=os.getenv('CDK_DEFAULT_ACCOUNT'),
                        database_input=glue.CfnDatabase.DatabaseInputProperty(

                            name="dashboard_db"
                        )
                    )
Glue Job
The code snippet below shows the Python CDK constructs that can be used to create a Glue job. The create_glue_job first creates a policy with permission to s3:GetObject and s3:PutObject and assigns it a role, which can be assumed by the Glue service. The CFNJob() construct creates the Glue job with all the possible configurations. The code for the Glue job is provided as an S3 path in the script_location parameter to the JobCommandProperty(). One can also leverage the performance of the job by tuning the max_concurrent_runs, number_of_workers, timeout, and worker_type parameters. Once the job is created, the next step is to create a Trigger to execute the job, which is provided in the following section:
def create_glue_job(self,bucket,dashboard_database,content):

        policy_statement = iam.PolicyStatement(
                actions=['s3:GetObject','s3:PutObject']
            )

        glue_job_role = iam.Role(
                    self,
                    f'{content}-glue-job-role',
                    assumed_by=iam.ServicePrincipal('glue.amazonaws.com')
                )
        glue_job_role.add_managed_policy(iam.ManagedPolicy.from_aws_managed_policy_name("service-role/AWSGlueServiceRole"))

        glue_job_role.add_to_policy(
                    policy_statement
                )

        policy_statement.add_resources(f"{bucket.bucket_arn}/dashboard-data/*")

        glue_job = glue.CfnJob(
            self,
            f'{content}-glue-job',
            role=glue_job_role.role_name,

            command=glue.CfnJob.JobCommandProperty(
                name="glueetl",
                python_version = os.getenv('PYTHON_VERSION',"3"),
                script_location=f"s3://{bucket.bucket_name}/{SCRIPT_LOCATION}{content}_etl_job"
            ),
            description="GLE ETL Job to loading dashboard data",
            execution_property=glue.CfnJob.ExecutionPropertyProperty(
                max_concurrent_runs=2
            ),
            glue_version="2.0",


            max_retries=0,
            name=f"{content}_etl_job",

            number_of_workers=10,
            #timeout=1200,
            worker_type="G.1X")

        dashboard_job_trigger = self.create_glue_job_trigger(glue_job,self.inference_bucket,content,dashboard_database,"cron(/5 * * * ? *)")

        return glue_job
Glue Trigger (Job Scheduler)
A trigger for the Glue job can be created with the CfnTrigger() construct. A Glue job can be triggered in three different ways, i.e. SCHEDULED, CONDITIONAL, and ON DEMAND provided by the type parameter. All the arguments required to trigger the job are passed using the argument parameter in the ActionProperty(). In the example below, we are using the SCHEDULED trigger with a Cron schedule passed to the schedule parameter.
def create_glue_job_trigger(self,glue_job,bucket,content,glue_database,schedule):
        arguments = {
                 '--class':   'GlueApp',
                 '--partition_keys':  'location,product_line_name,factory_line_id,station_type,station_id,data_dt',
                 '--s3_src_path':  f's3://{bucket.bucket_name}/dashboard-data/dashboard-raw',
                 '--s3_tgt_path': f's3://{bucket.bucket_name}/dashboard-data/dashboard-curated',
                 '--tgt_database': glue_database.database_input.name,
                 '--tgt_table':'curated',
                 '--content_type':content,
                 '--job-bookmark-option': 'job-bookmark-enable'
        }

        cfn_trigger = glue.CfnTrigger(self, f"{content}_glue_job_trigger",
            actions=[glue.CfnTrigger.ActionProperty(
                    arguments=arguments,
                    job_name=glue_job.name,
                    timeout=2880
                )],
                type="SCHEDULED",

                # the properties below are optional
                description="description",
                name=f"{content}_glue_job_trigger",

                schedule=schedule,
                start_on_creation=True
            )
Conclusion
The above code snippets can be tweaked as per requirements to create the Glue job and Glue trigger using Python CDK. This will help people get the Glue job up and running in a short time and then they can adjust the parameters based on the performance requirements and use-cases. People who are more comfortable with Python will probably like to use these constructs over the typescript constructs.
AWS Glue is a serverless data integration service that makes it easier to discover, prepare, move, and integrate data from multiple sources for analytics, machine learning (ML), and application development. This article will go into the best practices of application development and deployment on Cloud mandate using Infrastructure as code (IaC).
Out of the various technologies available in the market for writing IaC, AWS CDK leverages popular programming languages (Python, Typescript, Java, Go, etc.) and is widely adopted by the developers. In this article, I will show how we can use Python-based CDK constructs to set up a Glue job that loads data from Amazon S3 to AWS Glue catalog tables.
Prerequisites
- An AWS account
- An AWS profile configured with the user having an administrator access policy.
- NPM and Python installed
Product Versions
- CDK: v2.26 or later
- Python: v3.9.7
- Glue: v2.0 or later
Target Architecture
The following architecture diagram shows the components involved in this solution and the interactions between them:
The steps numbered in the diagram are explained in detail below:
- Data files are loaded into a CSV format in the source-data S3 bucket.
- Transformer-Lambda when invoked from the REST client converts data from CSV to parquet format and uploads to the “Insights-Data-Raw” folder in the source-data S3 bucket.
- Glue trigger will kick-off the Glue job as scheduled.
- The Glue job will transform, aggregate, and load data from the parquet files into the glue data catalog tables.
- Client application will invoke query API, which will invoke
Data-Fetcher-Lambda. Data-Fetcher-Lambdawill fetch data from the Glue catalog tables using Athena.
Component Details
Transformer Lambda
The code snippet given below in Python shows how a CSV file is downloaded from a folder in the S3 bucket and after conversion to the parquet format is loaded back to a different folder in the same S3 bucket. This lambda function downloads and reads a CSV file from path stored in the environment variable called SOURCE_BUCKET. It uses the pandas library to create a data-frame with the data content in the CSV file and then write the data into the parquet file. The parquet file is then uploaded to the S3 bucket to be consumed by the Glue job later:
import logging
import os
import boto3
from botocore.exceptions import ClientError
import pandas as pd
logger = logging.getLogger()
logger.setLevel(logging.INFO)
def lambda_handler(event, context):
payload = event['body']
path = payload.get('file-path')
bucket_name = os.getenv('SOURCE_BUCKET','source-data-us-west-2-<account_number>')
s3_client = boto3.client('s3')
file_name = path.split("https://feeds.dzone.com/")[-1]
local_tmp_path = f'/tmp/{file_name}'
content="inference"
try:
s3_client.download_file(bucket_name, path, local_tmp_path)
except ClientError as e:
logger.info(f"Unable to download the image to /tmp location : Error Code : {e.response['Error']['Code']} , error Message: {e.response['Error']['Message']}")
return "FAILED"
df = pd.read_csv(local_tmp_path)
print('df',df)
try:
src_file_name = file_name.split('.')[0] #removing the json file extension
parquet_file_name = f"/tmp/{src_file_name}_{content}.parquet"
logger.info(f"Getting src_filename")
data_dt_val = src_file_name.split("-")[0].split("_")[-1] # Fetching the date value from file name
logger.info(f"Data_date value{data_dt_val}")
target_file_location = f's3://{bucket_name}/dashboard-data/dashboard-raw/{content}/data_dt={data_dt_val}{parquet_file_name}'
logger.info(f"parque_file_path :::{target_file_location}")
df.to_parquet(target_file_location)
logger.info(f"writing to parquet file regular")
return {"message":"Parquet file created"}
except Exception as e:
logger.info(f"Unable to write parquet file for the following reason {str(e)}")
return {"message":str(e)}Glue Database
A Glue database helps to logically group the clue catalog tables. The below code snippet shows the creation of a Glue database in the account provided as a catalog_id. The account number is obtained from environment variable CDK_DEFAULT_ACCOUNT:
dashboard_database = glue.CfnDatabase(self, "dashboard_db",
                        catalog_id=os.getenv('CDK_DEFAULT_ACCOUNT'),
                        database_input=glue.CfnDatabase.DatabaseInputProperty(

                            name="dashboard_db"
                        )
                    )
Glue Job
The code snippet below shows the Python CDK constructs that can be used to create a Glue job. The create_glue_job first creates a policy with permission to s3:GetObject and s3:PutObject and assigns it a role, which can be assumed by the Glue service. The CFNJob() construct creates the Glue job with all the possible configurations. The code for the Glue job is provided as an S3 path in the script_location parameter to the JobCommandProperty(). One can also leverage the performance of the job by tuning the max_concurrent_runs, number_of_workers, timeout, and worker_type parameters. Once the job is created, the next step is to create a Trigger to execute the job, which is provided in the following section:
def create_glue_job(self,bucket,dashboard_database,content):

        policy_statement = iam.PolicyStatement(
                actions=['s3:GetObject','s3:PutObject']
            )

        glue_job_role = iam.Role(
                    self,
                    f'{content}-glue-job-role',
                    assumed_by=iam.ServicePrincipal('glue.amazonaws.com')
                )
        glue_job_role.add_managed_policy(iam.ManagedPolicy.from_aws_managed_policy_name("service-role/AWSGlueServiceRole"))

        glue_job_role.add_to_policy(
                    policy_statement
                )

        policy_statement.add_resources(f"{bucket.bucket_arn}/dashboard-data/*")

        glue_job = glue.CfnJob(
            self,
            f'{content}-glue-job',
            role=glue_job_role.role_name,

            command=glue.CfnJob.JobCommandProperty(
                name="glueetl",
                python_version = os.getenv('PYTHON_VERSION',"3"),
                script_location=f"s3://{bucket.bucket_name}/{SCRIPT_LOCATION}{content}_etl_job"
            ),
            description="GLE ETL Job to loading dashboard data",
            execution_property=glue.CfnJob.ExecutionPropertyProperty(
                max_concurrent_runs=2
            ),
            glue_version="2.0",


            max_retries=0,
            name=f"{content}_etl_job",

            number_of_workers=10,
            #timeout=1200,
            worker_type="G.1X")

        dashboard_job_trigger = self.create_glue_job_trigger(glue_job,self.inference_bucket,content,dashboard_database,"cron(/5 * * * ? *)")

        return glue_job
Glue Trigger (Job Scheduler)
A trigger for the Glue job can be created with the CfnTrigger() construct. A Glue job can be triggered in three different ways, i.e. SCHEDULED, CONDITIONAL, and ON DEMAND provided by the type parameter. All the arguments required to trigger the job are passed using the argument parameter in the ActionProperty(). In the example below, we are using the SCHEDULED trigger with a Cron schedule passed to the schedule parameter.
def create_glue_job_trigger(self,glue_job,bucket,content,glue_database,schedule):
        arguments = {
                 '--class':   'GlueApp',
                 '--partition_keys':  'location,product_line_name,factory_line_id,station_type,station_id,data_dt',
                 '--s3_src_path':  f's3://{bucket.bucket_name}/dashboard-data/dashboard-raw',
                 '--s3_tgt_path': f's3://{bucket.bucket_name}/dashboard-data/dashboard-curated',
                 '--tgt_database': glue_database.database_input.name,
                 '--tgt_table':'curated',
                 '--content_type':content,
                 '--job-bookmark-option': 'job-bookmark-enable'
        }

        cfn_trigger = glue.CfnTrigger(self, f"{content}_glue_job_trigger",
            actions=[glue.CfnTrigger.ActionProperty(
                    arguments=arguments,
                    job_name=glue_job.name,
                    timeout=2880
                )],
                type="SCHEDULED",

                # the properties below are optional
                description="description",
                name=f"{content}_glue_job_trigger",

                schedule=schedule,
                start_on_creation=True
            )
Conclusion
The above code snippets can be tweaked as per requirements to create the Glue job and Glue trigger using Python CDK. This will help people get the Glue job up and running in a short time and then they can adjust the parameters based on the performance requirements and use-cases. People who are more comfortable with Python will probably like to use these constructs over the typescript constructs.
Denial of responsibility! Techno Blender is an automatic aggregator of the all world’s media. In each content, the hyperlink to the primary source is specified. All trademarks belong to their rightful owners, all materials to their authors. If you are the owner of the content and do not want us to publish your materials, please contact us by email – [email protected]. The content will be deleted within 24 hours.