
Crafting a Custom Sports Activity Service
Enter the realm of Artificial Intelligence (AI), where machine learning models and intelligent algorithms are revolutionizing how we interact with data, make decisions, and predict outcomes. The fusion of AI with Node.js opens a portal to a multitude of possibilities, transforming the landscape of web services across various domains, including sports and fitness.
Lifecycle
At the base of the application, we going to have some sports activity daily suggestions which will be generated based on AI. That means we do an activity that AI suggested, then we have to ask AI again about suggestions. Then we get a response from AI on our application and expose it for the next day. Then users will see that new suggestion plan again and again day by day.
Lifecycle of sports activity generation
Also, we going to limit sports activities around the possibilities that can be accomplished individually by the user.

Some possible sports activities that the user can do
Let’s say football or hockey can be done by the user, but it’s a team game and requires some additional prompt setup for AI generation. We going to focus specifically on solo activity which going to bring us simplicity at the beginning.
Setup OpenAI API
The path is going to be pretty simple. In our case, we going to use OpenAI API and a Node.js environment. This is usually straightforward to find from the main dashboard or menu.
If you’re a new user or haven’t used the API before, you may need to apply for access. This could involve filling out a form where you explain how you plan to use the API.
OpenAI might have different plans, including free or paid options, depending on usage limits and additional features. For most paid plans, you’ll need to enter billing information.
Once your account is set up and you have API access, you’ll be given an API key. This key is a long string of characters that uniquely identifies your account.
Let’s go to OpenAI and navigate to the API section. Navigate to https://platform.openai.com/api-keys. From the list of api-keys take what you going to use. That key looks something like this:
OPENAI_API_KEY="sk-PMCRj7YiTV9e8OdTV26AI7BhcdkFJYZ3lu0p00H3217315y84"With your API key, you can start making requests to the OpenAI API. In your code, you’ll typically set this key in your HTTP headers or in a configuration file to authenticate your API requests.
Here you can see how we going to proceed:

Service building process
Choose the OpenAI Model
The best model would be one from the GPT-4 series with the ability to process and generate text based on a vast range of information. But in our case, I going to use gpt-3.5-turbo. This model is super fast and optimized for faster response. Also, it’s designed to be more cost-effective making it a suitable choice for applications that require frequent and large numbers of API calls.
Setting Node.js Environment
Let’s generate a simple node application with express framework. For that, I am using create-node-application, but it’s up to you which generator to use or set it up by yourself. We need an environment and entry point from where we going to expose endpoints.
npx create-node-application sports_activity_servise -fw=expressThe project should have a `src` file with `index.ts` which should be a simple default setup for launching the server.
App listening at http://localhost:3000If you are able to get Hello world by accessing that URL, then everything is fine.
Let’s take a look at the structure of the service.
Schema of the application
Now we need to install dependencies. Run npm i --save openai and verify in your package.json that the package has been installed.

OpenAI package in the package.json
The next step is to verify the environment variables. For that, we have to create .env in the root of sports_activity_servise and add the following values:
Environment variables for sports activity service
Now, we can utilize these values in our application, thanks to the dotenvpackage. Let’s use the OPENAI_API_KEY we obtained from the platform. To do this, we need to create src/config/index.ts and add the following code:
import OpenAI from 'openai';

export const openai = new OpenAI({
  apiKey: process.env.OPENAI_API_KEY,
});
This configuration will grant us access to the OpenAI interface, which we plan to utilize within our controllers.
Usage of the OpenAI With Node.js
To accurately suggest a sports activity, it’s essential to gather specific information about the user. In our database, we aim to collect basic user indicators and a history of activities they have undertaken since the last suggestion provided by the service. Let’s review the schema.
Result of sports activity based on indicators and history of activities
As you can see, the outcome is always influenced by history. However, this result can be enhanced through various factors. The final suggestion can be affected by the current weather, activity frequency, partners, living area, lifestyle, and accessibility, among others. We will concentrate on a select few of these factors to simplify the process.
Schema of building the prompt for OpenAI
We need to construct a concise prompt that clearly communicates to OpenAI our requirement for a response detailing today’s activity.
As previously mentioned, we will utilize Knex for database interactions. For guidance on setting up the database, executing migrations, and seeding, please refer to my other article: How to Create Node.js Server With Postgres and Knex on Express.
Let’s develop the necessary migrations for our database:
knex migrate:make create_users_table -x ts
knex migrate:make create_indicators_table -x ts
knex migrate:make create_activities_table -x ts
Then fill them up one by one:
{
await knex.schema.createTable(tableName, function (table) {
table.increments(‘id’).primary();
table.string(‘first_name’).notNullable();
table.string(‘last_name’).notNullable();
table.string(‘username’).notNullable();
table.string(’email’).notNullable();
table.string(‘password’).notNullable();
table.timestamps(true, true);
});
}
export async function down(knex: Knex): Promise
await knex.schema.dropTable(tableName);
}” data-lang=”application/typescript”>
import { Knex } from 'knex';

const tableName="users";

export async function up(knex: Knex): Promise<void> {
  await knex.schema.createTable(tableName, function (table) {
    table.increments('id').primary();
    table.string('first_name').notNullable();
    table.string('last_name').notNullable();
    table.string('username').notNullable();
    table.string('email').notNullable();
    table.string('password').notNullable();
    table.timestamps(true, true);
  });
}

export async function down(knex: Knex): Promise<void> {
  await knex.schema.dropTable(tableName);
}
Users table migration file
{
await knex.schema.createTable(tableName, function (table) {
table.increments(‘id’).primary();
table.integer(‘age’).notNullable();
table.integer(‘weight’).notNullable();
table.integer(‘height’).notNullable();
table.enu(‘life_style’, Object.values(LifeStyle)).notNullable();
table.integer(‘user_id’).unsigned().notNullable();
table.foreign(‘user_id’).references(‘id’).inTable(‘users’).onDelete(‘CASCADE’);
table.timestamps(true, true);
});
}
export async function down(knex: Knex): Promise
await knex.schema.dropTable(tableName);
}” data-lang=”application/typescript”>
import { Knex } from 'knex';
import { LifeStyle } from '../../src/constants/indicators';

const tableName="indicators";

export async function up(knex: Knex): Promise<void> {
  await knex.schema.createTable(tableName, function (table) {
    table.increments('id').primary();
    table.integer('age').notNullable();
    table.integer('weight').notNullable();
    table.integer('height').notNullable();
    table.enu('life_style', Object.values(LifeStyle)).notNullable();
    table.integer('user_id').unsigned().notNullable();
    table.foreign('user_id').references('id').inTable('users').onDelete('CASCADE');
    table.timestamps(true, true);
  });
}

export async function down(knex: Knex): Promise<void> {
  await knex.schema.dropTable(tableName);
}
Indicators table migration file
The migration for activities will include a boolean flag to indicate completion. This is necessary to determine the appropriate timing for sending another suggestion.
import { Knex } from 'knex';
import { activities } from '../../src/constants/activities';

export async function up(knex: Knex): Promise<void> {
  await knex.schema.createTable('activities', function (table) {
    table.increments('id').primary();
    table.enu('activity_type', Object.values(activities)).notNullable();
    table.string('duration').notNullable();
    table.boolean('is_completed').defaultTo(false).notNullable();
    table.integer('user_id').unsigned().notNullable();
    table.foreign('user_id').references('id').inTable('users').onDelete('CASCADE');
    table.timestamps(true, true);
  });
}

export async function down(knex: Knex): Promise<void> {
  await knex.schema.dropTable('activities');
}
Activities table migration file
Next, execute knex migrate:latest to incorporate all the specified fields into the database. Following this, to populate the database with initial data, execute the seeding command:
knex seed:make 01-users -x ts
knex seed:make 02-indicators -x ts
With the following files:
[] = [
…Array(10).keys(),
].map(() => ({
email: faker.internet.email().toLowerCase(),
first_name: faker.person.firstName(),
last_name: faker.person.lastName(),
username: faker.internet.userName().toLowerCase(),
}));
const testUser = {
email: process.env.TEST_USER_EMAIL as string,
first_name: process.env.TEST_USER_FIRST_NAME as string,
last_name: process.env.TEST_USER_LAST_NAME as string,
username: process.env.TEST_USER_USERNAME as string,
};
users.push(testUser);
const hashed_password = await bcrypt.hash(defaultPassword, 10);
await knex(tableName).insert(users.map(user => ({ …user, password: hashed_password })));
};” data-lang=”application/typescript”>
require('dotenv').config();
import { Knex } from 'knex';
import * as process from 'process';
import bcrypt from 'bcrypt';
import { faker } from '@faker-js/faker';
import { Role, User } from '../../src/@types';

const tableName="users";
const defaultPassword = process.env.DEFAULT_PASSWORD as string;

exports.seed = async function (knex: Knex) {
  await knex(tableName).del();
  const users: Omit<User, 'id' | 'password' | 'created_at' | 'updated_at'>[] = [
    ...Array(10).keys(),
  ].map(() => ({
    email: faker.internet.email().toLowerCase(),
    first_name: faker.person.firstName(),
    last_name: faker.person.lastName(),
    username: faker.internet.userName().toLowerCase(),
  }));
  const testUser = {
    email: process.env.TEST_USER_EMAIL as string,
    first_name: process.env.TEST_USER_FIRST_NAME as string,
    last_name: process.env.TEST_USER_LAST_NAME as string,
    username: process.env.TEST_USER_USERNAME as string,
  };
  users.push(testUser);
  const hashed_password = await bcrypt.hash(defaultPassword, 10);
  await knex(tableName).insert(users.map(user => ({ ...user, password: hashed_password })));
};
01-users.ts — users seed
{
return {
id: index + 1,
age: faker.number.int({ min: 14, max: 60 }),
weight: faker.number.int({ min: 50, max: 110 }),
height: faker.number.int({ min: 140, max: 220 }),
life_style: lifeStyleValues[faker.number.int({ min: 0, max: lifeStyleValues.length – 1 })],
user_id: user.id,
};
});
return {
id: index + 1,
age: faker.number.int({ min: 14, max: 60 }),
weight: faker.number.int({ min: 50, max: 110 }),
height: faker.number.int({ min: 140, max: 220 }),
life_style: lifeStyleValues[faker.number.int({ min: 0, max: lifeStyleValues.length – 1 })],
user_id: user.id,
};
});
await knex(tableName).insert(indicators);
};” data-lang=”application/typescript”>
import { faker } from '@faker-js/faker';
import { Knex } from 'knex';
import { LifeStyle } from '../../src/constants/indicators';

const tableName="indicators";

exports.seed = async function (knex: Knex) {
  await knex(tableName).del();
  const lifeStyleValues = Object.values(LifeStyle);

  const usersIds = await knex('users').select('id');
  const indicators = usersIds.map((user, index) => {
    return {
      id: index + 1,
      age: faker.number.int({ min: 14, max: 60 }),
      weight: faker.number.int({ min: 50, max: 110 }),
      height: faker.number.int({ min: 140, max: 220 }),
      life_style: lifeStyleValues[faker.number.int({ min: 0, max: lifeStyleValues.length - 1 })],
      user_id: user.id,
    };
  });

  await knex(tableName).insert(indicators);
};
02-indicators.ts — Indicators Seed
As you can observe, the indicators for the user are quite basic. Additionally, while the prompt could include a history of activities for more context, we will omit this step for the initial seeding process. Once all the files are prepared, simply execute knex seed:run to populate the database. At this stage, our database is fully prepared.
Now in the src folder create a index.ts as an entry point for our service:
import * as process from 'process';
require('dotenv').config();
import express from 'express';
import bodyParser from 'body-parser';
import cors from 'cors';
import { router } from 'src/routes';
import { connectToRedis } from 'src/redis';

const app = express();
const PORT = process.env.PORT || 9999;

app.use(bodyParser.json());
app.use(cors());
app.use('/api/v1', router);

(async () => {
  try {
    await connectToRedis();

    app.listen(PORT, async () => {
      console.log(`Server is running on port ${PORT}`);
    });
  } catch (error) {
    console.error('Failed to start server:', error);
    process.exit(1);
  }
})();
Entrypoint for service
Routing
Before we proceed to construct controllers, let’s examine the routing setup which we getting from src/routes/index.ts.
import { Router } from 'express';
import { authRouter } from 'src/routes/authRouter';
import { sessionController } from 'src/controllers/sessionController';
import { authMiddleware } from 'src/middlewares/authMiddleware';
import { userRouter } from 'src/routes/userRouter';
import { suggestionRouter } from 'src/routes/suggestionRouter';
import { indicatorRouter } from 'src/routes/indicatorRouter';

export const router = Router({ mergeParams: true });

router.use('/auth', authRouter);
router.use(authMiddleware);
router.get('/session', sessionController);

router.use('/user', userRouter);
router.use('/suggestion', suggestionRouter);
router.use('/indicator', indicatorRouter);
Routes for application
To maintain focus and avoid diverging from our current context, we will bypass the setup of Redis and the authentication segment. For an in-depth exploration of these areas, please consult my other articles on authentication in Node.js applications.
From middleware authMiddleware in the following iterations we going to obtain user session: req.user = userSession. This session consists solely of an identifier, with no additional information.
export type UserSession = {
  id: number;
}
We will utilize that ID to retrieve the user and all essential data required for the prompt. Remember, our objective is to construct a prompt tailored for OpenAI.
Suggestions we going to get from suggestionRouter which contain get and post endpoints.
import { Router } from 'express';
import { getSuggestionController } from 'src/controllers/suggestion/getSuggestionController';
import { finishLastSuggestionController } from 'src/controllers/suggestion/finishLastSuggestionController';

export const suggestionRouter = Router({ mergeParams: true });

suggestionRouter.get("https://feeds.dzone.com/", getSuggestionController);
suggestionRouter.post('/finish', finishLastSuggestionController);
Router for suggestions
The final component is the indicatorRouter, which houses a single controller:
import { Router } from 'express';
import { updateIndicatorController } from 'src/controllers/indicators/updateIndicatorController';

export const indicatorRouter = Router({ mergeParams: true });

indicatorRouter.post("https://feeds.dzone.com/", updateIndicatorController);
Router for indicators
Models
Now, it’s time to explore the functionality of models and how to manage them. For more detailed information on creating modules, I’ve provided an in-depth explanation in another article: Crafting Database Models with Knex.js and PostgreSQL. You can check there how to build basic Model and use it for other models. We need to have 3 additional models in the folder src/models:
(data: Payload) {
return super.insert({
…data,
role: Role.User,
});
}
return super.insert
…data,
role: Role.User,
});
}
public static findByEmail(email: string): Promise
return this.findOneBy({ email });
}
public static findByUsername(username: string): Promise
return this.findOneBy({ username });
}
}” data-lang=”application/typescript”>
import { Model } from 'src/models/Model';
import { Role, User, DefaultUserData } from 'src/@types';

export class UserModel extends Model {
  static tableName="users";

  public static async create<Payload>(data: Payload) {
    return super.insert<Payload & DefaultUserData>({
      ...data,
      role: Role.User,
    });
  }

  public static findByEmail(email: string): Promise<User | null> {
    return this.findOneBy<
      {
        email: string;
      },
      User
    >({ email });
  }

  public static findByUsername(username: string): Promise<User | null> {
    return this.findOneBy<
      {
        username: string;
      },
      User
    >({ username });
  }
}
User model
({
user_id: userId,
});
}
user_id: userId,
});
}
public static async updateByUserId(userId: number, data: Partial
return this.updateBy
>(
{
user_id: userId,
},
data
);
}
}” data-lang=”application/typescript”>
import { Model } from 'src/models/Model';
import type { Indicator } from 'src/@types';

export class IndicatorModel extends Model {
  static tableName="indicators";

  public static async findAllByUserId(userId: number) {
    return this.findAllBy<
      {
        user_id: number;
      },
      Indicator
    >({
      user_id: userId,
    });
  }

  public static async updateByUserId(userId: number, data: Partial<Indicator>) {
    return this.updateBy<
      {
        user_id: number;
      },
      Partial<Indicator>
    >(
      {
        user_id: userId,
      },
      data
    );
  }
}
Indicator model
({
user_id: userId,
});
}
}” data-lang=”application/typescript”>
user_id: userId,
});
}
}” data-lang=”application/typescript”>
import { Model } from 'src/models/Model';
import type { Activity } from 'src/@types';

export class ActivityModel extends Model {
  static tableName="activities";

  public static async findAllByUserId(userId: number) {
    return this.findAllBy<
      {
        user_id: number;
      },
      Activity
    >({
      user_id: userId,
    });
  }
}
Activity model
All these models inherit from a base model, which provides a collection of tools for get, set, or delete methods. Now, we are prepared to incorporate these models into our controllers.
Expectations From the Prompt
Now, let’s step back from the core implementation details and focus on the outcome we expect from OpenAI.
- It needs to be a GET endpoint that returns the result to us. Our route:
localhost:9999/api/v1/suggestion - The result should be a JSON object with the specific keys that we are expecting in the response.
- It should return the type of activity in a format that we can easily recognize.
Let’s review the response from Postman depicted in this image.
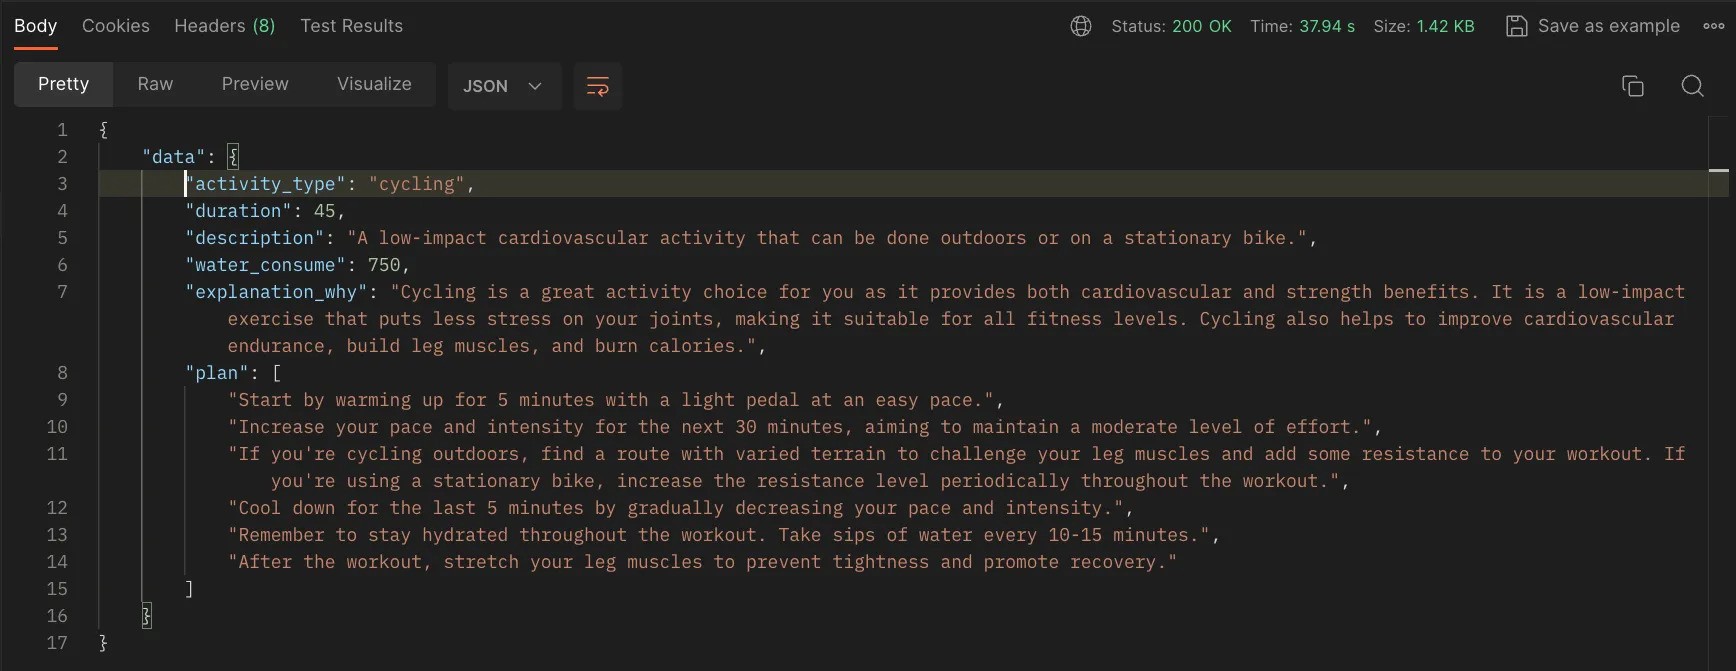
Postman Response on suggestion route
The type of response we aim to describe will resemble the following:: Promise<Suggestion>
export type Activity = {
  id: number;
  activity_type: string;
  is_completed: boolean;
  duration: number;
  created_at: Date;
};

export type ActivityDescription = {
  description: string;
  water_consume: number;
  distance?: number;
  plan: string[];
};

export type Suggestion = Activity & ActivityDescription;
So, that means, that we need to create a function: getSportActivitySuggestionwhich going to return to us a promise with suggestion data.
But how frequently should we expect to receive this suggestion? One of approach is to either use a timer or wait until the completion of the last suggestion, as indicated by a POST request from the client with new indicators after the last activity. Here’s the schema:
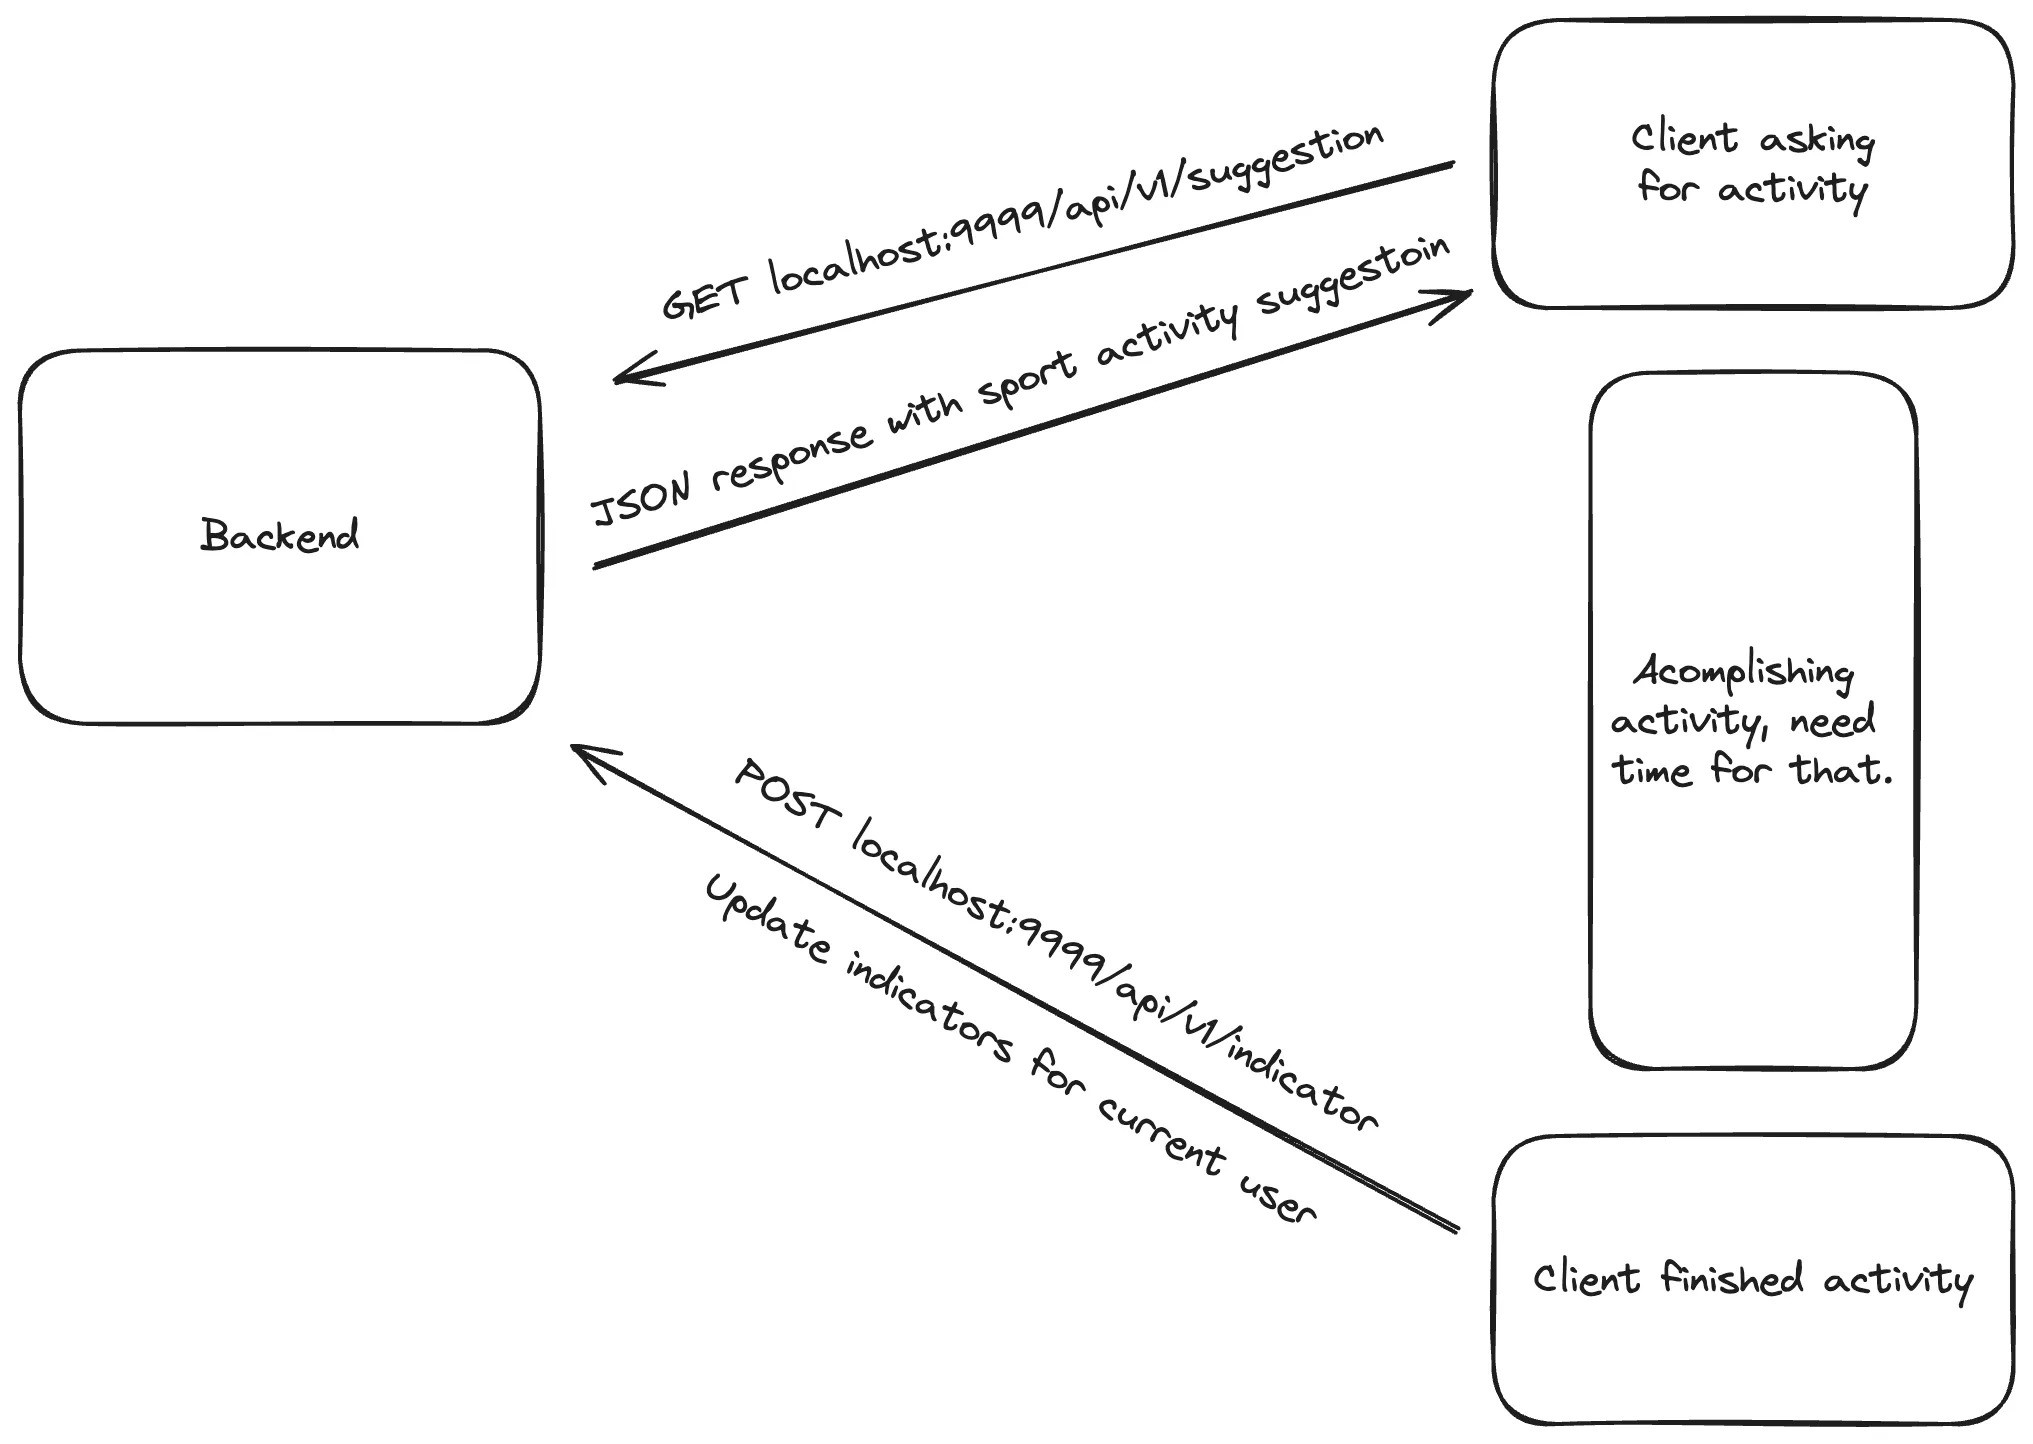
Lifecircle of suggestion and update indicators.
When a client sends a request for a suggestion, the client app should also specify the timing for the next request. This can occur immediately after updating the indicators, serving as a signal to the client that it’s time to seek a new suggestion, depending on the period elapsed since the last suggestion.
Get Suggestions for Sport Activity
Now, we need to develop a controller to manage the suggestion results. To do this, create src/controllers/getSuggestionController and insert the following code:
import { Request, Response } from 'express';
import { IndicatorModel } from 'src/models/IndicatorModel';
import { ActivityModel } from 'src/models/ActivityModel';
import { getSportActivitySuggestion } from 'src/helpers/getSportActivitySuggestion';

export const getSuggestionController = async (req: Request, res: Response) => {
  try {
    const [indicator] = await IndicatorModel.findAllByUserId(req.user.id);
    const [lastActivity] = await ActivityModel.findAllByUserId(req.user.id);

    if (lastActivity && !lastActivity.is_completed) {
      res.json({
        data: lastActivity,
      });
      return;
    }

    const result = await getSportActivitySuggestion(indicator, lastActivity);

    await ActivityModel.insert({
      activity_type: result.activity_type,
      duration: result.duration,
      is_completed: false,
      user_id: req.user.id,
    });

    res.json({
      data: result,
    });
  } catch (error: unknown) {
    console.log(error);
    res.status(500).json({
      message: 'Internal Server Error',
    });
  }
};
getSuggestionController.ts
Upon receiving a suggestion, we must verify the status is_completed of the last activity to avoid making unnecessary requests to the OpenAI API if an activity is already in progress. If there are no active activities, we obtain a suggestion through our getSportActivitySuggestion helper function. Next, we must log the activity in the database under the user’s ID with the appropriate status, enabling its retrieval for future suggestion requests. Ultimately, we return that result.
To obtain a suggestion from the helper, we must craft an appropriate prompt message for the OpenAI API payload. Let’s delve into the processes executed by our helper function.
import { Indicator, Activity, ActivityDescription } from 'src/@types';
import { activities } from 'src/constants/activities';
import { openai } from 'src/configs/openai';

export async function getSportActivitySuggestion(
  indicator: Indicator,
  lastActivity?: Activity
): Promise<Activity & ActivityDescription> {
  const systemPrompt = `
    You will be provided with indicators as age, weight, height, lifestyle
    and previous activity type with duration if the exist,
    and your task is to return sports activity plan in JSON format depends on those indicators.
    The plan should include the type of activity, the duration in minutes, a good description
    of how to do the activity, the recommended water consumption in milliliters,
    and the plan like step by step what to do during the activity.

    Example of the response:
    {
      "activity_type": ${activities.sort(() => Math.random() - 0.5).join(' || ')},
      "duration": 30,
      "description": "A continuous run at a moderate pace to improve cardiovascular endurance.",
      "water_consume": 500
      "distance": 3000,
      "explanation_why": "The explanation why this activity is good for you based on you previous activity and indicators",
      "plan: ["First step description", "Second step description", "Third step description"]
    }
  `;

  const lastActivityMessage = lastActivity
    ? `
      - Last activity type: ${lastActivity.activity_type}
      - Last activity duration: ${lastActivity.duration}
      `
    : '';

  const userPrompt = `
  - Age: ${indicator.age}
  - Weight: ${indicator.weight}
  - Height: ${indicator.height}
  - Lifestyle: ${indicator.life_style}
  ${lastActivityMessage}
  `;

  const completion = await openai.chat.completions.create({
    messages: [
      { role: 'system', content: systemPrompt },
      { role: 'user', content: userPrompt },
    ],
    model: 'gpt-3.5-turbo',
    temperature: 0.9,
  });

  return JSON.parse(completion.choices[0].message.content || '{}');
}
The helper function uses the OpenAI API to generate completions based on a conversation-like structure.
Essentially, we are crafting appropriate messages to create completions, simulating a conversation, and instructing the system on how to construct the response accurately. We incorporate all the parameters of indicators, an example of the response, and details from the last completed activity. The function openai.chat.completions.create() indicates that we need to create completion and generate text for example. At the property messages you can find role which can be system where we provide instructions and userwhich represent input from the user. And content the content of the message, which could be a prompt or user input. The model specifies the model to be used for generating the completion, which is a specific version of the GPT-3.5 model optimized for speed and performance, in our case most cheapest one. The last parameter is temperature which controls the randomness of the generated text. A higher temperature leads to more diverse outputs, while a lower temperature produces more conservative, predictable results. Here, it’s set to 0.9, indicating a moderate level of randomness. Finally, we simply parse the JSON from the completion result.
The price fro gpt-3.5-turbo depends on the provider and the terms of use. Typically, pricing for using models like GPT-3.5 Turbo is based on factors such as the number of requests made, the complexity of the requests, and any additional services provided. It’s best to check with the specific provider of the model for accurate pricing information.
We need to create a controller that will be responsible for finishing the last activity:
import { Request, Response } from 'express';
import { ActivityModel } from 'src/models/ActivityModel';

export const finishLastSuggestionController = async (req: Request, res: Response) => {
  try {
    const [lastActivity] = await ActivityModel.findAllByUserId(req.user.id);
    await ActivityModel.updateOneById(lastActivity.id, {
      is_completed: true,
    });

    res.json({
      id: lastActivity.id,
    });
  } catch (error: unknown) {
    console.log(error);
    res.status(500).json({
      message: 'Internal Server Error',
    });
  }
};
Finish the last activity
And update the indicators contained within the POST request.
import { Request, Response } from 'express';
import { IndicatorModel } from 'src/models/IndicatorModel';

export const updateIndicatorController = async (req: Request, res: Response) => {
  try {
    const { id } = await IndicatorModel.updateByUserId(req.user.id, {
      age: req.body.age,
      weight: req.body.weight,
      height: req.body.height,
      life_style: req.body.life_style,
    });

    res.json({
      id,
    });
  } catch (error: unknown) {
    console.log(error);
    res.status(500).json({
      message: 'Internal Server Error',
    });
  }
};
Update indicators controller
We can update indicators using metrics from any client that utilizes this service, such as Apple iPhones or Android phones, which provide ample data. By leveraging this endpoint, we can augment the schema with additional parameters to enhance precision.
At the conclusion of this process, I would like to illustrate the result of the table of suggestions in the database that you will obtain after completing all of these steps:
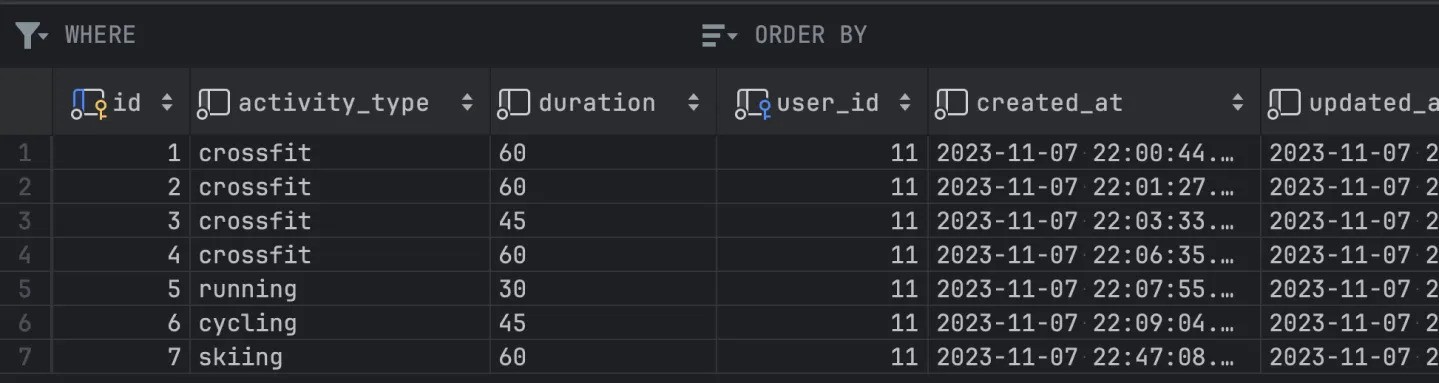
Result of suggestions in the database
Conclusion
In summary, harnessing OpenAI for sports activity suggestions presents a robust solution to elevate user engagement and encourage active lifestyles. The refinement of indicators holds immense potential to enhance the clarity and effectiveness of prompt messages, paving the way for more personalized and compelling user experiences. At the core of this article lies the pivotal concept of communicating with the OpenAI API, constructing prompt messages, and parsing the resultant data. These fundamental processes form the backbone of our application, driving its ability to generate tailored sports activity suggestions and deliver a seamless user experience.
I trust you found this journey enjoyable and informative. Should you have any further suggestions or inquiries, please don’t hesitate to reach out to me via comments or other platforms.
Enter the realm of Artificial Intelligence (AI), where machine learning models and intelligent algorithms are revolutionizing how we interact with data, make decisions, and predict outcomes. The fusion of AI with Node.js opens a portal to a multitude of possibilities, transforming the landscape of web services across various domains, including sports and fitness.
Lifecycle
At the base of the application, we going to have some sports activity daily suggestions which will be generated based on AI. That means we do an activity that AI suggested, then we have to ask AI again about suggestions. Then we get a response from AI on our application and expose it for the next day. Then users will see that new suggestion plan again and again day by day.

Lifecycle of sports activity generation
Also, we going to limit sports activities around the possibilities that can be accomplished individually by the user.
Some possible sports activities that the user can do
Let’s say football or hockey can be done by the user, but it’s a team game and requires some additional prompt setup for AI generation. We going to focus specifically on solo activity which going to bring us simplicity at the beginning.
Setup OpenAI API
The path is going to be pretty simple. In our case, we going to use OpenAI API and a Node.js environment. This is usually straightforward to find from the main dashboard or menu.
If you’re a new user or haven’t used the API before, you may need to apply for access. This could involve filling out a form where you explain how you plan to use the API.
OpenAI might have different plans, including free or paid options, depending on usage limits and additional features. For most paid plans, you’ll need to enter billing information.
Once your account is set up and you have API access, you’ll be given an API key. This key is a long string of characters that uniquely identifies your account.
Let’s go to OpenAI and navigate to the API section. Navigate to https://platform.openai.com/api-keys. From the list of api-keys take what you going to use. That key looks something like this:
OPENAI_API_KEY="sk-PMCRj7YiTV9e8OdTV26AI7BhcdkFJYZ3lu0p00H3217315y84"With your API key, you can start making requests to the OpenAI API. In your code, you’ll typically set this key in your HTTP headers or in a configuration file to authenticate your API requests.
Here you can see how we going to proceed:
Service building process
Choose the OpenAI Model
The best model would be one from the GPT-4 series with the ability to process and generate text based on a vast range of information. But in our case, I going to use gpt-3.5-turbo. This model is super fast and optimized for faster response. Also, it’s designed to be more cost-effective making it a suitable choice for applications that require frequent and large numbers of API calls.
Setting Node.js Environment
Let’s generate a simple node application with express framework. For that, I am using create-node-application, but it’s up to you which generator to use or set it up by yourself. We need an environment and entry point from where we going to expose endpoints.
npx create-node-application sports_activity_servise -fw=expressThe project should have a `src` file with `index.ts` which should be a simple default setup for launching the server.
App listening at http://localhost:3000If you are able to get Hello world by accessing that URL, then everything is fine.
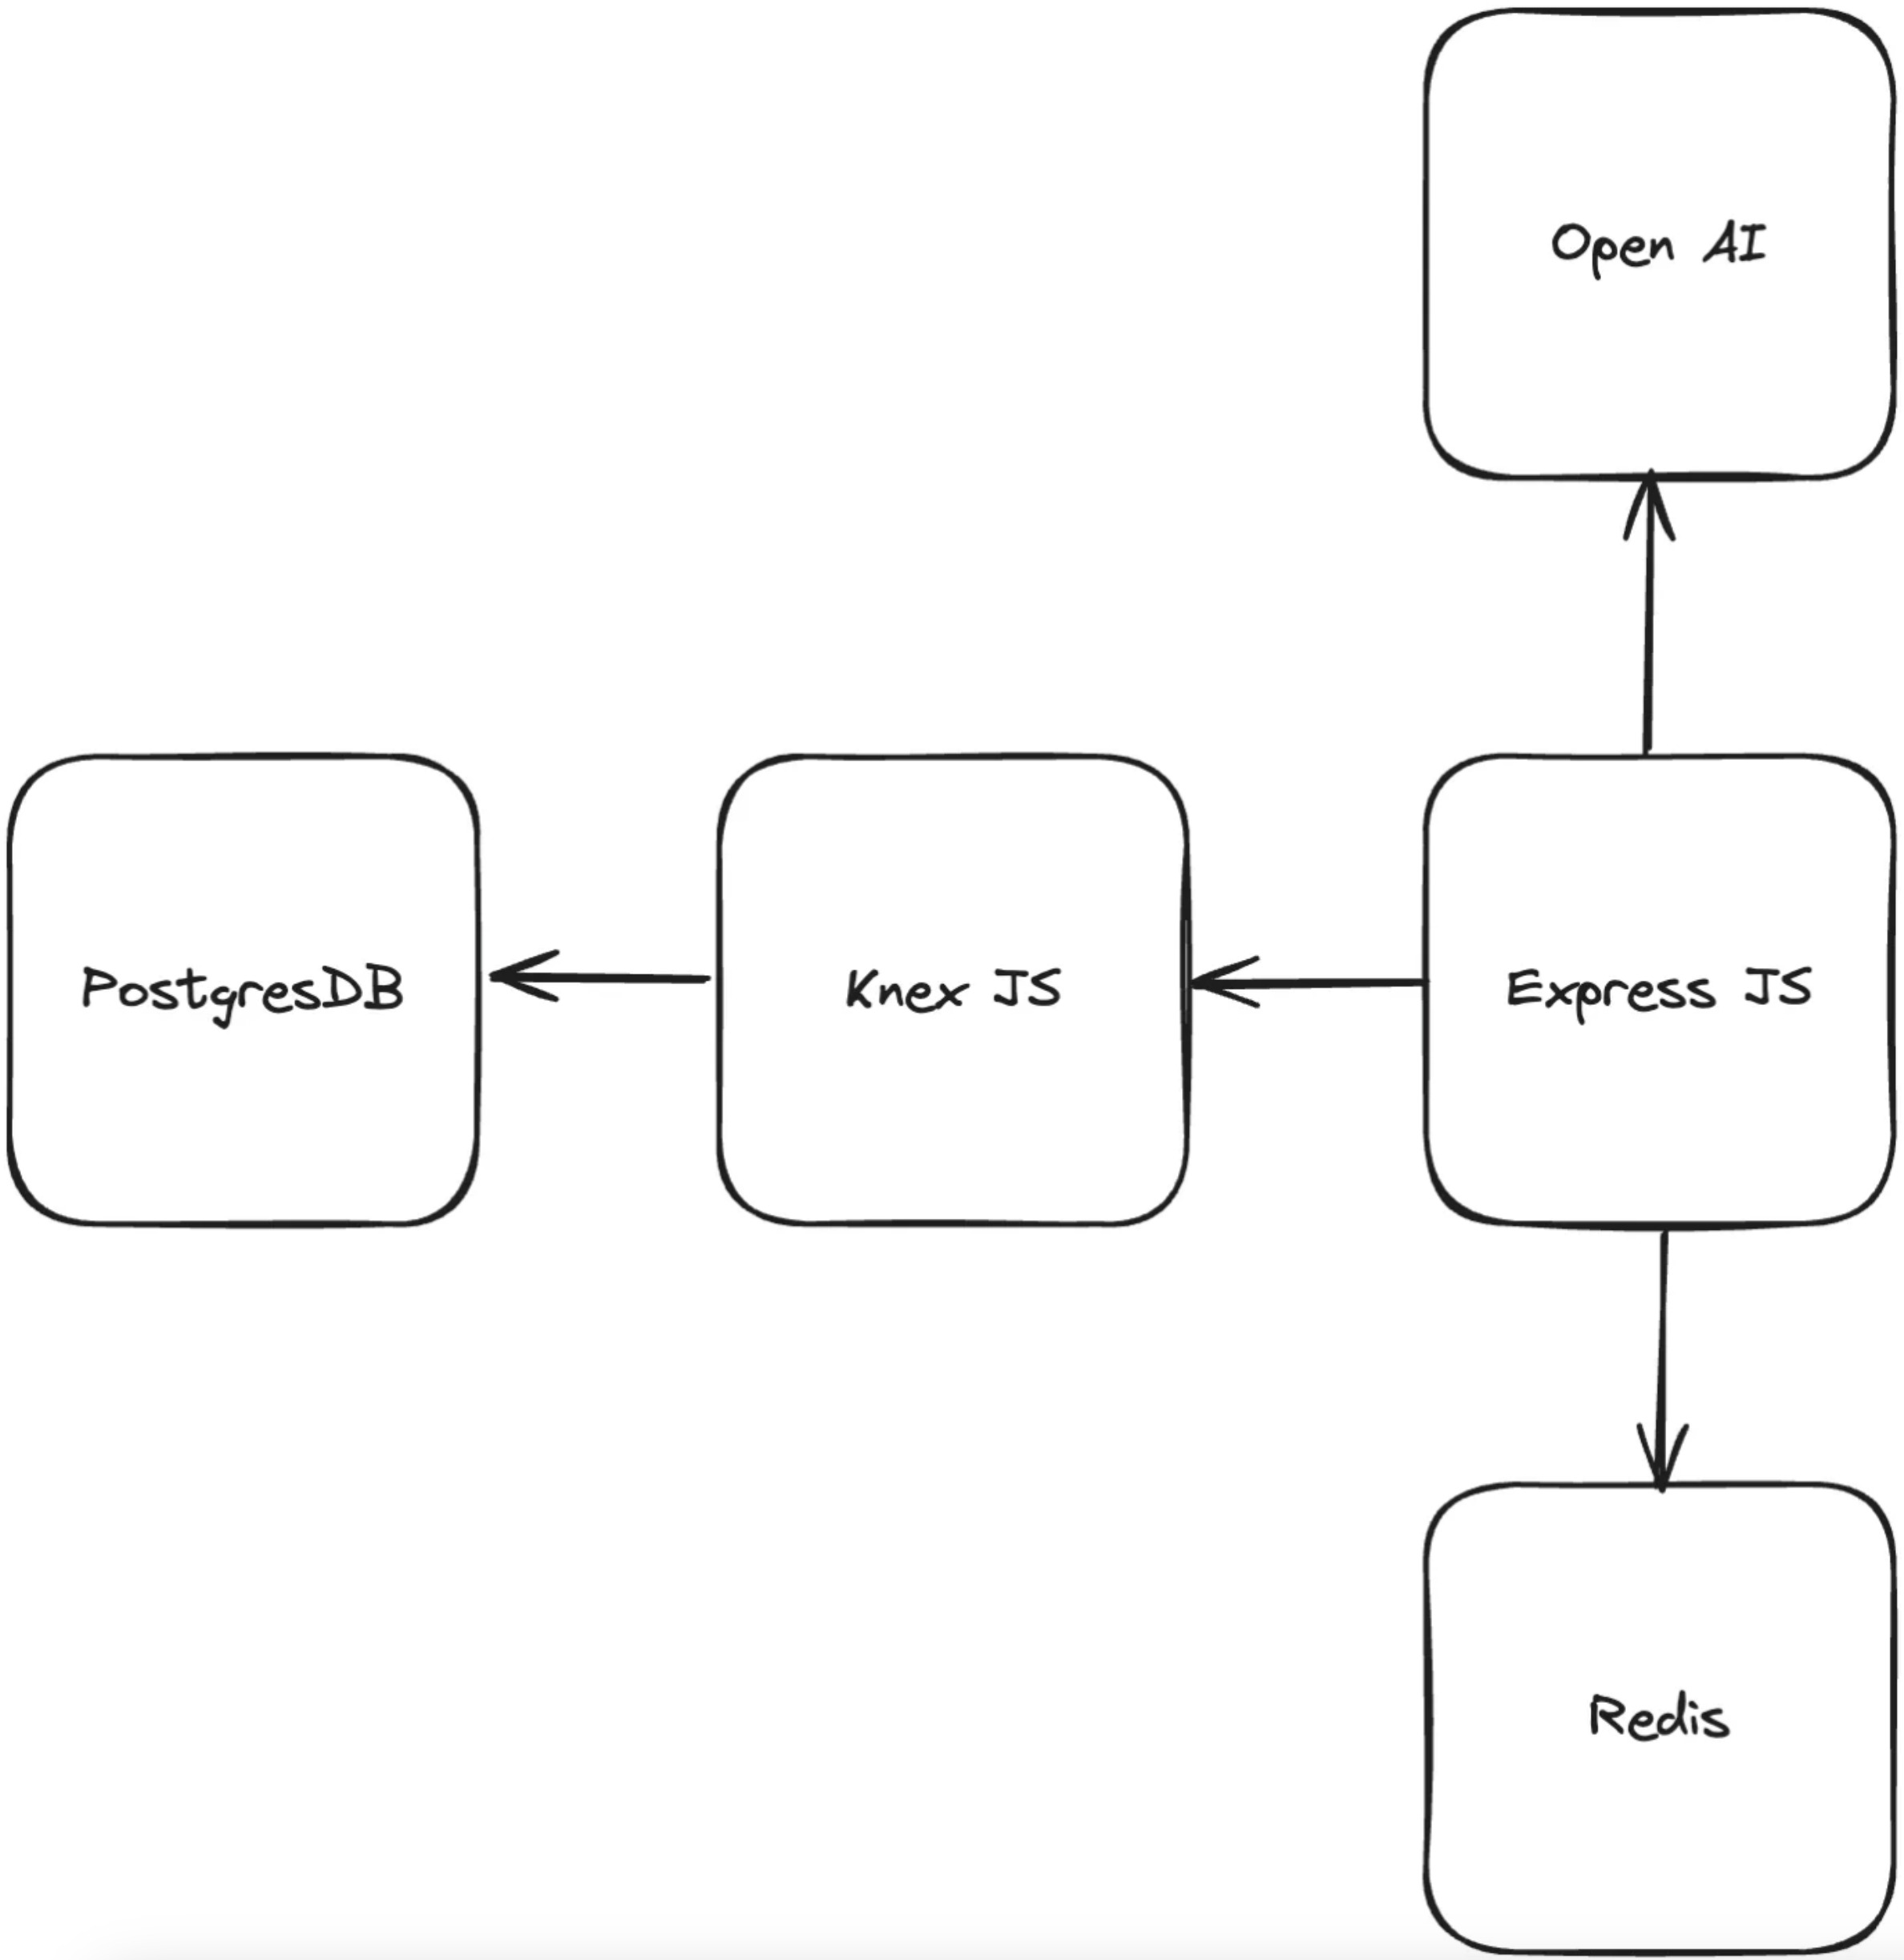
Let’s take a look at the structure of the service.
Schema of the application
Now we need to install dependencies. Run npm i --save openai and verify in your package.json that the package has been installed.
OpenAI package in the package.json
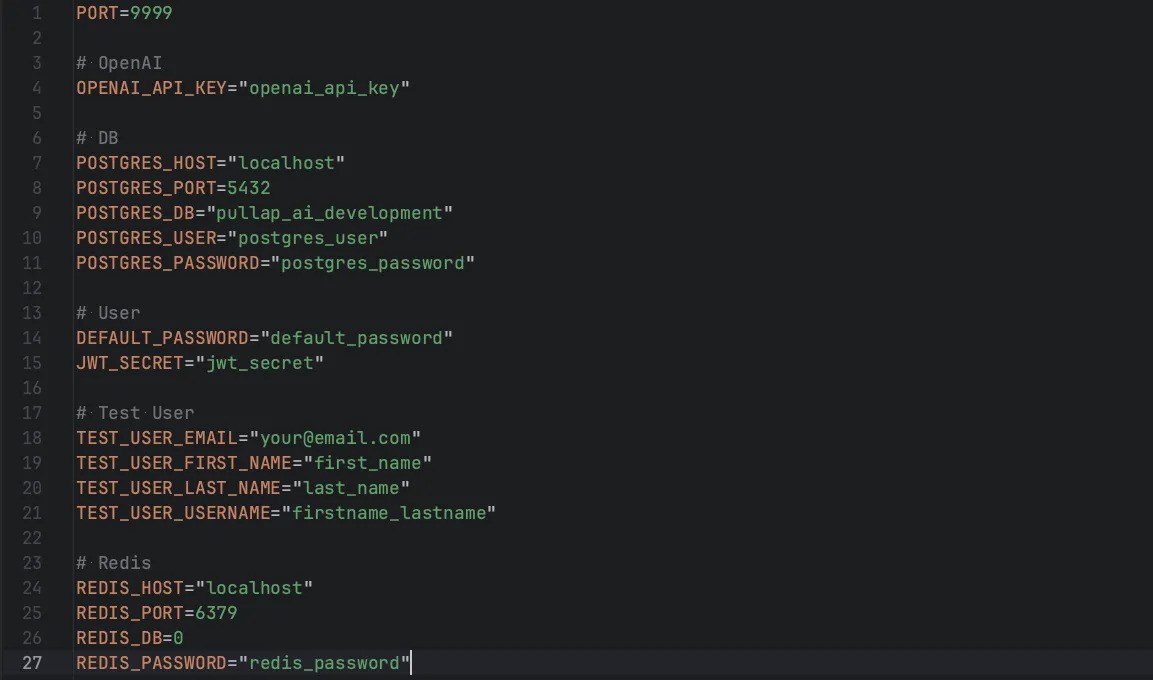
The next step is to verify the environment variables. For that, we have to create .env in the root of sports_activity_servise and add the following values:
Environment variables for sports activity service
Now, we can utilize these values in our application, thanks to the dotenvpackage. Let’s use the OPENAI_API_KEY we obtained from the platform. To do this, we need to create src/config/index.ts and add the following code:
import OpenAI from 'openai';

export const openai = new OpenAI({
  apiKey: process.env.OPENAI_API_KEY,
});
This configuration will grant us access to the OpenAI interface, which we plan to utilize within our controllers.
Usage of the OpenAI With Node.js
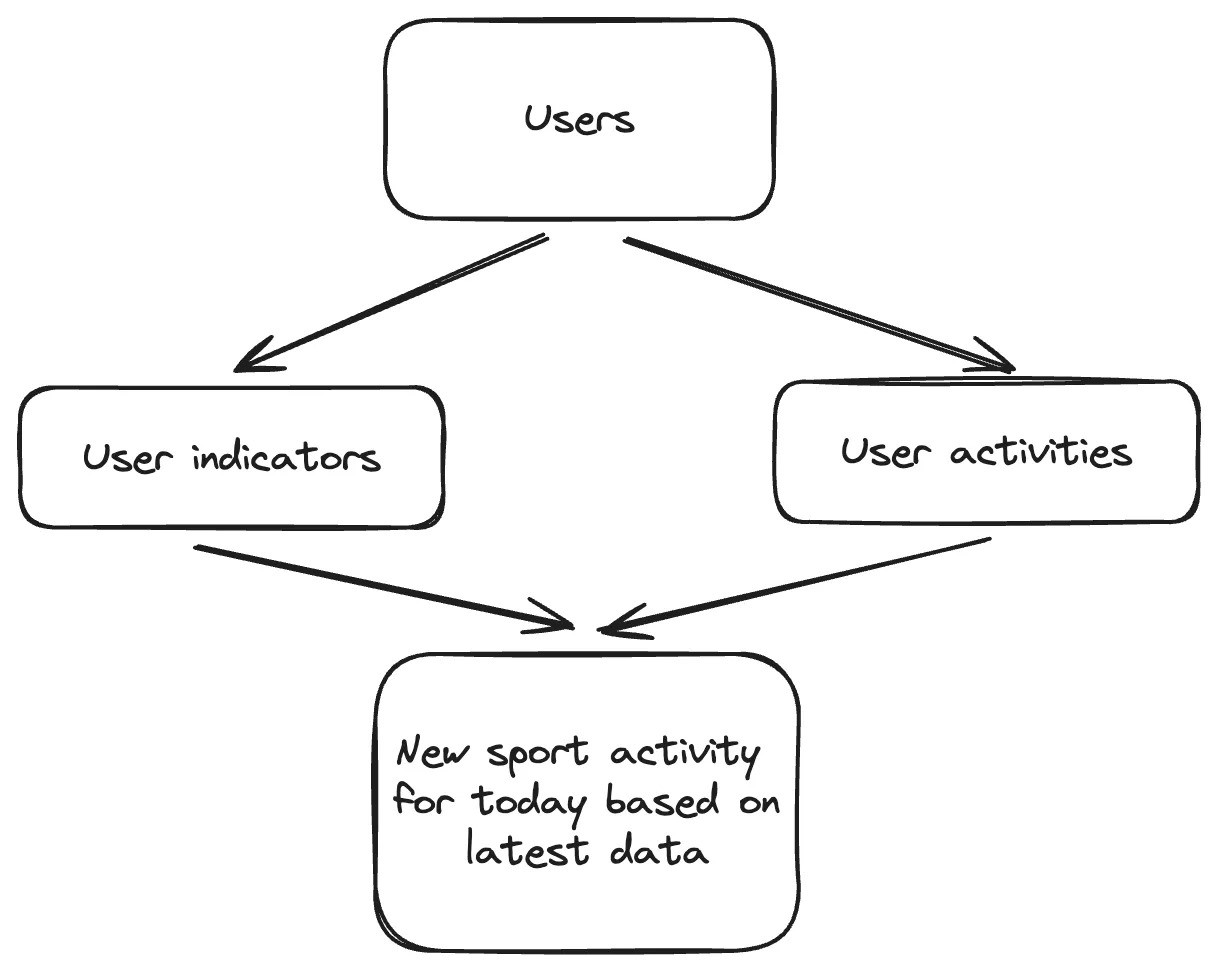
To accurately suggest a sports activity, it’s essential to gather specific information about the user. In our database, we aim to collect basic user indicators and a history of activities they have undertaken since the last suggestion provided by the service. Let’s review the schema.
Result of sports activity based on indicators and history of activities
As you can see, the outcome is always influenced by history. However, this result can be enhanced through various factors. The final suggestion can be affected by the current weather, activity frequency, partners, living area, lifestyle, and accessibility, among others. We will concentrate on a select few of these factors to simplify the process.
Schema of building the prompt for OpenAI
We need to construct a concise prompt that clearly communicates to OpenAI our requirement for a response detailing today’s activity.
As previously mentioned, we will utilize Knex for database interactions. For guidance on setting up the database, executing migrations, and seeding, please refer to my other article: How to Create Node.js Server With Postgres and Knex on Express.
Let’s develop the necessary migrations for our database:
knex migrate:make create_users_table -x ts
knex migrate:make create_indicators_table -x ts
knex migrate:make create_activities_table -x ts
Then fill them up one by one:
{
await knex.schema.createTable(tableName, function (table) {
table.increments(‘id’).primary();
table.string(‘first_name’).notNullable();
table.string(‘last_name’).notNullable();
table.string(‘username’).notNullable();
table.string(’email’).notNullable();
table.string(‘password’).notNullable();
table.timestamps(true, true);
});
}
await knex.schema.createTable(tableName, function (table) {
table.increments(‘id’).primary();
table.string(‘first_name’).notNullable();
table.string(‘last_name’).notNullable();
table.string(‘username’).notNullable();
table.string(’email’).notNullable();
table.string(‘password’).notNullable();
table.timestamps(true, true);
});
}
export async function down(knex: Knex): Promise
await knex.schema.dropTable(tableName);
}” data-lang=”application/typescript”>
import { Knex } from 'knex';

const tableName="users";

export async function up(knex: Knex): Promise<void> {
  await knex.schema.createTable(tableName, function (table) {
    table.increments('id').primary();
    table.string('first_name').notNullable();
    table.string('last_name').notNullable();
    table.string('username').notNullable();
    table.string('email').notNullable();
    table.string('password').notNullable();
    table.timestamps(true, true);
  });
}

export async function down(knex: Knex): Promise<void> {
  await knex.schema.dropTable(tableName);
}
Users table migration file
{
await knex.schema.createTable(tableName, function (table) {
table.increments(‘id’).primary();
table.integer(‘age’).notNullable();
table.integer(‘weight’).notNullable();
table.integer(‘height’).notNullable();
table.enu(‘life_style’, Object.values(LifeStyle)).notNullable();
table.integer(‘user_id’).unsigned().notNullable();
table.foreign(‘user_id’).references(‘id’).inTable(‘users’).onDelete(‘CASCADE’);
table.timestamps(true, true);
});
}
await knex.schema.createTable(tableName, function (table) {
table.increments(‘id’).primary();
table.integer(‘age’).notNullable();
table.integer(‘weight’).notNullable();
table.integer(‘height’).notNullable();
table.enu(‘life_style’, Object.values(LifeStyle)).notNullable();
table.integer(‘user_id’).unsigned().notNullable();
table.foreign(‘user_id’).references(‘id’).inTable(‘users’).onDelete(‘CASCADE’);
table.timestamps(true, true);
});
}
export async function down(knex: Knex): Promise
await knex.schema.dropTable(tableName);
}” data-lang=”application/typescript”>
import { Knex } from 'knex';
import { LifeStyle } from '../../src/constants/indicators';

const tableName="indicators";

export async function up(knex: Knex): Promise<void> {
  await knex.schema.createTable(tableName, function (table) {
    table.increments('id').primary();
    table.integer('age').notNullable();
    table.integer('weight').notNullable();
    table.integer('height').notNullable();
    table.enu('life_style', Object.values(LifeStyle)).notNullable();
    table.integer('user_id').unsigned().notNullable();
    table.foreign('user_id').references('id').inTable('users').onDelete('CASCADE');
    table.timestamps(true, true);
  });
}

export async function down(knex: Knex): Promise<void> {
  await knex.schema.dropTable(tableName);
}
Indicators table migration file
The migration for activities will include a boolean flag to indicate completion. This is necessary to determine the appropriate timing for sending another suggestion.
import { Knex } from 'knex';
import { activities } from '../../src/constants/activities';

export async function up(knex: Knex): Promise<void> {
  await knex.schema.createTable('activities', function (table) {
    table.increments('id').primary();
    table.enu('activity_type', Object.values(activities)).notNullable();
    table.string('duration').notNullable();
    table.boolean('is_completed').defaultTo(false).notNullable();
    table.integer('user_id').unsigned().notNullable();
    table.foreign('user_id').references('id').inTable('users').onDelete('CASCADE');
    table.timestamps(true, true);
  });
}

export async function down(knex: Knex): Promise<void> {
  await knex.schema.dropTable('activities');
}
Activities table migration file
Next, execute knex migrate:latest to incorporate all the specified fields into the database. Following this, to populate the database with initial data, execute the seeding command:
knex seed:make 01-users -x ts
knex seed:make 02-indicators -x ts
With the following files:
[] = [
…Array(10).keys(),
].map(() => ({
email: faker.internet.email().toLowerCase(),
first_name: faker.person.firstName(),
last_name: faker.person.lastName(),
username: faker.internet.userName().toLowerCase(),
}));
const testUser = {
email: process.env.TEST_USER_EMAIL as string,
first_name: process.env.TEST_USER_FIRST_NAME as string,
last_name: process.env.TEST_USER_LAST_NAME as string,
username: process.env.TEST_USER_USERNAME as string,
};
users.push(testUser);
const hashed_password = await bcrypt.hash(defaultPassword, 10);
await knex(tableName).insert(users.map(user => ({ …user, password: hashed_password })));
};” data-lang=”application/typescript”>
…Array(10).keys(),
].map(() => ({
email: faker.internet.email().toLowerCase(),
first_name: faker.person.firstName(),
last_name: faker.person.lastName(),
username: faker.internet.userName().toLowerCase(),
}));
const testUser = {
email: process.env.TEST_USER_EMAIL as string,
first_name: process.env.TEST_USER_FIRST_NAME as string,
last_name: process.env.TEST_USER_LAST_NAME as string,
username: process.env.TEST_USER_USERNAME as string,
};
users.push(testUser);
const hashed_password = await bcrypt.hash(defaultPassword, 10);
await knex(tableName).insert(users.map(user => ({ …user, password: hashed_password })));
};” data-lang=”application/typescript”>
require('dotenv').config();
import { Knex } from 'knex';
import * as process from 'process';
import bcrypt from 'bcrypt';
import { faker } from '@faker-js/faker';
import { Role, User } from '../../src/@types';

const tableName="users";
const defaultPassword = process.env.DEFAULT_PASSWORD as string;

exports.seed = async function (knex: Knex) {
  await knex(tableName).del();
  const users: Omit<User, 'id' | 'password' | 'created_at' | 'updated_at'>[] = [
    ...Array(10).keys(),
  ].map(() => ({
    email: faker.internet.email().toLowerCase(),
    first_name: faker.person.firstName(),
    last_name: faker.person.lastName(),
    username: faker.internet.userName().toLowerCase(),
  }));
  const testUser = {
    email: process.env.TEST_USER_EMAIL as string,
    first_name: process.env.TEST_USER_FIRST_NAME as string,
    last_name: process.env.TEST_USER_LAST_NAME as string,
    username: process.env.TEST_USER_USERNAME as string,
  };
  users.push(testUser);
  const hashed_password = await bcrypt.hash(defaultPassword, 10);
  await knex(tableName).insert(users.map(user => ({ ...user, password: hashed_password })));
};
01-users.ts — users seed
{
return {
id: index + 1,
age: faker.number.int({ min: 14, max: 60 }),
weight: faker.number.int({ min: 50, max: 110 }),
height: faker.number.int({ min: 140, max: 220 }),
life_style: lifeStyleValues[faker.number.int({ min: 0, max: lifeStyleValues.length – 1 })],
user_id: user.id,
};
});
return {
id: index + 1,
age: faker.number.int({ min: 14, max: 60 }),
weight: faker.number.int({ min: 50, max: 110 }),
height: faker.number.int({ min: 140, max: 220 }),
life_style: lifeStyleValues[faker.number.int({ min: 0, max: lifeStyleValues.length – 1 })],
user_id: user.id,
};
});
await knex(tableName).insert(indicators);
};” data-lang=”application/typescript”>
import { faker } from '@faker-js/faker';
import { Knex } from 'knex';
import { LifeStyle } from '../../src/constants/indicators';

const tableName="indicators";

exports.seed = async function (knex: Knex) {
  await knex(tableName).del();
  const lifeStyleValues = Object.values(LifeStyle);

  const usersIds = await knex('users').select('id');
  const indicators = usersIds.map((user, index) => {
    return {
      id: index + 1,
      age: faker.number.int({ min: 14, max: 60 }),
      weight: faker.number.int({ min: 50, max: 110 }),
      height: faker.number.int({ min: 140, max: 220 }),
      life_style: lifeStyleValues[faker.number.int({ min: 0, max: lifeStyleValues.length - 1 })],
      user_id: user.id,
    };
  });

  await knex(tableName).insert(indicators);
};
02-indicators.ts — Indicators Seed
As you can observe, the indicators for the user are quite basic. Additionally, while the prompt could include a history of activities for more context, we will omit this step for the initial seeding process. Once all the files are prepared, simply execute knex seed:run to populate the database. At this stage, our database is fully prepared.
Now in the src folder create a index.ts as an entry point for our service:
import * as process from 'process';
require('dotenv').config();
import express from 'express';
import bodyParser from 'body-parser';
import cors from 'cors';
import { router } from 'src/routes';
import { connectToRedis } from 'src/redis';

const app = express();
const PORT = process.env.PORT || 9999;

app.use(bodyParser.json());
app.use(cors());
app.use('/api/v1', router);

(async () => {
  try {
    await connectToRedis();

    app.listen(PORT, async () => {
      console.log(`Server is running on port ${PORT}`);
    });
  } catch (error) {
    console.error('Failed to start server:', error);
    process.exit(1);
  }
})();
Entrypoint for service
Routing
Before we proceed to construct controllers, let’s examine the routing setup which we getting from src/routes/index.ts.
import { Router } from 'express';
import { authRouter } from 'src/routes/authRouter';
import { sessionController } from 'src/controllers/sessionController';
import { authMiddleware } from 'src/middlewares/authMiddleware';
import { userRouter } from 'src/routes/userRouter';
import { suggestionRouter } from 'src/routes/suggestionRouter';
import { indicatorRouter } from 'src/routes/indicatorRouter';

export const router = Router({ mergeParams: true });

router.use('/auth', authRouter);
router.use(authMiddleware);
router.get('/session', sessionController);

router.use('/user', userRouter);
router.use('/suggestion', suggestionRouter);
router.use('/indicator', indicatorRouter);
Routes for application
To maintain focus and avoid diverging from our current context, we will bypass the setup of Redis and the authentication segment. For an in-depth exploration of these areas, please consult my other articles on authentication in Node.js applications.
From middleware authMiddleware in the following iterations we going to obtain user session: req.user = userSession. This session consists solely of an identifier, with no additional information.
export type UserSession = {
  id: number;
}
We will utilize that ID to retrieve the user and all essential data required for the prompt. Remember, our objective is to construct a prompt tailored for OpenAI.
Suggestions we going to get from suggestionRouter which contain get and post endpoints.
import { Router } from 'express';
import { getSuggestionController } from 'src/controllers/suggestion/getSuggestionController';
import { finishLastSuggestionController } from 'src/controllers/suggestion/finishLastSuggestionController';

export const suggestionRouter = Router({ mergeParams: true });

suggestionRouter.get("https://feeds.dzone.com/", getSuggestionController);
suggestionRouter.post('/finish', finishLastSuggestionController);
Router for suggestions
The final component is the indicatorRouter, which houses a single controller:
import { Router } from 'express';
import { updateIndicatorController } from 'src/controllers/indicators/updateIndicatorController';

export const indicatorRouter = Router({ mergeParams: true });

indicatorRouter.post("https://feeds.dzone.com/", updateIndicatorController);
Router for indicators
Models
Now, it’s time to explore the functionality of models and how to manage them. For more detailed information on creating modules, I’ve provided an in-depth explanation in another article: Crafting Database Models with Knex.js and PostgreSQL. You can check there how to build basic Model and use it for other models. We need to have 3 additional models in the folder src/models:
(data: Payload) {
return super.insert({
…data,
role: Role.User,
});
}
return super.insert
…data,
role: Role.User,
});
}
public static findByEmail(email: string): Promise
return this.findOneBy({ email });
}
public static findByUsername(username: string): Promise
return this.findOneBy({ username });
}
}” data-lang=”application/typescript”>
import { Model } from 'src/models/Model';
import { Role, User, DefaultUserData } from 'src/@types';

export class UserModel extends Model {
  static tableName="users";

  public static async create<Payload>(data: Payload) {
    return super.insert<Payload & DefaultUserData>({
      ...data,
      role: Role.User,
    });
  }

  public static findByEmail(email: string): Promise<User | null> {
    return this.findOneBy<
      {
        email: string;
      },
      User
    >({ email });
  }

  public static findByUsername(username: string): Promise<User | null> {
    return this.findOneBy<
      {
        username: string;
      },
      User
    >({ username });
  }
}
User model
({
user_id: userId,
});
}
user_id: userId,
});
}
public static async updateByUserId(userId: number, data: Partial
return this.updateBy
>(
{
user_id: userId,
},
data
);
}
}” data-lang=”application/typescript”>
import { Model } from 'src/models/Model';
import type { Indicator } from 'src/@types';

export class IndicatorModel extends Model {
  static tableName="indicators";

  public static async findAllByUserId(userId: number) {
    return this.findAllBy<
      {
        user_id: number;
      },
      Indicator
    >({
      user_id: userId,
    });
  }

  public static async updateByUserId(userId: number, data: Partial<Indicator>) {
    return this.updateBy<
      {
        user_id: number;
      },
      Partial<Indicator>
    >(
      {
        user_id: userId,
      },
      data
    );
  }
}
Indicator model
({
user_id: userId,
});
}
}” data-lang=”application/typescript”>
user_id: userId,
});
}
}” data-lang=”application/typescript”>
import { Model } from 'src/models/Model';
import type { Activity } from 'src/@types';

export class ActivityModel extends Model {
  static tableName="activities";

  public static async findAllByUserId(userId: number) {
    return this.findAllBy<
      {
        user_id: number;
      },
      Activity
    >({
      user_id: userId,
    });
  }
}
Activity model
All these models inherit from a base model, which provides a collection of tools for get, set, or delete methods. Now, we are prepared to incorporate these models into our controllers.
Expectations From the Prompt
Now, let’s step back from the core implementation details and focus on the outcome we expect from OpenAI.
- It needs to be a GET endpoint that returns the result to us. Our route:
localhost:9999/api/v1/suggestion - The result should be a JSON object with the specific keys that we are expecting in the response.
- It should return the type of activity in a format that we can easily recognize.
Let’s review the response from Postman depicted in this image.
Postman Response on suggestion route
The type of response we aim to describe will resemble the following:: Promise<Suggestion>
export type Activity = {
  id: number;
  activity_type: string;
  is_completed: boolean;
  duration: number;
  created_at: Date;
};

export type ActivityDescription = {
  description: string;
  water_consume: number;
  distance?: number;
  plan: string[];
};

export type Suggestion = Activity & ActivityDescription;
So, that means, that we need to create a function: getSportActivitySuggestionwhich going to return to us a promise with suggestion data.
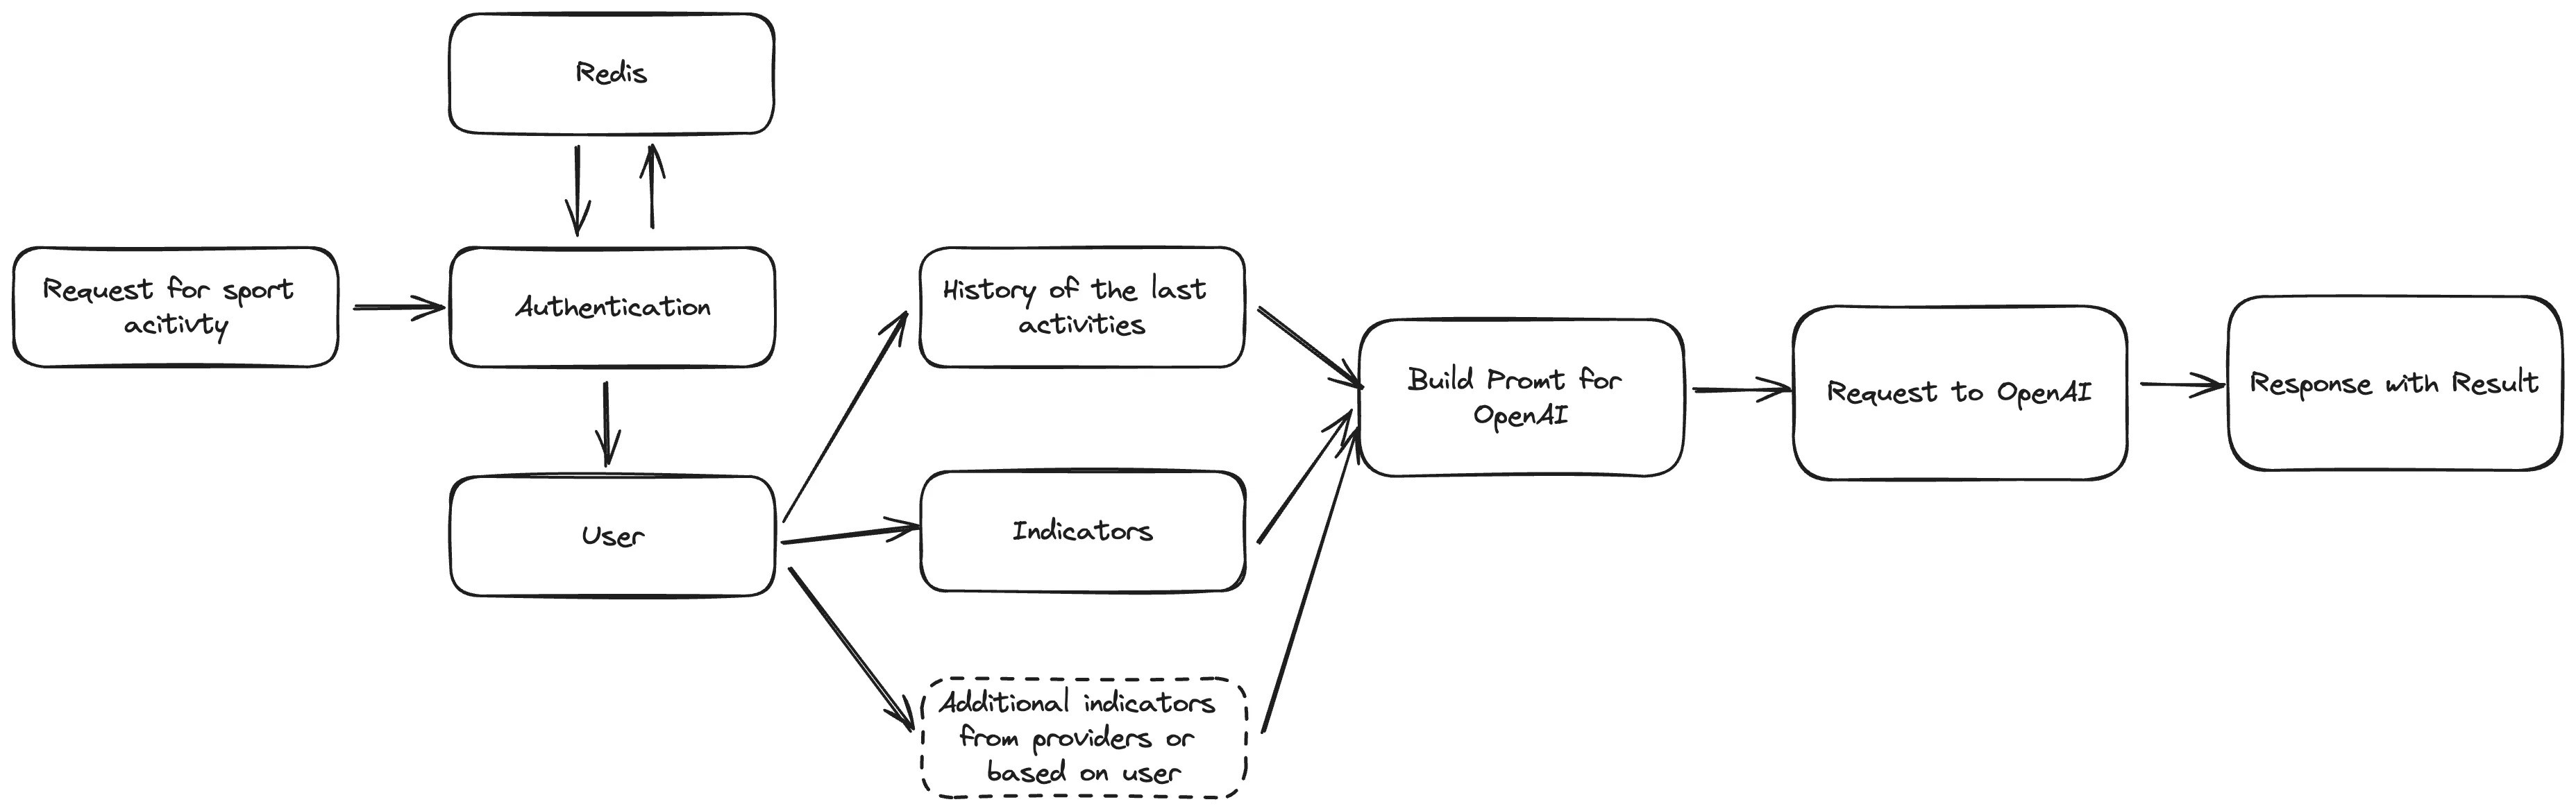
But how frequently should we expect to receive this suggestion? One of approach is to either use a timer or wait until the completion of the last suggestion, as indicated by a POST request from the client with new indicators after the last activity. Here’s the schema:
Lifecircle of suggestion and update indicators.
When a client sends a request for a suggestion, the client app should also specify the timing for the next request. This can occur immediately after updating the indicators, serving as a signal to the client that it’s time to seek a new suggestion, depending on the period elapsed since the last suggestion.
Get Suggestions for Sport Activity
Now, we need to develop a controller to manage the suggestion results. To do this, create src/controllers/getSuggestionController and insert the following code:
import { Request, Response } from 'express';
import { IndicatorModel } from 'src/models/IndicatorModel';
import { ActivityModel } from 'src/models/ActivityModel';
import { getSportActivitySuggestion } from 'src/helpers/getSportActivitySuggestion';

export const getSuggestionController = async (req: Request, res: Response) => {
  try {
    const [indicator] = await IndicatorModel.findAllByUserId(req.user.id);
    const [lastActivity] = await ActivityModel.findAllByUserId(req.user.id);

    if (lastActivity && !lastActivity.is_completed) {
      res.json({
        data: lastActivity,
      });
      return;
    }

    const result = await getSportActivitySuggestion(indicator, lastActivity);

    await ActivityModel.insert({
      activity_type: result.activity_type,
      duration: result.duration,
      is_completed: false,
      user_id: req.user.id,
    });

    res.json({
      data: result,
    });
  } catch (error: unknown) {
    console.log(error);
    res.status(500).json({
      message: 'Internal Server Error',
    });
  }
};
getSuggestionController.ts
Upon receiving a suggestion, we must verify the status is_completed of the last activity to avoid making unnecessary requests to the OpenAI API if an activity is already in progress. If there are no active activities, we obtain a suggestion through our getSportActivitySuggestion helper function. Next, we must log the activity in the database under the user’s ID with the appropriate status, enabling its retrieval for future suggestion requests. Ultimately, we return that result.
To obtain a suggestion from the helper, we must craft an appropriate prompt message for the OpenAI API payload. Let’s delve into the processes executed by our helper function.
import { Indicator, Activity, ActivityDescription } from 'src/@types';
import { activities } from 'src/constants/activities';
import { openai } from 'src/configs/openai';

export async function getSportActivitySuggestion(
  indicator: Indicator,
  lastActivity?: Activity
): Promise<Activity & ActivityDescription> {
  const systemPrompt = `
    You will be provided with indicators as age, weight, height, lifestyle
    and previous activity type with duration if the exist,
    and your task is to return sports activity plan in JSON format depends on those indicators.
    The plan should include the type of activity, the duration in minutes, a good description
    of how to do the activity, the recommended water consumption in milliliters,
    and the plan like step by step what to do during the activity.

    Example of the response:
    {
      "activity_type": ${activities.sort(() => Math.random() - 0.5).join(' || ')},
      "duration": 30,
      "description": "A continuous run at a moderate pace to improve cardiovascular endurance.",
      "water_consume": 500
      "distance": 3000,
      "explanation_why": "The explanation why this activity is good for you based on you previous activity and indicators",
      "plan: ["First step description", "Second step description", "Third step description"]
    }
  `;

  const lastActivityMessage = lastActivity
    ? `
      - Last activity type: ${lastActivity.activity_type}
      - Last activity duration: ${lastActivity.duration}
      `
    : '';

  const userPrompt = `
  - Age: ${indicator.age}
  - Weight: ${indicator.weight}
  - Height: ${indicator.height}
  - Lifestyle: ${indicator.life_style}
  ${lastActivityMessage}
  `;

  const completion = await openai.chat.completions.create({
    messages: [
      { role: 'system', content: systemPrompt },
      { role: 'user', content: userPrompt },
    ],
    model: 'gpt-3.5-turbo',
    temperature: 0.9,
  });

  return JSON.parse(completion.choices[0].message.content || '{}');
}
The helper function uses the OpenAI API to generate completions based on a conversation-like structure.
Essentially, we are crafting appropriate messages to create completions, simulating a conversation, and instructing the system on how to construct the response accurately. We incorporate all the parameters of indicators, an example of the response, and details from the last completed activity. The function openai.chat.completions.create() indicates that we need to create completion and generate text for example. At the property messages you can find role which can be system where we provide instructions and userwhich represent input from the user. And content the content of the message, which could be a prompt or user input. The model specifies the model to be used for generating the completion, which is a specific version of the GPT-3.5 model optimized for speed and performance, in our case most cheapest one. The last parameter is temperature which controls the randomness of the generated text. A higher temperature leads to more diverse outputs, while a lower temperature produces more conservative, predictable results. Here, it’s set to 0.9, indicating a moderate level of randomness. Finally, we simply parse the JSON from the completion result.
The price fro gpt-3.5-turbo depends on the provider and the terms of use. Typically, pricing for using models like GPT-3.5 Turbo is based on factors such as the number of requests made, the complexity of the requests, and any additional services provided. It’s best to check with the specific provider of the model for accurate pricing information.
We need to create a controller that will be responsible for finishing the last activity:
import { Request, Response } from 'express';
import { ActivityModel } from 'src/models/ActivityModel';

export const finishLastSuggestionController = async (req: Request, res: Response) => {
  try {
    const [lastActivity] = await ActivityModel.findAllByUserId(req.user.id);
    await ActivityModel.updateOneById(lastActivity.id, {
      is_completed: true,
    });

    res.json({
      id: lastActivity.id,
    });
  } catch (error: unknown) {
    console.log(error);
    res.status(500).json({
      message: 'Internal Server Error',
    });
  }
};
Finish the last activity
And update the indicators contained within the POST request.
import { Request, Response } from 'express';
import { IndicatorModel } from 'src/models/IndicatorModel';

export const updateIndicatorController = async (req: Request, res: Response) => {
  try {
    const { id } = await IndicatorModel.updateByUserId(req.user.id, {
      age: req.body.age,
      weight: req.body.weight,
      height: req.body.height,
      life_style: req.body.life_style,
    });

    res.json({
      id,
    });
  } catch (error: unknown) {
    console.log(error);
    res.status(500).json({
      message: 'Internal Server Error',
    });
  }
};
Update indicators controller
We can update indicators using metrics from any client that utilizes this service, such as Apple iPhones or Android phones, which provide ample data. By leveraging this endpoint, we can augment the schema with additional parameters to enhance precision.
At the conclusion of this process, I would like to illustrate the result of the table of suggestions in the database that you will obtain after completing all of these steps:
Result of suggestions in the database
Conclusion
In summary, harnessing OpenAI for sports activity suggestions presents a robust solution to elevate user engagement and encourage active lifestyles. The refinement of indicators holds immense potential to enhance the clarity and effectiveness of prompt messages, paving the way for more personalized and compelling user experiences. At the core of this article lies the pivotal concept of communicating with the OpenAI API, constructing prompt messages, and parsing the resultant data. These fundamental processes form the backbone of our application, driving its ability to generate tailored sports activity suggestions and deliver a seamless user experience.
I trust you found this journey enjoyable and informative. Should you have any further suggestions or inquiries, please don’t hesitate to reach out to me via comments or other platforms.
Denial of responsibility! Techno Blender is an automatic aggregator of the all world’s media. In each content, the hyperlink to the primary source is specified. All trademarks belong to their rightful owners, all materials to their authors. If you are the owner of the content and do not want us to publish your materials, please contact us by email – [email protected]. The content will be deleted within 24 hours.