
Create Your Own ChatGPT Application Using Spring Boot
In this blog, I will try to explain how to integrate with OpenAI chat completion APIs to use them and create your own version of ChatGPT. This will utilize the classic Spring Boot app with core Java and OpenAI chat completion API.
We will expose a REST endpoint that will take the query from the end user in the form of requestParam, process it, and return the response in human-readable text format.
Let’s follow the below steps:
Prerequisites
We are going to use OpenAI ChatGPT completion API in our app.
The various important parameters of this API are described under:
model: we will send requests to the “gpt-3.5-turbo”
What Is GPT-3.5-Turbo?
GPT-3.5 Turbo is an incredibly powerful Artificial Intelligence-powered language model. It can understand and generate human-like text based on only a prompt, making it a valuable tool for a wide variety of applications. It allows you to communicate with the model and, conversationally receive detailed responses.
Messages: This represents the actual request being sent to the model so that the model can parse the message and generate a corresponding response in a human-readable format.
This further contains a couple of sub-attributes:
role: Specifies the sender of the message(it is ‘user’ for request and ‘assistant’ in response).
content: This is the actual message
The Message DTO would look something like below:
public class Message {
    private String role;
    private String content;
    // getters & setters
}
Without further ado, let’s start integrating with our Spring Boot app.
Create a basic Spring Boot app. For this, head over to start.spring.io and use the below selections:
we only need the Spring web dependency:
  <dependency>
    <groupId>org.springframework.boot</groupId>
    <artifactId>spring-boot-starter-web</artifactId>
  </dependency>
Create a package for Controller layer and put the below code:
package com.akash.mychatGPT.controller;

import com.akash.mychatGPT.dtos.ChatRequest;
import com.akash.mychatGPT.dtos.ChatResponse;
import org.springframework.beans.factory.annotation.Autowired;
import org.springframework.beans.factory.annotation.Qualifier;
import org.springframework.beans.factory.annotation.Value;
import org.springframework.web.bind.annotation.GetMapping;
import org.springframework.web.bind.annotation.RequestParam;
import org.springframework.web.bind.annotation.RestController;
import org.springframework.web.client.RestTemplate;

@RestController
public class ChatController {

    @Qualifier("openaiRestTemplate")
    @Autowired
    private RestTemplate restTemplate;

    @Value("${openai.model}")
    private String model;

    @Value("${openai.api.url}")
    private String apiUrl;

    @GetMapping("/chat")
    public String chat(@RequestParam String prompt) {
        // create a request
        ChatRequest request = new ChatRequest(model, prompt, 1, 1.1);

        // call the API
        ChatResponse response = restTemplate.postForObject(apiUrl, request, ChatResponse.class);

        if (response == null || response.getChoices() == null || response.getChoices().isEmpty()) {
            return "No response";
        }

        // return the first response
        return response.getChoices().get(0).getMessage().getContent();
    }
}
Let’s create the ChatRequest class:
package com.akash.mychatGPT.dtos;

import java.util.ArrayList;
import java.util.List;

public class ChatRequest {

    private String model;
    private List<Message> messages;
    private int n;// can be specified if we want to increase the number of responses to generate. The default value is 1.
    private double temperature;// controls the randomness of the response. The default value is 1 (most random).

    // all arg constructors, Getters & setters
}
Here, we use the below properties, which we would put in application.properties:
openai.model=gpt-3.5-turbo
openai.api.url=https://api.openai.com/v1/chat/completions
openai.api.key=<generated_key_goes_here>
Important: A Word About OpenAI API Key:
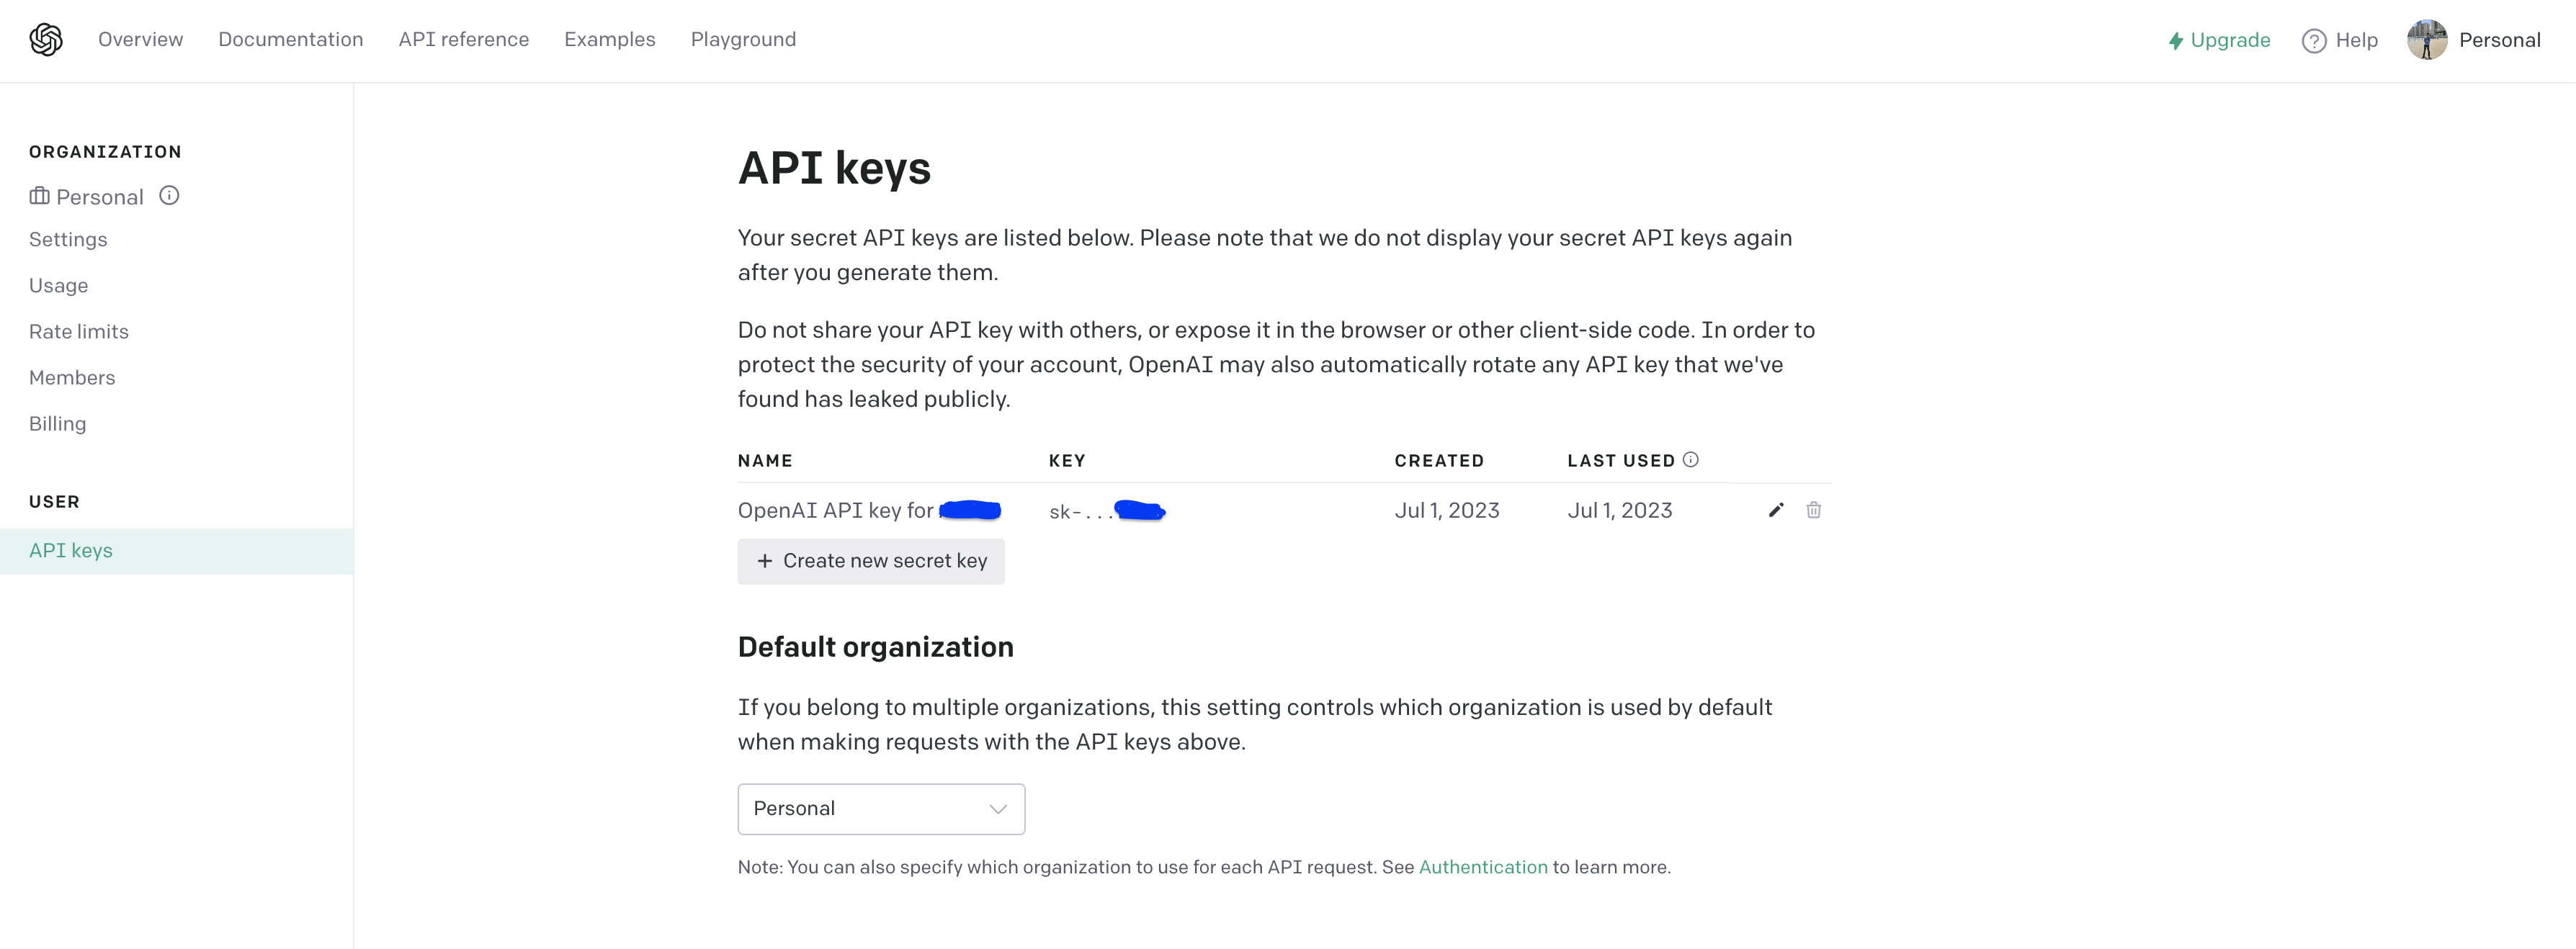
The OpenAI lets you generate a unique API key to consume OpenAI APIs. For this, click here. Here you need to sign up and create your API key (which is a fairly simple step, as shown in the snapshot below). Make sure you keep it secure and don’t let it get compromised, e.g., by keeping it hardcoded in your codebase.
Click on “create new secret key” and follow the on-screen steps. Now you have your own OpenAI API key.
Next, we use RestTemplate for making calls to OpenAI API URLs. So, let’s add an interceptor as below:
package com.akash.mychatGPT.config;

import org.springframework.beans.factory.annotation.Qualifier;
import org.springframework.beans.factory.annotation.Value;
import org.springframework.context.annotation.Bean;
import org.springframework.context.annotation.Configuration;
import org.springframework.web.client.RestTemplate;

@Configuration
public class OpenAIRestTemplateConfig {

    @Value("${openai.api.key}")
    private String openaiApiKey;

    @Bean
    @Qualifier("openaiRestTemplate")
    public RestTemplate openaiRestTemplate() {
        RestTemplate restTemplate = new RestTemplate();
        restTemplate.getInterceptors().add((request, body, execution) -> {
            request.getHeaders().add("Authorization", "Bearer " + openaiApiKey);
            return execution.execute(request, body);
        });
        return restTemplate;
    }
}
The interceptor intercepts the request and adds the OpenAI API key to the request header.
That’s it! Now we can simply run the application using the main class and start invoking the API.
package com.akash.mychatGPT;

import org.springframework.boot.SpringApplication;
import org.springframework.boot.autoconfigure.SpringBootApplication;

@SpringBootApplication
public class MyChatGptApplication {

	public static void main(String[] args) {
		SpringApplication.run(MyChatGptApplication.class, args);
	}

}
Testing
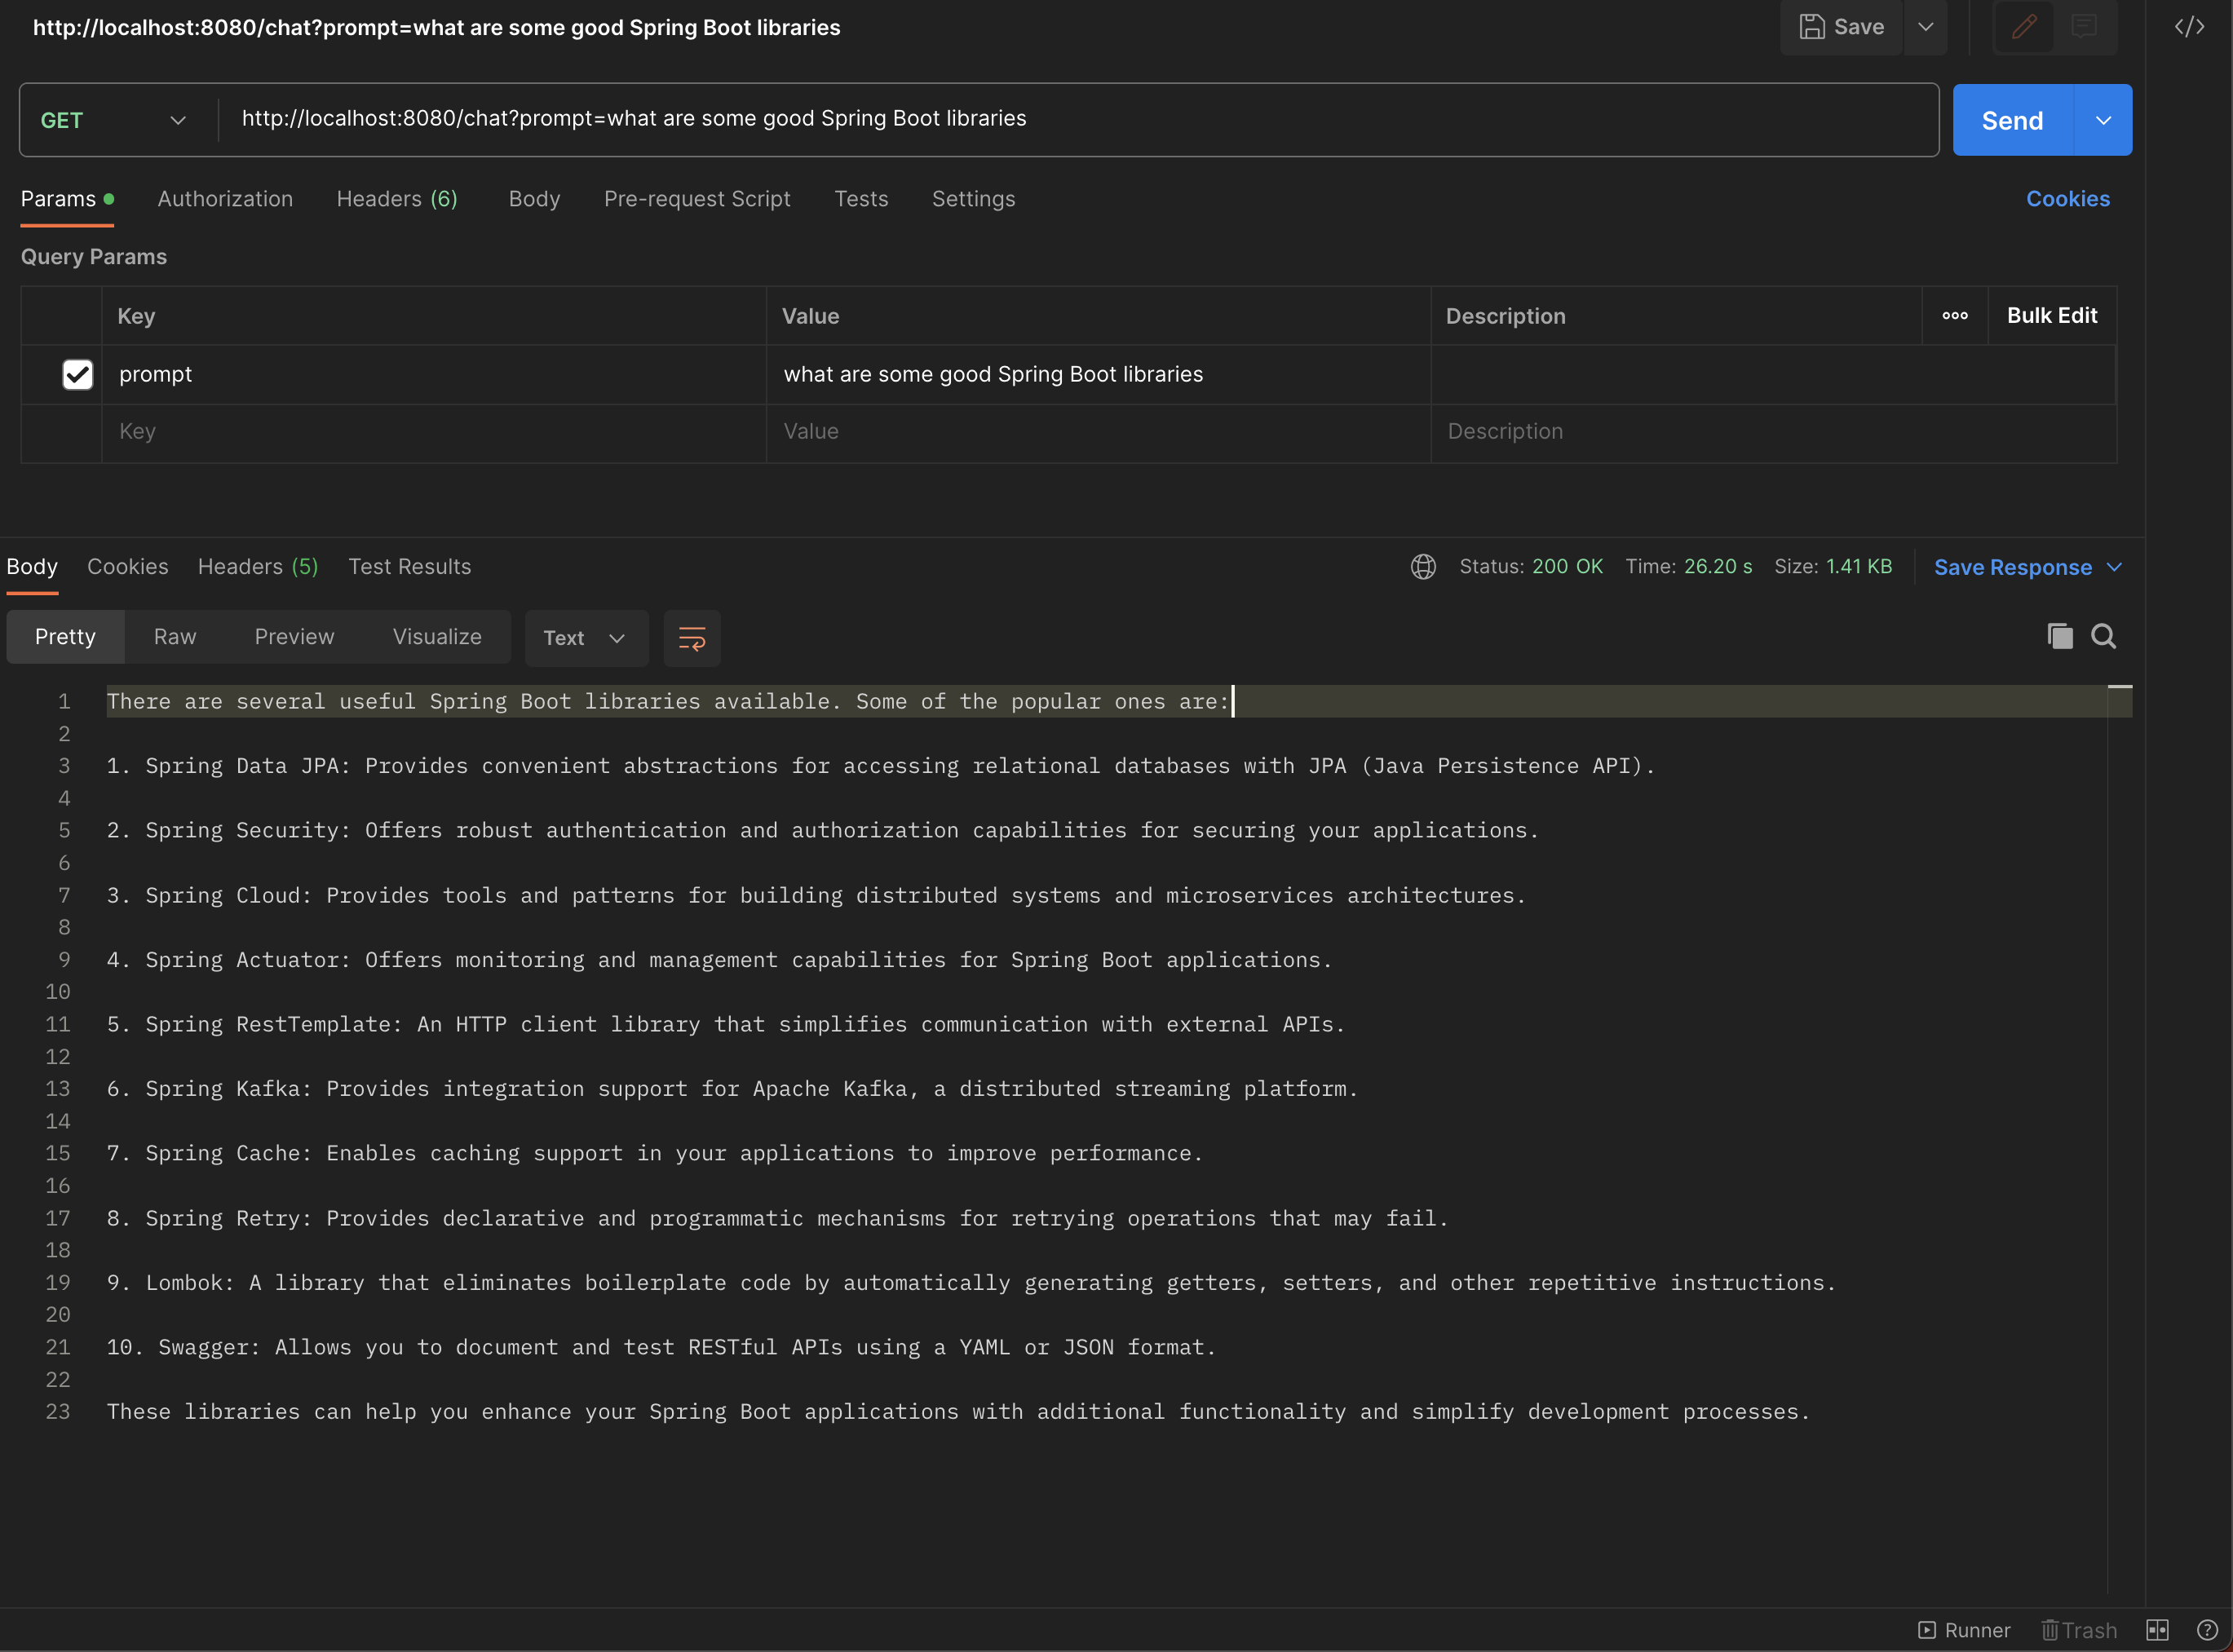
Head over to Postman (or your favorite browser, i.e., chrome :P) and hit the below URL. Pass your query to which you want to ask the model. You will be amazed to see the correctness of its response. (Make sure to pass the query in the request param).
Example #1
http://localhost:8080/chat?prompt=what are some good Spring Boot libraries
Example #2
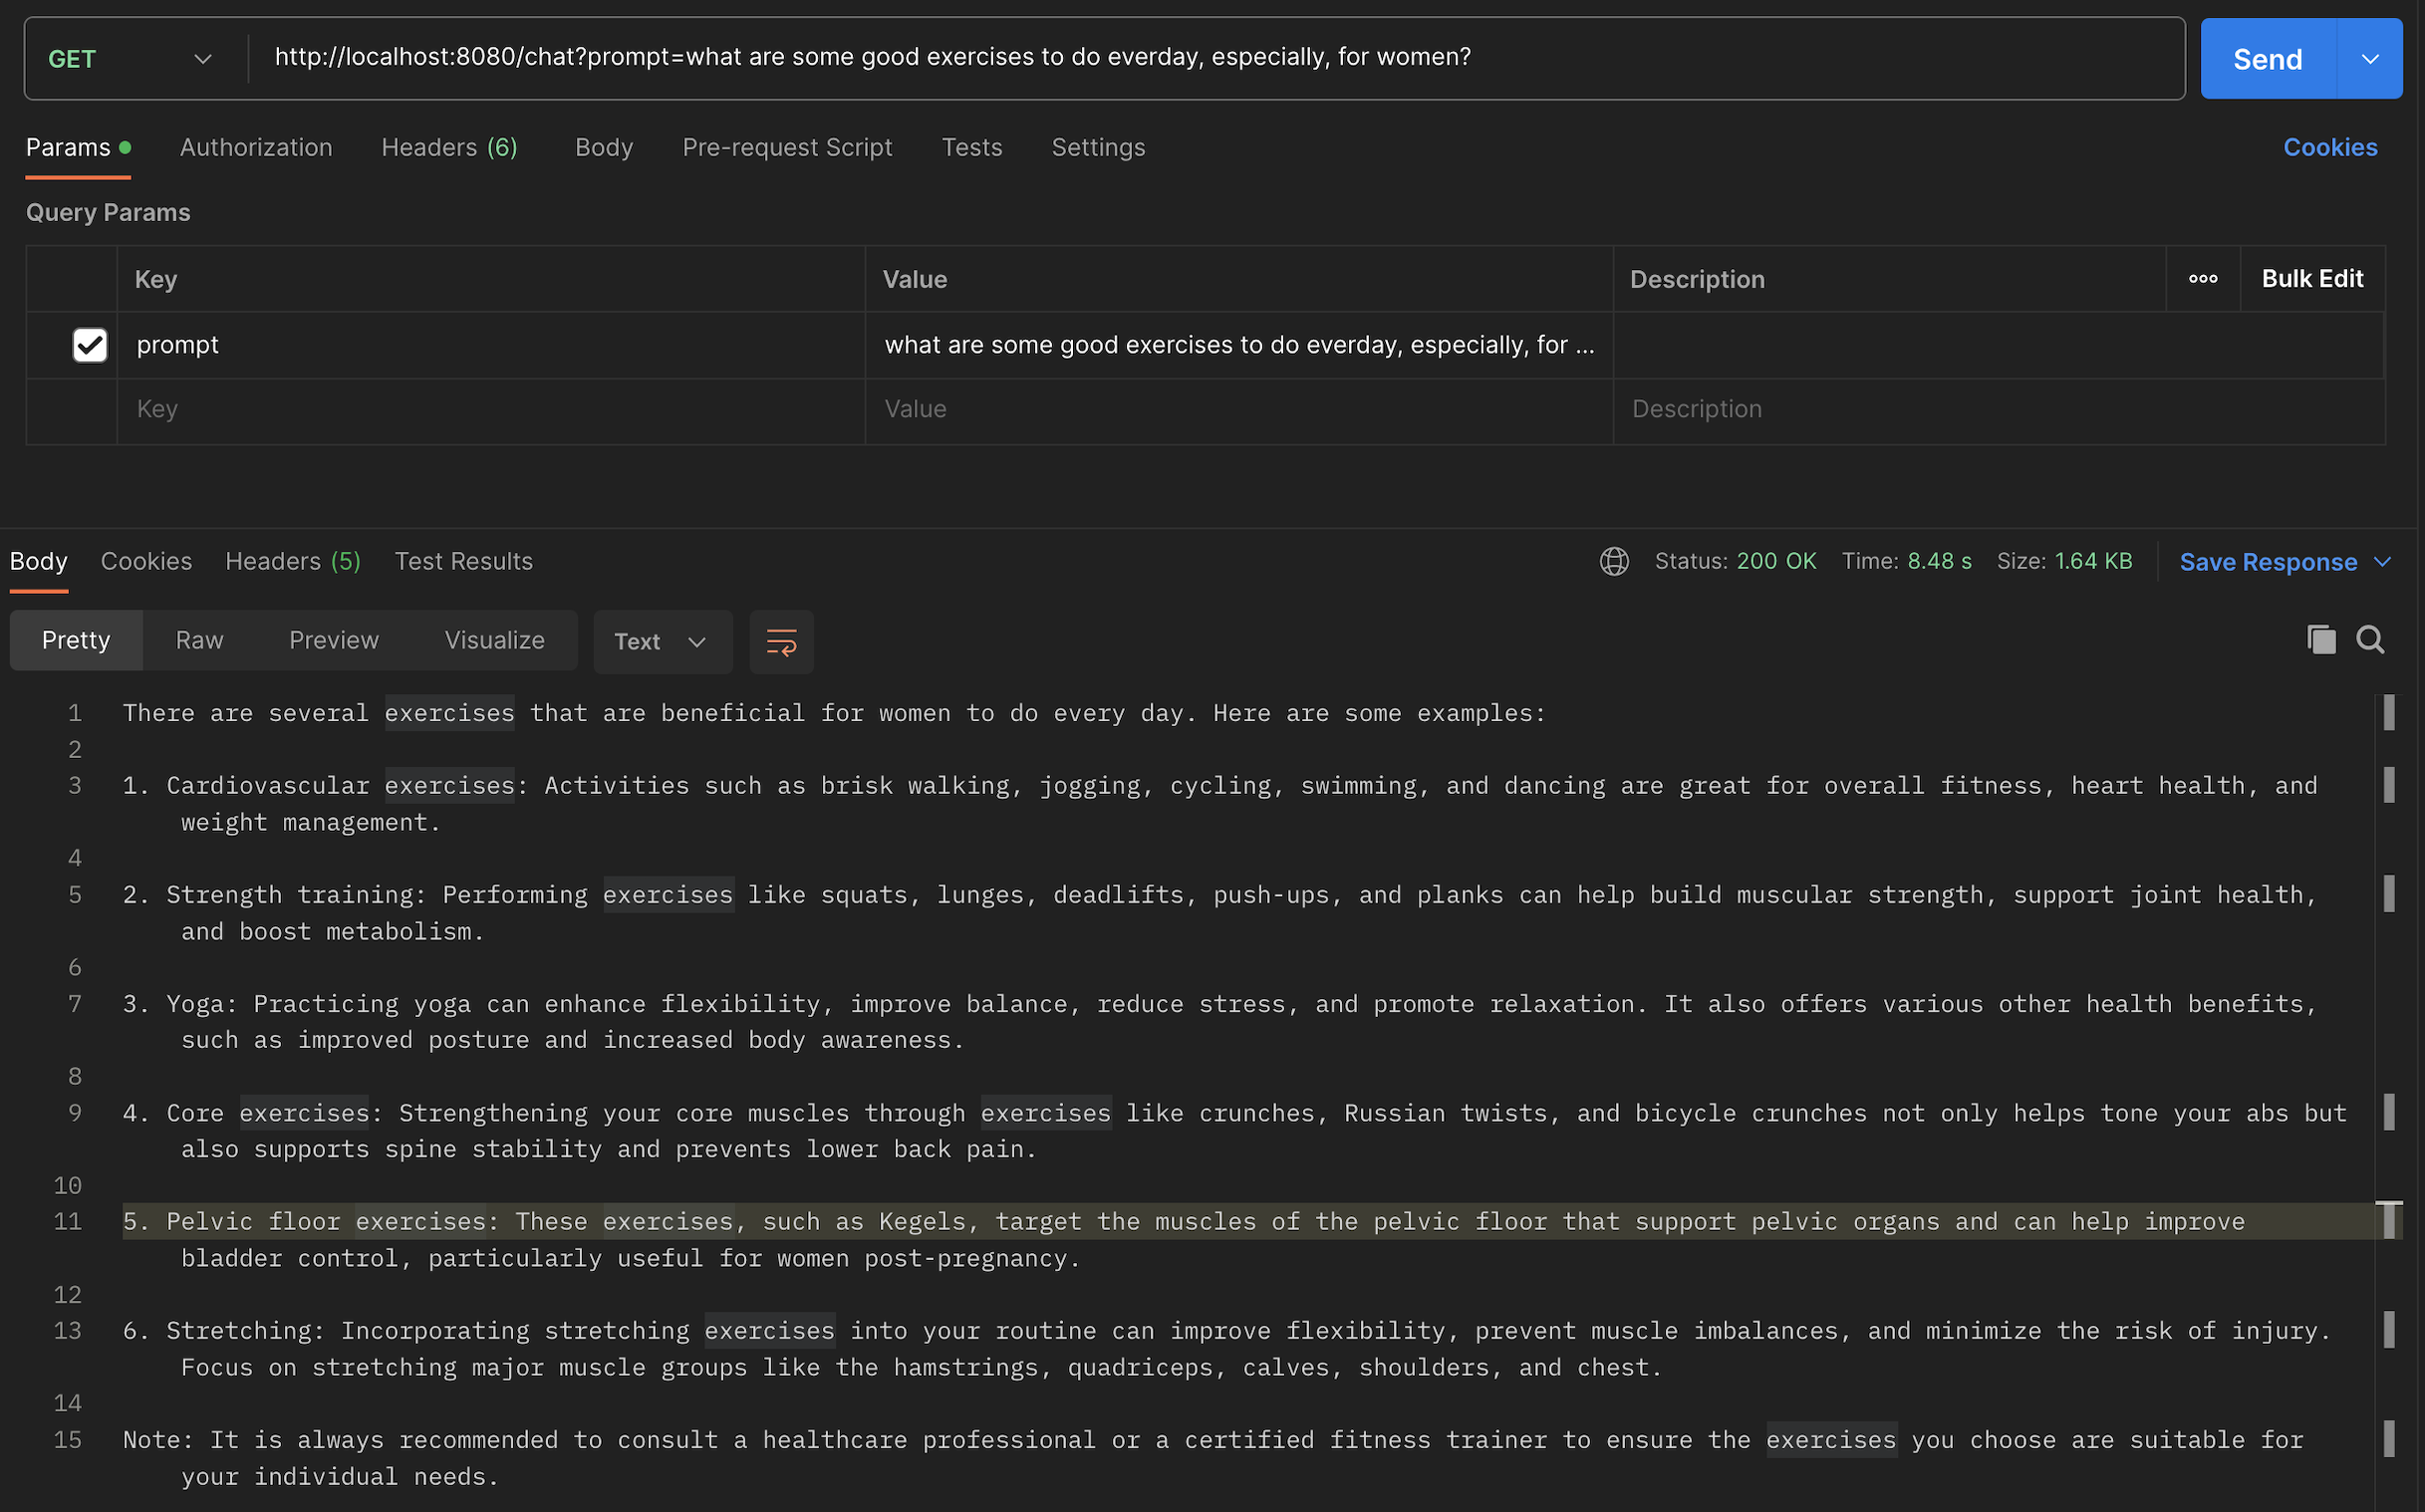
The model GPT 3.5 Turbo is advanced enough to show a highly realistic response. (Thanks to billions of lines of text, the model has been trained with).
Note: the actual call being made to the OpenAI API curl would look something like this:
curl --location 'https://api.openai.com/v1/chat/completions' \
--header 'Content-Type: application/json' \
--header 'Authorization: Bearer $OPENAI_API_KEY' \
--data '{
    "model": "gpt-3.5-turbo",
    "messages": [
        {
            "role": "user",
            "content": "Hello!"
        }
    ]
}'
Caveats
While developing the application, below are the common problems one may encounter. Read on and try them if you face any such scenario:
-
com.fasterxml.jackson.databind.exc.InvalidDefinitionException: Cannot construct instance of `com.akash.mychatGPT.Message` (no Creators, like default constructor, exist): cannot deserialize from Object value (no delegate- or property-based Creator)
 at [Source: (org.springframework.util.StreamUtils$NonClosingInputStream); line: 10, column: 9] (through reference chain: com.akash.mychatGPT.ChatResponse["choices"]->java.util.ArrayList[0]->com.akash.mychatGPT.ChatResponse$Choice["message"])
Make sure to create a no-arg constructor and also supply getters and setters for:
-
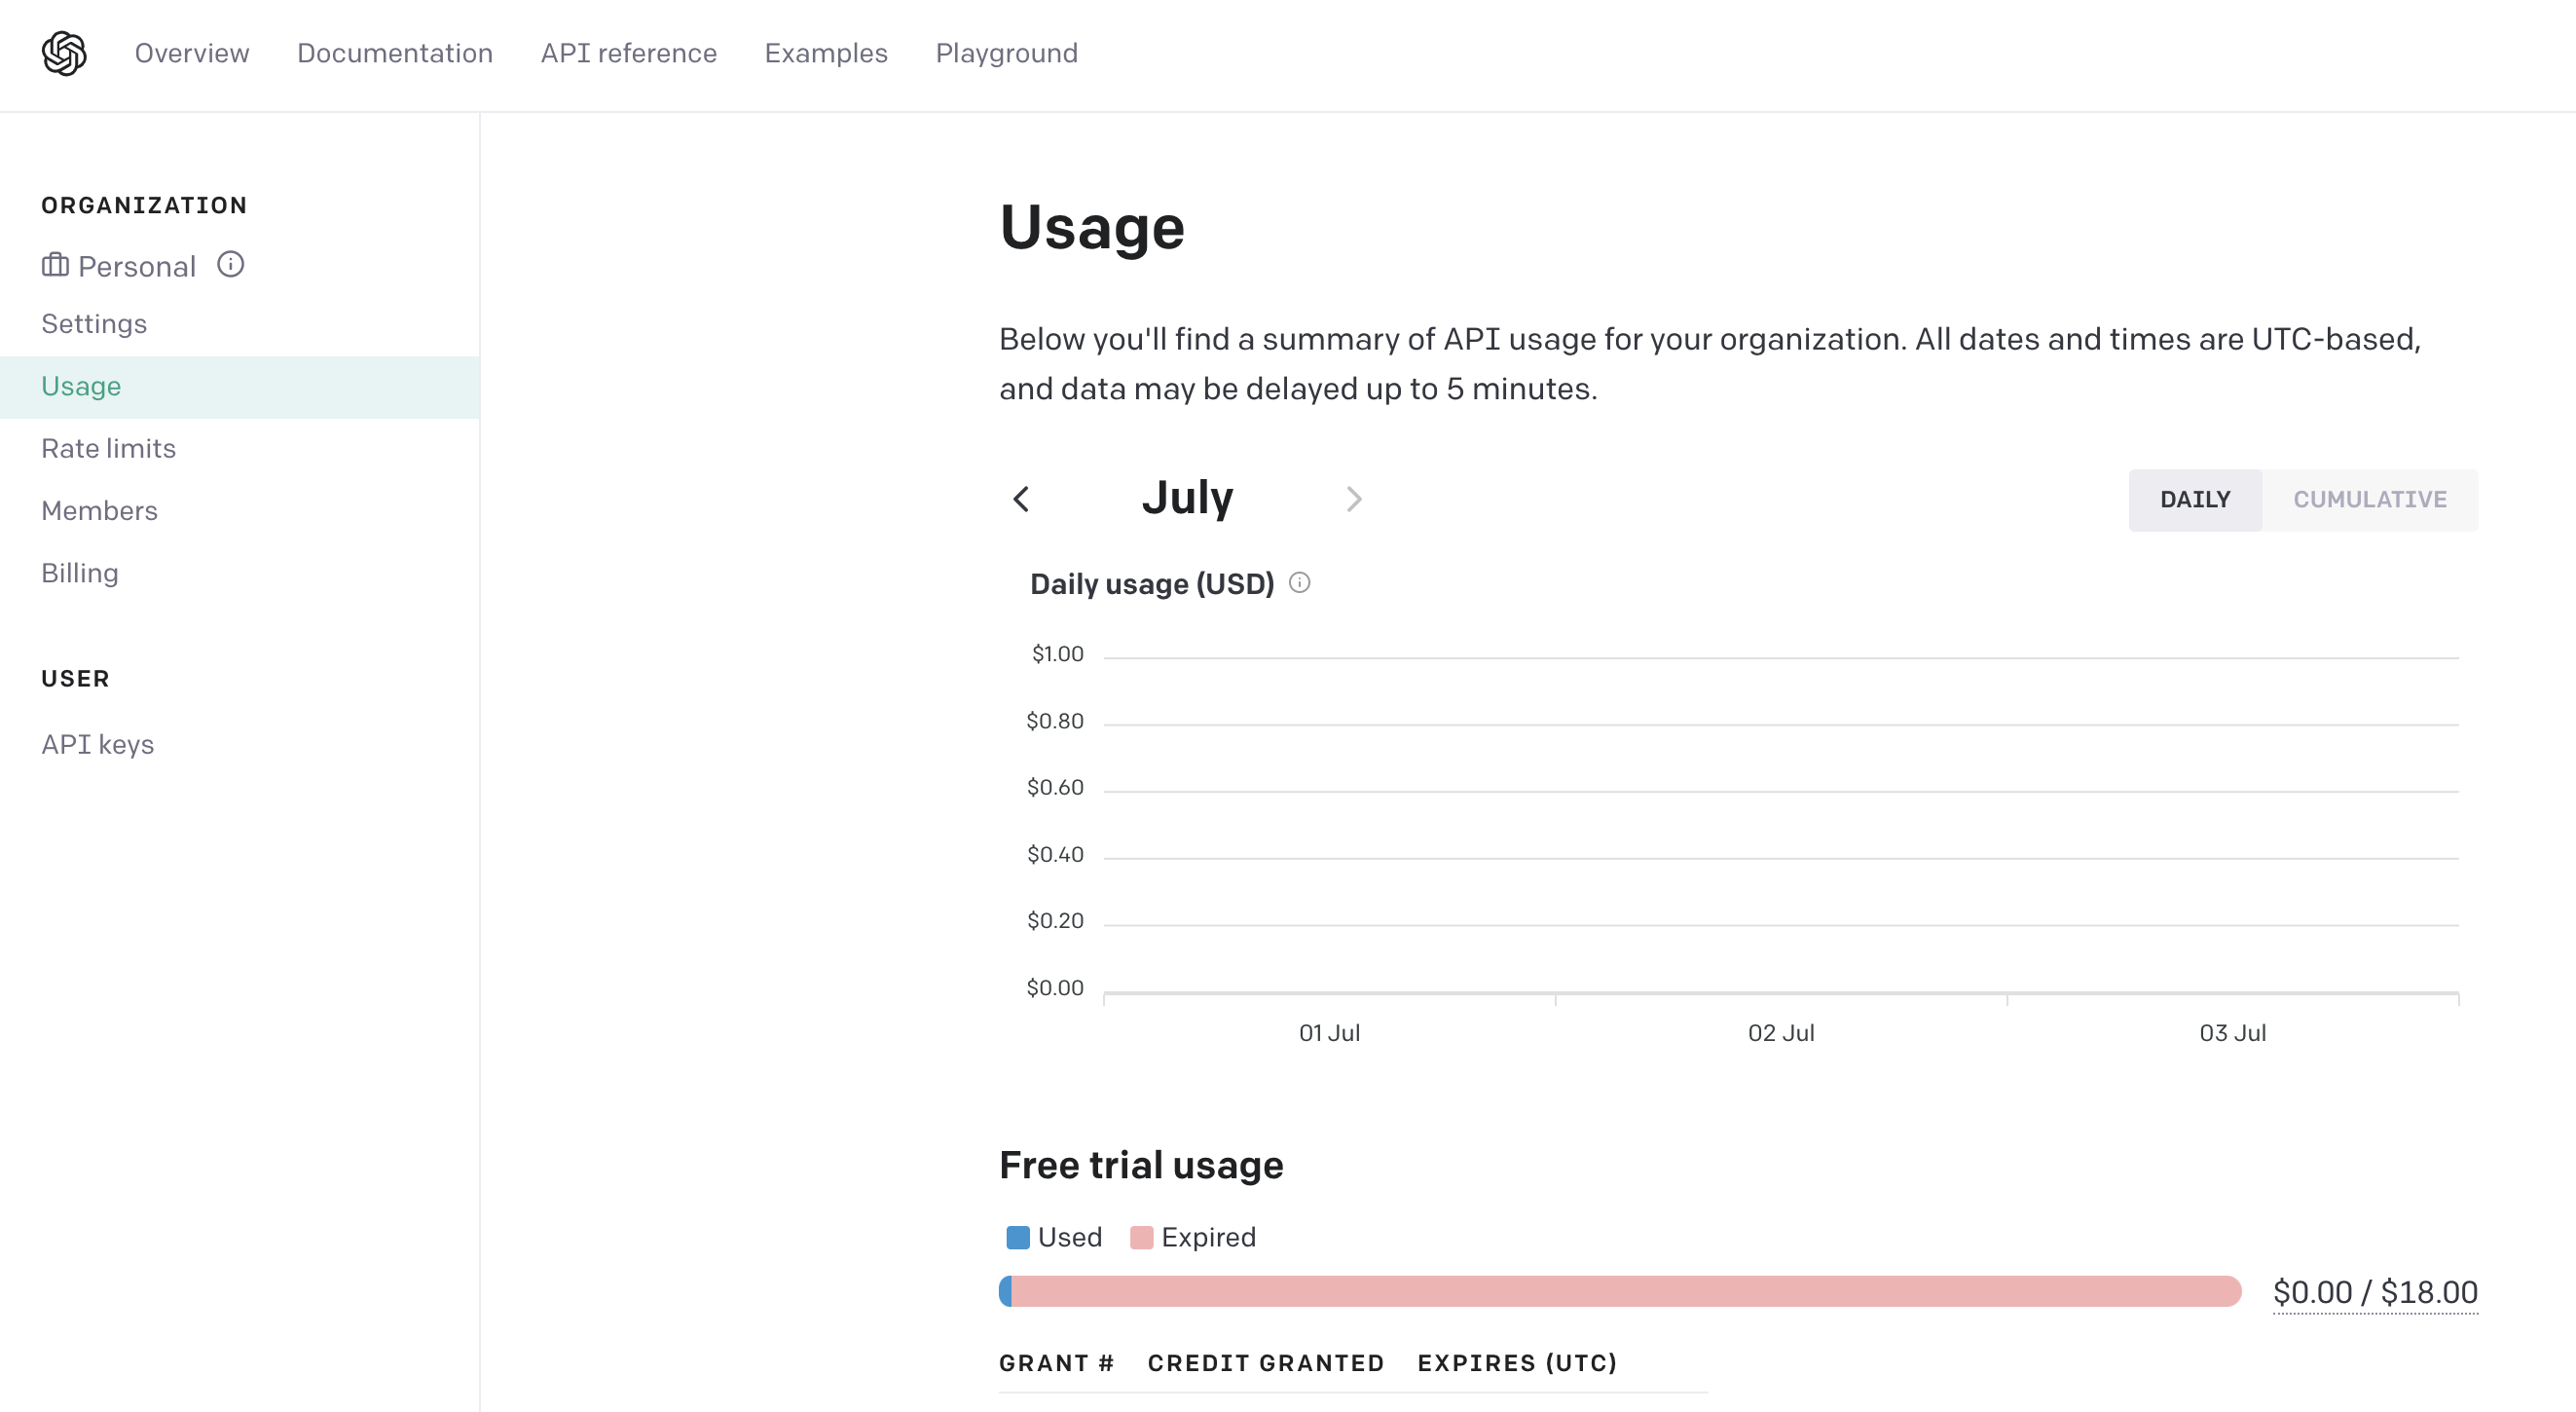
org.springframework.web.client.HttpClientErrorException$TooManyRequests: 429 Too Many Requests:
"{<EOL>    "error": {<EOL>        "message": "You exceeded your current quota, please check your plan and billing details.",<EOL>        "type": "insufficient_quota",<EOL>        "param": null,<EOL>        "code": null<EOL>    }<EOL>}<EOL>"
OpenAI provides a basic quota. Your quota for your current email id was exhausted, so you used a new email id.
-
org.springframework.web.client.HttpClientErrorException$TooManyRequests: 429 Too Many Requests: "{<EOL> "error": {<EOL> "message": "Rate limit reached for default-gpt-3.5-turbo in organization org-V9XKg3mYkRRTJhHWq1lYjVtS on requests per min. Limit: 3 / min. Please try again in 20s. Contact us through our help center at help.openai.com if you continue to have issues. Please add a payment method to your account to increase your rate limit. Visit https://platform.openai.com/account/billing to add a payment method.",<EOL> "type": "requests",<EOL> "param": null,<EOL> "code": null<EOL> }<EOL>}<EOL>"Try invoking the API after some time. (For security, a good working window is 30 mins).
Conclusion
In this short article, we learned about a GPT 3.5 Turbo model from OpenAI. Its important parameters and the chat completion API. We also looked at the significance of the OpenAI API key for consuming APIs in a rate-limited order and how we can generate one for individual usage.
Then we also looked at how easy it is to integrate our classic Spring Boot app with OpenAI chat completion API, made actual calls to the endpoint, and validated the response.
Caveats
The API from OpenAI is a regulated resource. The amount of calls we’re making to the API is limited, and you can track the same here.
In this blog, I will try to explain how to integrate with OpenAI chat completion APIs to use them and create your own version of ChatGPT. This will utilize the classic Spring Boot app with core Java and OpenAI chat completion API.
We will expose a REST endpoint that will take the query from the end user in the form of requestParam, process it, and return the response in human-readable text format.
Let’s follow the below steps:
Prerequisites
We are going to use OpenAI ChatGPT completion API in our app.
The various important parameters of this API are described under:
model: we will send requests to the “gpt-3.5-turbo”
What Is GPT-3.5-Turbo?
GPT-3.5 Turbo is an incredibly powerful Artificial Intelligence-powered language model. It can understand and generate human-like text based on only a prompt, making it a valuable tool for a wide variety of applications. It allows you to communicate with the model and, conversationally receive detailed responses.
Messages: This represents the actual request being sent to the model so that the model can parse the message and generate a corresponding response in a human-readable format.
This further contains a couple of sub-attributes:
role: Specifies the sender of the message(it is ‘user’ for request and ‘assistant’ in response).
content: This is the actual message
The Message DTO would look something like below:
public class Message {
    private String role;
    private String content;
    // getters & setters
}
Without further ado, let’s start integrating with our Spring Boot app.
Create a basic Spring Boot app. For this, head over to start.spring.io and use the below selections:
we only need the Spring web dependency:
  <dependency>
    <groupId>org.springframework.boot</groupId>
    <artifactId>spring-boot-starter-web</artifactId>
  </dependency>
Create a package for Controller layer and put the below code:
package com.akash.mychatGPT.controller;

import com.akash.mychatGPT.dtos.ChatRequest;
import com.akash.mychatGPT.dtos.ChatResponse;
import org.springframework.beans.factory.annotation.Autowired;
import org.springframework.beans.factory.annotation.Qualifier;
import org.springframework.beans.factory.annotation.Value;
import org.springframework.web.bind.annotation.GetMapping;
import org.springframework.web.bind.annotation.RequestParam;
import org.springframework.web.bind.annotation.RestController;
import org.springframework.web.client.RestTemplate;

@RestController
public class ChatController {

    @Qualifier("openaiRestTemplate")
    @Autowired
    private RestTemplate restTemplate;

    @Value("${openai.model}")
    private String model;

    @Value("${openai.api.url}")
    private String apiUrl;

    @GetMapping("/chat")
    public String chat(@RequestParam String prompt) {
        // create a request
        ChatRequest request = new ChatRequest(model, prompt, 1, 1.1);

        // call the API
        ChatResponse response = restTemplate.postForObject(apiUrl, request, ChatResponse.class);

        if (response == null || response.getChoices() == null || response.getChoices().isEmpty()) {
            return "No response";
        }

        // return the first response
        return response.getChoices().get(0).getMessage().getContent();
    }
}
Let’s create the ChatRequest class:
package com.akash.mychatGPT.dtos;

import java.util.ArrayList;
import java.util.List;

public class ChatRequest {

    private String model;
    private List<Message> messages;
    private int n;// can be specified if we want to increase the number of responses to generate. The default value is 1.
    private double temperature;// controls the randomness of the response. The default value is 1 (most random).

    // all arg constructors, Getters & setters
}
Here, we use the below properties, which we would put in application.properties:
openai.model=gpt-3.5-turbo
openai.api.url=https://api.openai.com/v1/chat/completions
openai.api.key=<generated_key_goes_here>
Important: A Word About OpenAI API Key:
The OpenAI lets you generate a unique API key to consume OpenAI APIs. For this, click here. Here you need to sign up and create your API key (which is a fairly simple step, as shown in the snapshot below). Make sure you keep it secure and don’t let it get compromised, e.g., by keeping it hardcoded in your codebase.
Click on “create new secret key” and follow the on-screen steps. Now you have your own OpenAI API key.
Next, we use RestTemplate for making calls to OpenAI API URLs. So, let’s add an interceptor as below:
package com.akash.mychatGPT.config;

import org.springframework.beans.factory.annotation.Qualifier;
import org.springframework.beans.factory.annotation.Value;
import org.springframework.context.annotation.Bean;
import org.springframework.context.annotation.Configuration;
import org.springframework.web.client.RestTemplate;

@Configuration
public class OpenAIRestTemplateConfig {

    @Value("${openai.api.key}")
    private String openaiApiKey;

    @Bean
    @Qualifier("openaiRestTemplate")
    public RestTemplate openaiRestTemplate() {
        RestTemplate restTemplate = new RestTemplate();
        restTemplate.getInterceptors().add((request, body, execution) -> {
            request.getHeaders().add("Authorization", "Bearer " + openaiApiKey);
            return execution.execute(request, body);
        });
        return restTemplate;
    }
}
The interceptor intercepts the request and adds the OpenAI API key to the request header.
That’s it! Now we can simply run the application using the main class and start invoking the API.
package com.akash.mychatGPT;

import org.springframework.boot.SpringApplication;
import org.springframework.boot.autoconfigure.SpringBootApplication;

@SpringBootApplication
public class MyChatGptApplication {

	public static void main(String[] args) {
		SpringApplication.run(MyChatGptApplication.class, args);
	}

}
Testing
Head over to Postman (or your favorite browser, i.e., chrome :P) and hit the below URL. Pass your query to which you want to ask the model. You will be amazed to see the correctness of its response. (Make sure to pass the query in the request param).
Example #1
http://localhost:8080/chat?prompt=what are some good Spring Boot libraries
Example #2
The model GPT 3.5 Turbo is advanced enough to show a highly realistic response. (Thanks to billions of lines of text, the model has been trained with).
Note: the actual call being made to the OpenAI API curl would look something like this:
curl --location 'https://api.openai.com/v1/chat/completions' \
--header 'Content-Type: application/json' \
--header 'Authorization: Bearer $OPENAI_API_KEY' \
--data '{
    "model": "gpt-3.5-turbo",
    "messages": [
        {
            "role": "user",
            "content": "Hello!"
        }
    ]
}'
Caveats
While developing the application, below are the common problems one may encounter. Read on and try them if you face any such scenario:
-
com.fasterxml.jackson.databind.exc.InvalidDefinitionException: Cannot construct instance of `com.akash.mychatGPT.Message` (no Creators, like default constructor, exist): cannot deserialize from Object value (no delegate- or property-based Creator)
 at [Source: (org.springframework.util.StreamUtils$NonClosingInputStream); line: 10, column: 9] (through reference chain: com.akash.mychatGPT.ChatResponse["choices"]->java.util.ArrayList[0]->com.akash.mychatGPT.ChatResponse$Choice["message"])
Make sure to create a no-arg constructor and also supply getters and setters for:
-
org.springframework.web.client.HttpClientErrorException$TooManyRequests: 429 Too Many Requests:
"{<EOL>    "error": {<EOL>        "message": "You exceeded your current quota, please check your plan and billing details.",<EOL>        "type": "insufficient_quota",<EOL>        "param": null,<EOL>        "code": null<EOL>    }<EOL>}<EOL>"
OpenAI provides a basic quota. Your quota for your current email id was exhausted, so you used a new email id.
-
org.springframework.web.client.HttpClientErrorException$TooManyRequests: 429 Too Many Requests: "{<EOL> "error": {<EOL> "message": "Rate limit reached for default-gpt-3.5-turbo in organization org-V9XKg3mYkRRTJhHWq1lYjVtS on requests per min. Limit: 3 / min. Please try again in 20s. Contact us through our help center at help.openai.com if you continue to have issues. Please add a payment method to your account to increase your rate limit. Visit https://platform.openai.com/account/billing to add a payment method.",<EOL> "type": "requests",<EOL> "param": null,<EOL> "code": null<EOL> }<EOL>}<EOL>"Try invoking the API after some time. (For security, a good working window is 30 mins).
Conclusion
In this short article, we learned about a GPT 3.5 Turbo model from OpenAI. Its important parameters and the chat completion API. We also looked at the significance of the OpenAI API key for consuming APIs in a rate-limited order and how we can generate one for individual usage.
Then we also looked at how easy it is to integrate our classic Spring Boot app with OpenAI chat completion API, made actual calls to the endpoint, and validated the response.
Caveats
The API from OpenAI is a regulated resource. The amount of calls we’re making to the API is limited, and you can track the same here.
Denial of responsibility! Techno Blender is an automatic aggregator of the all world’s media. In each content, the hyperlink to the primary source is specified. All trademarks belong to their rightful owners, all materials to their authors. If you are the owner of the content and do not want us to publish your materials, please contact us by email – [email protected]. The content will be deleted within 24 hours.