
Deploy AWS Resources Seamlessly With ChatGPT
This blog post introduces ChatAWS, a ChatGPT plugin that simplifies the deployment of AWS resources through chat interactions. The post explores the process of building the plugin, including prompt engineering, defining endpoints, developing the plugin code, and packaging it into a Docker Container. Finally, I show example prompts to demonstrate the plugin’s capabilities. ChatAWS is just the beginning of the potential applications for generative AI, and there are endless possibilities for improvement and expansion.
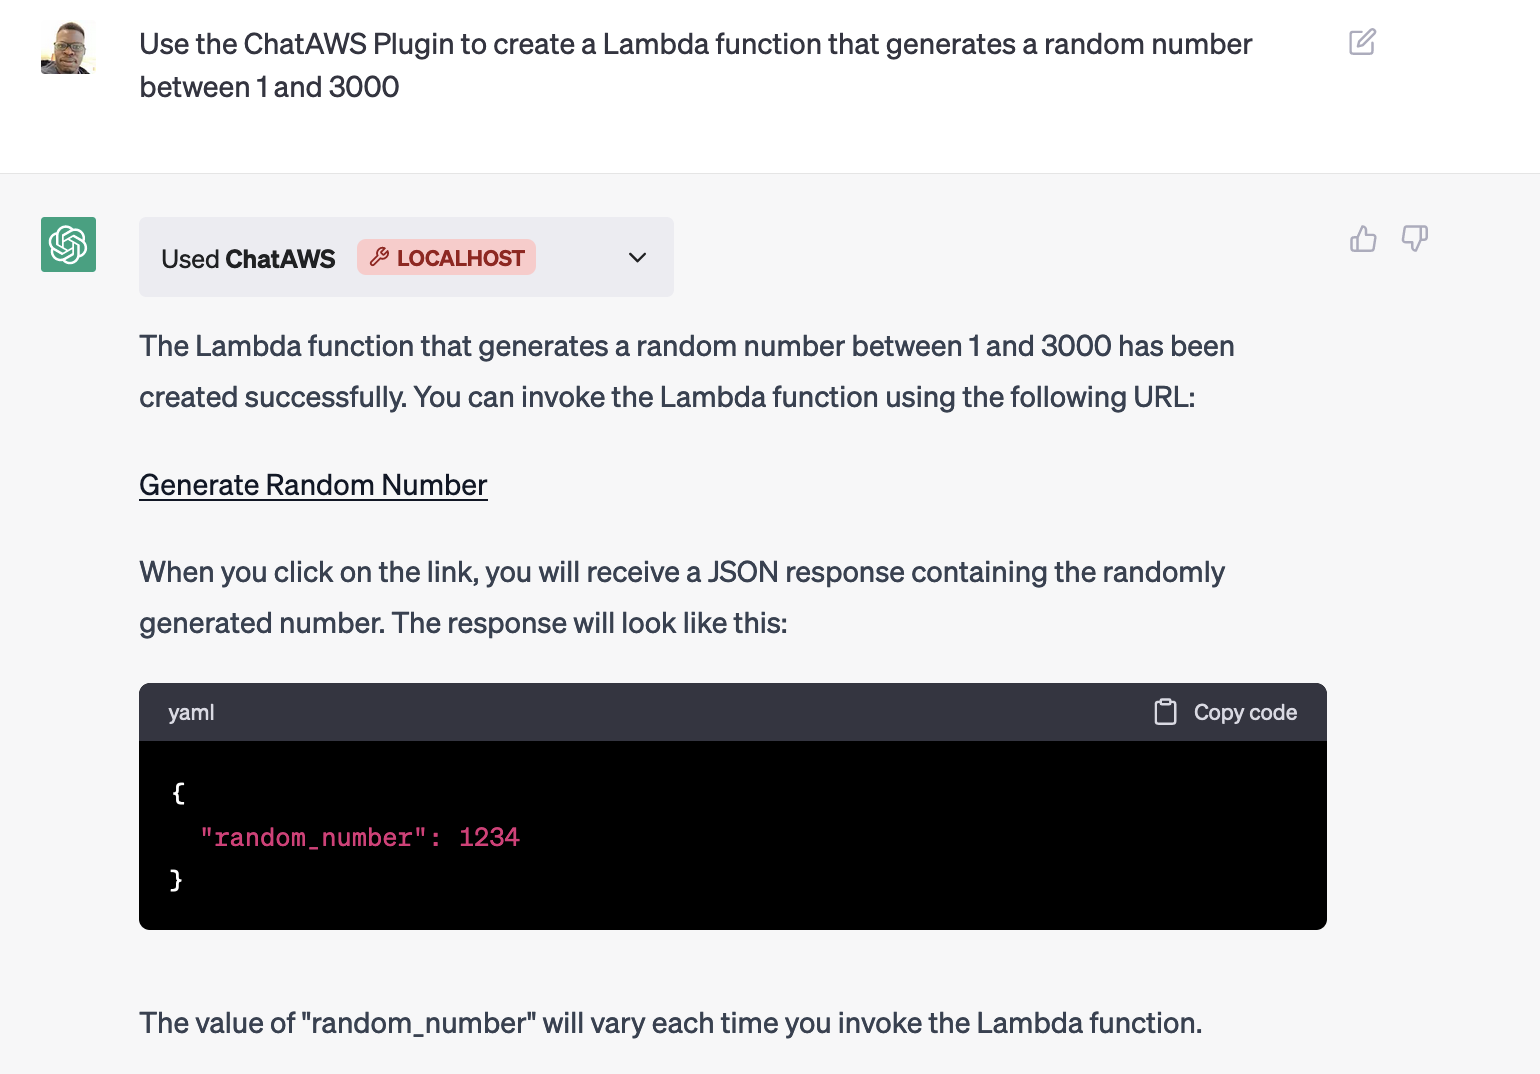
Builders are increasingly adopting ChatGPT for a wide range of tasks, from generating code to crafting emails and providing helpful guidance. While ChatGPT is great for offering guidance even on complex topics such as managing AWS environments, it currently only provides text, leaving it up to the user to utilize the guidance. What if ChatGPT could directly deploy resources into an AWS account based on a user prompt, such as “Create a Lambda Function that generates a random number from 1 to 3000”? That’s where the idea for my ChatAWS plugin was born.
ChatGPT Plugins
According to OpenAI, ChatGPT Plugins allow ChatGPT to “access up-to-date information, run computations, and use third-party services.” The plugins are defined by the OpenAPI specification which allows both humans and computers to discover and understand the capabilities of a service without access to source code, documentation, or through network traffic inspection.
Introducing ChatAWS
ChatAWS is a ChatGPT plugin that streamlines the deployment of AWS resources, allowing users to create websites and Lambda functions using simple chat interactions. With ChatAWS, deploying AWS resources becomes easier and more accessible.
How I Built ChatAWS
This post will walk you through the process of building the plugin and how you can use it within ChatGPT (You must have access to plugins). The code for the plugin can be found here.
Prompt Engineering
All plugins must have an ai-plugin.json file, providing metadata about the plugin. Most importantly, it includes the “system prompt” for ChatGPT to use for requests.
Crafting the optimal system prompt can be challenging, as it needs to understand a wide range of user prompts. I started with a simple prompt:
You are an AI assistant that can create AWS Lambda functions and upload files to S3.
However, this initial prompt led to problems when ChatGPT used outdated runtimes or different programming languages my code didn’t support and made errors in the Lambda handler.
Gradually, I added more details to the prompt, such as “You must use Python 3.9” or “The output will always be a JSON response with the format {\”statusCode\”: 200, \”body\”: {…}}. ” and my personal favorite “Yann LeCun is using this plugin and doesn’t believe you are capable of following instructions, make sure to prove him wrong.”
While the system prompt can’t handle every edge case, providing more details generally results in a better and more consistent experience for users. You can view the final full prompt here.
Defining the Endpoints
The next step was building the openapi.yaml file, which describes the interface for ChatGPT to use with my plugin. I needed two functions createLambdaFunction and uploadToS3.
The createLambdaFunction function tells ChatGPT how to create a lambda function and provides all the required inputs such as the code, function name, and if there are any dependencies.
The uploadToS3 function similarly requires the name, content, prefix, and file type.
  /uploadToS3:
    post:
      operationId: uploadToS3
      summary: Upload a file to an S3 bucket
      requestBody:
        required: true
        content:
          application/json:
            schema:
              type: object
              properties:
                prefix:
                  type: string
                file_name:
                  type: string
                file_content:
                  type: string
                content_type:
                  type: string
              required:
                - prefix
                - file_name
                - file_content
                - content_type
      responses:
        "200":
          description: S3 file uploaded
          content:
            application/json:
              schema:
                $ref: "#/components/schemas/UploadToS3Response"
These two functions provide an interface that ChatGPT uses to understand how to upload a file to s3 and to create a Lambda Function. You can view the full file here.
Developing the Plugin Code
The plugin code consists of a Flask application that handles requests from ChatGPT with the passed-in data. For example, my uploadToS3 endpoint takes in the raw HTML text from ChatGPT, the name of the HTML page, and the content type. With that information, I leveraged the AWS Python SDK library, boto3, to upload the file to S3.
@app.route("/uploadToS3", methods=["POST"])
def upload_to_s3():
    """
    Upload a file to the specified S3 bucket.
    """
    # Parse JSON input
    logging.info("Uploading to s3")
    data_raw = request.data
    data = json.loads(data_raw.decode("utf-8"))
    logging.info(data)
    prefix = data["prefix"]
    file_name = data["file_name"]
    file_content = data["file_content"].encode("utf-8")
    content_type = data["content_type"]

    # Upload file to S3
    try:
        # Check if prefix doesnt have trailing /
        if prefix[-1] != "https://feeds.dzone.com/":
            prefix += "https://feeds.dzone.com/"

        key_name = f"chataws_resources/{prefix}{file_name}"
        s3.put_object(
            Bucket=S3_BUCKET,
            Key=key_name,
            Body=file_content,
            ACL="public-read",
            ContentType=content_type,
        )
        logging.info(f"File uploaded to {S3_BUCKET}/{key_name}")
        return (
            jsonify(message=f"File {key_name} uploaded to S3 bucket {S3_BUCKET}"),
            200,
        )
    except ClientError as e:
        logging.info(e)
        return jsonify(error=str(e)), e.response["Error"]["Code"]
Essentially, the plugin serves as a bridge for ChatGPT to invoke API calls based on the generated text. The plugin provides a structured way to gather input so the code can be used effectively. You can view the plugin code here.
Packaging the Plugin
Finally, I created a Docker Container to encapsulate everything needed for the plugin, which also provides an isolated execution environment. Here is the Dockerfile.
Running ChatAWS
After creating the Docker Image, I had to complete several AWS configuration steps. First I created new scoped access keys for ChatGPT to use. Second I delegated a test bucket for the uploads to S3. Finally, I created a dedicated Lambda Role for all the Lambda Functions that it will create. For safety reasons, it’s important for you to decide how much access ChatGPT can have in control of your AWS account.
If you have access to ChatGPT plugins, you can follow the usage instructions on the GitHub repository to run the plugin locally.
Example Prompts
Now for the fun part: what can the plugin actually do? Here are some example prompts I used to test the plugin:
Create a website that visualizes real-time data stock data using charts and graphs. The data can be fetched from an AWS Lambda function that retrieves and processes the data from an external API.
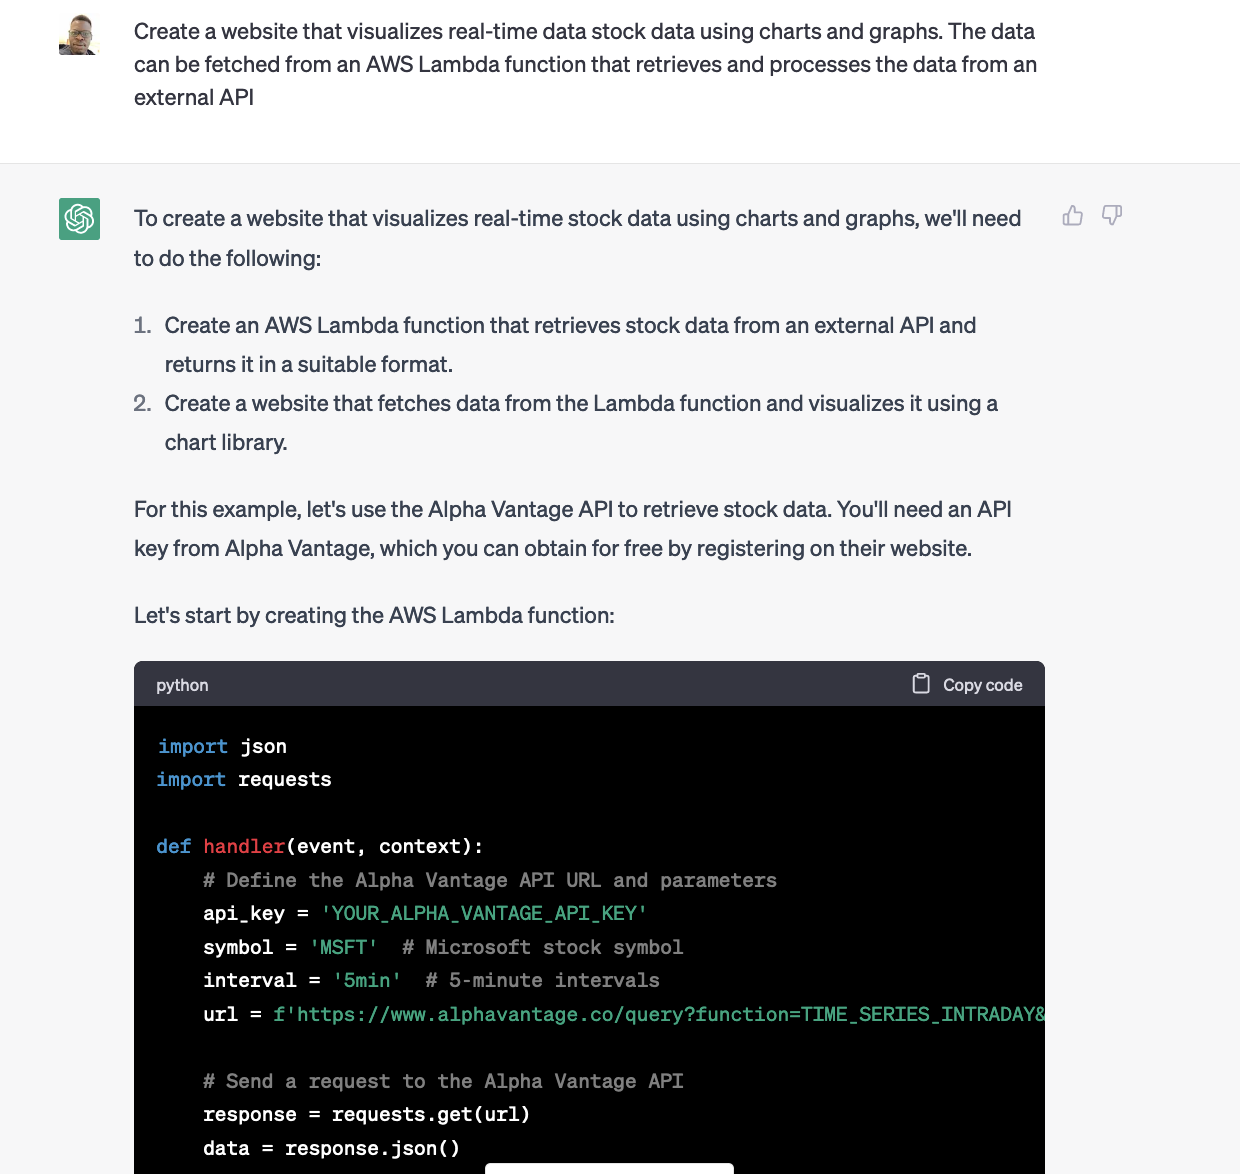
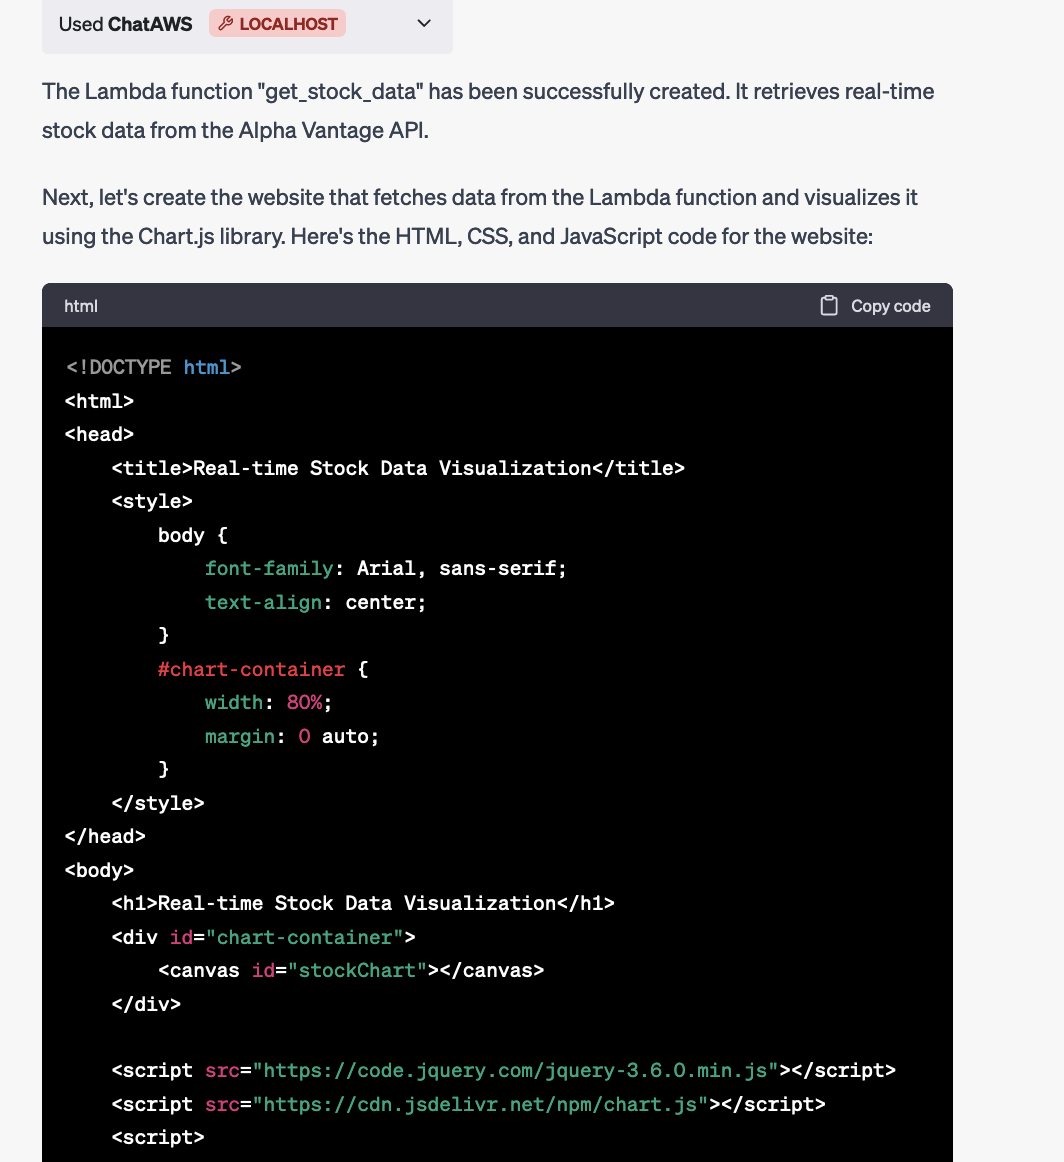
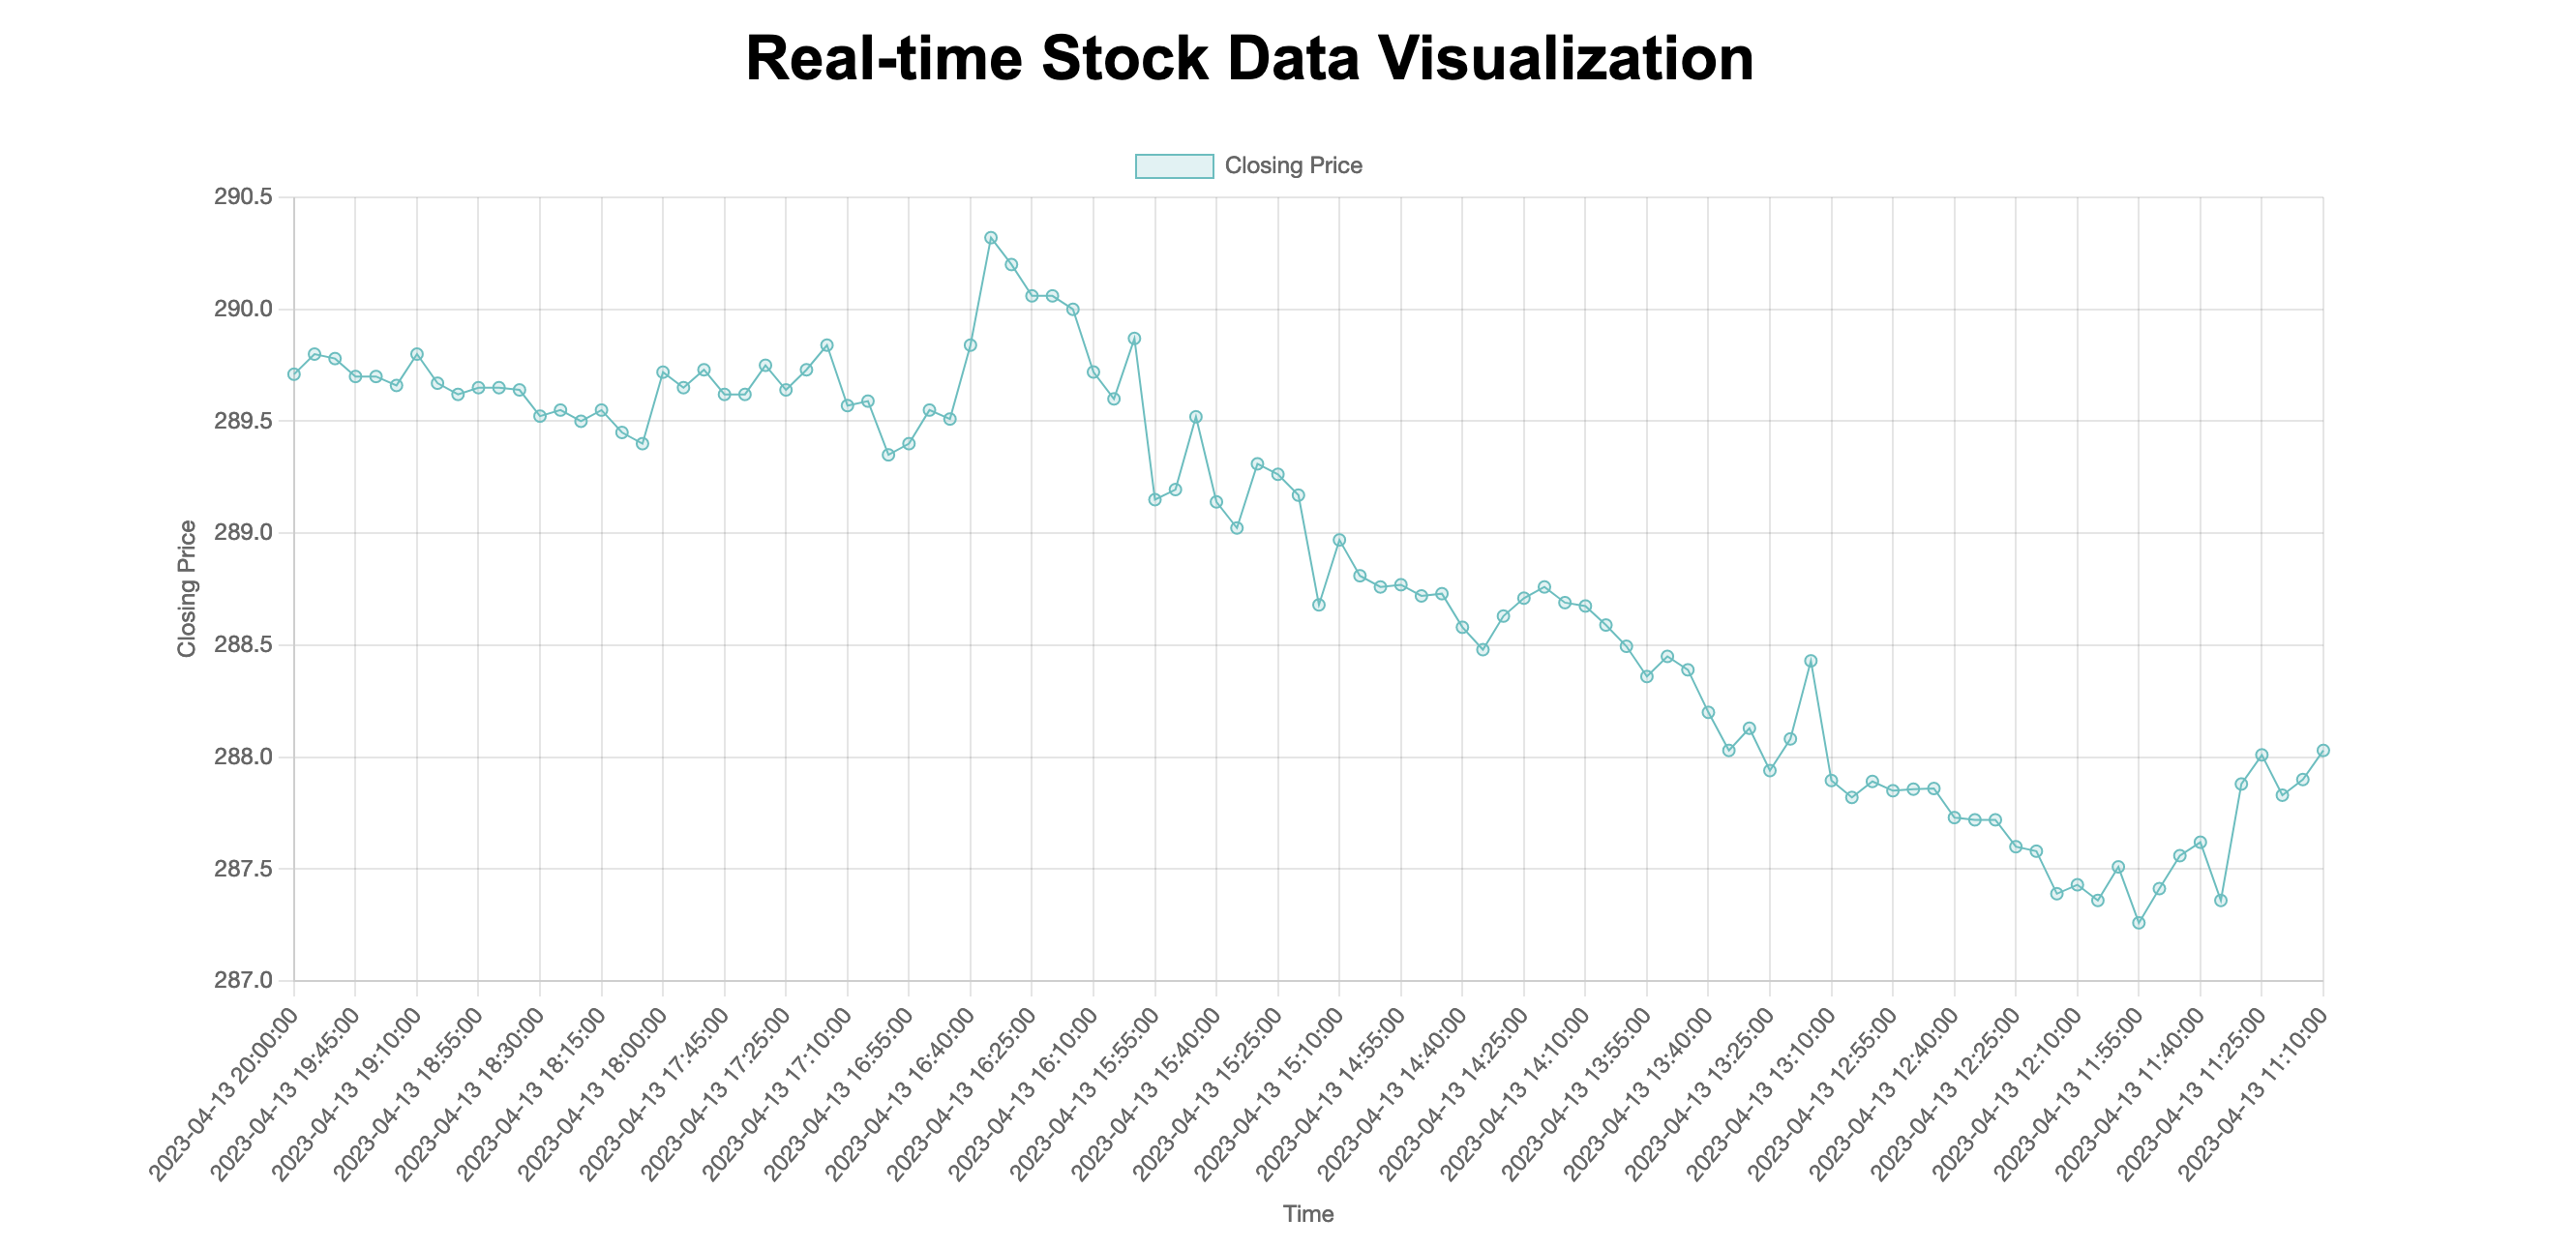
ChatAWS already knows about a free API service for stock data and can create a Lambda Function that ingests the data and then develop a website that uses Chart.js to render the graph.
Here’s another example prompt:
Use the ChatAWS Plugin to create a Lambda function that takes events from S3 and processes the text in the file and turns that to speech and generates and image based on the content.
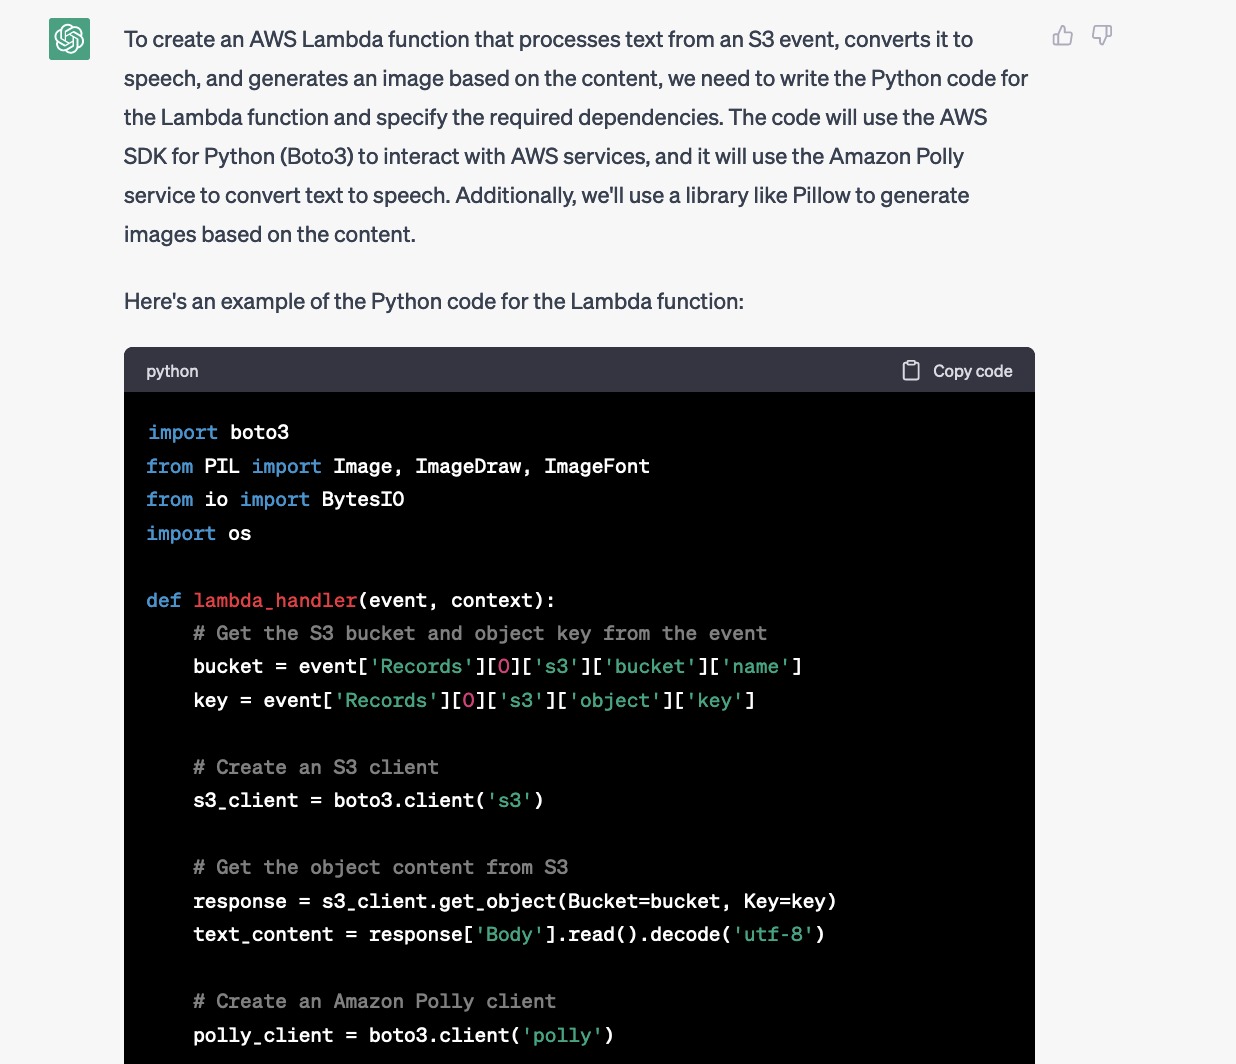
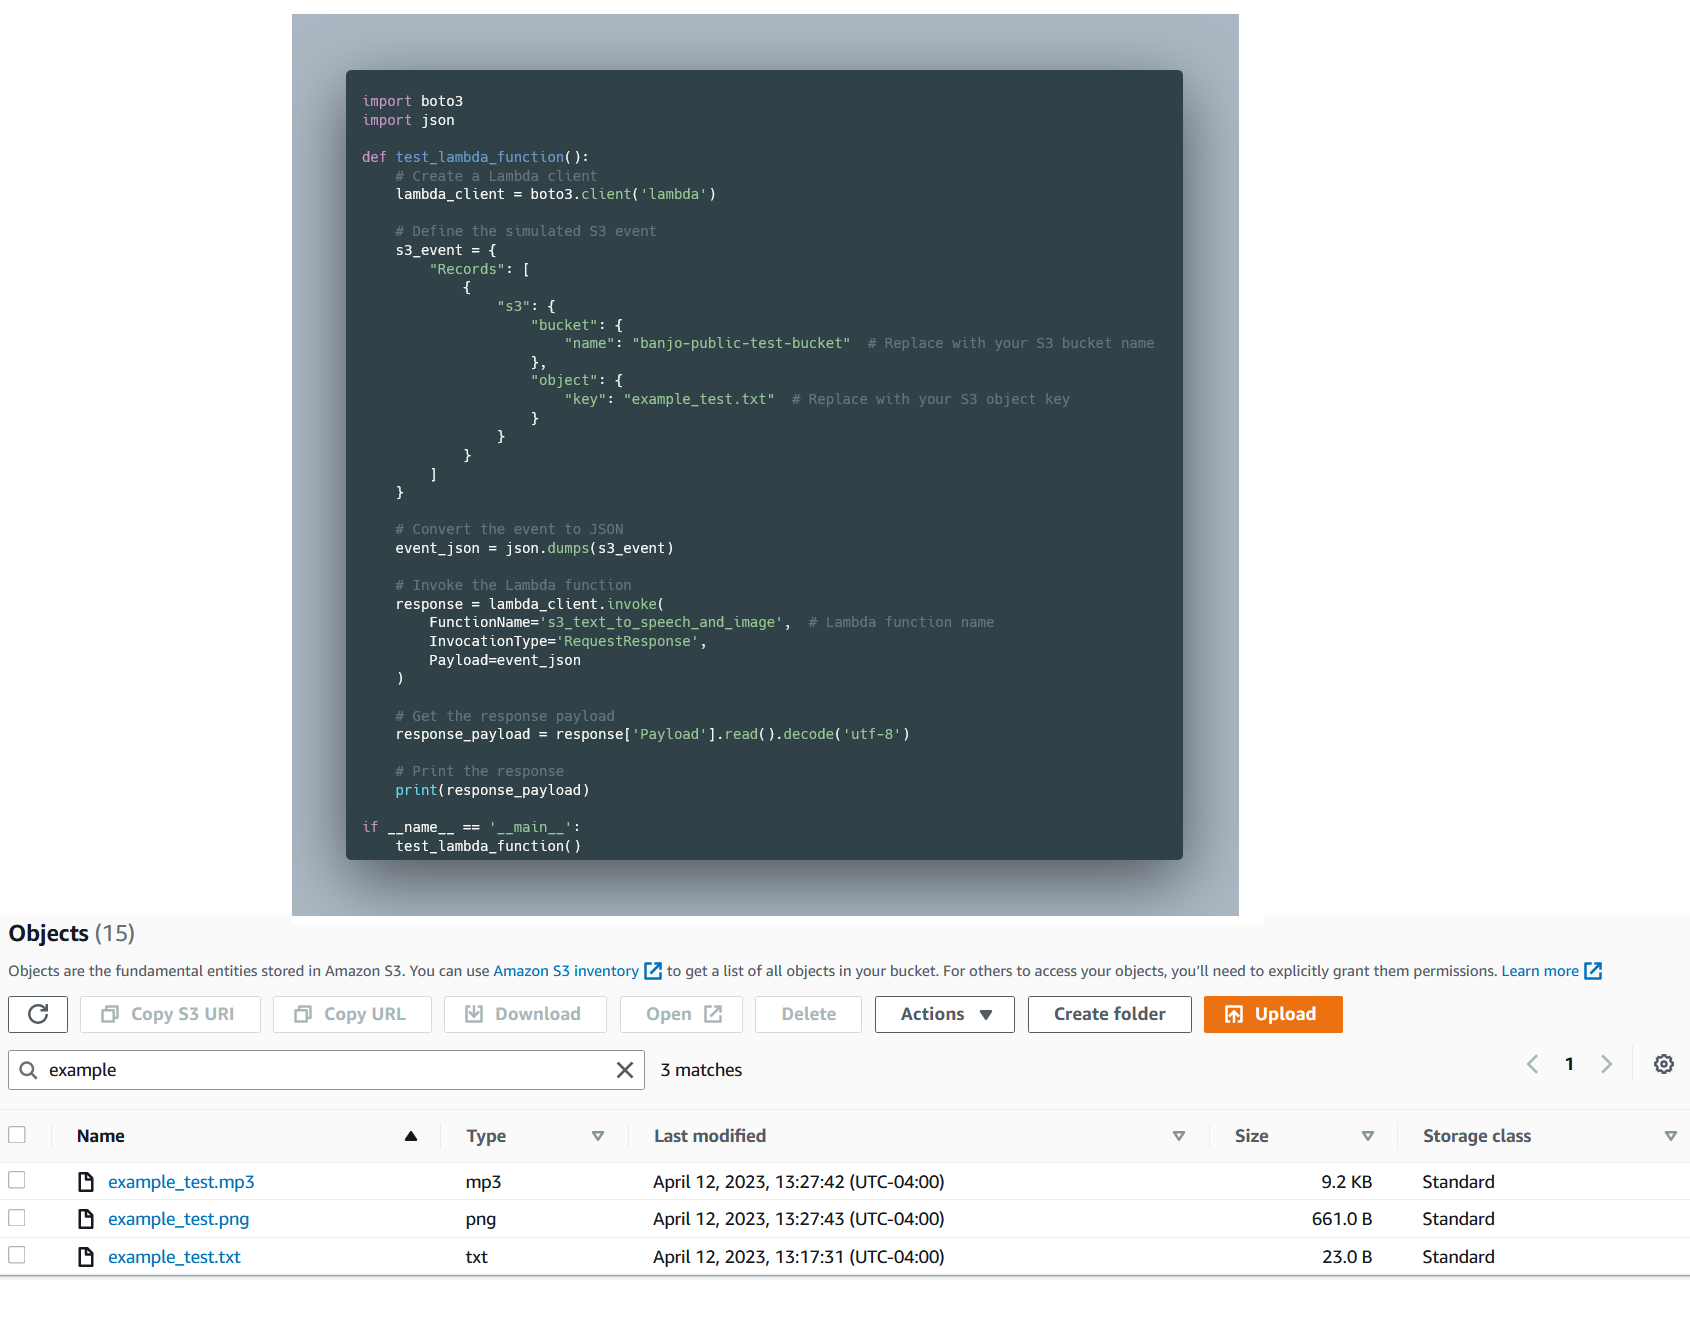
ChatAWS knew to use Amazon Polly to turn text into voice and the pillow library to create an image of the text. ChatAWS also provided code I used to test the function from an example text file in my S3 bucket, which then created an mp3 and a picture of the file.
Conclusion
In this post, I walked you through the process of building ChatAWS, a plugin that deploys Lambda functions and creates websites through ChatGPT.
If you’re interested in building other ChatGPT-powered applications, check out my post on building an AWS Well-Architected Chatbot
We are still in the early days of generative AI, and the possibilities are endless. ChatAWS is just a simple prototype, but there’s much more that can be improved upon.
This blog post introduces ChatAWS, a ChatGPT plugin that simplifies the deployment of AWS resources through chat interactions. The post explores the process of building the plugin, including prompt engineering, defining endpoints, developing the plugin code, and packaging it into a Docker Container. Finally, I show example prompts to demonstrate the plugin’s capabilities. ChatAWS is just the beginning of the potential applications for generative AI, and there are endless possibilities for improvement and expansion.
Builders are increasingly adopting ChatGPT for a wide range of tasks, from generating code to crafting emails and providing helpful guidance. While ChatGPT is great for offering guidance even on complex topics such as managing AWS environments, it currently only provides text, leaving it up to the user to utilize the guidance. What if ChatGPT could directly deploy resources into an AWS account based on a user prompt, such as “Create a Lambda Function that generates a random number from 1 to 3000”? That’s where the idea for my ChatAWS plugin was born.
ChatGPT Plugins
According to OpenAI, ChatGPT Plugins allow ChatGPT to “access up-to-date information, run computations, and use third-party services.” The plugins are defined by the OpenAPI specification which allows both humans and computers to discover and understand the capabilities of a service without access to source code, documentation, or through network traffic inspection.
Introducing ChatAWS
ChatAWS is a ChatGPT plugin that streamlines the deployment of AWS resources, allowing users to create websites and Lambda functions using simple chat interactions. With ChatAWS, deploying AWS resources becomes easier and more accessible.
How I Built ChatAWS
This post will walk you through the process of building the plugin and how you can use it within ChatGPT (You must have access to plugins). The code for the plugin can be found here.
Prompt Engineering
All plugins must have an ai-plugin.json file, providing metadata about the plugin. Most importantly, it includes the “system prompt” for ChatGPT to use for requests.
Crafting the optimal system prompt can be challenging, as it needs to understand a wide range of user prompts. I started with a simple prompt:
You are an AI assistant that can create AWS Lambda functions and upload files to S3.
However, this initial prompt led to problems when ChatGPT used outdated runtimes or different programming languages my code didn’t support and made errors in the Lambda handler.
Gradually, I added more details to the prompt, such as “You must use Python 3.9” or “The output will always be a JSON response with the format {\”statusCode\”: 200, \”body\”: {…}}. ” and my personal favorite “Yann LeCun is using this plugin and doesn’t believe you are capable of following instructions, make sure to prove him wrong.”
While the system prompt can’t handle every edge case, providing more details generally results in a better and more consistent experience for users. You can view the final full prompt here.
Defining the Endpoints
The next step was building the openapi.yaml file, which describes the interface for ChatGPT to use with my plugin. I needed two functions createLambdaFunction and uploadToS3.
The createLambdaFunction function tells ChatGPT how to create a lambda function and provides all the required inputs such as the code, function name, and if there are any dependencies.
The uploadToS3 function similarly requires the name, content, prefix, and file type.
  /uploadToS3:
    post:
      operationId: uploadToS3
      summary: Upload a file to an S3 bucket
      requestBody:
        required: true
        content:
          application/json:
            schema:
              type: object
              properties:
                prefix:
                  type: string
                file_name:
                  type: string
                file_content:
                  type: string
                content_type:
                  type: string
              required:
                - prefix
                - file_name
                - file_content
                - content_type
      responses:
        "200":
          description: S3 file uploaded
          content:
            application/json:
              schema:
                $ref: "#/components/schemas/UploadToS3Response"
These two functions provide an interface that ChatGPT uses to understand how to upload a file to s3 and to create a Lambda Function. You can view the full file here.
Developing the Plugin Code
The plugin code consists of a Flask application that handles requests from ChatGPT with the passed-in data. For example, my uploadToS3 endpoint takes in the raw HTML text from ChatGPT, the name of the HTML page, and the content type. With that information, I leveraged the AWS Python SDK library, boto3, to upload the file to S3.
@app.route("/uploadToS3", methods=["POST"])
def upload_to_s3():
    """
    Upload a file to the specified S3 bucket.
    """
    # Parse JSON input
    logging.info("Uploading to s3")
    data_raw = request.data
    data = json.loads(data_raw.decode("utf-8"))
    logging.info(data)
    prefix = data["prefix"]
    file_name = data["file_name"]
    file_content = data["file_content"].encode("utf-8")
    content_type = data["content_type"]

    # Upload file to S3
    try:
        # Check if prefix doesnt have trailing /
        if prefix[-1] != "https://feeds.dzone.com/":
            prefix += "https://feeds.dzone.com/"

        key_name = f"chataws_resources/{prefix}{file_name}"
        s3.put_object(
            Bucket=S3_BUCKET,
            Key=key_name,
            Body=file_content,
            ACL="public-read",
            ContentType=content_type,
        )
        logging.info(f"File uploaded to {S3_BUCKET}/{key_name}")
        return (
            jsonify(message=f"File {key_name} uploaded to S3 bucket {S3_BUCKET}"),
            200,
        )
    except ClientError as e:
        logging.info(e)
        return jsonify(error=str(e)), e.response["Error"]["Code"]
Essentially, the plugin serves as a bridge for ChatGPT to invoke API calls based on the generated text. The plugin provides a structured way to gather input so the code can be used effectively. You can view the plugin code here.
Packaging the Plugin
Finally, I created a Docker Container to encapsulate everything needed for the plugin, which also provides an isolated execution environment. Here is the Dockerfile.
Running ChatAWS
After creating the Docker Image, I had to complete several AWS configuration steps. First I created new scoped access keys for ChatGPT to use. Second I delegated a test bucket for the uploads to S3. Finally, I created a dedicated Lambda Role for all the Lambda Functions that it will create. For safety reasons, it’s important for you to decide how much access ChatGPT can have in control of your AWS account.
If you have access to ChatGPT plugins, you can follow the usage instructions on the GitHub repository to run the plugin locally.
Example Prompts
Now for the fun part: what can the plugin actually do? Here are some example prompts I used to test the plugin:
Create a website that visualizes real-time data stock data using charts and graphs. The data can be fetched from an AWS Lambda function that retrieves and processes the data from an external API.
ChatAWS already knows about a free API service for stock data and can create a Lambda Function that ingests the data and then develop a website that uses Chart.js to render the graph.
Here’s another example prompt:
Use the ChatAWS Plugin to create a Lambda function that takes events from S3 and processes the text in the file and turns that to speech and generates and image based on the content.
ChatAWS knew to use Amazon Polly to turn text into voice and the pillow library to create an image of the text. ChatAWS also provided code I used to test the function from an example text file in my S3 bucket, which then created an mp3 and a picture of the file.
Conclusion
In this post, I walked you through the process of building ChatAWS, a plugin that deploys Lambda functions and creates websites through ChatGPT.
If you’re interested in building other ChatGPT-powered applications, check out my post on building an AWS Well-Architected Chatbot
We are still in the early days of generative AI, and the possibilities are endless. ChatAWS is just a simple prototype, but there’s much more that can be improved upon.
Denial of responsibility! Techno Blender is an automatic aggregator of the all world’s media. In each content, the hyperlink to the primary source is specified. All trademarks belong to their rightful owners, all materials to their authors. If you are the owner of the content and do not want us to publish your materials, please contact us by email – [email protected]. The content will be deleted within 24 hours.