
Deploying Scikit-Learn Models In Android Apps With ONNX | by Shubham Panchal | Aug, 2022
Using scikit-learn models to perform inference in Android apps
Scikit-learn is truly a package that revolutionized machine learning and data science and is still the most fundamental prerequisite for any ML/DS role. But as the domain of machine learning is making in its way from research to industry, deployment of ML models now plays a crucial role in the software development cycle.
But most of us could only run scikit-learn models in Python scripts or Jupyter notebooks and only a limited number of blogs/videos discuss about their deployment. Deployment is easy with web frameworks like Flask, Django or FastAPI that can help build an API for interfacing the app code with the ML code.
Deployment of ML models that could bring innovative features to mobile apps would be a great deal, as smartphones are the only devices that remain with users throughout and handle most of their workload. So, in this story, we’ll discuss how to deploy scikit-learn models on Android apps using ONNX that would act as a bridge between both the worlds. If you aren’t aware of ONNX, don’t worry even I wasn’t aware before I made this story!
As I’m an Android developer, I can discuss the deployment process of an ML-model on Android from head to toe. For iOS or cross-platform frameworks, a procedure similar to what we’ll discuss can be followed too.
First, we’ll convert the scikit-learn model to ONNX then use this ONNX model in an Android app.

The source code for the Android app can be found here ->
https://github.com/shubham0204/Scikit_Learn_Android_Demo
What is ONNX?
ONNX stands for Open Neural Network Exchange, which is an intermediate representation used to convert ML models from one framework to another easily. It is an open-source project co-developed by Microsoft, Amazon and Meta to bring robustness in deploying and running ML models thus making them framework-invariant.
For instance, if you had to convert a PyTorch model to a TensorFlow model, you can first convert it to an ONNX model. TensorFlow supports loading ONNX models, so you can then get a TF model from the ONNX model. Here’s a detailed blog on the ONNX framework,
A. Building the Scikit-Learn model
The first step is to build a scikit-learn model in Python. To demonstrate the deployment process, we’d use a simple LinearRegression model to make predictions. You may download the student-study-hours dataset by Himanshu Nakrani from Kaggle. The dataset is available with the CC 1.0 Public Domain License.
Run the above snippet and note down the output. We’ll use the same input variable i.e. 8.5 to make a prediction in the Android app
B. Installing sklearn2onnx and ONNX conversion
We’ll install sklearn-onnx that will help us convert the scikit-learn model to an ONNX model ( .onnx ).
pip install skl2onnx
sklearn-onnx can convert mostly all scikit-learn models and preprocessing components and you can find a list here. Next, we convert the scikit-learn model,
C. Conversion to ONNX Runtime
Note, till now we’ve only converted the scikit-learn model to ONNX. ONNX is an open format to represent machine learning models. Running ONNX models on different systems or devices or accelerating the inference of ONNX would require a runtime. The runtime should be able to parse the ONNX model format and make predictions from it. Such a runtime is onnxruntime from Microsoft open-source.
We’ll now convert the .onnx model to the .ort format. The official docs say,
The ORT format is the format supported by reduced size ONNX Runtime builds. Reduced size builds may be more appropriate for use in size-constrained environments such as mobile and web applications.
pip install onnxruntime
Next, we need to use the convert_onnx_models_to_ort script to perform the conversion, like,
!python -m onnxruntime.tools.convert_onnx_models_to_ort sklearn_model.onnx
You can also run the .ort build in Python. See this official tutorial,
Next, we move on to the Android part and discuss how we can make predictions using the .ort model.
You may open a new Android Studio project with desired configurations, and add the onnxruntime Maven dependency in build.gradle file (module-level)
implementation 'com.microsoft.onnxruntime:onnxruntime-android:latest.release'
A. Create an OrtSession
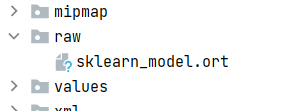
First, we need to copy the .ort file and add it the app\src\main\res\raw folder. This folder isn’t created initially when you create a new Android app project. Refer to this SO answer if you haven’t created the raw folder.
Next, define a method in MainActivity.kt to create an OrtSession with an OrtEnvironment .
B. Performing inference
Next, we need to run the ORT file using the OrtSession that we created in the previous step. Here’s a method runPrediction to do so,
We create an OrtTensor with the shape that we provided as initial_type in step 1-B. Then, we simply need to run ortSession.run to run the ORT model. With some customized input in Android, we can add the following lines in the onCreate method in MainActivity.kt ,
Run the app and see the magic yourself. The app produces the same output for 8.5 hours of study ( input variable ) as it would do in Python,

As you might have realized till now, the process of this conversion was very easy and doesn’t include any cross-platform conversions. Many developers, startups and ML practitioners might have thought of such conversion, but they might be unaware of this simple process.
This is may be a glorified hack, so if you’re facing any issues with this workaround, do share them in the comments so that other readers know about them. You can also open an issue on the GitHub repository.
Hope you found this story interesting. If you have any queries, do let me know in the comments or send me a message on equipintelligence@gmail. Keep learning and have a nice day ahead!
Using scikit-learn models to perform inference in Android apps

Scikit-learn is truly a package that revolutionized machine learning and data science and is still the most fundamental prerequisite for any ML/DS role. But as the domain of machine learning is making in its way from research to industry, deployment of ML models now plays a crucial role in the software development cycle.
But most of us could only run scikit-learn models in Python scripts or Jupyter notebooks and only a limited number of blogs/videos discuss about their deployment. Deployment is easy with web frameworks like Flask, Django or FastAPI that can help build an API for interfacing the app code with the ML code.
Deployment of ML models that could bring innovative features to mobile apps would be a great deal, as smartphones are the only devices that remain with users throughout and handle most of their workload. So, in this story, we’ll discuss how to deploy scikit-learn models on Android apps using ONNX that would act as a bridge between both the worlds. If you aren’t aware of ONNX, don’t worry even I wasn’t aware before I made this story!
As I’m an Android developer, I can discuss the deployment process of an ML-model on Android from head to toe. For iOS or cross-platform frameworks, a procedure similar to what we’ll discuss can be followed too.
First, we’ll convert the scikit-learn model to ONNX then use this ONNX model in an Android app.
The source code for the Android app can be found here ->
https://github.com/shubham0204/Scikit_Learn_Android_Demo
What is ONNX?
ONNX stands for Open Neural Network Exchange, which is an intermediate representation used to convert ML models from one framework to another easily. It is an open-source project co-developed by Microsoft, Amazon and Meta to bring robustness in deploying and running ML models thus making them framework-invariant.
For instance, if you had to convert a PyTorch model to a TensorFlow model, you can first convert it to an ONNX model. TensorFlow supports loading ONNX models, so you can then get a TF model from the ONNX model. Here’s a detailed blog on the ONNX framework,
A. Building the Scikit-Learn model
The first step is to build a scikit-learn model in Python. To demonstrate the deployment process, we’d use a simple LinearRegression model to make predictions. You may download the student-study-hours dataset by Himanshu Nakrani from Kaggle. The dataset is available with the CC 1.0 Public Domain License.
Run the above snippet and note down the output. We’ll use the same input variable i.e. 8.5 to make a prediction in the Android app
B. Installing sklearn2onnx and ONNX conversion
We’ll install sklearn-onnx that will help us convert the scikit-learn model to an ONNX model ( .onnx ).
pip install skl2onnx
sklearn-onnx can convert mostly all scikit-learn models and preprocessing components and you can find a list here. Next, we convert the scikit-learn model,
C. Conversion to ONNX Runtime
Note, till now we’ve only converted the scikit-learn model to ONNX. ONNX is an open format to represent machine learning models. Running ONNX models on different systems or devices or accelerating the inference of ONNX would require a runtime. The runtime should be able to parse the ONNX model format and make predictions from it. Such a runtime is onnxruntime from Microsoft open-source.
We’ll now convert the .onnx model to the .ort format. The official docs say,
The ORT format is the format supported by reduced size ONNX Runtime builds. Reduced size builds may be more appropriate for use in size-constrained environments such as mobile and web applications.
pip install onnxruntime
Next, we need to use the convert_onnx_models_to_ort script to perform the conversion, like,
!python -m onnxruntime.tools.convert_onnx_models_to_ort sklearn_model.onnx
You can also run the .ort build in Python. See this official tutorial,
Next, we move on to the Android part and discuss how we can make predictions using the .ort model.
You may open a new Android Studio project with desired configurations, and add the onnxruntime Maven dependency in build.gradle file (module-level)
implementation 'com.microsoft.onnxruntime:onnxruntime-android:latest.release'
A. Create an OrtSession
First, we need to copy the .ort file and add it the app\src\main\res\raw folder. This folder isn’t created initially when you create a new Android app project. Refer to this SO answer if you haven’t created the raw folder.
Next, define a method in MainActivity.kt to create an OrtSession with an OrtEnvironment .
B. Performing inference
Next, we need to run the ORT file using the OrtSession that we created in the previous step. Here’s a method runPrediction to do so,
We create an OrtTensor with the shape that we provided as initial_type in step 1-B. Then, we simply need to run ortSession.run to run the ORT model. With some customized input in Android, we can add the following lines in the onCreate method in MainActivity.kt ,
Run the app and see the magic yourself. The app produces the same output for 8.5 hours of study ( input variable ) as it would do in Python,
As you might have realized till now, the process of this conversion was very easy and doesn’t include any cross-platform conversions. Many developers, startups and ML practitioners might have thought of such conversion, but they might be unaware of this simple process.
This is may be a glorified hack, so if you’re facing any issues with this workaround, do share them in the comments so that other readers know about them. You can also open an issue on the GitHub repository.
Hope you found this story interesting. If you have any queries, do let me know in the comments or send me a message on equipintelligence@gmail. Keep learning and have a nice day ahead!
Denial of responsibility! Techno Blender is an automatic aggregator of the all world’s media. In each content, the hyperlink to the primary source is specified. All trademarks belong to their rightful owners, all materials to their authors. If you are the owner of the content and do not want us to publish your materials, please contact us by email – [email protected]. The content will be deleted within 24 hours.