
Generating Images with Stable Diffusion and OnnxStream on the Raspberry Pi
Learn how to use OnnxStream to generate images with Stable Diffusion XL Turbo on the Raspberry Pi!
In my last article, I shared how to run large language models and vision language models on the Raspberry Pi. This time around, instead of LLMs and VLMs, we shall run an image generation model — Stable Diffusion XL (SDXL) Turbo — on the Raspberry Pi 5. It’s another impossible sounding feat, but open-source wonders do exist, and running a SDXL Turbo model on a very resource constrained environment is one of them.
OnnxStream
OnnxStream is an open-source project created by Vito Plantamura with the original intention of running Stable Diffusion 1.5 (SD1.5) on a Raspberry Pi Zero 2 by minimising memory consumption as much as possible, albeit at the cost of increased inference latency/throughput.
At the time of writing, it has expanded to support not only Stable Diffusion 1.5 but also Stable Diffusion XL 1.0 Base (SDXL) and Stable Diffusion XL Turbo 1.0. I won’t go into detail about how exactly this amazing feat is being achieved since the GitHub repository already explains it very well.
Instead, let’s just jump right into getting it working.
Technical Requirements
All you need is the following:
- Raspberry Pi 5 — Or Raspberry Pi 4 or any other Raspberry Pi, just expect it to be slower
- SD Card — Minimally 16GB, with Raspbian or some Linux distro already setup. The SDXL Turbo weights are around 8GB.
- An internet connection

Setting Up OnnxStream
The instructions here are from the GitHub repository, but I’m breaking it down and explaining it a bit more.
1. Building XNNPack
First, we have to install XNNPack, which is a library from Google that provides “high-efficiency floating-point neural network inference operators”. But we can’t just get the latest version in case of any breaking changes. Instead, we shall get the version that the OnnxStream creator has verified to be working at the time of writing. In a terminal, run:
git clone https://github.com/google/XNNPACK.git
cd XNNPACK
git checkout 579de32260742a24166ecd13213d2e60af862675
mkdir build
cd build
cmake -DXNNPACK_BUILD_TESTS=OFF -DXNNPACK_BUILD_BENCHMARKS=OFF ..
cmake --build . --config Release
XNNPack will take a couple of minutes to build. Go get coffee or something.
2. Building OnnxStream
Next, we have to build OnnxStream. In a terminal, run:
git clone https://github.com/vitoplantamura/OnnxStream.git
cd OnnxStream
cd src
mkdir build
cd build
cmake -DMAX_SPEED=ON -DXNNPACK_DIR=<DIRECTORY_WHERE_XNNPACK_WAS_CLONED> ..
cmake --build . --config Release
Make sure to replace <DIRECTORY_WHERE_XNNPACK_WAS_CLONED> with the path at which XNNPack was cloned to (not the build folder). In my case, it was at /home/admin/XNNPACK/.
3. Downloading Model Weights
Now, we need to download the model weights for SDXL Turbo. In a terminal, run:
git lfs install
git clone --depth=1 https://huggingface.co/AeroX2/stable-diffusion-xl-turbo-1.0-onnxstream
If you have not installed git-lfs yet, do so first. This will take even longer than the step before since the model weights are quite big. Go get lunch!
You can also run the other two models supported — Stable Diffusion 1.5 and Stable Diffusion XL 1.0 Base by downloading their weights from the links provided in OnnxStream’s GitHub repository. Make sure your SD card has enough space if you are downloading all these models!
Once done, that’s it! We are ready to generate images on a Raspberry Pi!
Generating Images
To generate images, run the code block below:
cd ~/OnnxStream/src/build/
./sd --turbo --models-path /home/admin/stable-diffusion-xl-turbo-1.0-onnxstream --prompt "An astronaut riding a horse on Mars" --steps 1 --output astronaut.png
Replace the prompt with what you want to generate. I’m just using the go-to classic astronaut prompt here. I set steps to just 1 as SDXL Turbo doesn’t need many steps to generate a good-looking image.
There are other arguments you can pass too, such as — neg-prompt for negative prompts (SDXL Turbo does not support negative prompts but you can use it for the other two models), — steps to set the number of generative steps and — seed to set the random seed.
The arguments required will change according to the type of model used, so please take a look at OnnxStream’s GitHub repository for the full list of arguments to pass if you’re using something other than SDXL Turbo.

As you can see in the image above, on the Raspberry Pi 5, each diffusion step takes around 1 minute, and in total with pre-processing and decoding, it around 3 minutes to generate a single image.
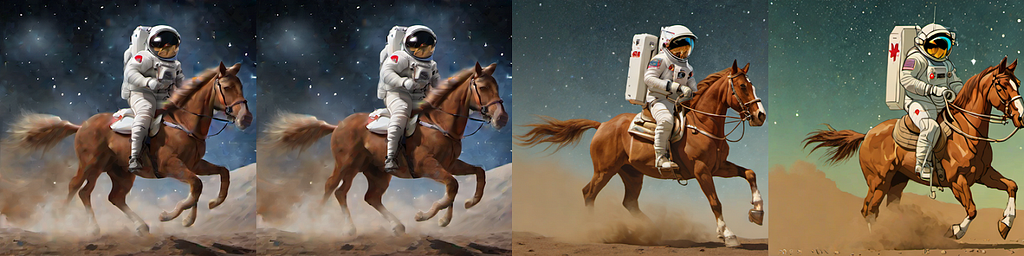
Here’s a comparison and progression of the same prompt with the same seed from step 1 to 10. You can see that even with a single step with refinement, the generated image is already really well-done. This is in contrast to SDXL or SD1.5 which requires quite a few steps to reach that quality.
Conclusion
With it taking around at least a couple of minutes to generate an image, the question of use cases for it comes begging.
The most obvious and fun use case to me is an ever-changing photo frame that will generate a new image every few minutes. There is actually a project along this tangent that uses OnnxStream, by rvdveen on GitHub, where he uses OnnxStream on a Raspberry Pi Zero 2 W to generate images for news articles and shows it on a photo frame using an e-ink display. It takes around 5 hours to generate an image on the Pi Zero 2 W with what should be SD1.5, but hey it’s not like you need a photo frame to be changing what it’s showing in real-time.
Or maybe you just want your own locally hosted image generator which can produce decent quality images while not hogging any major compute devices on your network.
Have fun playing around with SDXL Turbo on the Raspberry Pi!
Disclaimer: I have no affiliation with OnnxStream or StabilityAI. All views and opinions are my own and do not represent any organisation.
Generating Images with Stable Diffusion and OnnxStream on the Raspberry Pi was originally published in Towards Data Science on Medium, where people are continuing the conversation by highlighting and responding to this story.
Learn how to use OnnxStream to generate images with Stable Diffusion XL Turbo on the Raspberry Pi!
In my last article, I shared how to run large language models and vision language models on the Raspberry Pi. This time around, instead of LLMs and VLMs, we shall run an image generation model — Stable Diffusion XL (SDXL) Turbo — on the Raspberry Pi 5. It’s another impossible sounding feat, but open-source wonders do exist, and running a SDXL Turbo model on a very resource constrained environment is one of them.
OnnxStream
OnnxStream is an open-source project created by Vito Plantamura with the original intention of running Stable Diffusion 1.5 (SD1.5) on a Raspberry Pi Zero 2 by minimising memory consumption as much as possible, albeit at the cost of increased inference latency/throughput.
At the time of writing, it has expanded to support not only Stable Diffusion 1.5 but also Stable Diffusion XL 1.0 Base (SDXL) and Stable Diffusion XL Turbo 1.0. I won’t go into detail about how exactly this amazing feat is being achieved since the GitHub repository already explains it very well.
Instead, let’s just jump right into getting it working.
Technical Requirements
All you need is the following:
- Raspberry Pi 5 — Or Raspberry Pi 4 or any other Raspberry Pi, just expect it to be slower
- SD Card — Minimally 16GB, with Raspbian or some Linux distro already setup. The SDXL Turbo weights are around 8GB.
- An internet connection
Setting Up OnnxStream
The instructions here are from the GitHub repository, but I’m breaking it down and explaining it a bit more.
1. Building XNNPack
First, we have to install XNNPack, which is a library from Google that provides “high-efficiency floating-point neural network inference operators”. But we can’t just get the latest version in case of any breaking changes. Instead, we shall get the version that the OnnxStream creator has verified to be working at the time of writing. In a terminal, run:
git clone https://github.com/google/XNNPACK.git
cd XNNPACK
git checkout 579de32260742a24166ecd13213d2e60af862675
mkdir build
cd build
cmake -DXNNPACK_BUILD_TESTS=OFF -DXNNPACK_BUILD_BENCHMARKS=OFF ..
cmake --build . --config Release
XNNPack will take a couple of minutes to build. Go get coffee or something.
2. Building OnnxStream
Next, we have to build OnnxStream. In a terminal, run:
git clone https://github.com/vitoplantamura/OnnxStream.git
cd OnnxStream
cd src
mkdir build
cd build
cmake -DMAX_SPEED=ON -DXNNPACK_DIR=<DIRECTORY_WHERE_XNNPACK_WAS_CLONED> ..
cmake --build . --config Release
Make sure to replace <DIRECTORY_WHERE_XNNPACK_WAS_CLONED> with the path at which XNNPack was cloned to (not the build folder). In my case, it was at /home/admin/XNNPACK/.
3. Downloading Model Weights
Now, we need to download the model weights for SDXL Turbo. In a terminal, run:
git lfs install
git clone --depth=1 https://huggingface.co/AeroX2/stable-diffusion-xl-turbo-1.0-onnxstream
If you have not installed git-lfs yet, do so first. This will take even longer than the step before since the model weights are quite big. Go get lunch!
You can also run the other two models supported — Stable Diffusion 1.5 and Stable Diffusion XL 1.0 Base by downloading their weights from the links provided in OnnxStream’s GitHub repository. Make sure your SD card has enough space if you are downloading all these models!
Once done, that’s it! We are ready to generate images on a Raspberry Pi!
Generating Images
To generate images, run the code block below:
cd ~/OnnxStream/src/build/
./sd --turbo --models-path /home/admin/stable-diffusion-xl-turbo-1.0-onnxstream --prompt "An astronaut riding a horse on Mars" --steps 1 --output astronaut.png
Replace the prompt with what you want to generate. I’m just using the go-to classic astronaut prompt here. I set steps to just 1 as SDXL Turbo doesn’t need many steps to generate a good-looking image.
There are other arguments you can pass too, such as — neg-prompt for negative prompts (SDXL Turbo does not support negative prompts but you can use it for the other two models), — steps to set the number of generative steps and — seed to set the random seed.
The arguments required will change according to the type of model used, so please take a look at OnnxStream’s GitHub repository for the full list of arguments to pass if you’re using something other than SDXL Turbo.
As you can see in the image above, on the Raspberry Pi 5, each diffusion step takes around 1 minute, and in total with pre-processing and decoding, it around 3 minutes to generate a single image.
Here’s a comparison and progression of the same prompt with the same seed from step 1 to 10. You can see that even with a single step with refinement, the generated image is already really well-done. This is in contrast to SDXL or SD1.5 which requires quite a few steps to reach that quality.
Conclusion
With it taking around at least a couple of minutes to generate an image, the question of use cases for it comes begging.
The most obvious and fun use case to me is an ever-changing photo frame that will generate a new image every few minutes. There is actually a project along this tangent that uses OnnxStream, by rvdveen on GitHub, where he uses OnnxStream on a Raspberry Pi Zero 2 W to generate images for news articles and shows it on a photo frame using an e-ink display. It takes around 5 hours to generate an image on the Pi Zero 2 W with what should be SD1.5, but hey it’s not like you need a photo frame to be changing what it’s showing in real-time.
Or maybe you just want your own locally hosted image generator which can produce decent quality images while not hogging any major compute devices on your network.
Have fun playing around with SDXL Turbo on the Raspberry Pi!
Disclaimer: I have no affiliation with OnnxStream or StabilityAI. All views and opinions are my own and do not represent any organisation.
Generating Images with Stable Diffusion and OnnxStream on the Raspberry Pi was originally published in Towards Data Science on Medium, where people are continuing the conversation by highlighting and responding to this story.
Denial of responsibility! Techno Blender is an automatic aggregator of the all world’s media. In each content, the hyperlink to the primary source is specified. All trademarks belong to their rightful owners, all materials to their authors. If you are the owner of the content and do not want us to publish your materials, please contact us by email – [email protected]. The content will be deleted within 24 hours.