
Hands-On Introduction to Github Actions for Data Scientists | by Dr. Varshita Sher | Jun, 2022
Github Actions
Learn how to automate experiment tracking with Weights & Biases, unit testing, artifact creation, and lots more…
In layman’s terms, Github Actions lets you automate a few routine and repetitive tasks — be it testing code every time it is deployed on the production branch, checking for good coding practices on PRs, cross-browser code testing, unit-testing, retrieving runs from MLFlow/WandB tracking, automatically closing stale issues, etc. The list is truly endless.
While you can certainly write all these Github Actions yourself from scratch, I would advise against reinventing the wheel. Instead, a good place to search for available actions for your particular use case would be the marketplace. Let’s find out how to use them in action.
Note: While it may be tempting to run as many actions as the heart desires, private repos have only a limited amount of free minutes (~2000 minutes) and storage (~500MB) available every month (minutes get reset every month but storage does not). Public repos, however, have no such limitations for Github Actions usage. More details about billing can be found here.
To get started, we need to create .github/workflows directory in our repo and inside create a new .yml file. A typical .yml file looks like this:
name: Github Actions Demo
on:
issues:
types: [opened, edited, deleted]
jobs:
Job1:
runs-on: ubuntu-latest
steps:
- name: "This is Step 1 with bash command."
run: echo "hello World"
shell: bash
- name: "This is step 2 using marketplace action."
uses: actions/checkout@v3
Job2:
.....  Job3:
.....
Few things to consider:
- We need to define a
namefor the workflow and also when this workflow should run. The former can be anything you like and the latter needs to be specified usingon. For instance, we might want to run the workflow only when opening an issue, closing an issue, commenting on a PR, whenever a label is created, edited, etc. Check out the complete list of events that can trigger a workflow. In our example, it will be triggered anytime someone opens, edits, and/or deletes an issue. - Here we have defined three jobs (
job1,job2,job3) but in reality, you can have any number of jobs defined in a single.ymlfile and they will all run simultaneously when the event defined inonis triggered (there are workarounds for this wherein one can delay runningjob2untiljob1has been completed). - We have the option of defining a server using
runs-onthat will run your workflow. The stable choices includeubuntu-latest,macos-latestandwindows-latest.
Note: Be mindful of the choice as some Github-hosted runners consume more minutes than others. From the documentation, it seems that jobs that run on Windows and macOS runners consume minutes at 2 and 10 times the rate that jobs on Linux runners consume. - The steps within a job are run sequentially. Make sure you name a step something meaningful as this helps with debugging later on.
- The steps within a job can do one of two things — (a) run a bash command using
run(for example,echo "hello World") or (b) use a marketplace or third-party Github action usinguses(for example,actions/checkout@v3— this is a popular action that helps you check out a repo and use any of the files therein as part of your workflow — we will be covering it later in the tutorial).
We have a workflow named Dump event payload containing a single job called Comment that will be triggered every time an issue is opened, edited, or deleted.
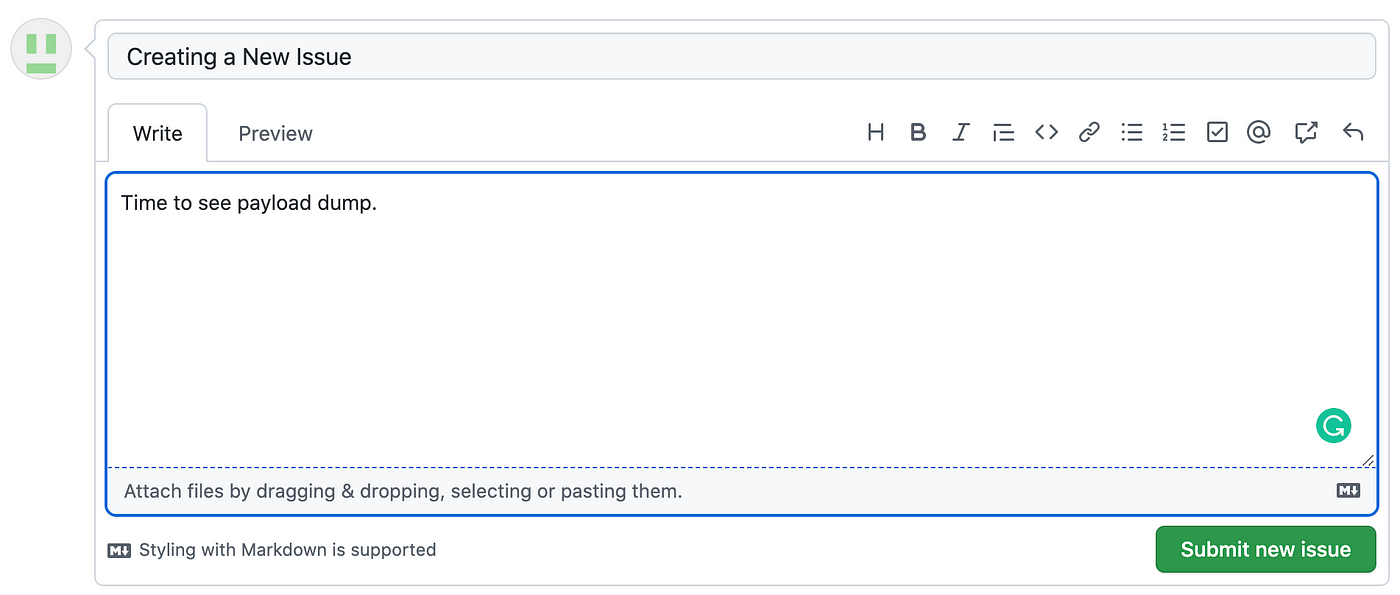
Before explaining what’s happening, let’s see it in action by creating a new issue.
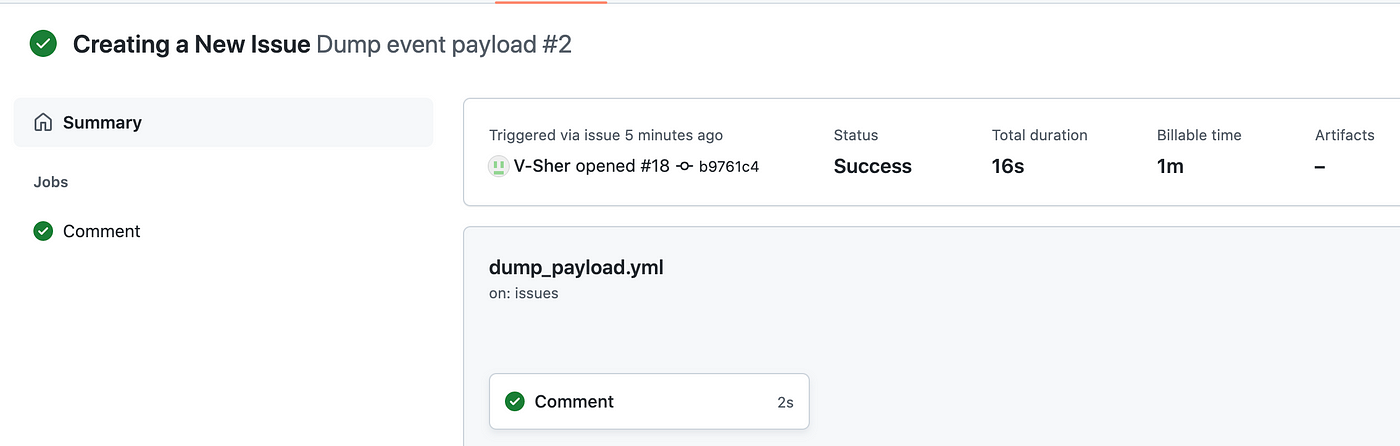
Next, head over to the Actions tab and you’ll see a yellow dot indicating the workflow is running. Once finished, it will turn green.

Upon completion, click on it to see the status, total duration, and artifacts created (we will cover artifacts later in the tutorial).
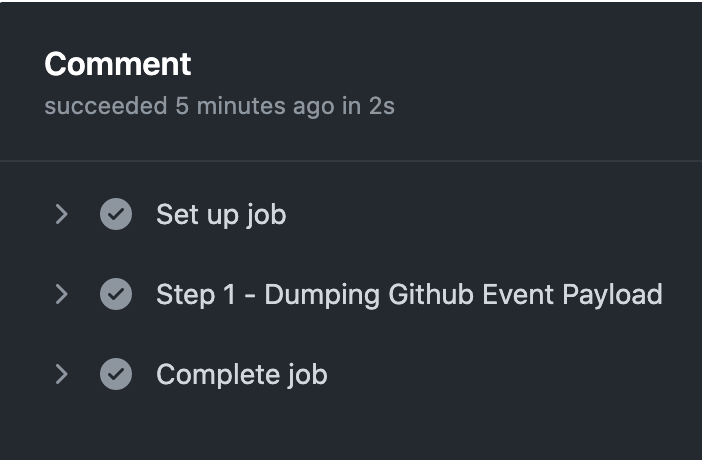
Finally, stepping inside the Commentjob, we should be able to see the outputs from all the steps we defined in the workflow.
Let’s break down what’s happening in the workflow.
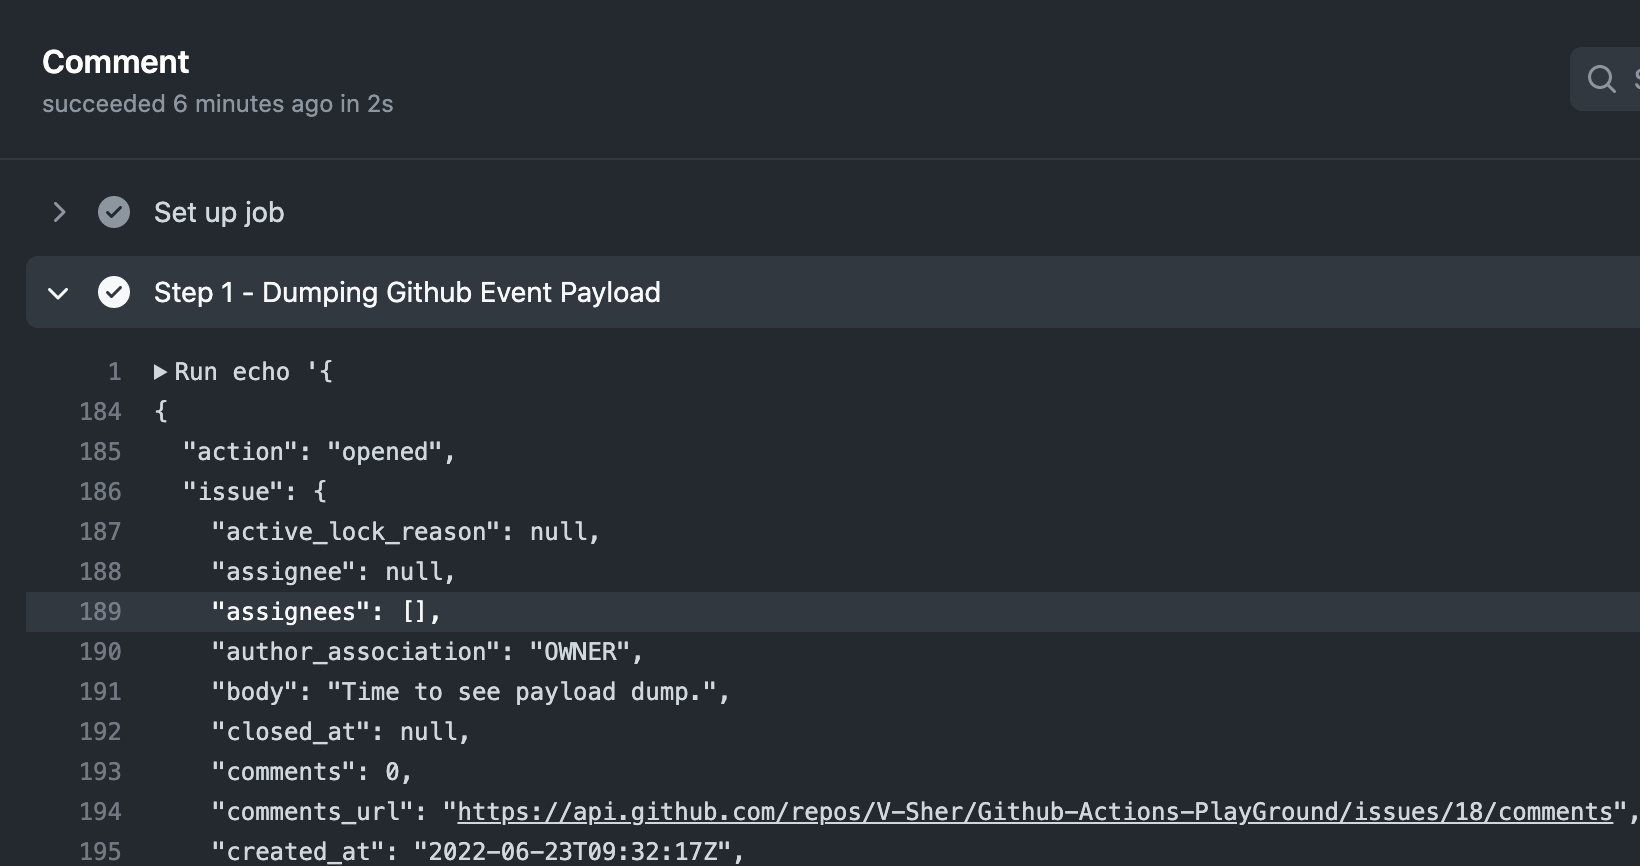
It contains a single step that will dump the entire Github event payload. I always find it useful to dump everything available in the github.event context to the terminal to see information about the event that triggered a workflow run. This will usually return a nested dictionary which we will pretty print using toJSON().
Note: There are other contexts you can check out like github.ref for the branch name that triggered the workflow run, github.repository for the repo name, etc. A complete list can be found here.
As you can see in the figure above, the returned context contains information about the action (i.e. opened), information about the issue itself, for instance, the time when it was created, the body of the issue, the number of comments, etc.
Note: The information inside github.event will depend on the type of event that triggered the workflow. For example, the contents of github.event will vary depending on whether an issue is opened vs. a push is made to the mainbranch.
Now that we know all the contextual information we have at our disposal, we can add a new Step 2 to the workflow that will echo some of this information to standard output. In particular, we are going to compare whether the action recorded by github.event was an issue-edit event as opposed to an issue-open event.
To see this in action, we are going to create a new issue, head over to the Actions tab, and check the outputs. As expected, it outputs a boolean 0 indicated False.
Up until now, we have only added steps that were running bash command to print something to standard output. As mentioned previously, we can also use an action from the Github marketplace within a step by using uses instead of run. To demonstrate this, we will be using Peter Evan’s Create-or-Update-Comment action to create a comment that automatically thanks the creator of a new issue. Its usage is explained in the Readme and is pretty straightforward — we must provide the issue number under which the comment needs to be made, along with the actual body of the message. Luckily, we have the former available to us as part of the github.event.issue context and the latter could be anything you’d like.
Let’s add Step 3 to do so. We will be adding an if clause to ensure this step is run only if an issue is opened (and not edited or deleted).
To test this, create a new issue, and immediately below you should see the bot message.
Note: In the full example below, I have also added a few additional steps for customizing the message based on whether the issue was edited or opened.
This is pretty much all you need to know to get started with the three main Github Actions I use on a day-to-day basis.
Every time we push commits to a branch, we tend to run some unit tests using pytestto make sure nothing breaks in the process.
To emulate the process, let’s assume we are now working on a new hello-worldbranch that has three new additions — two directories ( src and tests) and a requirements.txt file). The directory structure looks like this:
Github-Actions-PlayGround
│   README.md
│   requirements.txt
└───src
│   │   utils.py
└───tests
│   test_example.py
Contents of utils.py (on left) and test_example.py (on right) are as follows:


utils.py; On right test_example.pyFinally, we are ready to create a workflow in .github/worklfows/unit_test.yml on the hello-world branch that will run the tests inside tests directory anytime a commit is pushed to the branch (for now, we have only a single test defined in tests/test_example.py but you get the idea).
For the workflow to run successfully, we need to ensure that prior to running the tests, we should define steps that install the requirements.txt file in the runner environment (see Step 2 below) and add directories to PYTHONPATH, if any (see Step 3 below).
(P.S. If you’re still wondering if/how/why do I need apythonpath, check out this article.)
Few things to consider:
- If we are running more than one bash command in a single step, we use a pipe symbol (
|). For instance, see Step 2.
P.S. I have added|in other steps simply for neatness. - In Step 3, we could have simply done the following to set the correct
PYTHONPATH.
- name: "Step3: Add ./src to PYTHONPATH"
id: first_update_step
run: PYTHONPATH=$GITHUB_WORKSPACE/src
Since I wanted to demonstrate that we have indeed set the pythonpath correctly, in Step 3 we echo the output to $GITHUB_ENV — to be retrieved later in Step 4 using env.PYTHONPATH.
- As previously mentioned, a step can be any bash command that you can normally run in the terminal, in the final step, i.e. Step 5, we run the unit tests using
pytestcommand.
Now comes the fun part — seeing our workflow in action. Create a PR with this new branch hello-world and try pushing a new commit to it. On each and every push, you’ll see the checks starting automatically denoted by a yellow marker (see image on left). Once completed, they will turn green (see image on right).
Tinkering around with hyperparameters is a routine part of model training for any data scientist. Some sort of experiment tracking (like MLFlow or Weights & Biases (or wandb)) is usually implemented to keep track of the results for each different combination of hyperparameters.
Since important decisions (such as whether or not to merge the branch and use the model in production) must be made based on these, it is important that we fetch those runs and document them as part of the pull request. This helps improve transparency and accountability during code review as everyone can see the model’s performance.
To this end, machine-learning-apps/wandb-action marketplace action provides an easy-to-use solution. Let’s see how to fetch a dummy run (from all the logged wandb runs here) by creating a new workflow .github/workflows/wandb_runs.ymlin the main branch. We will be building this step-by-step.
Note: The dummy runs I logged were part of a project involving Huggingface Transformers. Check out this quick demo if you’d like to know how to log runs using Wandb with 🤗 Transformers with just 2 additional lines of code. Even if you are not using Huggingface, wandb will work for you because it is framework agnostic — meaning it can log models trained using Pytorch, Tensorflow, Scikit Learn, Keras, etc. Check out their tutorials for specific frameworks here.
Detecting trigger phrases
First, we need a trigger word/phrase that when present in the body of the PR comment, instructs the workflow to fetch a wandb run. Alongside this trigger word, we must also pass the id of the run that we want to be fetched. We will be using a marketplace action called machine-learning-apps/actions-chatopsfor achieving the same.
To use this action, we simply need to define a TRIGGER_PHRASE using with. It can be any string but in our case will be /get-runs.
Note: You’ll notice this action also requires setting an environment variable called GITHUB_TOKENusing env, however, GitHub automatically creates a unique GITHUB_TOKEN secret to use in your workflow — meaning you don’t have to do anything! You can read more about it here.
Because I want to inspect everything that is returned by this step, I am going to specify an id with it. Now we can use this id with the dot notation (for example, steps.chatops) to dump everything onto standard output using toJSON()in Step 3.
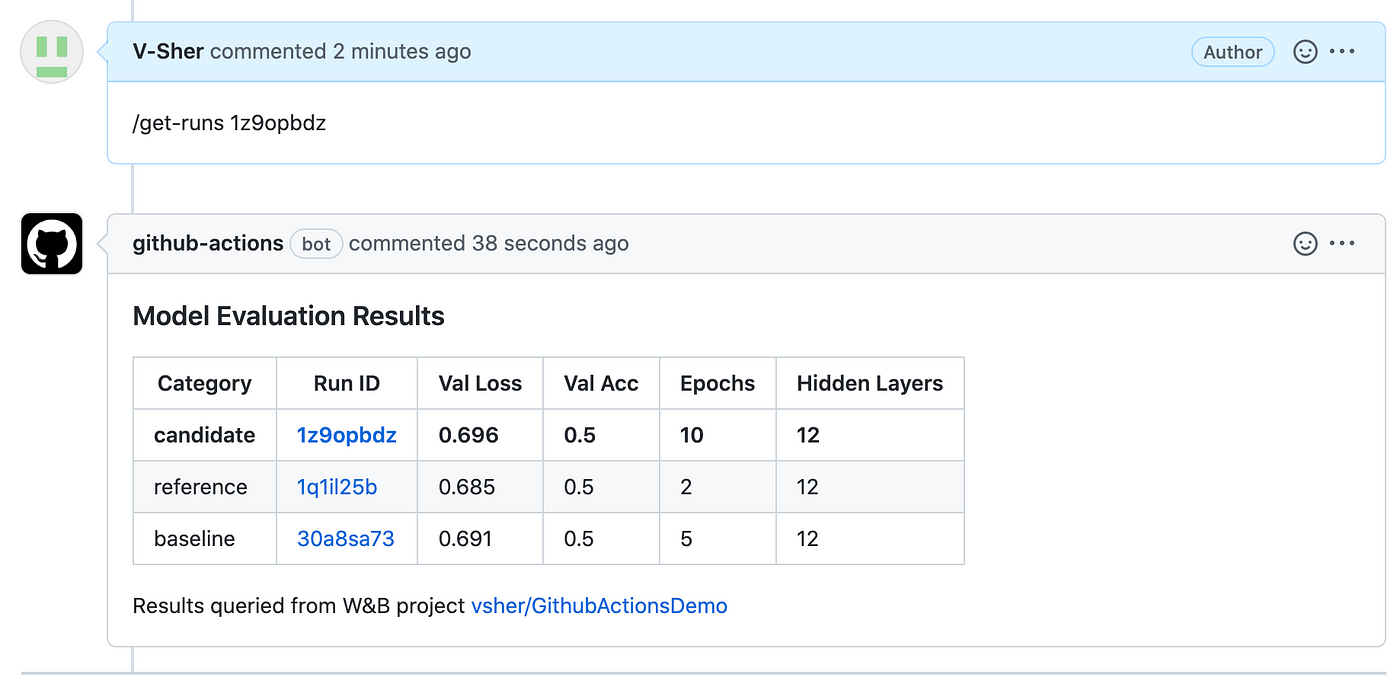
To see the workflow in action, create a new PR wishing to merge the commits pushed to the hello-world branch with the main branch. Next, make a new comment under the PR with the trigger word and the run id (see image below):

Note: You can find the run id in the run.id column in the wandb workspace.
Now, let’s head over to the Actions tab to see what’s returned by Step 3.
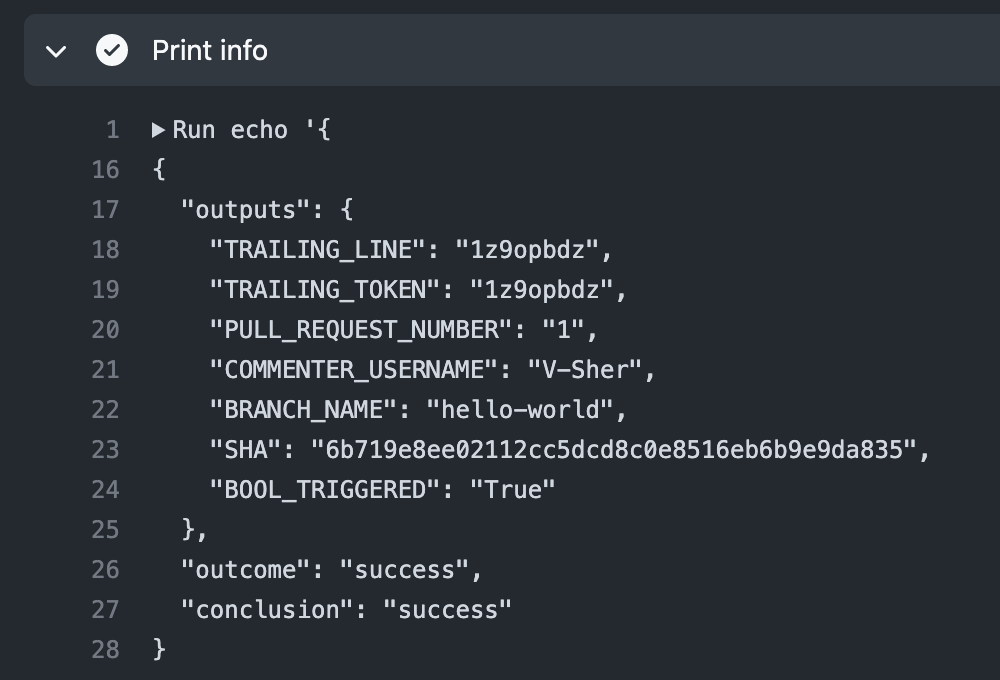
As expected, we get some useful information such as the branch name and commenter’s name. Also, the run id that was passed alongside the trigger word was stored under TRAILING_TOKEN. With that, we are ready to move on to Step 4 which will actually fetch the runs using machine-learning-apps/wandb-action.
In Step 4, we follow the guidelines in the official documentation and provide a few mandatory inputs using the with clause.
PROJECT_NAMEis the entity/project name associated with yourwandbproject. In the code snippet above,entityis vsher andprojectis GithubActionsDemo.- From dumping the data in the previous step, we know we can extract the
RUN_IDusingsteps.chatops.outputs.TRAILING_TOKEN. - In addition to the run specified by
RUN_ID, I would also like to fetch runs that I have manually tagged asbaselineandreferencein the weights and biases workspace. This can be done usingBASELINE_TAGS. - Some metrics (
DISPLAY_METRICS) and config variables (DISPLAY_CONFIG_VARS) are also defined. Make sure the column names you pass here are also logged as part ofwandblogging and that there isn’t any typo. - One final input we need to provide is the
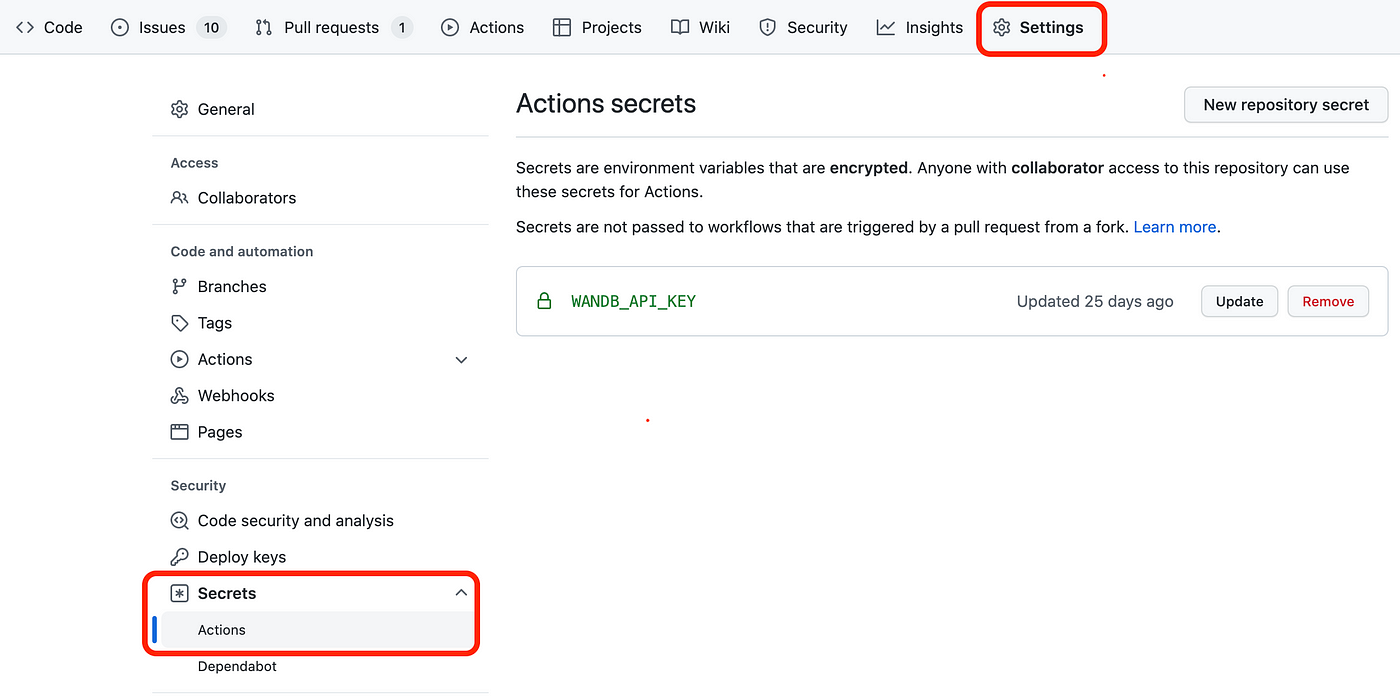
WANDB_API_KEY. Once you have logged in to yourwandbaccount, you will find your API key here: https://wandb.ai/authorize. Copy it and then head over to Github Settings -> Secrets (on the left pane) -> Actions and create a New Repository Secret with the nameWANDB_API_KEYand the value as the key you just copied!
Finally, we are going to dump the entire output from this step using toJSON(steps.wandb). To see this in action, push a commit to the PR and head over to the Actions tab to inspect.
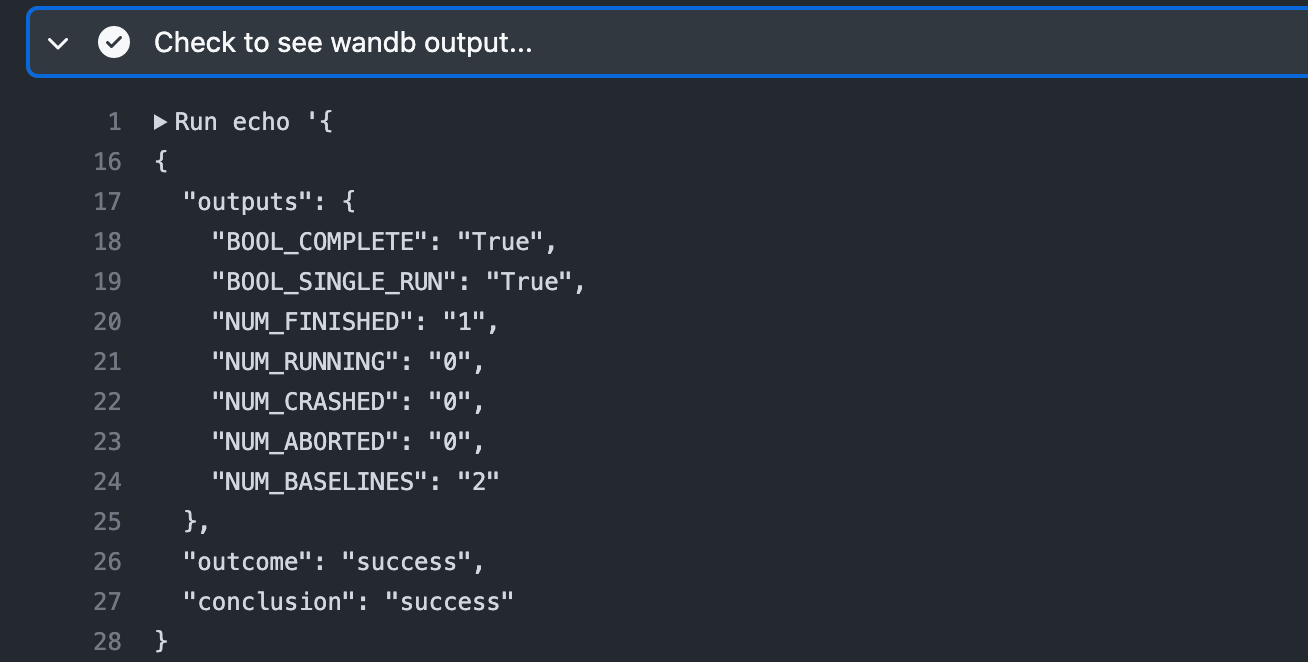
The output is self-explanatory, however, feel free to check the meaning of each of the dictionary keys here. More importantly, we can reference any of these outputs using dot notation, for instance steps.wandb.outputs.BOOL_COMPLETE or steps.wandb.outputs.outcome.
Creating Artifacts
Now you might wonder, all these steps are fine but where is the actual run that was supposed to be fetched and displayed in the PR comments!
Reading through the documentation, one thing to bear in mind is that machine-learning-apps/wandb-action does not display runs in PR comments but instead saves a csv file called wandb_report.csv (containing the fetched runs) into the path specified by the default working directory. Since we have checked out the repo using actions/checkout@v3 in Step 1 of the workflow, our csv file will be created in home/runner/work/Github-Actions-PlayGround/Github-Actions-PlayGround.
To verify this, we will add a new step that uploads this csv artifact from our workflow using the actions/upload-artifact action.
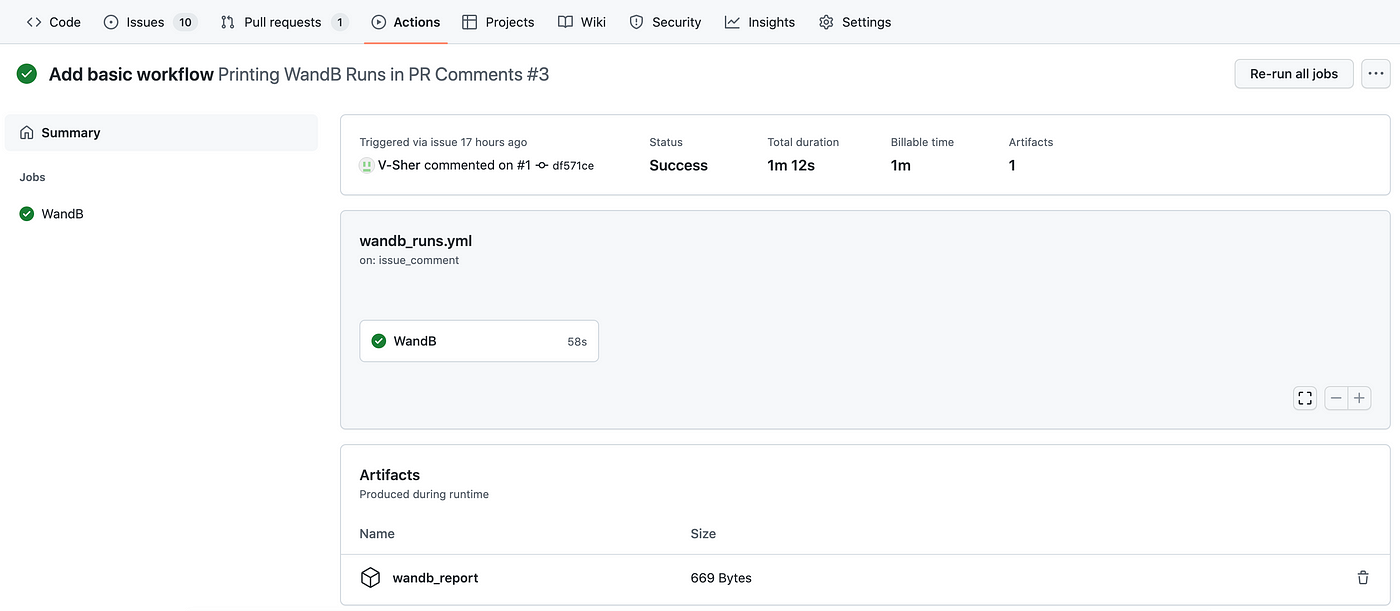
To see this in action, push a new commit to the PR branch and head over to the Actions tab. You will see a newly created wandb_report at the bottom of the screen under the Artifacts tab. Feel free to download it and inspect its contents.
Displaying wandb runs in PR comments
Now onto the most exciting step of the workflow — displaying this csv as a markdown formatted comment in a pull request. We are going to use the standard Github REST API for creating a comment.
Note: A quick detour to showcase how the API works. Using the python requests module, we make a post API call to the URL : https://api.github.com/repos/{repo-name}/issues/{pr_num}/comments, where repo-name and pr_num need to be passed explicitly. The body of the post request is a simple string reflecting the contents of the comment.
# REST API Example: Add a simple comment to PRimport requestsurl = f"https://api.github.com/repos/{repo-name}/issues/{pr_num}/comments"
data = {"body": "Making a new comment using API"}
result = requests.post(url=url, headers=headers, json=data)
With the API example sorted, we are going to implement similar functionality in a new file called wandb_results.py which we will run inside the workflow. The python script contains the requests.post() method described above, in addition to some data frame reformatting applied to the csv file (before passing it as the body of the message).
Note: I would like to acknowledge that wandb_results.py is heavily based on the code available here.
You’ll notice that at the very beginning of wandb_results.py, we use three environment variables using os.getenv(...). The former i.e. GITHUB_REPOSITORY is available automatically to the server running the workflow. The latter two — GITHUB_TOKENand PR_NUM — need to be set in the workflow step (see lines 42–43 below).
FINAL REVEAL
To see our full workflow in action, head over to the PR and make a new comment similar to /get-runs <run-id>. Within a few minutes, you should see the bot displaying the fetched run.
Without going into too much detail, I am going to quickly cover one more use case for Github Actions. actions/setup-python allows you to test your python scripts on multiple versions. See example usage below.
jobs:
build:
runs-on: ubuntu-latest
strategy:
matrix:
python-version: ['2.x', '3.x']
name: Python ${{ matrix.python-version }} sample
steps:
- uses: actions/checkout@v3
- name: Set up Python
uses: actions/setup-python@v4
with:
python-version: ${{ matrix.python-version }}
architecture: x64
- run: python my_script.py
By now you’d have had a deeper understanding and profound appreciation of the many wonders of Github Actions. Hopefully, by now, you should also be able to implement them yourself using the relevant documentation. If you have come across other useful time-saving actions in your day-to-day as a data scientist, please do let me know!
As always if there’s an easier way to do/explain some of the things mentioned in this article, do let me know. In general, refrain from unsolicited destructive/trash/hostile comments!
Until next time ✨
Note: All images unless otherwise noted are by the author.
Github Actions
Learn how to automate experiment tracking with Weights & Biases, unit testing, artifact creation, and lots more…

In layman’s terms, Github Actions lets you automate a few routine and repetitive tasks — be it testing code every time it is deployed on the production branch, checking for good coding practices on PRs, cross-browser code testing, unit-testing, retrieving runs from MLFlow/WandB tracking, automatically closing stale issues, etc. The list is truly endless.
While you can certainly write all these Github Actions yourself from scratch, I would advise against reinventing the wheel. Instead, a good place to search for available actions for your particular use case would be the marketplace. Let’s find out how to use them in action.
Note: While it may be tempting to run as many actions as the heart desires, private repos have only a limited amount of free minutes (~2000 minutes) and storage (~500MB) available every month (minutes get reset every month but storage does not). Public repos, however, have no such limitations for Github Actions usage. More details about billing can be found here.
To get started, we need to create .github/workflows directory in our repo and inside create a new .yml file. A typical .yml file looks like this:
name: Github Actions Demo
on:
issues:
types: [opened, edited, deleted]
jobs:
Job1:
runs-on: ubuntu-latest
steps:
- name: "This is Step 1 with bash command."
run: echo "hello World"
shell: bash
- name: "This is step 2 using marketplace action."
uses: actions/checkout@v3
Job2:
.....  Job3:
.....
Few things to consider:
- We need to define a
namefor the workflow and also when this workflow should run. The former can be anything you like and the latter needs to be specified usingon. For instance, we might want to run the workflow only when opening an issue, closing an issue, commenting on a PR, whenever a label is created, edited, etc. Check out the complete list of events that can trigger a workflow. In our example, it will be triggered anytime someone opens, edits, and/or deletes an issue. - Here we have defined three jobs (
job1,job2,job3) but in reality, you can have any number of jobs defined in a single.ymlfile and they will all run simultaneously when the event defined inonis triggered (there are workarounds for this wherein one can delay runningjob2untiljob1has been completed). - We have the option of defining a server using
runs-onthat will run your workflow. The stable choices includeubuntu-latest,macos-latestandwindows-latest.
Note: Be mindful of the choice as some Github-hosted runners consume more minutes than others. From the documentation, it seems that jobs that run on Windows and macOS runners consume minutes at 2 and 10 times the rate that jobs on Linux runners consume. - The steps within a job are run sequentially. Make sure you name a step something meaningful as this helps with debugging later on.
- The steps within a job can do one of two things — (a) run a bash command using
run(for example,echo "hello World") or (b) use a marketplace or third-party Github action usinguses(for example,actions/checkout@v3— this is a popular action that helps you check out a repo and use any of the files therein as part of your workflow — we will be covering it later in the tutorial).
We have a workflow named Dump event payload containing a single job called Comment that will be triggered every time an issue is opened, edited, or deleted.
Before explaining what’s happening, let’s see it in action by creating a new issue.
Next, head over to the Actions tab and you’ll see a yellow dot indicating the workflow is running. Once finished, it will turn green.
Upon completion, click on it to see the status, total duration, and artifacts created (we will cover artifacts later in the tutorial).
Finally, stepping inside the Commentjob, we should be able to see the outputs from all the steps we defined in the workflow.
Let’s break down what’s happening in the workflow.
It contains a single step that will dump the entire Github event payload. I always find it useful to dump everything available in the github.event context to the terminal to see information about the event that triggered a workflow run. This will usually return a nested dictionary which we will pretty print using toJSON().
Note: There are other contexts you can check out like github.ref for the branch name that triggered the workflow run, github.repository for the repo name, etc. A complete list can be found here.
As you can see in the figure above, the returned context contains information about the action (i.e. opened), information about the issue itself, for instance, the time when it was created, the body of the issue, the number of comments, etc.
Note: The information inside github.event will depend on the type of event that triggered the workflow. For example, the contents of github.event will vary depending on whether an issue is opened vs. a push is made to the mainbranch.
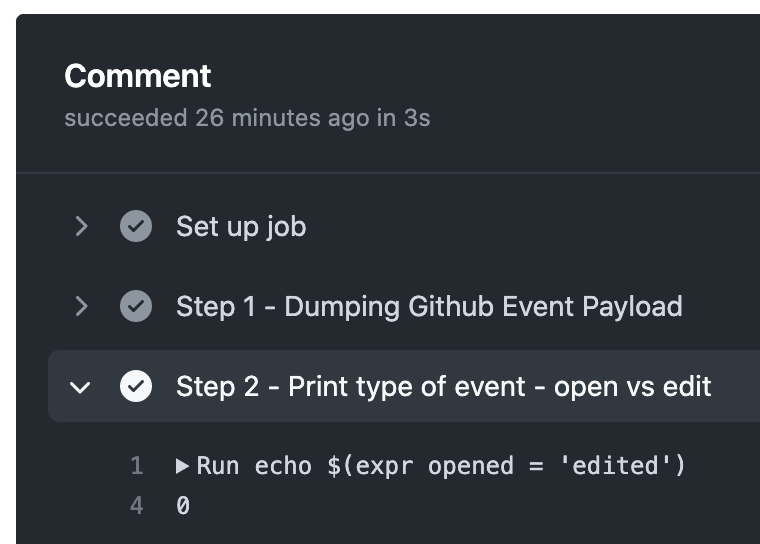
Now that we know all the contextual information we have at our disposal, we can add a new Step 2 to the workflow that will echo some of this information to standard output. In particular, we are going to compare whether the action recorded by github.event was an issue-edit event as opposed to an issue-open event.
To see this in action, we are going to create a new issue, head over to the Actions tab, and check the outputs. As expected, it outputs a boolean 0 indicated False.
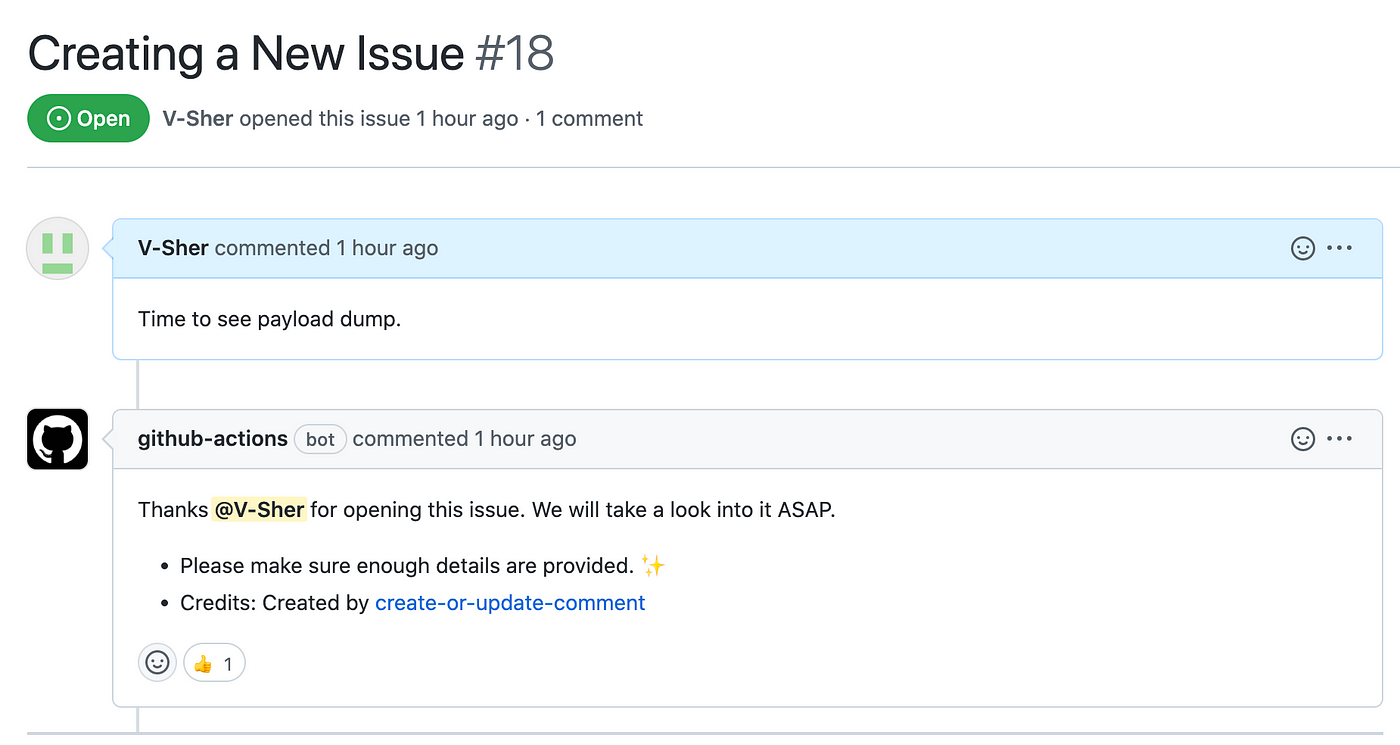
Up until now, we have only added steps that were running bash command to print something to standard output. As mentioned previously, we can also use an action from the Github marketplace within a step by using uses instead of run. To demonstrate this, we will be using Peter Evan’s Create-or-Update-Comment action to create a comment that automatically thanks the creator of a new issue. Its usage is explained in the Readme and is pretty straightforward — we must provide the issue number under which the comment needs to be made, along with the actual body of the message. Luckily, we have the former available to us as part of the github.event.issue context and the latter could be anything you’d like.
Let’s add Step 3 to do so. We will be adding an if clause to ensure this step is run only if an issue is opened (and not edited or deleted).
To test this, create a new issue, and immediately below you should see the bot message.
Note: In the full example below, I have also added a few additional steps for customizing the message based on whether the issue was edited or opened.
This is pretty much all you need to know to get started with the three main Github Actions I use on a day-to-day basis.
Every time we push commits to a branch, we tend to run some unit tests using pytestto make sure nothing breaks in the process.
To emulate the process, let’s assume we are now working on a new hello-worldbranch that has three new additions — two directories ( src and tests) and a requirements.txt file). The directory structure looks like this:
Github-Actions-PlayGround
│   README.md
│   requirements.txt
└───src
│   │   utils.py
└───tests
│   test_example.py
Contents of utils.py (on left) and test_example.py (on right) are as follows:
utils.py; On right test_example.pyFinally, we are ready to create a workflow in .github/worklfows/unit_test.yml on the hello-world branch that will run the tests inside tests directory anytime a commit is pushed to the branch (for now, we have only a single test defined in tests/test_example.py but you get the idea).
For the workflow to run successfully, we need to ensure that prior to running the tests, we should define steps that install the requirements.txt file in the runner environment (see Step 2 below) and add directories to PYTHONPATH, if any (see Step 3 below).
(P.S. If you’re still wondering if/how/why do I need apythonpath, check out this article.)
Few things to consider:
- If we are running more than one bash command in a single step, we use a pipe symbol (
|). For instance, see Step 2.
P.S. I have added|in other steps simply for neatness. - In Step 3, we could have simply done the following to set the correct
PYTHONPATH.
- name: "Step3: Add ./src to PYTHONPATH"
id: first_update_step
run: PYTHONPATH=$GITHUB_WORKSPACE/src
Since I wanted to demonstrate that we have indeed set the pythonpath correctly, in Step 3 we echo the output to $GITHUB_ENV — to be retrieved later in Step 4 using env.PYTHONPATH.
- As previously mentioned, a step can be any bash command that you can normally run in the terminal, in the final step, i.e. Step 5, we run the unit tests using
pytestcommand.
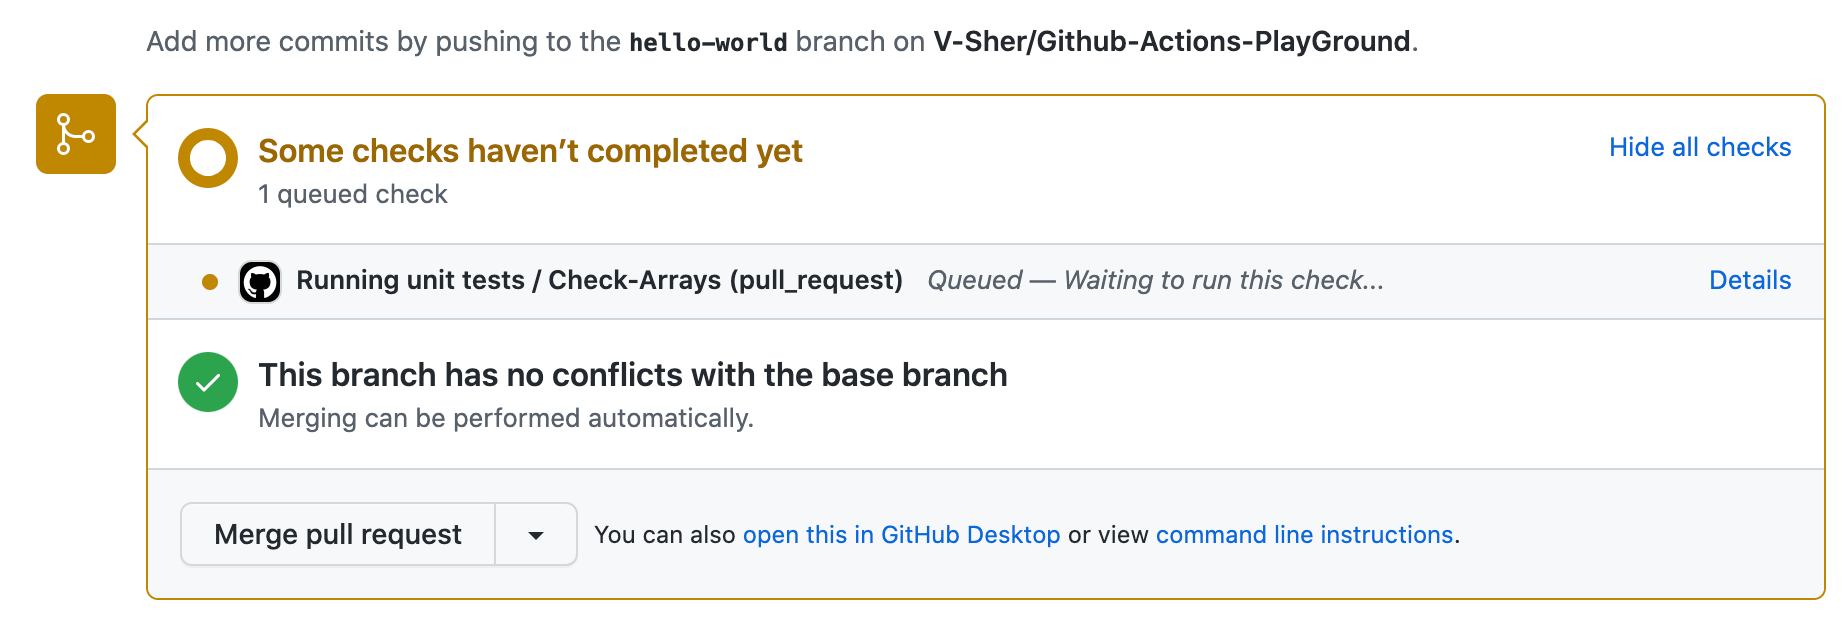
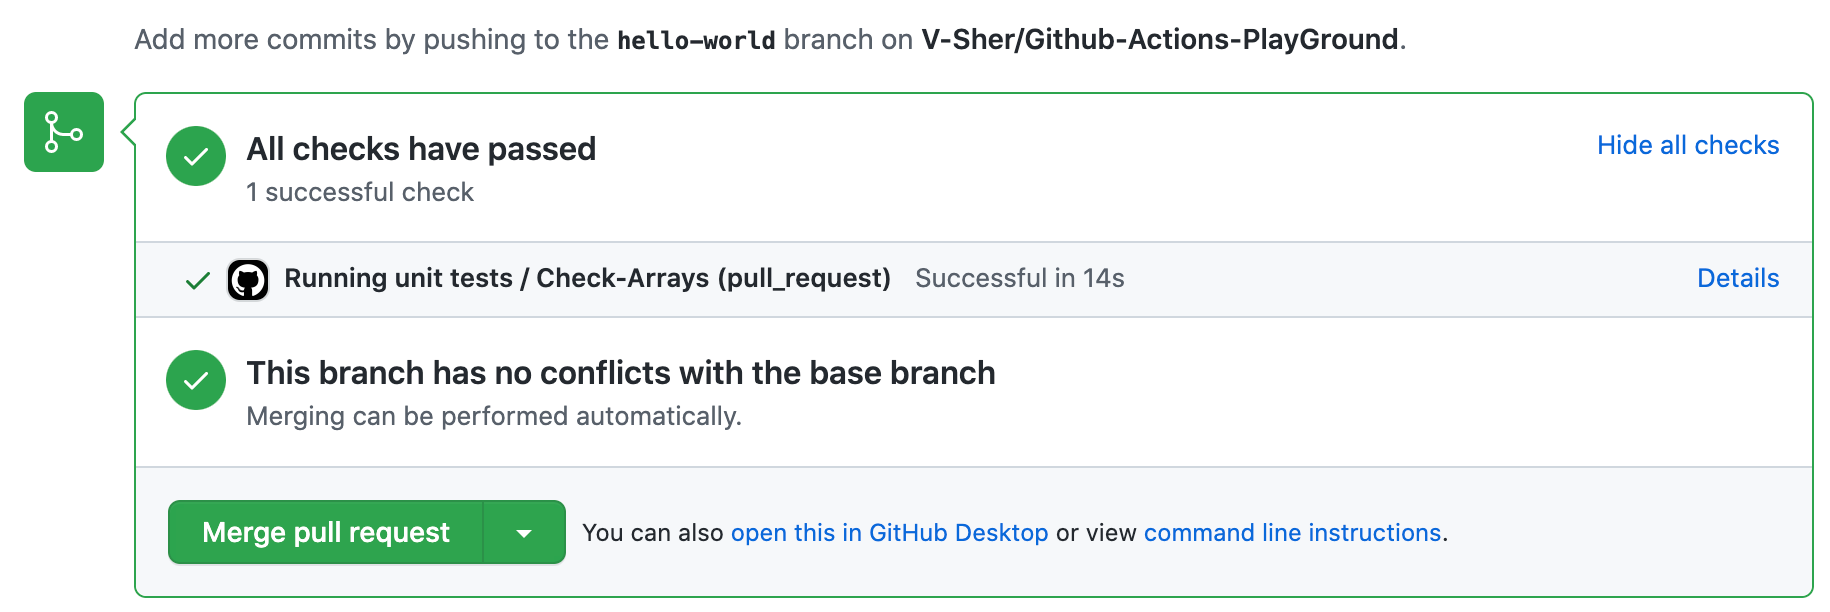
Now comes the fun part — seeing our workflow in action. Create a PR with this new branch hello-world and try pushing a new commit to it. On each and every push, you’ll see the checks starting automatically denoted by a yellow marker (see image on left). Once completed, they will turn green (see image on right).
Tinkering around with hyperparameters is a routine part of model training for any data scientist. Some sort of experiment tracking (like MLFlow or Weights & Biases (or wandb)) is usually implemented to keep track of the results for each different combination of hyperparameters.
Since important decisions (such as whether or not to merge the branch and use the model in production) must be made based on these, it is important that we fetch those runs and document them as part of the pull request. This helps improve transparency and accountability during code review as everyone can see the model’s performance.
To this end, machine-learning-apps/wandb-action marketplace action provides an easy-to-use solution. Let’s see how to fetch a dummy run (from all the logged wandb runs here) by creating a new workflow .github/workflows/wandb_runs.ymlin the main branch. We will be building this step-by-step.
Note: The dummy runs I logged were part of a project involving Huggingface Transformers. Check out this quick demo if you’d like to know how to log runs using Wandb with 🤗 Transformers with just 2 additional lines of code. Even if you are not using Huggingface, wandb will work for you because it is framework agnostic — meaning it can log models trained using Pytorch, Tensorflow, Scikit Learn, Keras, etc. Check out their tutorials for specific frameworks here.
Detecting trigger phrases
First, we need a trigger word/phrase that when present in the body of the PR comment, instructs the workflow to fetch a wandb run. Alongside this trigger word, we must also pass the id of the run that we want to be fetched. We will be using a marketplace action called machine-learning-apps/actions-chatopsfor achieving the same.
To use this action, we simply need to define a TRIGGER_PHRASE using with. It can be any string but in our case will be /get-runs.
Note: You’ll notice this action also requires setting an environment variable called GITHUB_TOKENusing env, however, GitHub automatically creates a unique GITHUB_TOKEN secret to use in your workflow — meaning you don’t have to do anything! You can read more about it here.
Because I want to inspect everything that is returned by this step, I am going to specify an id with it. Now we can use this id with the dot notation (for example, steps.chatops) to dump everything onto standard output using toJSON()in Step 3.
To see the workflow in action, create a new PR wishing to merge the commits pushed to the hello-world branch with the main branch. Next, make a new comment under the PR with the trigger word and the run id (see image below):
Note: You can find the run id in the run.id column in the wandb workspace.
Now, let’s head over to the Actions tab to see what’s returned by Step 3.
As expected, we get some useful information such as the branch name and commenter’s name. Also, the run id that was passed alongside the trigger word was stored under TRAILING_TOKEN. With that, we are ready to move on to Step 4 which will actually fetch the runs using machine-learning-apps/wandb-action.
In Step 4, we follow the guidelines in the official documentation and provide a few mandatory inputs using the with clause.
PROJECT_NAMEis the entity/project name associated with yourwandbproject. In the code snippet above,entityis vsher andprojectis GithubActionsDemo.- From dumping the data in the previous step, we know we can extract the
RUN_IDusingsteps.chatops.outputs.TRAILING_TOKEN. - In addition to the run specified by
RUN_ID, I would also like to fetch runs that I have manually tagged asbaselineandreferencein the weights and biases workspace. This can be done usingBASELINE_TAGS. - Some metrics (
DISPLAY_METRICS) and config variables (DISPLAY_CONFIG_VARS) are also defined. Make sure the column names you pass here are also logged as part ofwandblogging and that there isn’t any typo. - One final input we need to provide is the
WANDB_API_KEY. Once you have logged in to yourwandbaccount, you will find your API key here: https://wandb.ai/authorize. Copy it and then head over to Github Settings -> Secrets (on the left pane) -> Actions and create a New Repository Secret with the nameWANDB_API_KEYand the value as the key you just copied!
Finally, we are going to dump the entire output from this step using toJSON(steps.wandb). To see this in action, push a commit to the PR and head over to the Actions tab to inspect.
The output is self-explanatory, however, feel free to check the meaning of each of the dictionary keys here. More importantly, we can reference any of these outputs using dot notation, for instance steps.wandb.outputs.BOOL_COMPLETE or steps.wandb.outputs.outcome.
Creating Artifacts
Now you might wonder, all these steps are fine but where is the actual run that was supposed to be fetched and displayed in the PR comments!
Reading through the documentation, one thing to bear in mind is that machine-learning-apps/wandb-action does not display runs in PR comments but instead saves a csv file called wandb_report.csv (containing the fetched runs) into the path specified by the default working directory. Since we have checked out the repo using actions/checkout@v3 in Step 1 of the workflow, our csv file will be created in home/runner/work/Github-Actions-PlayGround/Github-Actions-PlayGround.
To verify this, we will add a new step that uploads this csv artifact from our workflow using the actions/upload-artifact action.
To see this in action, push a new commit to the PR branch and head over to the Actions tab. You will see a newly created wandb_report at the bottom of the screen under the Artifacts tab. Feel free to download it and inspect its contents.
Displaying wandb runs in PR comments
Now onto the most exciting step of the workflow — displaying this csv as a markdown formatted comment in a pull request. We are going to use the standard Github REST API for creating a comment.
Note: A quick detour to showcase how the API works. Using the python requests module, we make a post API call to the URL : https://api.github.com/repos/{repo-name}/issues/{pr_num}/comments, where repo-name and pr_num need to be passed explicitly. The body of the post request is a simple string reflecting the contents of the comment.
# REST API Example: Add a simple comment to PRimport requestsurl = f"https://api.github.com/repos/{repo-name}/issues/{pr_num}/comments"
data = {"body": "Making a new comment using API"}
result = requests.post(url=url, headers=headers, json=data)
With the API example sorted, we are going to implement similar functionality in a new file called wandb_results.py which we will run inside the workflow. The python script contains the requests.post() method described above, in addition to some data frame reformatting applied to the csv file (before passing it as the body of the message).
Note: I would like to acknowledge that wandb_results.py is heavily based on the code available here.
You’ll notice that at the very beginning of wandb_results.py, we use three environment variables using os.getenv(...). The former i.e. GITHUB_REPOSITORY is available automatically to the server running the workflow. The latter two — GITHUB_TOKENand PR_NUM — need to be set in the workflow step (see lines 42–43 below).
FINAL REVEAL
To see our full workflow in action, head over to the PR and make a new comment similar to /get-runs <run-id>. Within a few minutes, you should see the bot displaying the fetched run.
Without going into too much detail, I am going to quickly cover one more use case for Github Actions. actions/setup-python allows you to test your python scripts on multiple versions. See example usage below.
jobs:
build:
runs-on: ubuntu-latest
strategy:
matrix:
python-version: ['2.x', '3.x']
name: Python ${{ matrix.python-version }} sample
steps:
- uses: actions/checkout@v3
- name: Set up Python
uses: actions/setup-python@v4
with:
python-version: ${{ matrix.python-version }}
architecture: x64
- run: python my_script.py
By now you’d have had a deeper understanding and profound appreciation of the many wonders of Github Actions. Hopefully, by now, you should also be able to implement them yourself using the relevant documentation. If you have come across other useful time-saving actions in your day-to-day as a data scientist, please do let me know!
As always if there’s an easier way to do/explain some of the things mentioned in this article, do let me know. In general, refrain from unsolicited destructive/trash/hostile comments!
Until next time ✨
Note: All images unless otherwise noted are by the author.
Denial of responsibility! Techno Blender is an automatic aggregator of the all world’s media. In each content, the hyperlink to the primary source is specified. All trademarks belong to their rightful owners, all materials to their authors. If you are the owner of the content and do not want us to publish your materials, please contact us by email – [email protected]. The content will be deleted within 24 hours.