
How to Create Slick Math Animations Like 3Blue1Brown in Python | by Bex T. | May, 2022
Learning the best way of combining your love for math and programming
Do you know how many lines of code went into creating the Essence of Linear Algebra series of 3Blue1Brown?

With 16 videos in the series and a total of +100 on the channel, these numbers speak volumes about how indebted the math world is to Grant Sanderson.
Though the channel is seemingly math-focused, it is the by-product of the graphing library he created to practice his coding skills. He called it Manim, and it became the pioneering tool to visualize and animate some of the most complex topics of math and computer science.
Currently, his videos on neural networks, calculus, topology, and pure math are considered YouTube gems.
Wouldn’t it be cool if you could create something that is even remotely similar to his work? By the end of this Manim tutorial, you will not only be able to create your own awesome animations but also learn the secrets to some of the signature transformations Grant Sanderson uses in his videos.
Manim stands for mathematical animation engine and is created by Grant Sanderson to produce high-precision math animation videos. The main objective of the 3B1B channel and this Python library is to complement traditional textbook-based math learning with visual intuition.
Currently, there are two versions of Manim: the original library created by Grant and the forked version maintained by the Manim community. We will be using the community version in this post since it is better maintained, tested, and, most importantly, properly documented.
There are many installation options, and I think using the Docker image is the most hassle-free way to interact with the library. Kindly refer to this page for Dockerized installation instructions or this page for other options so that you can follow along.
Or, you can stay and enjoy the content because there will be some awesome animations!
Note that the post contains several animations as GIFs and videos, which might slow down their display. You can download the source code of the article from my GitHub repo. The post also refers to several Python OOP concepts that might confuse beginners. If at any point you find yourself struggling, check out my OOP series.
Manim was created as a bridge between the FFmpeg video encoding engine and Python. Since you can’t communicate built-in Python data structures to FFmpeg, Manim implements several mathematical object representation and animation classes.
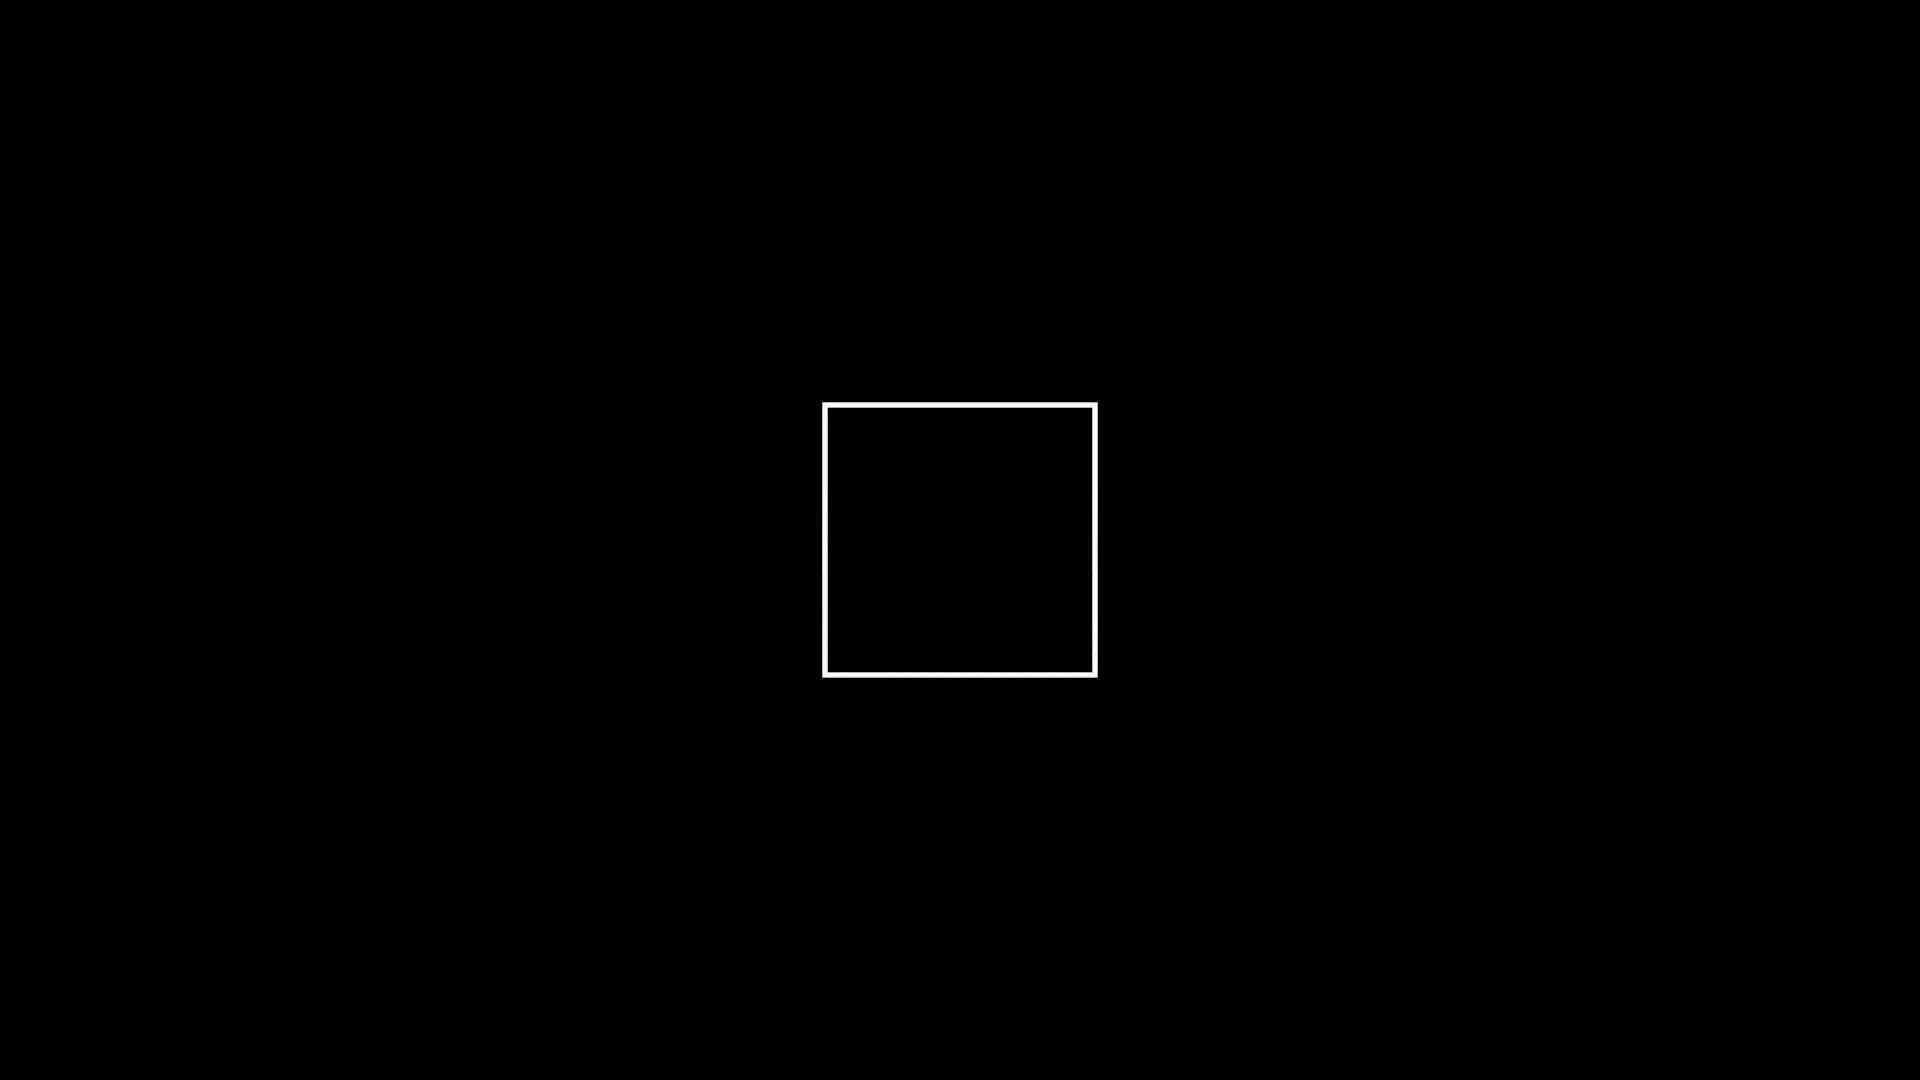
These classes are generally divided into three categories: Scene, Mobject and Animation. To explain these concepts more clearly, let’s create our very first animation:
After you have installed Manim and saved the above code in a script like scenes.py, run the following command:
manim -pqh scenes.py MyFirstAnimation
and you should get this output:

Congratulations! You just made your very first animation!
Here is the breakdown of this CLI command — adding -p to manim will enable you to play the video as soon as it is compiled. Combining it with qh means rendering it in high quality. There are four resolutions – low (l), medium (m), high (h) and 4k (k) with increasing render time.
If you want a GIF version of the animation, add -i after -pqh. Here is a full list of manim CLI commands.
Let’s understand the above animation by analyzing the code line by line.
After importing all manim content in the first line, we are defining a scene class with a construct method:
class MyFirstAnimation(Scene):
def construct(self):
...
This is the general formula for creating a single animation — you define a custom class that inherits from the Scene class and has a construct method. Scene class is the higher-level building block of Manim, which connects all related animations and objects into a single structure.
Next, we create two objects (a star and a circle) that belong to a Mobject class (mathematical object). This Mobject class is a base data structure for many built-in mobjects like geometric shapes, vectors, coordinate systems, etc. Basically, everything that is not a scene and animation is a Mobject.
Then, we have the Animation classes. In the above example, we are using 3 of them – FadeIn, Transform and FadeOut. All built-in Animation classes in manim accept mobjects as arguments and apply various effects to them. For example, Transform accepts two mobjects and plays out a smooth animation that converts the first one to the other.
Every time you create an animation, you have to wrap it inside the play function so that they are rendered on the screen.
Lastly, we have the constants like RED, BLUE, YELLOW, PI, TAU, etc. These are part of the constants module of Manim and encode commonly-used values as variables and are imported in the first line of the snippet:
By default, all mobjects added to the screen get displayed in the ORIGIN:
>>> ORIGINarray([0., 0., 0.])
Manim uses numpy arrays to represent the screen in x, y, z coordinates. z will stay 0 as long as you are animating in the 2D space. To shift an object a single unit in either x or y direction, you can use constants LEFT, RIGHT, UP and DOWN:
As an example, we will draw four mobjects at different locations on the screen and place a dot at the origin for reference:
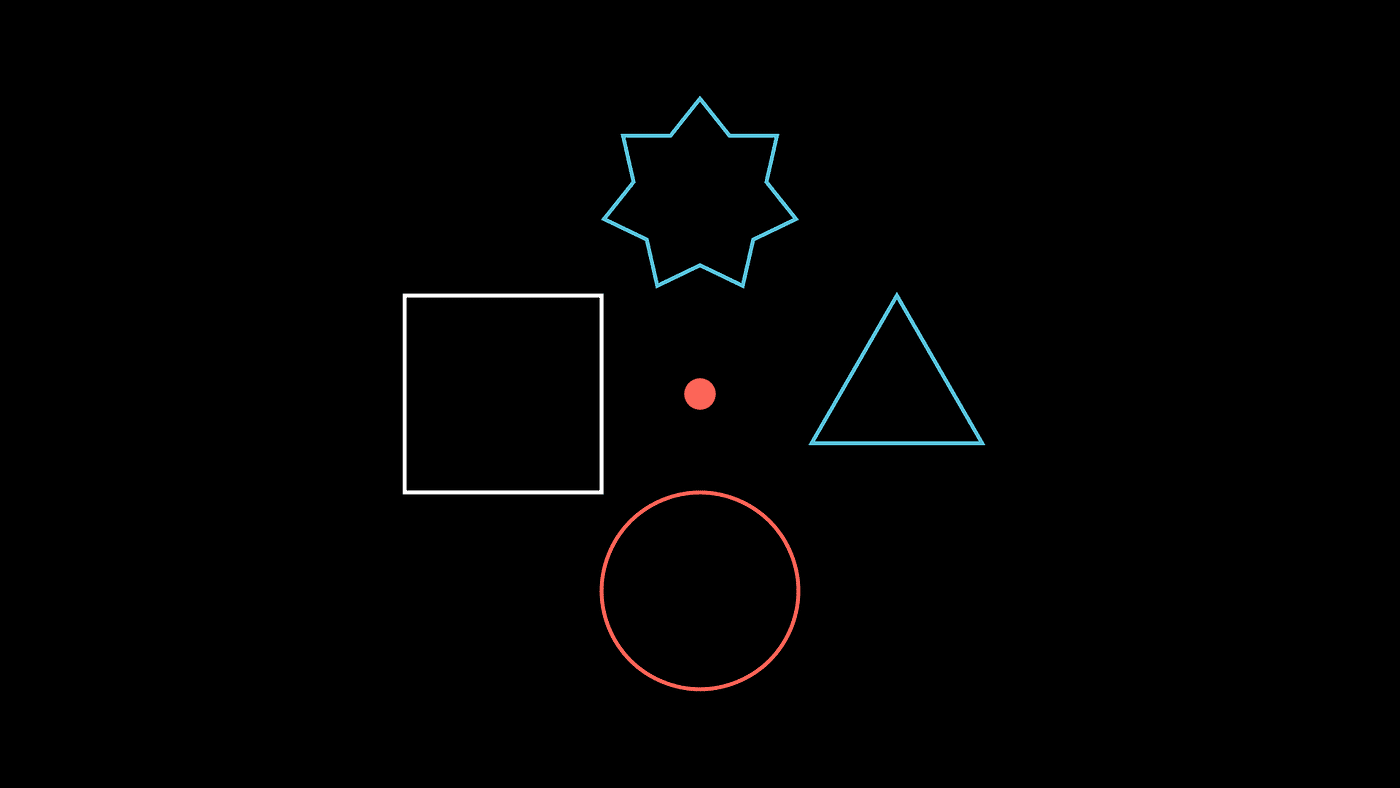
Since LEFT, RIGHT, etc. variables are Numpy arrays, they allow numeric operations that allow scaling them like above. There are also other built-in location variables like UL (UP + LEFT), DR (DOWN + RIGHT), etc.:
In the above snippet, we are using the shift method of the mobjects by passing their new coordinate location. Since shift is only a function, the actual shifting does not get animated. To display mobjects that aren’t animated, we use the add method.
What if we wanted to animate that shifting motion? Well, you can chain shift after the animate function like so:
In fact, with animate method, you can animate almost any type of change to a mobject. For example, mobjects have several methods that start with set_* that change their attributes. Here is an example:
Let’s get a bit more serious and learn how to draw functions and animate their creation. From now on, I will be using JupyterLab and its %%manim cell magic to render the manim output. The syntax is the same as the CLI interface.

To draw 2D axes like in Matplotlib, call the Axes class with the desired arguments.
Next, we are using the get_graph method, passing the function we want to draw. This built-in method only accepts single variable functions that return a one-to-one mapping between x and y. In the above example, we draw the graph of sin(1/x).
Optionally, you can place the function’s label at a specific location using get_graph_label:
Finally, we are creating a group of mobjects using the VGroup class. It allows simultaneous animations and transformations on multiple mobjects.
Also, don’t forget to draw each mobject you created. Either use animation functions like Create/Write or use self.add.
You didn’t think I would leave without showing some signature animations of 3B1B, right?
I learned about 3B1B from his Essence of Linear Algebra series, and seeing a linear transformation of space completely blew my mind. The crazy part is that animating it is stupidly easy with Manim:
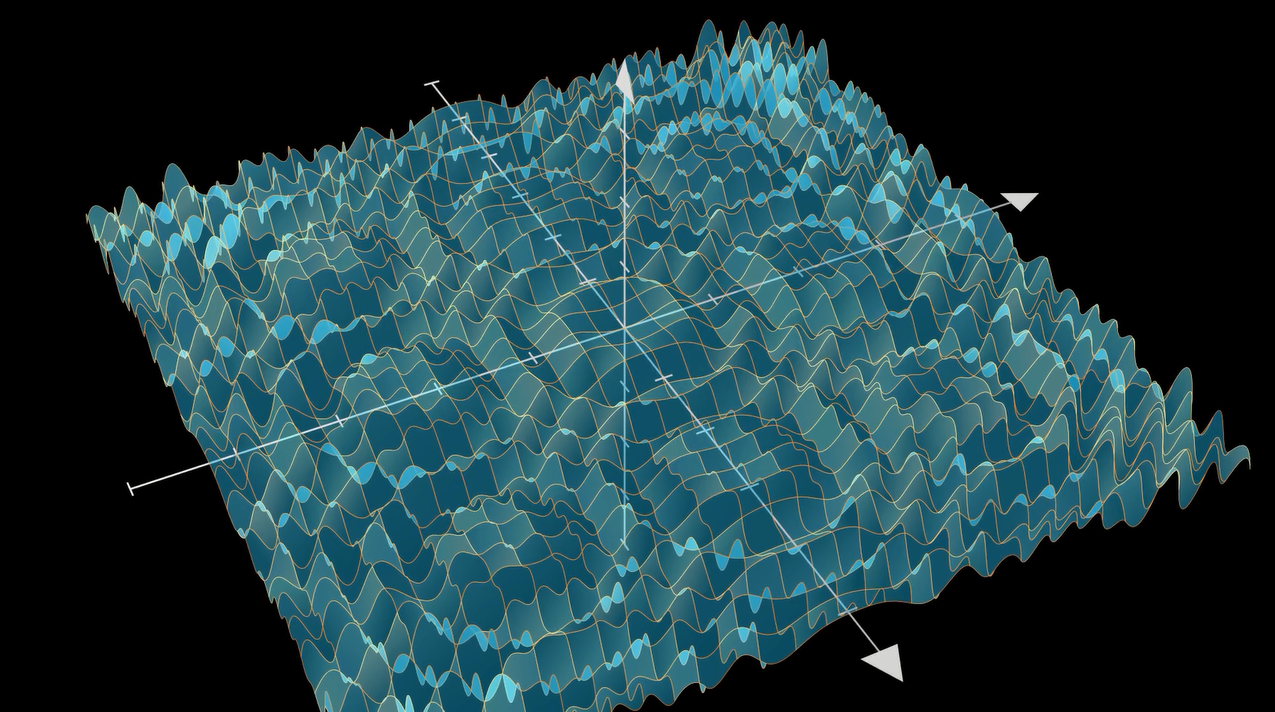
Similarly, seeing functions graphed in 3D was eye-opening because we are all used to drawing functions on the XY plane. You will realize how beautiful math can be when you look at functions like below:
Hey, how about those non-linear transforms?
Can it get any better than this? Of course, it can!
Though very cool already, what you learned today is only a thin slice of what manim can do. The above animations are only what Grant Sanderson uses in his simple opening scenes.
The library has a steep learning curve when you want to move beyond the built-in mobjects and animation classes. Implementing custom classes can be pretty lengthy, often taking thousands of lines of code for longer videos.
However, this shouldn’t stop you if you genuinely love math and explaining it to others in novel and creative ways.
I apologize for turning this piece into too much of a “how-to” post. That’s just my deep-rooted tendency to over-explain things.
However, I felt that proper explanations were necessary since the Internet was full of outdated tutorials and videos. On top of that, there is that confusion when you accidentally use different versions of manim in a single project.
I strongly recommend going through every page of the documentation of the community version if you want to be a die-hard manim animator. I also suggest you check out channels like this that use Manim and read their source code.
Learning the best way of combining your love for math and programming
Do you know how many lines of code went into creating the Essence of Linear Algebra series of 3Blue1Brown?
With 16 videos in the series and a total of +100 on the channel, these numbers speak volumes about how indebted the math world is to Grant Sanderson.
Though the channel is seemingly math-focused, it is the by-product of the graphing library he created to practice his coding skills. He called it Manim, and it became the pioneering tool to visualize and animate some of the most complex topics of math and computer science.
Currently, his videos on neural networks, calculus, topology, and pure math are considered YouTube gems.
Wouldn’t it be cool if you could create something that is even remotely similar to his work? By the end of this Manim tutorial, you will not only be able to create your own awesome animations but also learn the secrets to some of the signature transformations Grant Sanderson uses in his videos.
Manim stands for mathematical animation engine and is created by Grant Sanderson to produce high-precision math animation videos. The main objective of the 3B1B channel and this Python library is to complement traditional textbook-based math learning with visual intuition.
Currently, there are two versions of Manim: the original library created by Grant and the forked version maintained by the Manim community. We will be using the community version in this post since it is better maintained, tested, and, most importantly, properly documented.
There are many installation options, and I think using the Docker image is the most hassle-free way to interact with the library. Kindly refer to this page for Dockerized installation instructions or this page for other options so that you can follow along.
Or, you can stay and enjoy the content because there will be some awesome animations!
Note that the post contains several animations as GIFs and videos, which might slow down their display. You can download the source code of the article from my GitHub repo. The post also refers to several Python OOP concepts that might confuse beginners. If at any point you find yourself struggling, check out my OOP series.
Manim was created as a bridge between the FFmpeg video encoding engine and Python. Since you can’t communicate built-in Python data structures to FFmpeg, Manim implements several mathematical object representation and animation classes.
These classes are generally divided into three categories: Scene, Mobject and Animation. To explain these concepts more clearly, let’s create our very first animation:
After you have installed Manim and saved the above code in a script like scenes.py, run the following command:
manim -pqh scenes.py MyFirstAnimation
and you should get this output:
Congratulations! You just made your very first animation!
Here is the breakdown of this CLI command — adding -p to manim will enable you to play the video as soon as it is compiled. Combining it with qh means rendering it in high quality. There are four resolutions – low (l), medium (m), high (h) and 4k (k) with increasing render time.
If you want a GIF version of the animation, add -i after -pqh. Here is a full list of manim CLI commands.
Let’s understand the above animation by analyzing the code line by line.
After importing all manim content in the first line, we are defining a scene class with a construct method:
class MyFirstAnimation(Scene):
def construct(self):
...
This is the general formula for creating a single animation — you define a custom class that inherits from the Scene class and has a construct method. Scene class is the higher-level building block of Manim, which connects all related animations and objects into a single structure.
Next, we create two objects (a star and a circle) that belong to a Mobject class (mathematical object). This Mobject class is a base data structure for many built-in mobjects like geometric shapes, vectors, coordinate systems, etc. Basically, everything that is not a scene and animation is a Mobject.
Then, we have the Animation classes. In the above example, we are using 3 of them – FadeIn, Transform and FadeOut. All built-in Animation classes in manim accept mobjects as arguments and apply various effects to them. For example, Transform accepts two mobjects and plays out a smooth animation that converts the first one to the other.
Every time you create an animation, you have to wrap it inside the play function so that they are rendered on the screen.
Lastly, we have the constants like RED, BLUE, YELLOW, PI, TAU, etc. These are part of the constants module of Manim and encode commonly-used values as variables and are imported in the first line of the snippet:
By default, all mobjects added to the screen get displayed in the ORIGIN:
>>> ORIGINarray([0., 0., 0.])
Manim uses numpy arrays to represent the screen in x, y, z coordinates. z will stay 0 as long as you are animating in the 2D space. To shift an object a single unit in either x or y direction, you can use constants LEFT, RIGHT, UP and DOWN:
As an example, we will draw four mobjects at different locations on the screen and place a dot at the origin for reference:
Since LEFT, RIGHT, etc. variables are Numpy arrays, they allow numeric operations that allow scaling them like above. There are also other built-in location variables like UL (UP + LEFT), DR (DOWN + RIGHT), etc.:
In the above snippet, we are using the shift method of the mobjects by passing their new coordinate location. Since shift is only a function, the actual shifting does not get animated. To display mobjects that aren’t animated, we use the add method.
What if we wanted to animate that shifting motion? Well, you can chain shift after the animate function like so:
In fact, with animate method, you can animate almost any type of change to a mobject. For example, mobjects have several methods that start with set_* that change their attributes. Here is an example:
Let’s get a bit more serious and learn how to draw functions and animate their creation. From now on, I will be using JupyterLab and its %%manim cell magic to render the manim output. The syntax is the same as the CLI interface.
To draw 2D axes like in Matplotlib, call the Axes class with the desired arguments.
Next, we are using the get_graph method, passing the function we want to draw. This built-in method only accepts single variable functions that return a one-to-one mapping between x and y. In the above example, we draw the graph of sin(1/x).
Optionally, you can place the function’s label at a specific location using get_graph_label:
Finally, we are creating a group of mobjects using the VGroup class. It allows simultaneous animations and transformations on multiple mobjects.
Also, don’t forget to draw each mobject you created. Either use animation functions like Create/Write or use self.add.
You didn’t think I would leave without showing some signature animations of 3B1B, right?
I learned about 3B1B from his Essence of Linear Algebra series, and seeing a linear transformation of space completely blew my mind. The crazy part is that animating it is stupidly easy with Manim:
Similarly, seeing functions graphed in 3D was eye-opening because we are all used to drawing functions on the XY plane. You will realize how beautiful math can be when you look at functions like below:
Hey, how about those non-linear transforms?
Can it get any better than this? Of course, it can!
Though very cool already, what you learned today is only a thin slice of what manim can do. The above animations are only what Grant Sanderson uses in his simple opening scenes.
The library has a steep learning curve when you want to move beyond the built-in mobjects and animation classes. Implementing custom classes can be pretty lengthy, often taking thousands of lines of code for longer videos.
However, this shouldn’t stop you if you genuinely love math and explaining it to others in novel and creative ways.
I apologize for turning this piece into too much of a “how-to” post. That’s just my deep-rooted tendency to over-explain things.
However, I felt that proper explanations were necessary since the Internet was full of outdated tutorials and videos. On top of that, there is that confusion when you accidentally use different versions of manim in a single project.
I strongly recommend going through every page of the documentation of the community version if you want to be a die-hard manim animator. I also suggest you check out channels like this that use Manim and read their source code.
Denial of responsibility! Techno Blender is an automatic aggregator of the all world’s media. In each content, the hyperlink to the primary source is specified. All trademarks belong to their rightful owners, all materials to their authors. If you are the owner of the content and do not want us to publish your materials, please contact us by email – [email protected]. The content will be deleted within 24 hours.