
How to Dockerize Machine Learning Applications Built with H2O, MLflow, FastAPI, and Streamlit | by Kenneth Leung | Jun, 2022
An easy-to-follow guide to containerizing multi-service ML applications with Docker
Given Docker’s impressive capabilities of building, shipping, and running machine learning (ML) applications reliably, it is no surprise that its adoption has exploded and continues to surge within the data science field.
This article explains how to utilize Docker to containerize a multi-service ML application built with H2O AutoML, MLflow, FastAPI, and Streamlit.
Docker is an open-source platform service that lets us build, package, deploy, and run applications readily using containers.
It works by wrapping the application components (i.e., source codes, dependencies, libraries) into a single portable package (aka container).
With containers, anyone using different machines can spin up and run the same application reliably with just a few lines of code.

These containers decouple applications from the underlying infrastructure, allowing teams to deliver software quickly and consistently across different environments.
Here’s a look at the key Docker components of this project:
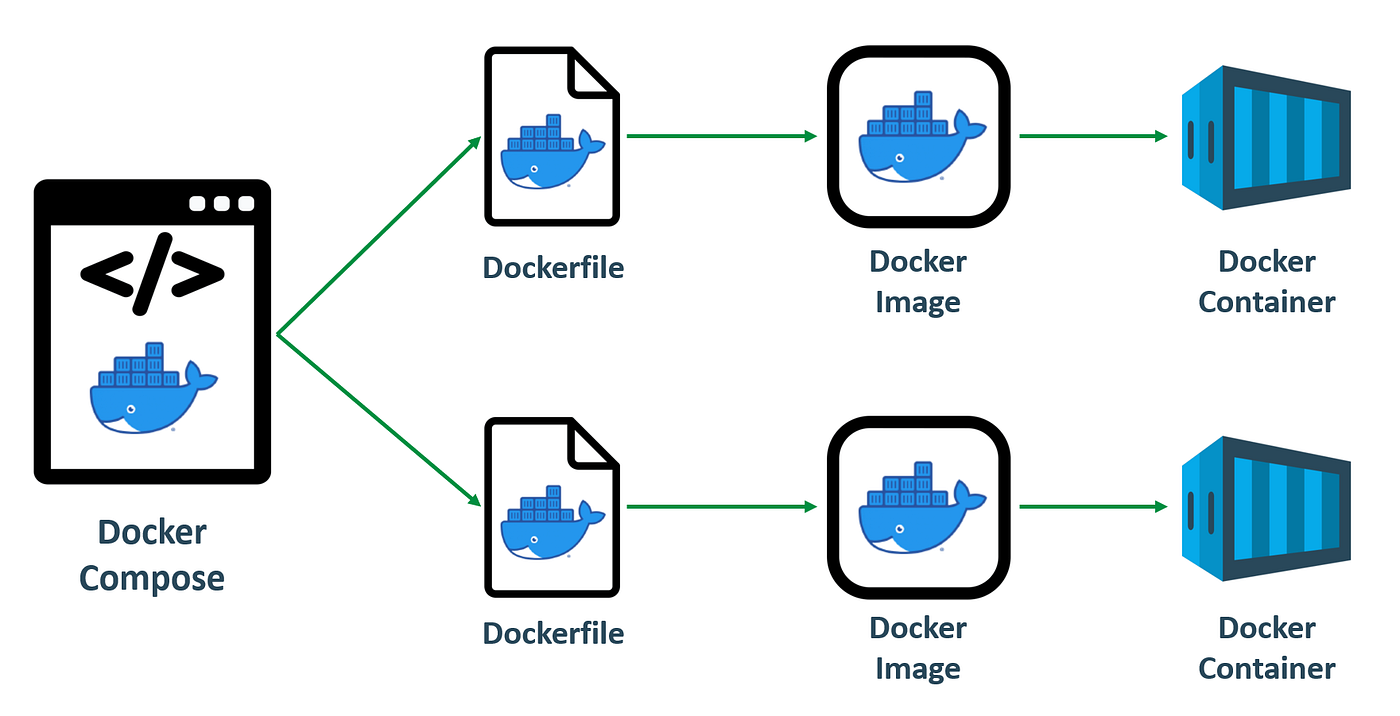
- Dockerfile: A text document with instructions on building a Docker image. It can be viewed as a recipe with specific commands for the Docker Engine to assemble the image, e.g., download requirements, copy files, etc.
- Docker Image: A read-only template that contains the executable source code and the libraries and dependencies that the application needs to run. When you run the Docker image, it generates an instance of the container.
- Docker Container: A live, running instance of a Docker image.
- Docker Compose: A configuration file that defines and orchestrates the building and sharing of multiple containers.
The easiest way to use Docker is with Docker Desktop, which provides a simple user interface to build and share containerized applications.
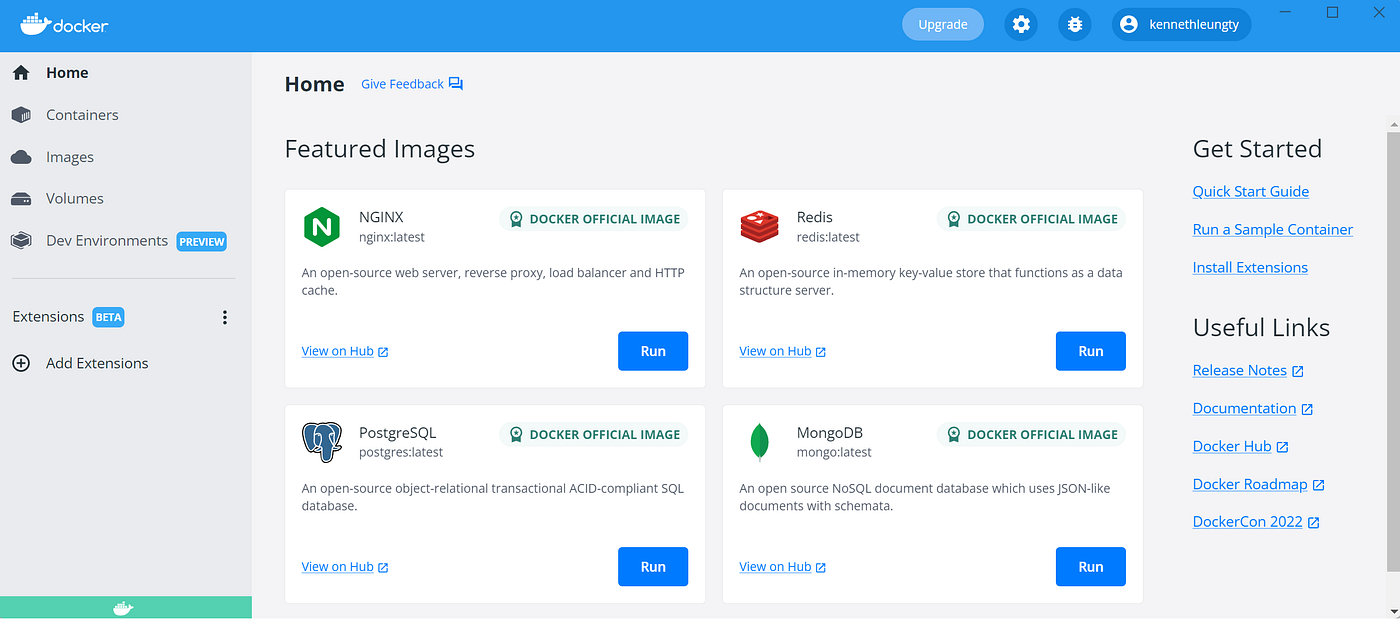
Like how GitHub Desktop simplifies development with Git, Docker Desktop makes it easy for us to work with Docker.
You can install the appropriate Docker Desktop version based on your operating system, i.e., Windows, Mac, or Linux.
The other tools used in this project include:
The application we will be using is based on an earlier project where we built an end-to-end ML pipeline to classify health insurance customers with a high likelihood of buying additional vehicle insurance (i.e., cross-sell).
We will not be going through the pipeline building, so refer to the article above for details.
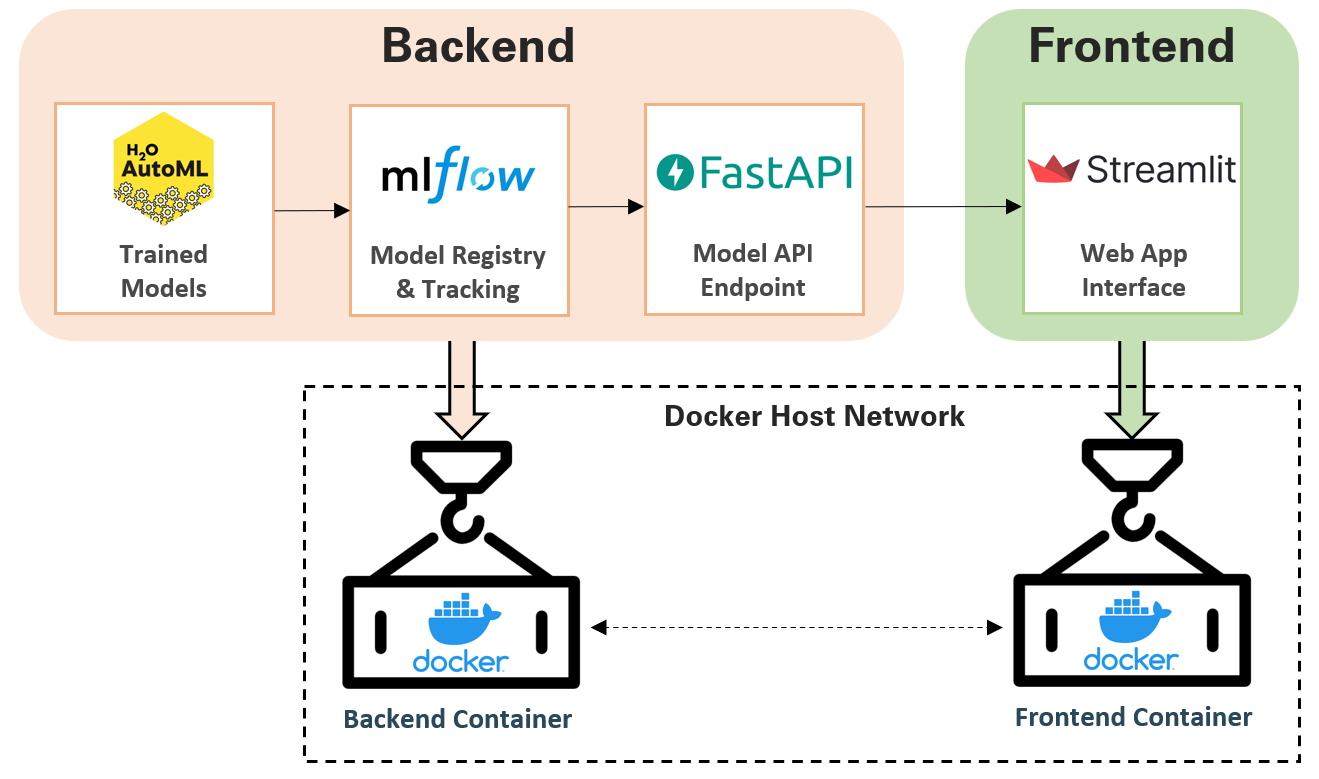
Here is a recap of the components within the application:
- H2O AutoML — Automatically train ML models in a series of experiments
- MLflow — Track results and artifacts of each AutoML experiment and select the best model based on performance metrics
- FastAPI — Deploy and expose the best model (via uvicorn server) as an API endpoint
- Streamlit — Serve API endpoint as a web application with a simple user interface for model prediction requests
The final product is a user-friendly web application where users can upload data and retrieve corresponding cross-sell predictions for each customer.

As illustrated below, the entire application can be segmented into two services (frontend and backend).

At this point, we have the source codes and artifacts for the various components (i.e., pre-trained models, API endpoint, web app interface). Let us learn how to containerize this entire application with Docker.
The application has two parts (i.e., frontend and backend), so we will package them into two separate containers before linking them within the same network.
We start by exploring how to containerize the backend setup. The backend directory structure is as follows:
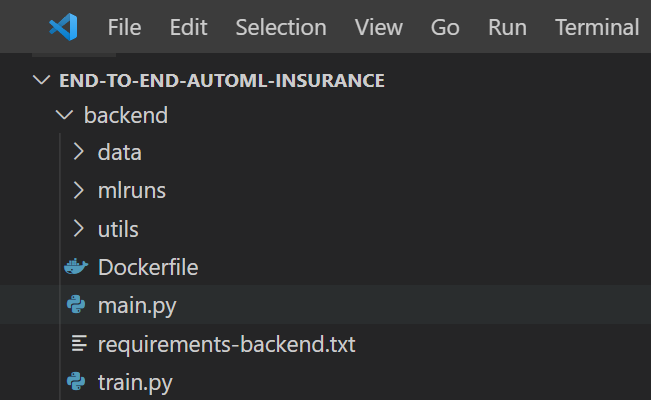
The source code for the backend setup is found within main.py, where it performs the following tasks:
- Initialize instances of FastAPI, H2O, and MLflow client
- Use the MLflow client to load the best H2O ML model (based on log loss) from the collection of pre-trained models stored in
/mlruns - Create a FastAPI POST endpoint that takes and processes uploaded data, feeds it into the ML model, and returns model predictions in JSON format
The first step to dockerizing is to build the Dockerfile, which we will use to create our application’s Docker image and containers.
We will create a Dockerfile specifically for the backend setup and save it in the /backend directory. The Dockerfile for the backend setup is shown below:
Let’s understand the Dockerfile contents:
- FROM python:3.9 — Pulls Python image (v3.9) from Docker Hub and creates the base layer upon which our Docker image is built.
- WORKDIR /app — Defines the working directory of the Docker container
- RUN — Executes a specific command, e.g., installs pip dependencies.
- COPY — Copy files from the source folder (i.e., Docker client’s current directory) into the destination folder
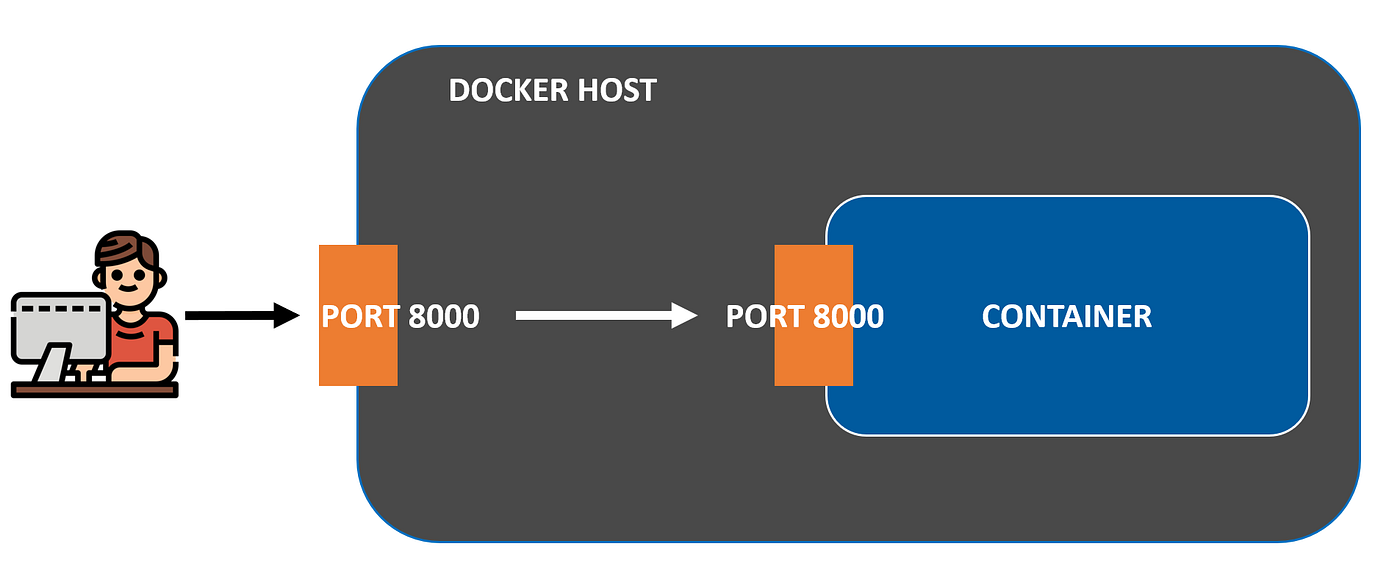
- EXPOSE — Indicates ports on which a container listens for connections
- CMD — Specifies the command to run within the Docker container:
uvicorn main:app --host 0.0.0.0 --port 8000
The command above instructs the machine to initiate and host the uvicorn server at IP address 0.0.0.0 (port 8000) and locate the FastAPI ASGI application in the main.py file (i.e., main:app).
Because the H2O server requires Java, we also need to run the following command to install a Java Runtime Environment (JRE) in our containers.
RUN apt-get update && apt-get install -y default-jre
If the above is not executed, we will encounter the H2OStartupError where the H2O server cannot find Java.
The Dockerfile for our backend setup is now ready. The classic approach to building the Docker image and running the container is with docker build and docker run respectively.
Unless done for testing purposes, I would avoid building the container individually at this stage. The reason is that we will learn in Step 5 how to use Docker Compose to build and run multiple containers concurrently.
Let’s turn our attention to building the frontend interface. The frontend directory structure is as follows:
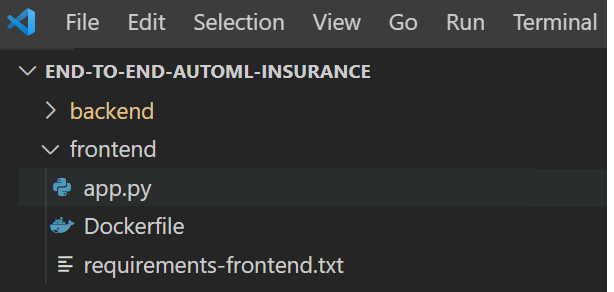
The source code for the frontend setup is found within app.py, where it performs the following tasks:
- Define endpoint location i.e.
endpoint = 'http://host.docker.internal:8000/predict'for the frontend interface to communicate with the backend FastAPI endpoint - Build Streamlit web interface, including the components for CSV file upload, data preview, and prediction download
- Convert CSV data into bytes object to be parsed into FastAPI endpoint
The Dockerfile for the frontend setup is shown below:
While we can build the backend and frontend containers individually, it is not the best way to create an interconnected multi-container application like ours.
We can instead leverage the capabilities of Docker Compose to define and run multi-container applications. Docker Desktop already has the Compose plugin installed, so no additional installation is required.
Docker Compose is defined in a YAML configuration file (docker-compose.yml) specifying the settings and instructions for building the application.

The docker-compose.yml file is shown below:
Let’s understand the contents of the docker-compose file:
- services — Defines the services (i.e., backend and frontend) that make up the application so that they can be run together in an isolated environment
- build — Specifies the folder from which to build the Docker image. Since we are running docker-compose from the root folder, we will specify the subdirectories to build from i.e.
backendorfrontend. For cases where we build directly from the root folder, we can specify. - image — Specifies the image from which to start the service container. Since we are building the image from scratch in the build section (instead of pulling from a registry), the value here will be the name of the new image, e.g., e2e-automl-frontend:latest
- ports — Exposes container ports. This configuration is to map the container port to the host port so that we can access the app via the localhost URL on a web browser. For example,
8501:8501refers to the mapping of host port 8501 to container port 8501 (i.e.HOST:CONTAINER). We have two exposed ports for the backend service, where 8000 is for the FastAPI endpoint while 54321 is for the H2O server.
- volumes — Defines a volume for persisting data generated by Docker containers. It is in the form of
VOLUME:CONTAINER_PATH. For example,./backend:/app/backendrefers to the mounting of volume contents from the relative path ./backend (our backend directory) into /app/backend in the container. - depends_on — Expresses the startup (and shutdown) dependencies between services. In our case, we want the backend service to be created before the frontend service. Therefore we include a depends_on: backend statement inside the frontend service.
- networks — Defines the networks that the containers are attached to, referencing entries under the top-level
networkskey. We make both services communicate with each other by attaching them under the sameproject_networknetwork.
Note: Based on the latest Compose specification, defining the top-level version property (e.g., v2, v3) in the YAML file is no longer necessary.
It is time to execute our docker-compose file to build our multi-service application. We do so by running the following command from the root folder:
docker-compose up -d --build

We can then check Docker Desktop to see if we have indeed successfully built the images for both services and got the application running locally.
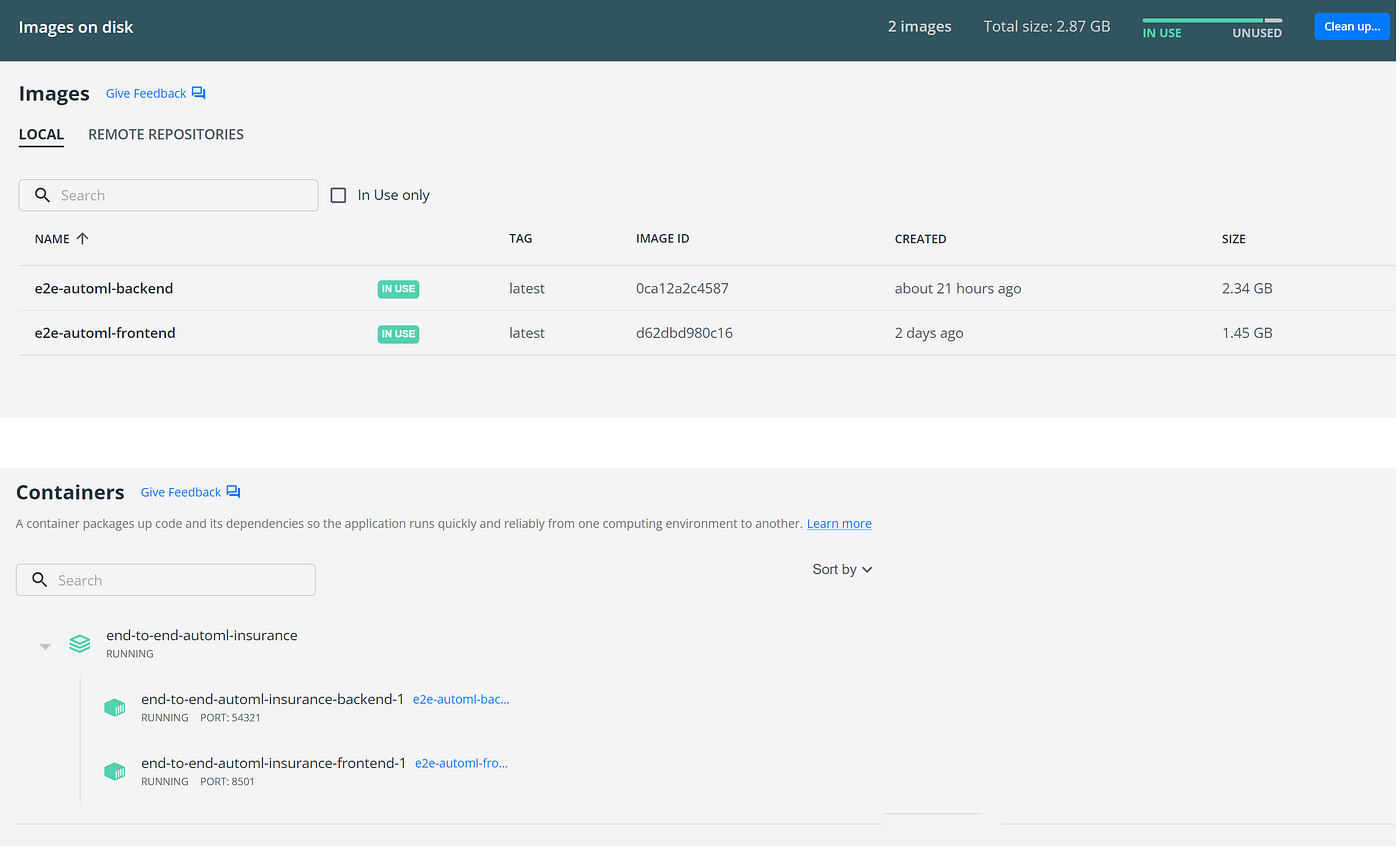
Finally, we can test our application by visiting localhost:8501 on our web browser.

From here, we can also easily stop and remove the containers, networks, volumes, and images by running docker-compose down
Having learned how to dockerize and run our ML application locally, the intuitive next step is to deploy this containerized application on the cloud e.g., AWS.
While I would like to demonstrate this cloud deployment, the Docker documentation already provides a good explanation of Docker container deployment on Amazon ECS.
Nonetheless, I intend to write a guide on the deployment of this project on other cloud platforms soon, so stay tuned to this Medium page!
With the simple walkthrough above, we have learned how to use Docker to containerize a multi-service ML application built on H2O, MLflow, FastAPI, and Streamlit.
You can find the source codes and files of this project in this GitHub repo.
I welcome you to join me on a data science learning journey! Follow this Medium page and check out my GitHub to stay in the loop of more exciting data science content. Meanwhile, have fun dockerizing your ML applications!
An easy-to-follow guide to containerizing multi-service ML applications with Docker
Given Docker’s impressive capabilities of building, shipping, and running machine learning (ML) applications reliably, it is no surprise that its adoption has exploded and continues to surge within the data science field.
This article explains how to utilize Docker to containerize a multi-service ML application built with H2O AutoML, MLflow, FastAPI, and Streamlit.
Docker is an open-source platform service that lets us build, package, deploy, and run applications readily using containers.
It works by wrapping the application components (i.e., source codes, dependencies, libraries) into a single portable package (aka container).
With containers, anyone using different machines can spin up and run the same application reliably with just a few lines of code.
These containers decouple applications from the underlying infrastructure, allowing teams to deliver software quickly and consistently across different environments.
Here’s a look at the key Docker components of this project:
- Dockerfile: A text document with instructions on building a Docker image. It can be viewed as a recipe with specific commands for the Docker Engine to assemble the image, e.g., download requirements, copy files, etc.
- Docker Image: A read-only template that contains the executable source code and the libraries and dependencies that the application needs to run. When you run the Docker image, it generates an instance of the container.
- Docker Container: A live, running instance of a Docker image.
- Docker Compose: A configuration file that defines and orchestrates the building and sharing of multiple containers.
The easiest way to use Docker is with Docker Desktop, which provides a simple user interface to build and share containerized applications.
Like how GitHub Desktop simplifies development with Git, Docker Desktop makes it easy for us to work with Docker.
You can install the appropriate Docker Desktop version based on your operating system, i.e., Windows, Mac, or Linux.
The other tools used in this project include:
The application we will be using is based on an earlier project where we built an end-to-end ML pipeline to classify health insurance customers with a high likelihood of buying additional vehicle insurance (i.e., cross-sell).
We will not be going through the pipeline building, so refer to the article above for details.
Here is a recap of the components within the application:
- H2O AutoML — Automatically train ML models in a series of experiments
- MLflow — Track results and artifacts of each AutoML experiment and select the best model based on performance metrics
- FastAPI — Deploy and expose the best model (via uvicorn server) as an API endpoint
- Streamlit — Serve API endpoint as a web application with a simple user interface for model prediction requests
The final product is a user-friendly web application where users can upload data and retrieve corresponding cross-sell predictions for each customer.
As illustrated below, the entire application can be segmented into two services (frontend and backend).
At this point, we have the source codes and artifacts for the various components (i.e., pre-trained models, API endpoint, web app interface). Let us learn how to containerize this entire application with Docker.
The application has two parts (i.e., frontend and backend), so we will package them into two separate containers before linking them within the same network.
We start by exploring how to containerize the backend setup. The backend directory structure is as follows:
The source code for the backend setup is found within main.py, where it performs the following tasks:
- Initialize instances of FastAPI, H2O, and MLflow client
- Use the MLflow client to load the best H2O ML model (based on log loss) from the collection of pre-trained models stored in
/mlruns - Create a FastAPI POST endpoint that takes and processes uploaded data, feeds it into the ML model, and returns model predictions in JSON format
The first step to dockerizing is to build the Dockerfile, which we will use to create our application’s Docker image and containers.
We will create a Dockerfile specifically for the backend setup and save it in the /backend directory. The Dockerfile for the backend setup is shown below:
Let’s understand the Dockerfile contents:
- FROM python:3.9 — Pulls Python image (v3.9) from Docker Hub and creates the base layer upon which our Docker image is built.
- WORKDIR /app — Defines the working directory of the Docker container
- RUN — Executes a specific command, e.g., installs pip dependencies.
- COPY — Copy files from the source folder (i.e., Docker client’s current directory) into the destination folder
- EXPOSE — Indicates ports on which a container listens for connections
- CMD — Specifies the command to run within the Docker container:
uvicorn main:app --host 0.0.0.0 --port 8000
The command above instructs the machine to initiate and host the uvicorn server at IP address 0.0.0.0 (port 8000) and locate the FastAPI ASGI application in the main.py file (i.e., main:app).
Because the H2O server requires Java, we also need to run the following command to install a Java Runtime Environment (JRE) in our containers.
RUN apt-get update && apt-get install -y default-jre
If the above is not executed, we will encounter the H2OStartupError where the H2O server cannot find Java.
The Dockerfile for our backend setup is now ready. The classic approach to building the Docker image and running the container is with docker build and docker run respectively.
Unless done for testing purposes, I would avoid building the container individually at this stage. The reason is that we will learn in Step 5 how to use Docker Compose to build and run multiple containers concurrently.
Let’s turn our attention to building the frontend interface. The frontend directory structure is as follows:
The source code for the frontend setup is found within app.py, where it performs the following tasks:
- Define endpoint location i.e.
endpoint = 'http://host.docker.internal:8000/predict'for the frontend interface to communicate with the backend FastAPI endpoint - Build Streamlit web interface, including the components for CSV file upload, data preview, and prediction download
- Convert CSV data into bytes object to be parsed into FastAPI endpoint
The Dockerfile for the frontend setup is shown below:
While we can build the backend and frontend containers individually, it is not the best way to create an interconnected multi-container application like ours.
We can instead leverage the capabilities of Docker Compose to define and run multi-container applications. Docker Desktop already has the Compose plugin installed, so no additional installation is required.
Docker Compose is defined in a YAML configuration file (docker-compose.yml) specifying the settings and instructions for building the application.
The docker-compose.yml file is shown below:
Let’s understand the contents of the docker-compose file:
- services — Defines the services (i.e., backend and frontend) that make up the application so that they can be run together in an isolated environment
- build — Specifies the folder from which to build the Docker image. Since we are running docker-compose from the root folder, we will specify the subdirectories to build from i.e.
backendorfrontend. For cases where we build directly from the root folder, we can specify. - image — Specifies the image from which to start the service container. Since we are building the image from scratch in the build section (instead of pulling from a registry), the value here will be the name of the new image, e.g., e2e-automl-frontend:latest
- ports — Exposes container ports. This configuration is to map the container port to the host port so that we can access the app via the localhost URL on a web browser. For example,
8501:8501refers to the mapping of host port 8501 to container port 8501 (i.e.HOST:CONTAINER). We have two exposed ports for the backend service, where 8000 is for the FastAPI endpoint while 54321 is for the H2O server.
- volumes — Defines a volume for persisting data generated by Docker containers. It is in the form of
VOLUME:CONTAINER_PATH. For example,./backend:/app/backendrefers to the mounting of volume contents from the relative path ./backend (our backend directory) into /app/backend in the container. - depends_on — Expresses the startup (and shutdown) dependencies between services. In our case, we want the backend service to be created before the frontend service. Therefore we include a depends_on: backend statement inside the frontend service.
- networks — Defines the networks that the containers are attached to, referencing entries under the top-level
networkskey. We make both services communicate with each other by attaching them under the sameproject_networknetwork.
Note: Based on the latest Compose specification, defining the top-level version property (e.g., v2, v3) in the YAML file is no longer necessary.
It is time to execute our docker-compose file to build our multi-service application. We do so by running the following command from the root folder:
docker-compose up -d --build
We can then check Docker Desktop to see if we have indeed successfully built the images for both services and got the application running locally.
Finally, we can test our application by visiting localhost:8501 on our web browser.
From here, we can also easily stop and remove the containers, networks, volumes, and images by running docker-compose down
Having learned how to dockerize and run our ML application locally, the intuitive next step is to deploy this containerized application on the cloud e.g., AWS.
While I would like to demonstrate this cloud deployment, the Docker documentation already provides a good explanation of Docker container deployment on Amazon ECS.
Nonetheless, I intend to write a guide on the deployment of this project on other cloud platforms soon, so stay tuned to this Medium page!
With the simple walkthrough above, we have learned how to use Docker to containerize a multi-service ML application built on H2O, MLflow, FastAPI, and Streamlit.
You can find the source codes and files of this project in this GitHub repo.
I welcome you to join me on a data science learning journey! Follow this Medium page and check out my GitHub to stay in the loop of more exciting data science content. Meanwhile, have fun dockerizing your ML applications!
Denial of responsibility! Techno Blender is an automatic aggregator of the all world’s media. In each content, the hyperlink to the primary source is specified. All trademarks belong to their rightful owners, all materials to their authors. If you are the owner of the content and do not want us to publish your materials, please contact us by email – [email protected]. The content will be deleted within 24 hours.