
How to Schedule Jupyter Notebooks In Amazon SageMaker | by Rhys Kilian | Jul, 2022
A step-by-step guide to regularly running Jupyter Notebooks using AWS services
Your manager asks, “Can you rerun this analysis for me next week?”. No worries: you set a reminder to rerun it manually.
The following week comes, and you rerun the analysis. This time your manager says, “This is great. Can you send it to me weekly?” That’s annoying. You don’t like the idea of opening your Jupyter Notebook, running it, and saving the results to S3 weekly. It’s time-consuming, and you’ve got more valuable tasks on your to-do list.
This article is a how-to guide for scheduling Jupyter Notebooks in Amazon SageMaker. These are the steps I used to automate a time-series forecasting notebook (more details in this article) at Movember to run every day.
I will show you how to schedule your Jupyter Notebooks using AWS services. I will assume your data is accessible online (e.g. S3, GitHub), and you will save it to a similar location. The Jupyter Notebook will run on an Amazon SageMaker Notebook instance. A lifecycle configuration will control the Notebook instance by specifying the conda environment and implementing the autostop functionality. Finally, we trigger the Notebook Instance on a fixed schedule using AWS Lambda and Amazon EventBridge.
Our architecture will look something like this.

You’ll see we’re using only AWS services. Third-party options, such as JetBrains, are available, but it may be more cost-effective to do it yourself.
We will work with the JHU CSSE COVID-19 Data [1], which gives the cumulative daily number of cases of COVID-19 by state and country. In our scenario, we imagine our manager has asked us to create a line plot of the daily cumulative cases for states in Australia in the past year. Our plot should be accessible in S3 in a PNG format and look like the image below.

We will run our Jupyter Notebook app in an Amazon SageMaker Notebook Instance. This service provides a fully managed cloud notebook, pre-loaded with libraries required to perform your data science tasks.
Start by creating a new notebook instance in the SageMaker console.

We create an ml.t3.medium instance using Jupyter Lab 3. I also make a new IAM role which will give access to all S3 buckets on my account.

After creating your notebook instance, you can start it in the SageMaker console and open Jupyter Lab. I will use the python3 conda environment kernel, which comes pre-installed with the basic libraries you need to perform the tutorial. You should read the documentation if you need to install external libraries in your environment.
We then create our analysis.ipynb Jupyter Notebook in our environment. The notebook uses pandas to read and process the CSV file from GitHub. We then plot our COVID-19 data using pandas and matplotlib and export the resulting PNG file to our S3 bucket.
The code in our example looks like this.
You can also find the example on GitHub.
A lifecycle configuration is a shell script we add to our SageMaker Notebook instance to install packages, select our conda environment and autostop our notebook to prevent overbilling.
Start by adding a new configuration for your notebook instance.
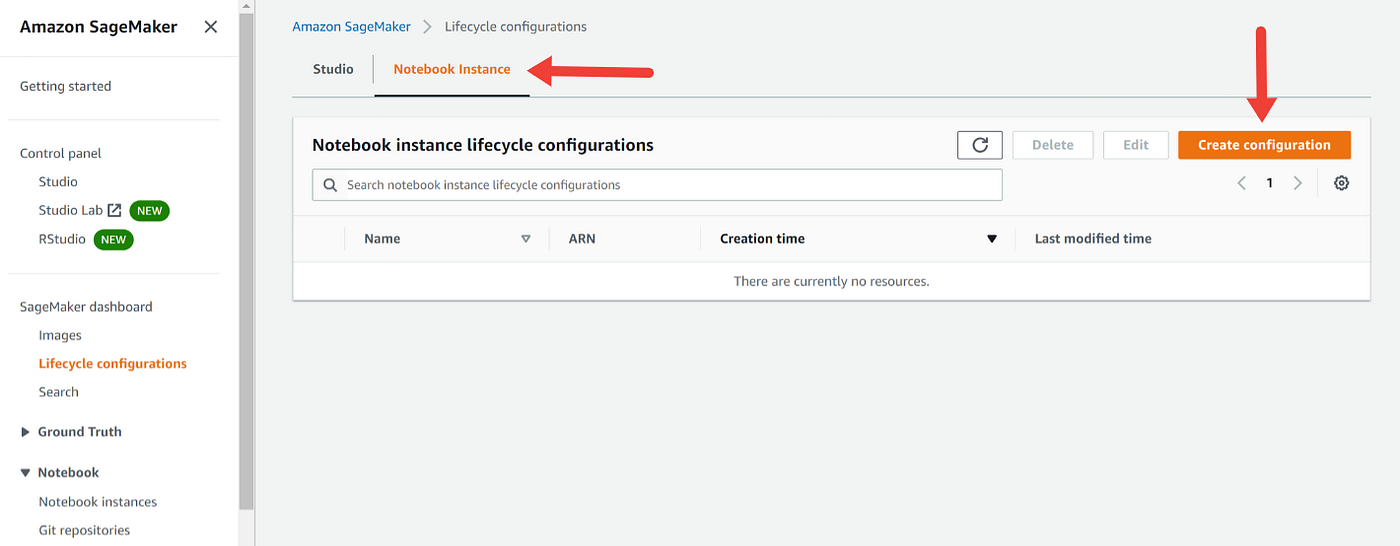
We will call our configuration schedule-configuration and include the below script. Our script activates the python3 conda environment and loads the commands to autostop our notebook instance after 5-minutes of being idle. This GitHub repo provided by Amazon hosts several sample lifecycle configuration scripts which you can use to customise your notebook instance.

set -esudo -u ec2-user -i <<'EOF'# PARAMETERS
ENVIRONMENT=python3
NOTEBOOK_FILE=/home/ec2-user/SageMaker/analysis.ipynbecho "Activating conda env"
source /home/ec2-user/anaconda3/bin/activate "$ENVIRONMENT"echo "Starting notebook"
jupyter nbconvert "$NOTEBOOK_FILE" --ExecutePreprocessor.kernel_name=python --execute --to notebookecho "Dectivating conda env"
source /home/ec2-user/anaconda3/bin/deactivate# PARAMETERS
IDLE_TIME=300echo "Fetching the autostop script"
wget https://raw.githubusercontent.com/aws-samples/amazon-sagemaker-notebook-instance-lifecycle-config-samples/master/scripts/auto-stop-idle/autostop.pyecho "Detecting Python install with boto3 install"# Find which install has boto3 and use that to run the cron command. So will use default when available
# Redirect stderr as it is unneeded
if /usr/bin/python -c "import boto3" 2>/dev/null; then
PYTHON_DIR='/usr/bin/python'
elif /usr/bin/python3 -c "import boto3" 2>/dev/null; then
PYTHON_DIR='/usr/bin/python3'
else
# If no boto3 just quit because the script won't work
echo "No boto3 found in Python or Python3. Exiting..."
exit 1
fiecho "Found boto3 at $PYTHON_DIR"echo "Starting the SageMaker autostop script in cron"(crontab -l 2>/dev/null; echo "*/5 * * * * $PYTHON_DIR $PWD/autostop.py --time $IDLE_TIME --ignore-connections >> /var/log/jupyter.log") | crontab -EOF
Once you’ve saved your lifecycle configuration, navigate to your notebook instance and press ‘Edit’.

Add your lifecycle configuration and save. Starting your notebook instance will load the python3 environment and trigger the autostop functionality after 5-minutes of idle.

Running our SageMaker notebook on a fixed schedule will be achieved using Amazon EventBridge and AWS Lambda. Amazon EventBridge is an event service that will trigger an AWS Lambda function that starts our SageMaker Notebook instance.
Firstly, start by creating a new Lambda function.

We will call our function launch_jupyter_nb and choose to write it in Python 3.9.

After saving, we add the boto3 commands to start our SageMaker Notebook instance. You can find the code below. Press ‘Deploy’ when complete.

import boto3
import logging
def lambda_handler(event, context):
client = boto3.client('sagemaker')
client.start_notebook_instance(NotebookInstanceName='sagemaker-schedule')
return 0
We also need to give our Lambda function permission to access our SageMaker Notebook instance. Navigate to the ‘Configuration’ tab and click on the current role.

Clicking the role will direct you to IAM. Here, you should attach the ‘AmazonSageMakerFullAccess’ policy.

Back in AWS Lambda, under ‘Function overview’, add a trigger to your function. We will add an EventBridge trigger called launch_jupyter_nb, which runs on a fixed schedule. We specify the schedule using a Cron expression. In our example, the EventBridge trigger will run daily at 03:00 UTC.
cron(0 3 * * ? *)

We’re done! Our Jupyter Notebook, hosted in a SageMaker Notebook instance, will run on a fixed schedule because of Amazon EventBridge and AWS Lambda. Once the notebook is finished running and is idle for 5-minutes, our lifecycle configuration will turn off the Notebook instance.
You should be aware of two important considerations when scheduling your Jupyter Notebook. Firstly, the lifecycle configuration we created cannot run longer than 5-minutes. Otherwise, it will fail. According to the documentation, you can overcome this limitation by:
- Reducing the number of steps
- Running tasks in parallel
- Using the nohup command in your script
Secondly, the tutorial has shown you how to schedule notebooks in SageMaker Notebook instances rather than Sagemaker Studio notebooks. You can modify the steps above to work with Studio notebooks by adjusting the lifecycle configuration and referring to the boto3 documentation.
A step-by-step guide to regularly running Jupyter Notebooks using AWS services
Your manager asks, “Can you rerun this analysis for me next week?”. No worries: you set a reminder to rerun it manually.
The following week comes, and you rerun the analysis. This time your manager says, “This is great. Can you send it to me weekly?” That’s annoying. You don’t like the idea of opening your Jupyter Notebook, running it, and saving the results to S3 weekly. It’s time-consuming, and you’ve got more valuable tasks on your to-do list.
This article is a how-to guide for scheduling Jupyter Notebooks in Amazon SageMaker. These are the steps I used to automate a time-series forecasting notebook (more details in this article) at Movember to run every day.
I will show you how to schedule your Jupyter Notebooks using AWS services. I will assume your data is accessible online (e.g. S3, GitHub), and you will save it to a similar location. The Jupyter Notebook will run on an Amazon SageMaker Notebook instance. A lifecycle configuration will control the Notebook instance by specifying the conda environment and implementing the autostop functionality. Finally, we trigger the Notebook Instance on a fixed schedule using AWS Lambda and Amazon EventBridge.
Our architecture will look something like this.
You’ll see we’re using only AWS services. Third-party options, such as JetBrains, are available, but it may be more cost-effective to do it yourself.
We will work with the JHU CSSE COVID-19 Data [1], which gives the cumulative daily number of cases of COVID-19 by state and country. In our scenario, we imagine our manager has asked us to create a line plot of the daily cumulative cases for states in Australia in the past year. Our plot should be accessible in S3 in a PNG format and look like the image below.
We will run our Jupyter Notebook app in an Amazon SageMaker Notebook Instance. This service provides a fully managed cloud notebook, pre-loaded with libraries required to perform your data science tasks.
Start by creating a new notebook instance in the SageMaker console.
We create an ml.t3.medium instance using Jupyter Lab 3. I also make a new IAM role which will give access to all S3 buckets on my account.
After creating your notebook instance, you can start it in the SageMaker console and open Jupyter Lab. I will use the python3 conda environment kernel, which comes pre-installed with the basic libraries you need to perform the tutorial. You should read the documentation if you need to install external libraries in your environment.
We then create our analysis.ipynb Jupyter Notebook in our environment. The notebook uses pandas to read and process the CSV file from GitHub. We then plot our COVID-19 data using pandas and matplotlib and export the resulting PNG file to our S3 bucket.
The code in our example looks like this.
You can also find the example on GitHub.
A lifecycle configuration is a shell script we add to our SageMaker Notebook instance to install packages, select our conda environment and autostop our notebook to prevent overbilling.
Start by adding a new configuration for your notebook instance.
We will call our configuration schedule-configuration and include the below script. Our script activates the python3 conda environment and loads the commands to autostop our notebook instance after 5-minutes of being idle. This GitHub repo provided by Amazon hosts several sample lifecycle configuration scripts which you can use to customise your notebook instance.
set -esudo -u ec2-user -i <<'EOF'# PARAMETERS
ENVIRONMENT=python3
NOTEBOOK_FILE=/home/ec2-user/SageMaker/analysis.ipynbecho "Activating conda env"
source /home/ec2-user/anaconda3/bin/activate "$ENVIRONMENT"echo "Starting notebook"
jupyter nbconvert "$NOTEBOOK_FILE" --ExecutePreprocessor.kernel_name=python --execute --to notebookecho "Dectivating conda env"
source /home/ec2-user/anaconda3/bin/deactivate# PARAMETERS
IDLE_TIME=300echo "Fetching the autostop script"
wget https://raw.githubusercontent.com/aws-samples/amazon-sagemaker-notebook-instance-lifecycle-config-samples/master/scripts/auto-stop-idle/autostop.pyecho "Detecting Python install with boto3 install"# Find which install has boto3 and use that to run the cron command. So will use default when available
# Redirect stderr as it is unneeded
if /usr/bin/python -c "import boto3" 2>/dev/null; then
PYTHON_DIR='/usr/bin/python'
elif /usr/bin/python3 -c "import boto3" 2>/dev/null; then
PYTHON_DIR='/usr/bin/python3'
else
# If no boto3 just quit because the script won't work
echo "No boto3 found in Python or Python3. Exiting..."
exit 1
fiecho "Found boto3 at $PYTHON_DIR"echo "Starting the SageMaker autostop script in cron"(crontab -l 2>/dev/null; echo "*/5 * * * * $PYTHON_DIR $PWD/autostop.py --time $IDLE_TIME --ignore-connections >> /var/log/jupyter.log") | crontab -EOF
Once you’ve saved your lifecycle configuration, navigate to your notebook instance and press ‘Edit’.
Add your lifecycle configuration and save. Starting your notebook instance will load the python3 environment and trigger the autostop functionality after 5-minutes of idle.
Running our SageMaker notebook on a fixed schedule will be achieved using Amazon EventBridge and AWS Lambda. Amazon EventBridge is an event service that will trigger an AWS Lambda function that starts our SageMaker Notebook instance.
Firstly, start by creating a new Lambda function.
We will call our function launch_jupyter_nb and choose to write it in Python 3.9.
After saving, we add the boto3 commands to start our SageMaker Notebook instance. You can find the code below. Press ‘Deploy’ when complete.
import boto3
import logging
def lambda_handler(event, context):
client = boto3.client('sagemaker')
client.start_notebook_instance(NotebookInstanceName='sagemaker-schedule')
return 0
We also need to give our Lambda function permission to access our SageMaker Notebook instance. Navigate to the ‘Configuration’ tab and click on the current role.
Clicking the role will direct you to IAM. Here, you should attach the ‘AmazonSageMakerFullAccess’ policy.
Back in AWS Lambda, under ‘Function overview’, add a trigger to your function. We will add an EventBridge trigger called launch_jupyter_nb, which runs on a fixed schedule. We specify the schedule using a Cron expression. In our example, the EventBridge trigger will run daily at 03:00 UTC.
cron(0 3 * * ? *)
We’re done! Our Jupyter Notebook, hosted in a SageMaker Notebook instance, will run on a fixed schedule because of Amazon EventBridge and AWS Lambda. Once the notebook is finished running and is idle for 5-minutes, our lifecycle configuration will turn off the Notebook instance.
You should be aware of two important considerations when scheduling your Jupyter Notebook. Firstly, the lifecycle configuration we created cannot run longer than 5-minutes. Otherwise, it will fail. According to the documentation, you can overcome this limitation by:
- Reducing the number of steps
- Running tasks in parallel
- Using the nohup command in your script
Secondly, the tutorial has shown you how to schedule notebooks in SageMaker Notebook instances rather than Sagemaker Studio notebooks. You can modify the steps above to work with Studio notebooks by adjusting the lifecycle configuration and referring to the boto3 documentation.
Denial of responsibility! Techno Blender is an automatic aggregator of the all world’s media. In each content, the hyperlink to the primary source is specified. All trademarks belong to their rightful owners, all materials to their authors. If you are the owner of the content and do not want us to publish your materials, please contact us by email – [email protected]. The content will be deleted within 24 hours.