
How to Use LLMs in Unity
Integrating Large Language Models in the Unity engine with LLMUnity
In this article we show how we can use LLMs (Large Language Models) within the Unity engine 🎮. We will use the LLMUnity package and see some examples on how to setup conversation interactions with only a few lines of code!
Disclaimer: I am the author of LLMUnity. Let me know if you have any comments / suggestions by opening a GitHub issue 🤗!
Why use LLMs in games?
At the moment almost all PC game interactions are based on multiple-choice conversations. This is a very primitive type of interaction established since the early era of PC games. LLMs in games can build a more immersive experience as they can allow an intelligent interaction with a PC game element or character (NPC).
Take for example Skyrim, one of the most successful RPGs out there. When you first meet Lydia, an NPC that you may spend a large part of the game together as companions, you have three possible dialogue options. What if you want to learn more about her or discuss other things?

This is where LLMs can shine. You can describe the role of the AI and their knowledge of the world (that you already have as part of the game narrative) and they can elevate the conversation.

What about ChatGPT?
Most people landing on this page will have familiarity with ChatGPT released by OpenAI, and will have witnessed how natural and powerful the interaction with an LLM is. Then why not directly use ChatGPT in games?
- ChatGPT use at scale costs 💸 . Each interaction has a tiny cost but when done at scale, for thousands of users with thousands of interactions each, the cost is not negligible.
- It creates a dependency 🔗. If for any reason ChatGPT stops working or the prices increase and the developer can’t afford it any more, the game will be broken.
- Open-source LLMs have on-par accuracy to ChatGPT 🏎️. I haven’t found a standarized benchmark to prove this, but the models released by Meta (Llama) and Mistral seem to have similar accuracy to ChatGPT qualitatively.
- LLMs are getting smaller and smaller in size 🤏. The recent Mistral 7B beats Llama2 13B and outperforms Llama 34B on many benchmarks. Quantization methods further push this limit by reducing the model size to an extent that they can be used on any recent PC and GPU. Mistral 7B quantized with the Q4_K_M method (model, quantization) requires at most 7GB RAM to run!
Welcome LLMUnity!
LLMUnity is a package that allows to run and distribute LLM models in the Unity engine.

It is is built on top of the awesome llama.cpp library that enables to use LLMs without external software dependencies, and llamafile that deploys llama.cpp in a cross-platform manner.
LLMUnity offers the following functionality:
- 💻 Cross-platform! Supports Windows, Linux and macOS
- 🏠 Runs locally without internet access but also supports remote servers
- ⚡ Fast inference on CPU and GPU
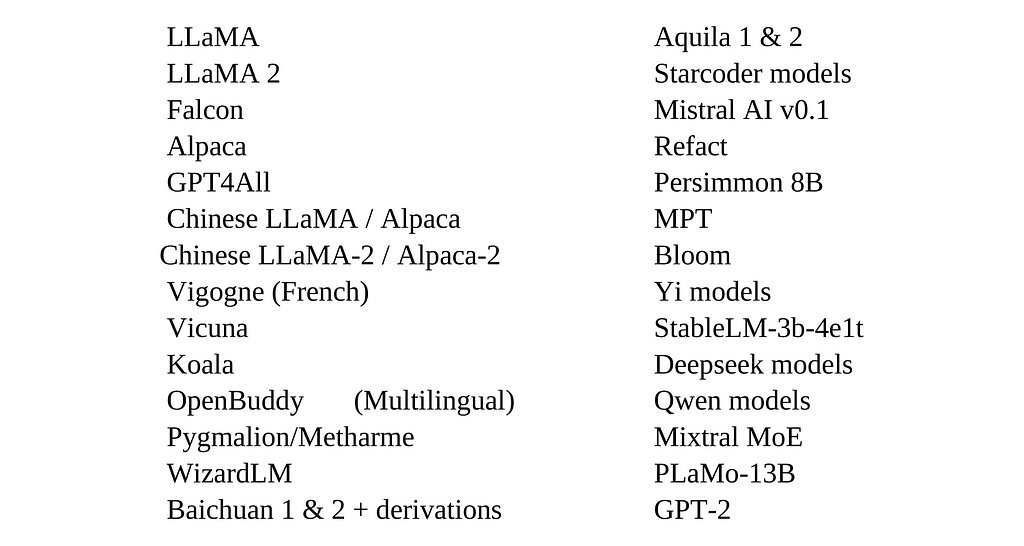
- 🤗 Support of the major LLM models
- 🔧 Easy to setup, call with a single line code
- 💰 Free to use for both personal and commercial purposes
How it works

LLMUnity uses a llama.cpp server under the hood. The server receives POST requests, runs inference on the LLM and returns the reply. The server is compiled into an executable by llamafile and can be used across different OSes (Windows, Linux, MacOS) based on the cosmopolitan library.
LLMUnity implements a client that sends the POST requests and passes the result to your Unity application.
How to setup
The LLMUnity package can be installed as a custom package using the GitHub URL or as a Unity asset (pending approval from the asset store). Instructions are provided here 🛠️.
The developer can create a LLM or a LLMClient object to use the LLM functionality. The LLMClient class handles only the client functionality, while the LLM class inherits the LLMClient class and additionally handles the server functionality.
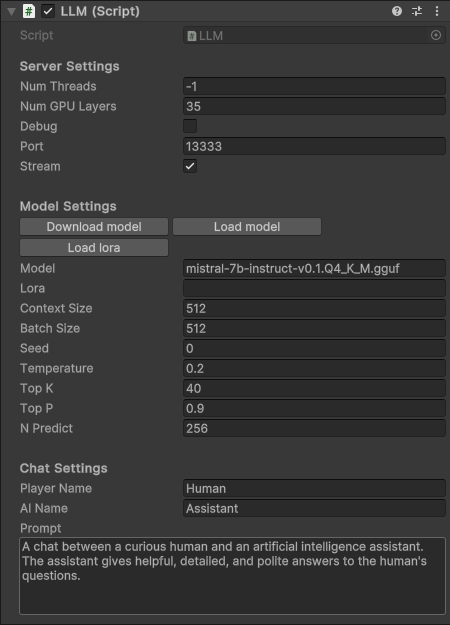
The developer can then specify the LLMClient / LLM properties:
- prompt. This specifies the role of the AI.
- player / AI name (optional). The player and AI name can be defined for the characters.
- streaming functionality (optional). The streaming functionality allows the Unity application to receive the output as it is produced by the model in real-time. If disabled, the Unity application will receive the reply by the model when it is fully produced.
- other model options (optional). There are more model options that can be specified by expert users used directly by the llama.cpp server.
and additionally the LLM only properties:
- model. This specifies which LLM to use. The Mistral 7B Instruct v0.2 model quantized by TheBloke can be downloaded as the default model directly within the Unity Inspector. Otherwise, any LLM supported by llama.cpp can be loaded. llama.cpp uses the gguf format and provides a conversion script for HuggingFace models. If you want to avoid installing llama.cpp and doing the conversion yourself, you can use models already converted by TheBloke 💣.
- running resources (optional). You can specify the number of CPU threads that can be used by the user application and/or the number of model layers that will be run by the GPU. If the user’s GPU is not supported, the CPU will be used instead.
Unless you want to get your hands dirty, you can simply press “Download model” and define the prompt 😌!
How to use
Now let’s get to the fun part 🎢!
LLMUnity is written so that it can be used with minimal code. All you have to do is construct a LLM object and then interact with it with:
_ = llm.Chat(message, HandleReply, ReplyCompleted);
where:
- message: a string object that contains the user input
- HandleReply : method that takes as input the model reply as string type. In this function you specify how to handle the reply. If the streaming functionality is enabled (default behavior), this function will receive the real-time reply as it is being produced by the model, otherwise it will receive the entire reply once.
- ReplyCompleted (optional): method with no arguments. This function is called when the model has finished producing the reply.
Basic functionality
A minimal example is shown below🚂. Here we send a message “Hello bot!” and display the reply by the model in the console:
using UnityEngine;
using LLMUnity;

public class MyGame : MonoBehaviour{
  public LLM llm;

  void HandleReply(string reply){
    Debug.Log(reply);
  }

  void Start(){
    _ = llm.Chat("Hello bot!", HandleReply);
  }
}
The Chat function of the LLM is called and the reply is received asynchronously when it is completed (in a streaming or not streaming fashion) by the HandleReply function.
To create the application in Unity, you then need to create a scene with:
- a GameObject for the LLM script. The properties of the LLM object are exposed in the Unity Inspector and can be setup as described in the previous section.
- a GameObject for your MyGame script. Here, you will link the LLM GameObject created above in the llm property in the Unity Inspector.
And … that’s all ✨!
Simple interaction
Now let’s see an example demonstrating a basic interaction:

Here we have a scene with:
- a GameObject for the LLM script (as before)
- a GameObject for the SimpleInteraction script
- an InputField (in green) that allows the user to enter text
- a Text field (in blue) that gets the reply from the model
The SimpleInteraction script can be implemented as follows:
using UnityEngine;
using LLMUnity;
using UnityEngine.UI;

public class SimpleInteraction : MonoBehaviour
{
    public LLM llm;
    public InputField playerText;
    public Text AIText;

    void Start()
    {
        playerText.onSubmit.AddListener(onInputFieldSubmit);
        playerText.Select();
    }

    void onInputFieldSubmit(string message)
    {
        playerText.interactable = false;
        AIText.text = "...";
        _ = llm.Chat(message, SetAIText, AIReplyComplete);
    }

    public void SetAIText(string text)
    {
       AIText.text = text;
    }

    public void AIReplyComplete()
    {
        playerText.interactable = true;
        playerText.Select();
        playerText.text = "";
    }
}
The script defines the following functions:
- Start: the playerText input field is selected when the scene starts so that the user can enter text. A listener is attached to the playerText that calls the onInputFieldSubmit function when the text is submitted.
- onInputFieldSubmit : when the input is submitted by the user, the playerText is disabled until the model replies. The model output field AIText is emptied and then the LLM chat function is called.
- SetAIText : this function is called when the model produces some reply and sets the AIText text to the reply content.
- AIReplyComplete : this function is called when the model has finished the reply. The playerText is again enabled and emptied so that the player can enter the next input.
As simple as this, we can have fully-fledged LLM interaction (fully-fledged, not beautiful I know 🙃). You can find this example in the SimpleInteraction sample.
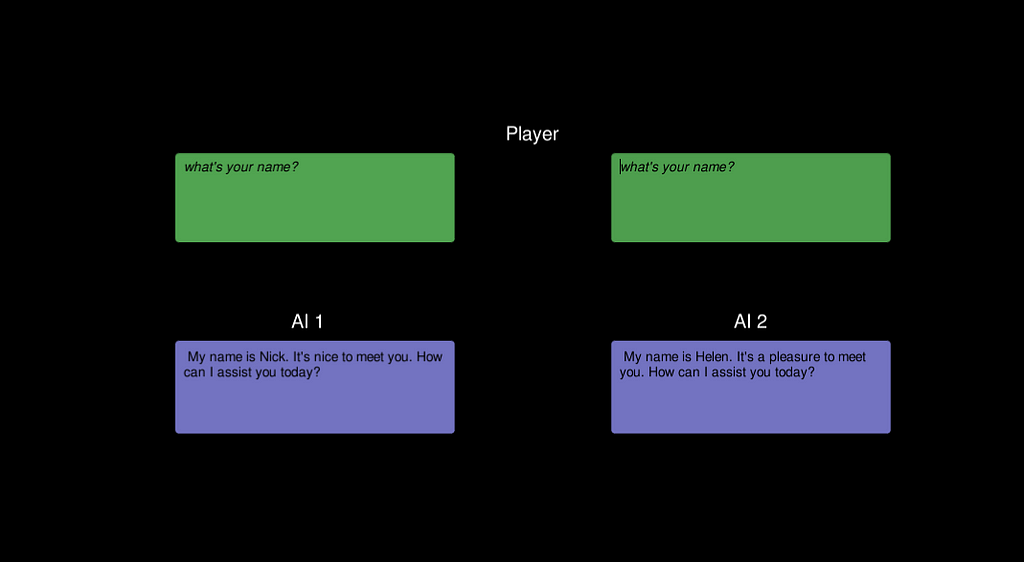
Multiple AI functionality
So far we have seen the interaction with a single AI. In practice we will have more than one NPCs in a game 🤖. The solution to this is to create one LLM object as above that handles the server but have additional LLMClient objects to define additional behaviors for the AIs using different prompts.
An example sample showcasing this functionality can be found in the ServerClient sample. This is an extension of the code above that uses a LLM object for the first AI and a LLMClient object with a different prompt for the second AI (using the same server as the first AI).
Chatbot
The final step in creating something more game-like is to enhance the UI aspects as you would like to have them in your game 🏰. I won’t go into more details here because it is outside of the LLM integration scope. If you are interested in a more complex UI you can look into the ChatBot sample, that creates a more pleasing interaction similar to a messaging app.

The end
That’s all! In this guide we have seen how to integrate LLMs in Unity using the LLMUnity package along with some practical examples. I hope you have found it useful! Feel free to send me any questions / comments / suggestions you have to improve this article or the LLMUnity package 🙏.
Note: Unless otherwise stated, all images are created by the author.
How to Use LLMs in Unity was originally published in Towards Data Science on Medium, where people are continuing the conversation by highlighting and responding to this story.
Integrating Large Language Models in the Unity engine with LLMUnity

In this article we show how we can use LLMs (Large Language Models) within the Unity engine 🎮. We will use the LLMUnity package and see some examples on how to setup conversation interactions with only a few lines of code!
Disclaimer: I am the author of LLMUnity. Let me know if you have any comments / suggestions by opening a GitHub issue 🤗!
Why use LLMs in games?
At the moment almost all PC game interactions are based on multiple-choice conversations. This is a very primitive type of interaction established since the early era of PC games. LLMs in games can build a more immersive experience as they can allow an intelligent interaction with a PC game element or character (NPC).
Take for example Skyrim, one of the most successful RPGs out there. When you first meet Lydia, an NPC that you may spend a large part of the game together as companions, you have three possible dialogue options. What if you want to learn more about her or discuss other things?
This is where LLMs can shine. You can describe the role of the AI and their knowledge of the world (that you already have as part of the game narrative) and they can elevate the conversation.
What about ChatGPT?
Most people landing on this page will have familiarity with ChatGPT released by OpenAI, and will have witnessed how natural and powerful the interaction with an LLM is. Then why not directly use ChatGPT in games?
- ChatGPT use at scale costs 💸 . Each interaction has a tiny cost but when done at scale, for thousands of users with thousands of interactions each, the cost is not negligible.
- It creates a dependency 🔗. If for any reason ChatGPT stops working or the prices increase and the developer can’t afford it any more, the game will be broken.
- Open-source LLMs have on-par accuracy to ChatGPT 🏎️. I haven’t found a standarized benchmark to prove this, but the models released by Meta (Llama) and Mistral seem to have similar accuracy to ChatGPT qualitatively.
- LLMs are getting smaller and smaller in size 🤏. The recent Mistral 7B beats Llama2 13B and outperforms Llama 34B on many benchmarks. Quantization methods further push this limit by reducing the model size to an extent that they can be used on any recent PC and GPU. Mistral 7B quantized with the Q4_K_M method (model, quantization) requires at most 7GB RAM to run!
Welcome LLMUnity!
LLMUnity is a package that allows to run and distribute LLM models in the Unity engine.
It is is built on top of the awesome llama.cpp library that enables to use LLMs without external software dependencies, and llamafile that deploys llama.cpp in a cross-platform manner.
LLMUnity offers the following functionality:
- 💻 Cross-platform! Supports Windows, Linux and macOS
- 🏠 Runs locally without internet access but also supports remote servers
- ⚡ Fast inference on CPU and GPU
- 🤗 Support of the major LLM models
- 🔧 Easy to setup, call with a single line code
- 💰 Free to use for both personal and commercial purposes
How it works
LLMUnity uses a llama.cpp server under the hood. The server receives POST requests, runs inference on the LLM and returns the reply. The server is compiled into an executable by llamafile and can be used across different OSes (Windows, Linux, MacOS) based on the cosmopolitan library.
LLMUnity implements a client that sends the POST requests and passes the result to your Unity application.
How to setup
The LLMUnity package can be installed as a custom package using the GitHub URL or as a Unity asset (pending approval from the asset store). Instructions are provided here 🛠️.
The developer can create a LLM or a LLMClient object to use the LLM functionality. The LLMClient class handles only the client functionality, while the LLM class inherits the LLMClient class and additionally handles the server functionality.
The developer can then specify the LLMClient / LLM properties:
- prompt. This specifies the role of the AI.
- player / AI name (optional). The player and AI name can be defined for the characters.
- streaming functionality (optional). The streaming functionality allows the Unity application to receive the output as it is produced by the model in real-time. If disabled, the Unity application will receive the reply by the model when it is fully produced.
- other model options (optional). There are more model options that can be specified by expert users used directly by the llama.cpp server.
and additionally the LLM only properties:
- model. This specifies which LLM to use. The Mistral 7B Instruct v0.2 model quantized by TheBloke can be downloaded as the default model directly within the Unity Inspector. Otherwise, any LLM supported by llama.cpp can be loaded. llama.cpp uses the gguf format and provides a conversion script for HuggingFace models. If you want to avoid installing llama.cpp and doing the conversion yourself, you can use models already converted by TheBloke 💣.
- running resources (optional). You can specify the number of CPU threads that can be used by the user application and/or the number of model layers that will be run by the GPU. If the user’s GPU is not supported, the CPU will be used instead.
Unless you want to get your hands dirty, you can simply press “Download model” and define the prompt 😌!
How to use
Now let’s get to the fun part 🎢!
LLMUnity is written so that it can be used with minimal code. All you have to do is construct a LLM object and then interact with it with:
_ = llm.Chat(message, HandleReply, ReplyCompleted);
where:
- message: a string object that contains the user input
- HandleReply : method that takes as input the model reply as string type. In this function you specify how to handle the reply. If the streaming functionality is enabled (default behavior), this function will receive the real-time reply as it is being produced by the model, otherwise it will receive the entire reply once.
- ReplyCompleted (optional): method with no arguments. This function is called when the model has finished producing the reply.
Basic functionality
A minimal example is shown below🚂. Here we send a message “Hello bot!” and display the reply by the model in the console:
using UnityEngine;
using LLMUnity;

public class MyGame : MonoBehaviour{
  public LLM llm;

  void HandleReply(string reply){
    Debug.Log(reply);
  }

  void Start(){
    _ = llm.Chat("Hello bot!", HandleReply);
  }
}
The Chat function of the LLM is called and the reply is received asynchronously when it is completed (in a streaming or not streaming fashion) by the HandleReply function.
To create the application in Unity, you then need to create a scene with:
- a GameObject for the LLM script. The properties of the LLM object are exposed in the Unity Inspector and can be setup as described in the previous section.
- a GameObject for your MyGame script. Here, you will link the LLM GameObject created above in the llm property in the Unity Inspector.
And … that’s all ✨!
Simple interaction
Now let’s see an example demonstrating a basic interaction:
Here we have a scene with:
- a GameObject for the LLM script (as before)
- a GameObject for the SimpleInteraction script
- an InputField (in green) that allows the user to enter text
- a Text field (in blue) that gets the reply from the model
The SimpleInteraction script can be implemented as follows:
using UnityEngine;
using LLMUnity;
using UnityEngine.UI;

public class SimpleInteraction : MonoBehaviour
{
    public LLM llm;
    public InputField playerText;
    public Text AIText;

    void Start()
    {
        playerText.onSubmit.AddListener(onInputFieldSubmit);
        playerText.Select();
    }

    void onInputFieldSubmit(string message)
    {
        playerText.interactable = false;
        AIText.text = "...";
        _ = llm.Chat(message, SetAIText, AIReplyComplete);
    }

    public void SetAIText(string text)
    {
       AIText.text = text;
    }

    public void AIReplyComplete()
    {
        playerText.interactable = true;
        playerText.Select();
        playerText.text = "";
    }
}
The script defines the following functions:
- Start: the playerText input field is selected when the scene starts so that the user can enter text. A listener is attached to the playerText that calls the onInputFieldSubmit function when the text is submitted.
- onInputFieldSubmit : when the input is submitted by the user, the playerText is disabled until the model replies. The model output field AIText is emptied and then the LLM chat function is called.
- SetAIText : this function is called when the model produces some reply and sets the AIText text to the reply content.
- AIReplyComplete : this function is called when the model has finished the reply. The playerText is again enabled and emptied so that the player can enter the next input.
As simple as this, we can have fully-fledged LLM interaction (fully-fledged, not beautiful I know 🙃). You can find this example in the SimpleInteraction sample.
Multiple AI functionality
So far we have seen the interaction with a single AI. In practice we will have more than one NPCs in a game 🤖. The solution to this is to create one LLM object as above that handles the server but have additional LLMClient objects to define additional behaviors for the AIs using different prompts.
An example sample showcasing this functionality can be found in the ServerClient sample. This is an extension of the code above that uses a LLM object for the first AI and a LLMClient object with a different prompt for the second AI (using the same server as the first AI).
Chatbot
The final step in creating something more game-like is to enhance the UI aspects as you would like to have them in your game 🏰. I won’t go into more details here because it is outside of the LLM integration scope. If you are interested in a more complex UI you can look into the ChatBot sample, that creates a more pleasing interaction similar to a messaging app.
The end
That’s all! In this guide we have seen how to integrate LLMs in Unity using the LLMUnity package along with some practical examples. I hope you have found it useful! Feel free to send me any questions / comments / suggestions you have to improve this article or the LLMUnity package 🙏.
Note: Unless otherwise stated, all images are created by the author.
How to Use LLMs in Unity was originally published in Towards Data Science on Medium, where people are continuing the conversation by highlighting and responding to this story.
Denial of responsibility! Techno Blender is an automatic aggregator of the all world’s media. In each content, the hyperlink to the primary source is specified. All trademarks belong to their rightful owners, all materials to their authors. If you are the owner of the content and do not want us to publish your materials, please contact us by email – [email protected]. The content will be deleted within 24 hours.