
How to use M1 Mac GPU on PyTorch
How do the new M1 chips perform with the new PyTorch update?
The release of M1 Macs in November 2020 marked a significant step up in the processing power of Apple machines [1]. Unfortunately, these new features were not integrated into PyTorch until now.
Today’s deep learning models owe a great deal of their exponential performance gains to ever increasing model sizes. Those larger models require more computations to train and run.
These models are simply too big to be run on CPU hardware, which performs large step-by-step computations. Instead, they need massively parallel computations, like those performed by GPUs.
GPUs use a highly parallel structure, originally designed to process images for visual heavy processes. They became essential components in gaming for rendering real-time 3D images.
That ability to render 3D images works well with the multi-dimensional computations required in deep learning models. Naturally, GPUs became the go to architecture for model training and inference.
GPUs are essential for the scale of today’s models. Using CPUs makes many of these models too slow to be useful, which can make deep learning on M1 machines rather disappointing.
TensorFlow supported GPU-accelerated from the outset [2], but TensorFlow represents just one of the two dominant libraries for deep learning. PyTorch fell behind in their M1 support. Fortunately, they just caught up.
PyTorch v1.12 introduces GPU-accelerated training on Apple silicon. It comes as a collaborative effort between PyTorch and the Metal engineering team at Apple.
It uses Apple’s Metal Performance Shaders (MPS) as the backend for PyTorch operations. MPS is fine-tuned for each family of M1 chips. In short, this means that the integration is fast.
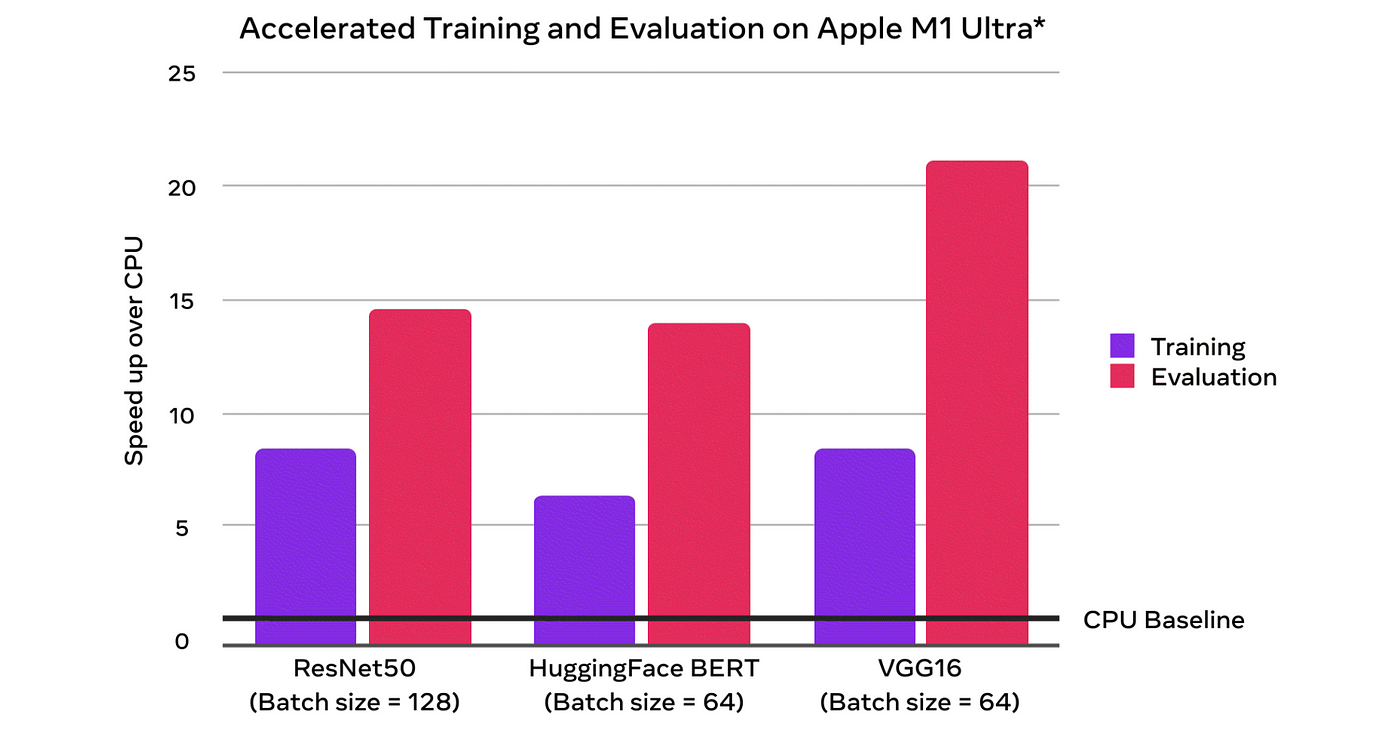
Taking a look at the baselines (using the M1 Ultra chip) demonstrates a ~7x speedup on training and ~14x speedup on inference for the popular BERT model.
Using my own first generation M1 MacBook Pro I unfortunately don’t see the same speedup, particularly when using a batch size of 64 shown above.

Maybe that is down to inefficient code or my comparatively puny base spec MacBook Pro, but I’ll take a 200% speedup any day. Now, rather than looking at charts and numbers let’s see how to use this new MPS-enabled PyTorch.
OS and Python Prerequisites
There are a few things that might trip you up before even getting started. The first are prerequisites. MPS-enabled PyTorch requires MacOS 12.3+ and a ARM Python installation. We can check both of these with:
import platformplatform.platform()[GOOD] >> macOS-12.4-arm64-arm-64bit
[BAD]  >> macOS-11.8-x86_64-i386-64bit
There are two things that this shows us, the [ 12.4 | 11.8 ] refers to the MacOS version, this must be 12.3 or more. If it isn’t, update your MacOS! The other is [ arm64 | x86 ]. We want arm64, if you see x86 then we need to create a new ARM environment for Python.
If using Anaconda we switch to a terminal window and create a new ARM environment like so:
CONDA_SUBDIR=osx-arm64 conda create -n ml python=3.9 -c conda-forge
Here we are setting the conda version variable to use the ARM environment. We then create a new conda environment with name (-n ) ml. Next, we set the environment to use Python 3.9 and ensure the conda-forge package repository is included in our channels (-c).
(If using another version of Python, check where you installed it from for an ARM version).
With our environment initialized we activate it with conda activate ml and modify the CONDA_SUBDIR variable to permanently use osx-arm64. Otherwise, we may default back to an incorrect x84 environment for future pip installs.
conda env config vars set CONDA_SUBDIR=osx-arm64
You may see a message asking you to reactivate the environment for these changes to take effect. If so, switch out of and back into the ml environment with:
conda activate
conda activate ml
PyTorch Installation
To get started we need to install PyTorch v1.12. For now, this is only available as a nightly release.
pip3 install -U --pre torch torchvision torchaudio --extra-index-url https://download.pytorch.org/whl/nightly/cpu

We will be using the transformers and datasets libraries, which are installed with a pip install transformers datasets.
Side note: The transformers library uses tokenizers built in Rust (it makes them faster). Because we are using this new ARM64 environment we may get ERROR: Failed building wheel for tokenizers. If so, we install Rust (in the same environment) with:
curl — proto ‘=https’ — tlsv1.2 -sSf https://sh.rustup.rs | sh
And then `pip install transformers datasets` again.
In Python we can confirm MPS is working using torch.has_mps.
Data Preparation
To test the new MPS-enabled PyTorch we’ll need some data. We’ll pull the first 1000 rows of the TREC dataset.
We will be testing the performance of MPS with a BERT model, for this we must tokenize our data using a BERT tokenizer. For the first few tests we will use just 64 rows of the TREC dataset.
Inference Tests
When processing these tokens on CPU we get an average processing time of 547ms. We can switch this to MPS by moving the tokens tensor and model to the MPS device.
Using this same approach with varying batch sizes we can see that the MPS device certainly outperforms CPU, but this is not very noticeable for smaller batches.
Training Tests
Training large models on Mac is not really the intended use-case, particularly for lower end M1 chips (like the first generation M1 MacBook Pro that these tests are running on). However, it is possible.
To fine-tune BERT on the TREC dataset we will be using the text feature as inputs, and the label-coarse feature as target labels. Our label feature contains six unique classes, and so we must initialize BERT with six output classes.
Note that we moved the BERT model to the MPS device. A similar step is followed within the training loop, where each tensor is moved to the MPS device.
For training on 1000 rows of TREC data, the CPU takes ~25 minutes, and MPS takes ~18 minutes. However, this is not a direct comparison. When fine-tuning the full BERT model the MPS device (GPU) could handle no more than a batch size of one, whereas with the CPU we used a batch size of 32.
These tests are optimizing the full BERT model, which is huge. For fine-tuning large language models (LLMs) we don’t usually need to fine-tune the full model. Instead, we can freeze already pretrained model core, and fine-tune the final few layers that make up the task-specific head.

Using this approach we get better training times of around four minutes and a maximum MPS batch size of ~64.
That’s it for this introduction to the new MPS-enabled PyTorch and how to use when performing inference and even training with popular models like BERT.
If you’d like to keep up to date with what I’m doing I post weekly on YouTube, and you get in touch directly via Discord. I hope to see you around!
*All images are by the author except where stated otherwise*
How do the new M1 chips perform with the new PyTorch update?
The release of M1 Macs in November 2020 marked a significant step up in the processing power of Apple machines [1]. Unfortunately, these new features were not integrated into PyTorch until now.
Today’s deep learning models owe a great deal of their exponential performance gains to ever increasing model sizes. Those larger models require more computations to train and run.
These models are simply too big to be run on CPU hardware, which performs large step-by-step computations. Instead, they need massively parallel computations, like those performed by GPUs.
GPUs use a highly parallel structure, originally designed to process images for visual heavy processes. They became essential components in gaming for rendering real-time 3D images.
That ability to render 3D images works well with the multi-dimensional computations required in deep learning models. Naturally, GPUs became the go to architecture for model training and inference.
GPUs are essential for the scale of today’s models. Using CPUs makes many of these models too slow to be useful, which can make deep learning on M1 machines rather disappointing.
TensorFlow supported GPU-accelerated from the outset [2], but TensorFlow represents just one of the two dominant libraries for deep learning. PyTorch fell behind in their M1 support. Fortunately, they just caught up.
PyTorch v1.12 introduces GPU-accelerated training on Apple silicon. It comes as a collaborative effort between PyTorch and the Metal engineering team at Apple.
It uses Apple’s Metal Performance Shaders (MPS) as the backend for PyTorch operations. MPS is fine-tuned for each family of M1 chips. In short, this means that the integration is fast.
Taking a look at the baselines (using the M1 Ultra chip) demonstrates a ~7x speedup on training and ~14x speedup on inference for the popular BERT model.
Using my own first generation M1 MacBook Pro I unfortunately don’t see the same speedup, particularly when using a batch size of 64 shown above.
Maybe that is down to inefficient code or my comparatively puny base spec MacBook Pro, but I’ll take a 200% speedup any day. Now, rather than looking at charts and numbers let’s see how to use this new MPS-enabled PyTorch.
OS and Python Prerequisites
There are a few things that might trip you up before even getting started. The first are prerequisites. MPS-enabled PyTorch requires MacOS 12.3+ and a ARM Python installation. We can check both of these with:
import platformplatform.platform()[GOOD] >> macOS-12.4-arm64-arm-64bit
[BAD]  >> macOS-11.8-x86_64-i386-64bit
There are two things that this shows us, the [ 12.4 | 11.8 ] refers to the MacOS version, this must be 12.3 or more. If it isn’t, update your MacOS! The other is [ arm64 | x86 ]. We want arm64, if you see x86 then we need to create a new ARM environment for Python.
If using Anaconda we switch to a terminal window and create a new ARM environment like so:
CONDA_SUBDIR=osx-arm64 conda create -n ml python=3.9 -c conda-forge
Here we are setting the conda version variable to use the ARM environment. We then create a new conda environment with name (-n ) ml. Next, we set the environment to use Python 3.9 and ensure the conda-forge package repository is included in our channels (-c).
(If using another version of Python, check where you installed it from for an ARM version).
With our environment initialized we activate it with conda activate ml and modify the CONDA_SUBDIR variable to permanently use osx-arm64. Otherwise, we may default back to an incorrect x84 environment for future pip installs.
conda env config vars set CONDA_SUBDIR=osx-arm64
You may see a message asking you to reactivate the environment for these changes to take effect. If so, switch out of and back into the ml environment with:
conda activate
conda activate ml
PyTorch Installation
To get started we need to install PyTorch v1.12. For now, this is only available as a nightly release.
pip3 install -U --pre torch torchvision torchaudio --extra-index-url https://download.pytorch.org/whl/nightly/cpu
We will be using the transformers and datasets libraries, which are installed with a pip install transformers datasets.
Side note: The transformers library uses tokenizers built in Rust (it makes them faster). Because we are using this new ARM64 environment we may get ERROR: Failed building wheel for tokenizers. If so, we install Rust (in the same environment) with:
curl — proto ‘=https’ — tlsv1.2 -sSf https://sh.rustup.rs | sh
And then `pip install transformers datasets` again.
In Python we can confirm MPS is working using torch.has_mps.
Data Preparation
To test the new MPS-enabled PyTorch we’ll need some data. We’ll pull the first 1000 rows of the TREC dataset.
We will be testing the performance of MPS with a BERT model, for this we must tokenize our data using a BERT tokenizer. For the first few tests we will use just 64 rows of the TREC dataset.
Inference Tests
When processing these tokens on CPU we get an average processing time of 547ms. We can switch this to MPS by moving the tokens tensor and model to the MPS device.
Using this same approach with varying batch sizes we can see that the MPS device certainly outperforms CPU, but this is not very noticeable for smaller batches.
Training Tests
Training large models on Mac is not really the intended use-case, particularly for lower end M1 chips (like the first generation M1 MacBook Pro that these tests are running on). However, it is possible.
To fine-tune BERT on the TREC dataset we will be using the text feature as inputs, and the label-coarse feature as target labels. Our label feature contains six unique classes, and so we must initialize BERT with six output classes.
Note that we moved the BERT model to the MPS device. A similar step is followed within the training loop, where each tensor is moved to the MPS device.
For training on 1000 rows of TREC data, the CPU takes ~25 minutes, and MPS takes ~18 minutes. However, this is not a direct comparison. When fine-tuning the full BERT model the MPS device (GPU) could handle no more than a batch size of one, whereas with the CPU we used a batch size of 32.
These tests are optimizing the full BERT model, which is huge. For fine-tuning large language models (LLMs) we don’t usually need to fine-tune the full model. Instead, we can freeze already pretrained model core, and fine-tune the final few layers that make up the task-specific head.
Using this approach we get better training times of around four minutes and a maximum MPS batch size of ~64.
That’s it for this introduction to the new MPS-enabled PyTorch and how to use when performing inference and even training with popular models like BERT.
If you’d like to keep up to date with what I’m doing I post weekly on YouTube, and you get in touch directly via Discord. I hope to see you around!
*All images are by the author except where stated otherwise*
Denial of responsibility! Techno Blender is an automatic aggregator of the all world’s media. In each content, the hyperlink to the primary source is specified. All trademarks belong to their rightful owners, all materials to their authors. If you are the owner of the content and do not want us to publish your materials, please contact us by email – [email protected]. The content will be deleted within 24 hours.