
Pytest with Marking, Mocking, and Fixtures in 10 Minutes | by Kay Jan Wong | Jul, 2022
Write robust unit tests with Python pytest
Update: This article is part of a series. Check out other “in 10 Minutes” topics here!
In my previous article on unit tests, I elaborated on the purpose of unit tests, unit test ecosystem, and best practices, and demonstrated basic and advanced examples with Python built-in unittest package. There is more than one way (and more than one Python package) to perform unit tests, this article will demonstrate how to implement unit tests with Python pytest package. This article will follow the flow of the previous article closely, so you can compare the various components of unittest vs. pytest.
While the unittest package is object-oriented since test cases are written in classes, the pytest package is functional, resulting in fewer lines of code. Personally, I prefer unittest as I find the codes more readable. That being said, both packages, or rather frameworks, are equally powerful, and choosing between them is a matter of preference.
Unlike unittest, pytest is not a built-in Python package and requires installation. This can simply be done with pip install pytest on the Terminal.
Do note that the best practices for unittest also apply for pytest, such that
- All unit tests must be written in a
tests/directory - File names should strictly start with
tests_ - Function names should strictly start with
test
The naming conventions must be followed so that the checker can discover the unit tests when it is run.
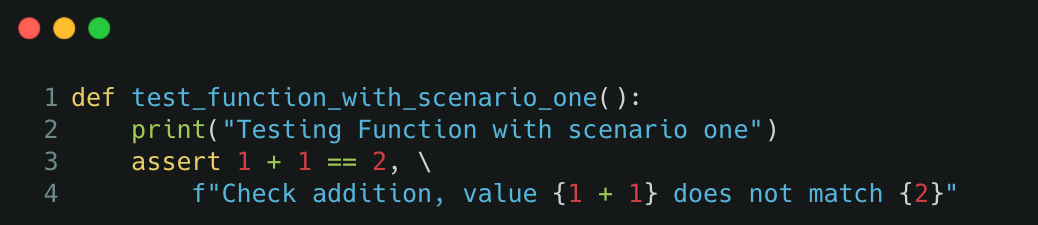
As pytest follows functional programming, the unit tests are written in functions where assertions are made within the function. This results in pytest being easy to pick up, and unit test codes looking short and sweet!
Unit tests can be run by typing pytest into the command line, which will discover all the unit tests if they follow the naming convention. The unit test output returns the total number of tests run, the number of tests passed, skipped, and failed, the total time taken to run the tests, and the failure stack trace if any.
To run unit tests on a specific directory, file, or function, the commands are as follows
$ pytest tests/
$ pytest tests/test_sample.py
$ pytest tests/test_sample.py::test_function_one
There are more customization that can be appended to the command, such as
-x: exit instantly or fail fast, to stop all unit tests upon encountering the first test failure-k "keyword": specify the keyword(s) to selectively run tests, can match file name or function name, and can containandandnotstatements--ff: failed first, to run all tests starting from those that failed the last run (preferred)--lf: last failed, to run tests that failed the last run (drawback: may not discover failures in tests that previously passed)--sw: step-wise, stop at the first test failure and continue from there in the next run (drawback: may not discover failures in tests that previously passed)
Bonus tip: If the unit tests are taking too long to run, you can run them in parallel instead of sequentially! Install the pytest-xdist Python package and add this to the command when running unit tests,
-n <number of workers>: number of workers to run the tests in parallel
Debugging error: You might face the error ModuleNotFoundError when your test scripts import from a folder from the base directory or whichever source directory. For instance, your function resides in src/sample_file.py and your test scripts residing in tests/ directory perform an import from src.sample_file import sample_function.
To overcome this, create a configuration file pytest.ini in the base directory to indicate the directory to perform the import relative to the base directory. A sample of the content to add to the configuration file is as follows,
[pytest]
pythonpath = .
This configuration file can be extended to more uses, to be elaborated on in later sections. For now, this configuration allows you to bypass the ModuleNotFoundError error.
After understanding the basic structure of a unit test and how to run them, it is time to dig deeper!
In reality, unit tests might not be as straightforward as calling the function and testing the expected output given some input. There can be advanced logic such as accounting for floating point precision, testing for expected errors, grouping tests together, conditional skipping of unit tests, mocking data, etc. which can be accomplished with context managers and decorators from the pytest package (basically already coded out for you!).
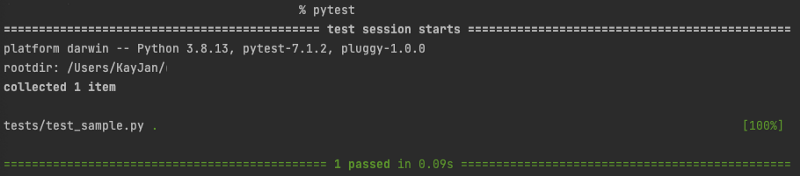
Besides testing for the expected output, you can also test for expected errors to ensure that functions will throw errors when used in a manner that it is not designed for. This can be done with pytest.raises context manager, using the with keyword.
Unit tests can be marked using pytest.mark decorator, which allows for various extended functionality such as,
- Grouping the unit tests: Multiple unit tests can then be run as a group
- Marked to fail: To indicate that the unit test is expected to fail
- Marked to skip/conditional skipping: Unit test default behaviour is to be skipped, or be skipped if certain conditions are met
- Marked to insert parameters: Test various inputs to a unit test
Decorators can be stacked to provide multiple extended functionalities. For instance, the test can be marked as a group and marked to be skipped!
The various functionality elaborated above are implemented in this manner,
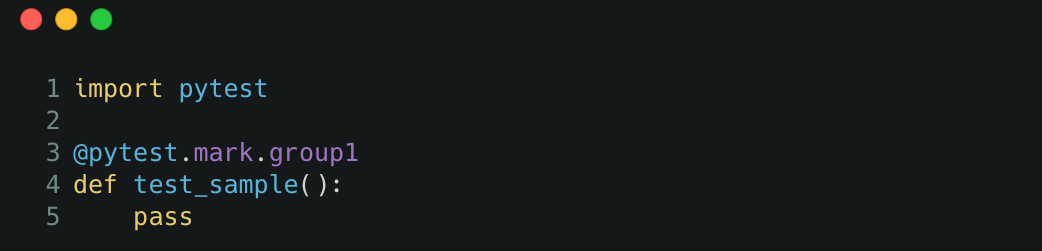
a) Grouping the unit tests
Instead of running the unit tests within a folder, file, or by keyword search, unit tests can be grouped and called with pytest -m <group-name>. The output of the test will show the number of tests ran and the number of tests that are deselected as they are not in the group.
This can be implemented with pytest.mark.<group-name> decorator with example below,
To make this work, we would need to define the group in the configuration file, the following content can be added to the existing contents in the pytest.ini file,
markers =
group1: description of group 1
b) Marked to fail
For tests that are expected to fail, they can be marked with the pytest.mark.xfail decorator. The output will show xfailed if the unit tests fail (as opposed to throwing an error in normal scenarios) and xpassed if the unit test unexpectedly passes. An example is as follows,

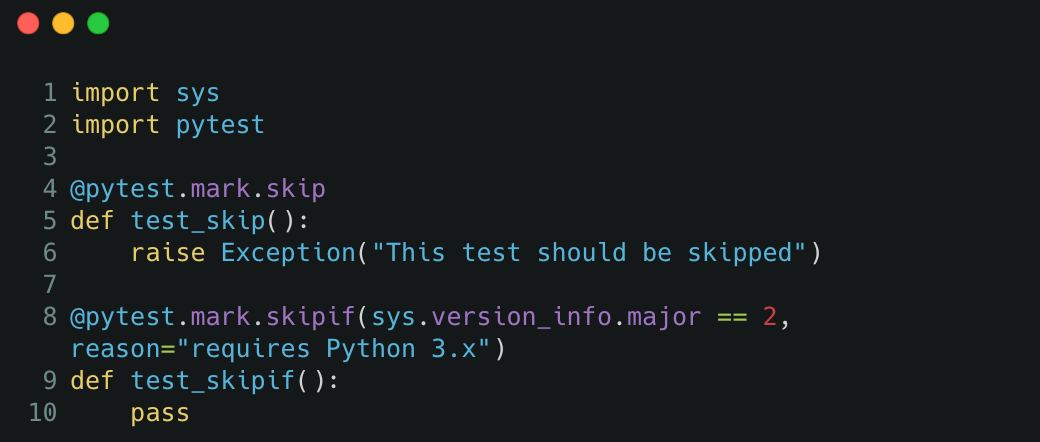
c) Marked to skip/conditional skipping
Marking a unit test to be skipped or skipped if certain conditions are met is similar to the previous section, just that the decorator is pytest.mark.skip and pytest.mark.skipif respectively. Skipping a unit test is useful if the test no longer works as expected with a newer Python version or newer Python package version.
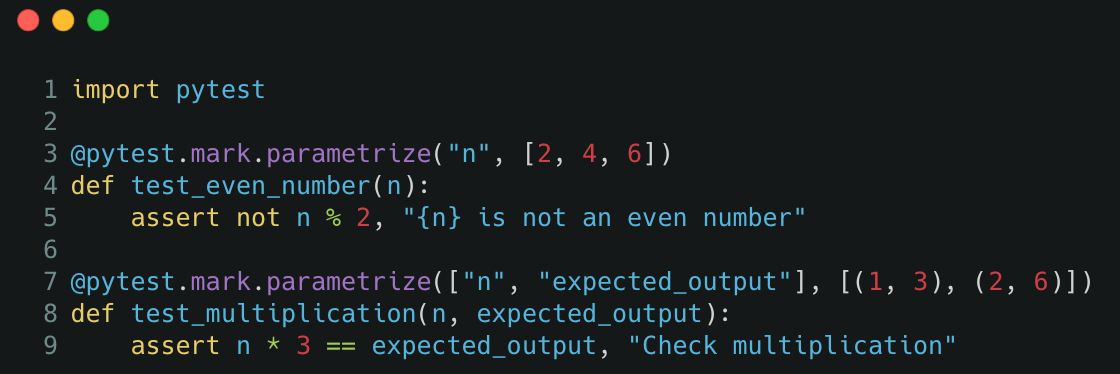
d) Marked to insert parameters
In some cases, we would want to test the function against a few inputs, for instance, to test the codebase against normal cases and edge cases. Instead of writing multiple assertions within one unit test or writing multiple unit tests, we can test multiple inputs in an automated fashion as follows,
Mocking is used in unit tests to replace the return value of a function. It is useful to replace operations that should not be run in a testing environment, for instance, to replace operations that connect to a database and loads data when the testing environment does not have the same data access.
In pytest, mocking can replace the return value of a function within a function. This is useful for testing the desired function and replacing the return value of a nested function within that desired function we are testing.
As such, mocking reduces the dependency of the unit test as we are testing the desired function and not its dependencies on other functions.
For instance, if the desired function loads data by connecting to a database, we can mock the function that loads data such that it does not connect to a database, and instead supply alternative data to be used.
To implement mocking, install the pytest-mock Python package. In this example within the src/sample_file.py file, we define the desired function and function to be mocked.
def load_data():
# This should be mocked as it is a dependency
return 1def dummy_function():
# This is the desired function we are testing
return load_data()
Within the test script, we define the function to be mocked by specifying its full dotted path, and define the value that should be returned instead,
from src.sample_file import dummy_functiondef test_mocking_function(mocker):
mocker.patch("src.sample_file.load_data", return_value=2)
assert dummy_function() == 2, "Value should be mocked"
Mocking can patch any function within the codebase, as long you define the full dotted path. Note that you cannot mock the desired function you are testing but can mock any dependencies, or even nested dependencies, the desired function relies on.
a) Pytest Configuration
As discussed in previous sections, the configuration file pytest.ini can be defined at the base directory to bypass ModuleNotFoundError and to define unit test groups. It should look something like this by now,
[pytest]
pythonpath = .
markers =
group1: description of group 1
Configuration files allow users to specify the default mode to run unit tests, for instance, pytest --ff for failed first setting, or pytest -ra -q for a condensed output result. The default mode can be indicated by adding the line addopts = -ra -q to the configuration file.
To suppress warnings, we can also add ignore::DeprecationWarning or ignore::ImportWarning to the configuration file.
More items can be added to the configuration file, but these are the more common ones. The official documentation for pytest configuration files can be found here.
b) Reusing Variables (by Fixtures)
Fixtures can be used to standardize input across multiple unit tests. For instance, a fixture can be defined to load a file or create an object to be used as input to multiple tests instead of rewriting the same lines of code in every test.
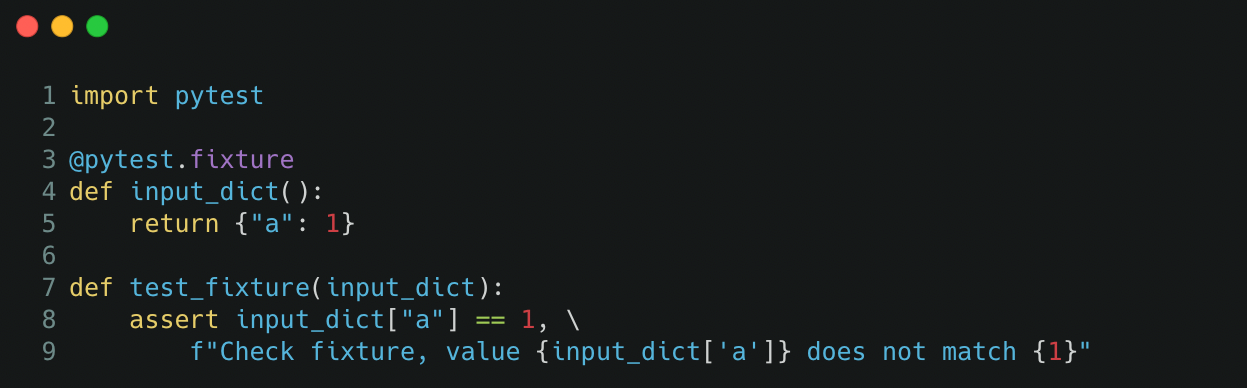
Fixtures can be defined within the same Python file or within the file tests/conftest.py which is handled by pytest automatically.
c) Accounting for Floating Point Precision
When asserting equality conditions for numerical values, there may be discrepancies in the values in the decimal point positions due to floating point arithmetic limitations.
To counter this, we can compare the equality of numerical values with some tolerance. Using assert output_value == pytest.approx(expected_value) will allow the equality comparison to be relaxed to a tolerance of 1e-6 by default.
Hope you have learned more about implementing unit tests with pytest and some cool tricks you can do with unit tests. There are a lot more functionalities offered such as using monkeypatch for mocking data, defining the scope in fixtures, using pytest in conjunction with the unittest Python package, and so much more. There can be a sequel to this if there is a demand for it 😉
Thank you for reading! If you liked this article, feel free to share it.
Write robust unit tests with Python pytest
Update: This article is part of a series. Check out other “in 10 Minutes” topics here!
In my previous article on unit tests, I elaborated on the purpose of unit tests, unit test ecosystem, and best practices, and demonstrated basic and advanced examples with Python built-in unittest package. There is more than one way (and more than one Python package) to perform unit tests, this article will demonstrate how to implement unit tests with Python pytest package. This article will follow the flow of the previous article closely, so you can compare the various components of unittest vs. pytest.
While the unittest package is object-oriented since test cases are written in classes, the pytest package is functional, resulting in fewer lines of code. Personally, I prefer unittest as I find the codes more readable. That being said, both packages, or rather frameworks, are equally powerful, and choosing between them is a matter of preference.
Unlike unittest, pytest is not a built-in Python package and requires installation. This can simply be done with pip install pytest on the Terminal.
Do note that the best practices for unittest also apply for pytest, such that
- All unit tests must be written in a
tests/directory - File names should strictly start with
tests_ - Function names should strictly start with
test
The naming conventions must be followed so that the checker can discover the unit tests when it is run.
As pytest follows functional programming, the unit tests are written in functions where assertions are made within the function. This results in pytest being easy to pick up, and unit test codes looking short and sweet!
Unit tests can be run by typing pytest into the command line, which will discover all the unit tests if they follow the naming convention. The unit test output returns the total number of tests run, the number of tests passed, skipped, and failed, the total time taken to run the tests, and the failure stack trace if any.
To run unit tests on a specific directory, file, or function, the commands are as follows
$ pytest tests/
$ pytest tests/test_sample.py
$ pytest tests/test_sample.py::test_function_one
There are more customization that can be appended to the command, such as
-x: exit instantly or fail fast, to stop all unit tests upon encountering the first test failure-k "keyword": specify the keyword(s) to selectively run tests, can match file name or function name, and can containandandnotstatements--ff: failed first, to run all tests starting from those that failed the last run (preferred)--lf: last failed, to run tests that failed the last run (drawback: may not discover failures in tests that previously passed)--sw: step-wise, stop at the first test failure and continue from there in the next run (drawback: may not discover failures in tests that previously passed)
Bonus tip: If the unit tests are taking too long to run, you can run them in parallel instead of sequentially! Install the pytest-xdist Python package and add this to the command when running unit tests,
-n <number of workers>: number of workers to run the tests in parallel
Debugging error: You might face the error ModuleNotFoundError when your test scripts import from a folder from the base directory or whichever source directory. For instance, your function resides in src/sample_file.py and your test scripts residing in tests/ directory perform an import from src.sample_file import sample_function.
To overcome this, create a configuration file pytest.ini in the base directory to indicate the directory to perform the import relative to the base directory. A sample of the content to add to the configuration file is as follows,
[pytest]
pythonpath = .
This configuration file can be extended to more uses, to be elaborated on in later sections. For now, this configuration allows you to bypass the ModuleNotFoundError error.
After understanding the basic structure of a unit test and how to run them, it is time to dig deeper!
In reality, unit tests might not be as straightforward as calling the function and testing the expected output given some input. There can be advanced logic such as accounting for floating point precision, testing for expected errors, grouping tests together, conditional skipping of unit tests, mocking data, etc. which can be accomplished with context managers and decorators from the pytest package (basically already coded out for you!).
Besides testing for the expected output, you can also test for expected errors to ensure that functions will throw errors when used in a manner that it is not designed for. This can be done with pytest.raises context manager, using the with keyword.
Unit tests can be marked using pytest.mark decorator, which allows for various extended functionality such as,
- Grouping the unit tests: Multiple unit tests can then be run as a group
- Marked to fail: To indicate that the unit test is expected to fail
- Marked to skip/conditional skipping: Unit test default behaviour is to be skipped, or be skipped if certain conditions are met
- Marked to insert parameters: Test various inputs to a unit test
Decorators can be stacked to provide multiple extended functionalities. For instance, the test can be marked as a group and marked to be skipped!
The various functionality elaborated above are implemented in this manner,
a) Grouping the unit tests
Instead of running the unit tests within a folder, file, or by keyword search, unit tests can be grouped and called with pytest -m <group-name>. The output of the test will show the number of tests ran and the number of tests that are deselected as they are not in the group.
This can be implemented with pytest.mark.<group-name> decorator with example below,
To make this work, we would need to define the group in the configuration file, the following content can be added to the existing contents in the pytest.ini file,
markers =
group1: description of group 1
b) Marked to fail
For tests that are expected to fail, they can be marked with the pytest.mark.xfail decorator. The output will show xfailed if the unit tests fail (as opposed to throwing an error in normal scenarios) and xpassed if the unit test unexpectedly passes. An example is as follows,
c) Marked to skip/conditional skipping
Marking a unit test to be skipped or skipped if certain conditions are met is similar to the previous section, just that the decorator is pytest.mark.skip and pytest.mark.skipif respectively. Skipping a unit test is useful if the test no longer works as expected with a newer Python version or newer Python package version.
d) Marked to insert parameters
In some cases, we would want to test the function against a few inputs, for instance, to test the codebase against normal cases and edge cases. Instead of writing multiple assertions within one unit test or writing multiple unit tests, we can test multiple inputs in an automated fashion as follows,
Mocking is used in unit tests to replace the return value of a function. It is useful to replace operations that should not be run in a testing environment, for instance, to replace operations that connect to a database and loads data when the testing environment does not have the same data access.
In pytest, mocking can replace the return value of a function within a function. This is useful for testing the desired function and replacing the return value of a nested function within that desired function we are testing.
As such, mocking reduces the dependency of the unit test as we are testing the desired function and not its dependencies on other functions.
For instance, if the desired function loads data by connecting to a database, we can mock the function that loads data such that it does not connect to a database, and instead supply alternative data to be used.
To implement mocking, install the pytest-mock Python package. In this example within the src/sample_file.py file, we define the desired function and function to be mocked.
def load_data():
# This should be mocked as it is a dependency
return 1def dummy_function():
# This is the desired function we are testing
return load_data()
Within the test script, we define the function to be mocked by specifying its full dotted path, and define the value that should be returned instead,
from src.sample_file import dummy_functiondef test_mocking_function(mocker):
mocker.patch("src.sample_file.load_data", return_value=2)
assert dummy_function() == 2, "Value should be mocked"
Mocking can patch any function within the codebase, as long you define the full dotted path. Note that you cannot mock the desired function you are testing but can mock any dependencies, or even nested dependencies, the desired function relies on.
a) Pytest Configuration
As discussed in previous sections, the configuration file pytest.ini can be defined at the base directory to bypass ModuleNotFoundError and to define unit test groups. It should look something like this by now,
[pytest]
pythonpath = .
markers =
group1: description of group 1
Configuration files allow users to specify the default mode to run unit tests, for instance, pytest --ff for failed first setting, or pytest -ra -q for a condensed output result. The default mode can be indicated by adding the line addopts = -ra -q to the configuration file.
To suppress warnings, we can also add ignore::DeprecationWarning or ignore::ImportWarning to the configuration file.
More items can be added to the configuration file, but these are the more common ones. The official documentation for pytest configuration files can be found here.
b) Reusing Variables (by Fixtures)
Fixtures can be used to standardize input across multiple unit tests. For instance, a fixture can be defined to load a file or create an object to be used as input to multiple tests instead of rewriting the same lines of code in every test.
Fixtures can be defined within the same Python file or within the file tests/conftest.py which is handled by pytest automatically.
c) Accounting for Floating Point Precision
When asserting equality conditions for numerical values, there may be discrepancies in the values in the decimal point positions due to floating point arithmetic limitations.
To counter this, we can compare the equality of numerical values with some tolerance. Using assert output_value == pytest.approx(expected_value) will allow the equality comparison to be relaxed to a tolerance of 1e-6 by default.
Hope you have learned more about implementing unit tests with pytest and some cool tricks you can do with unit tests. There are a lot more functionalities offered such as using monkeypatch for mocking data, defining the scope in fixtures, using pytest in conjunction with the unittest Python package, and so much more. There can be a sequel to this if there is a demand for it 😉
Thank you for reading! If you liked this article, feel free to share it.
Denial of responsibility! Techno Blender is an automatic aggregator of the all world’s media. In each content, the hyperlink to the primary source is specified. All trademarks belong to their rightful owners, all materials to their authors. If you are the owner of the content and do not want us to publish your materials, please contact us by email – [email protected]. The content will be deleted within 24 hours.