
Running RStudio Inside a Container
A step-by-step guide for setting up an RStudio server inside a container with your local RStudio settings
This is a step-by-step guide for setting up an RStudio server inside a container with your local RStudio settings. We will use the Rocker RStudio image and show how to customize it with the docker run command and its arguments.
By the end of this tutorial, you will be able to:
- Launch an RStudio server inside a container
- Mount local folders
- Clone local RStudio settings (color theme, code snippets, etc.)
- Load local Renviron setting
Introduction
RStudio is the primary IDE for the R programming language. Unlike other general-purpose IDEs such as VScode, RStudio was built and designed specifically for R users and their needs. This is one of the reasons for the popularity of RStudio among R users. By default, RStudio does not have native support for Docker. The main method for setting and running RStudio inside a container is using the RStudio server version. This required installing and setting the server inside a container, which might be an entry barrier for some users. Luckily, the Rocker project — the main source for R images provides built-in and ready-to-use images with an RStudio server.
Throughout this tutorial, we will use the Rocker RStudio image, which is available on Docker Hub.
Prerequisites
To follow along with this tutorial and run the code below, you will need:
- Docker Desktop (or any alternative)
- Docker Hub account
- Basic understanding of the docker run command
Getting Started with Rocker
The Rocker Project is the main hub for built-in R images. It provides various images with different R environment settings, such as base-r, tidyverse, ML-verse, shiny, geospatial, and, of course, the RStudio server image. The full list of available R images is on the Rocker’s Docker Hub page.
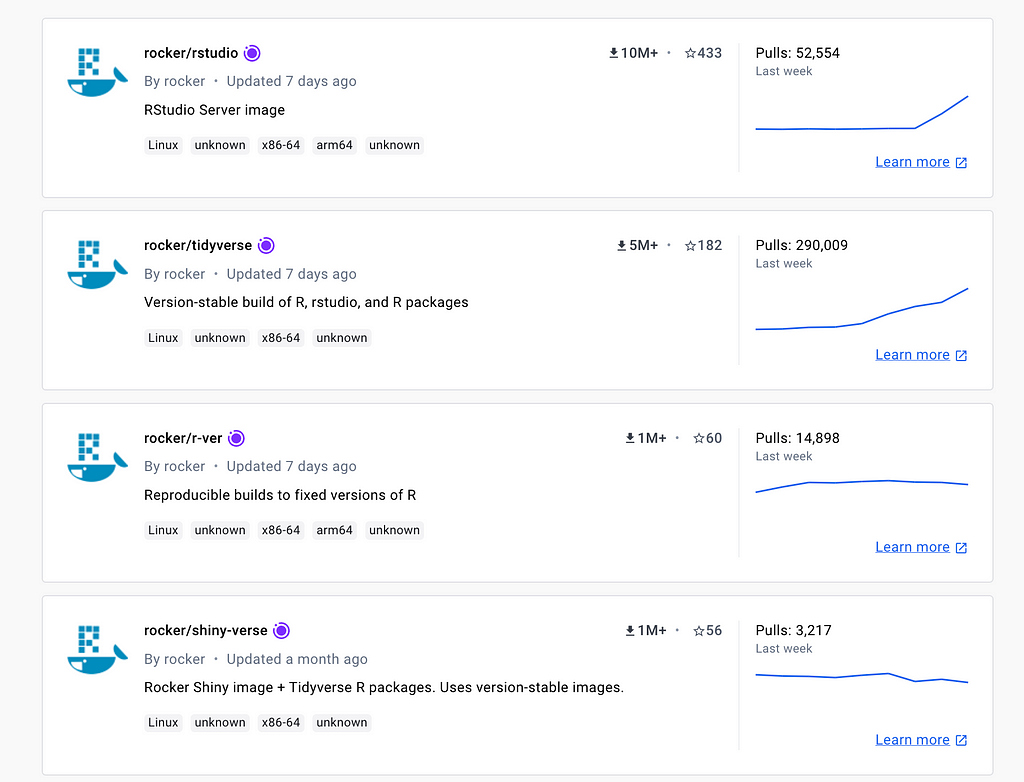
We will use the rocker/rstudio image, which, as its name implies, has an RStudio server installed and ready to use. Using thedocker run command, we can launch this container in an interactive mode and access the RStudio server via the browser.
Let’s get started by pulling the image with the docker pull command:
>docker pull rocker/rstudio                                                                                                                                            ok
Using default tag: latest
latest: Pulling from rocker/rstudio
a4a2c7a57ed8: Pull complete
d0f9831967fe: Pull complete
e78811385d51: Pull complete
c61633a20287: Pull complete
832cef14f2fb: Pull complete
8395fbba6231: Pull complete
fb53abdcfb34: Pull complete
c942edef0d7f: Pull complete
Digest: sha256:8e25784e1d29420effefae1f31e543c792d215d89ce717b0cc64fb18a77668f3
Status: Downloaded newer image for rocker/rstudio:latest
docker.io/rocker/rstudio:latest
You can use the docker images command to verify that the image was downloaded successfully:
>docker images                                                                                                                                                    ok  36s
REPOSITORY              TAG          IMAGE ID       CREATED       SIZE
rocker/rstudio          latest       7039fb162243   2 days ago    1.94GB
Let’s now go ahead and use the suggested command from the Rocker Project to launch RStudio inside the container with the docker run command:
>docker run --rm -ti -e PASSWORD=yourpassword -p 8787:8787 rocker/rstudio
Before we open the RStudio server on the browser, let’s review the run arguments we used above:
- rm — Automatically remove the container when it exits (from the terminal control + c)
- ti — Run the container in an interactive mode
- e — Set environment variable, in this case, to define the server login password as yourpassword
- p — Define the port mapping. In this case, we will map the container’s 8787 port with port 8787 on the local machine
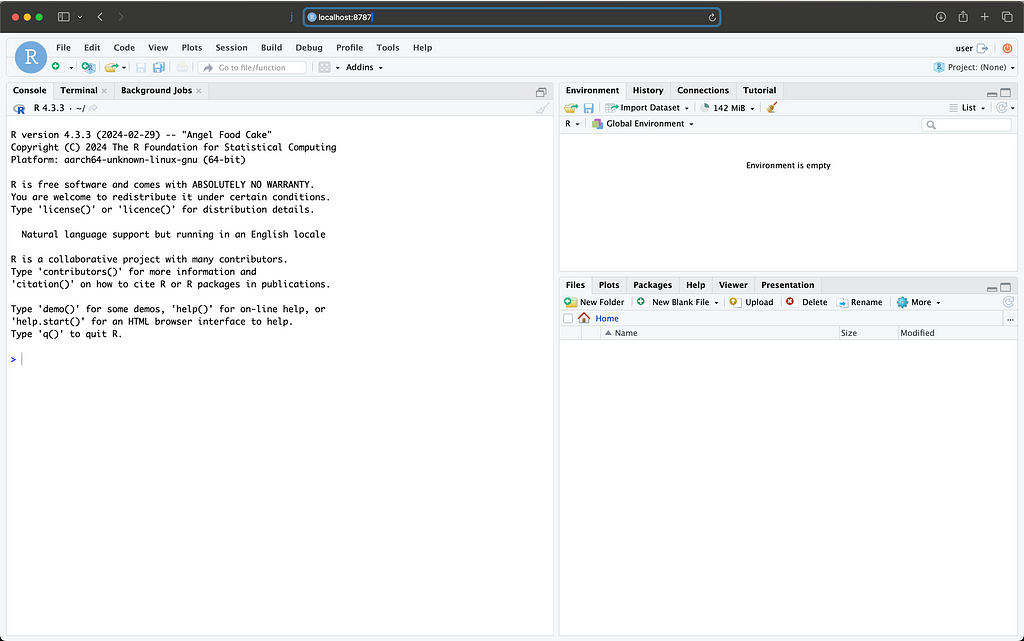
After running the command, you can access the RStudio server on local host 8787 (e.g., http://localhost:8787). This will prompt the login page, where you should use:
- Username: rstudio
- Password: yourpassword (as set in the run commend)
You should expect the following output:
Note: You can stop the running container on terminal by clicking control+c.
Oh No! It Is Ephemeral!
By default, the Docker container runs in ephemeral mode. Any code created and saved on the container or input you generated will be lost when terminating the container run time. This is neither practical nor useful if you wish to use Docker as your development environment. To address this issue, we will use the volume (or v) argument, which enables the mount of local folders with the container files system.
The below code demonstrates the use of the volume argument to mount the folder we execute the run command from (e.g., .) with the RStudio server home folder:
docker run --rm -ti \
-v .:/home/rstudio \
-e PASSWORD=yourpassword \
-p 8787:8787 rocker/rstudio
The volume argument maps the local folder (e.g., source) with the container (e.g., target) using the following format source:target.
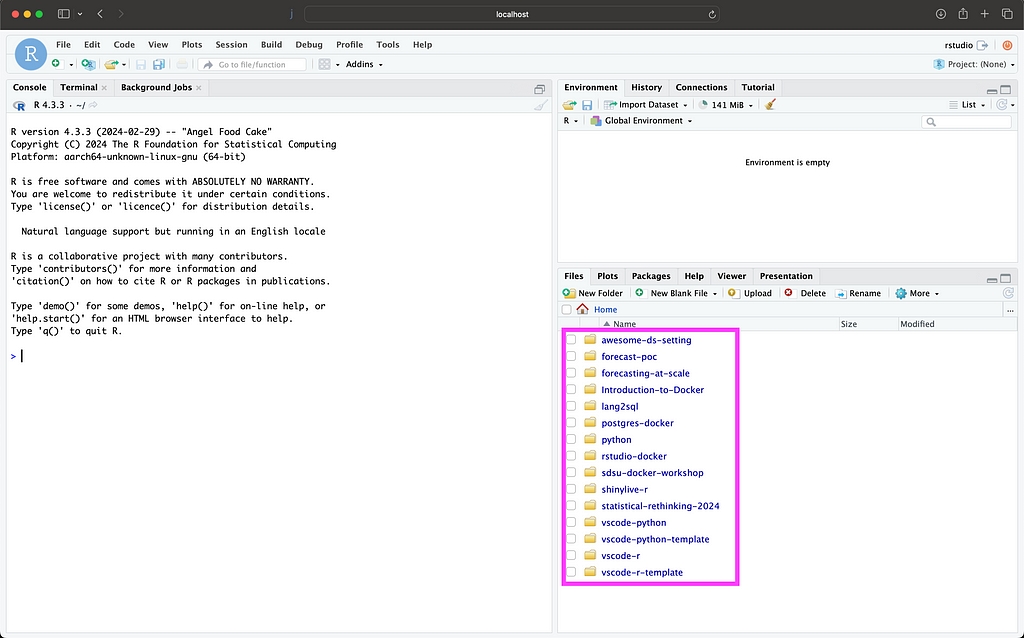
Let’s now go back to the browser and reopen the RStudio server using the local host address — http://localhost:8787. You should expect to see in the RStudio files section the folders and/or files that are available on the local folder you mount to the container. In my case, I will mount my tutorials folder, which has the following folders:
.
├── Introduction-to-Docker
├── awesome-ds-setting
├── forecast-poc
├── forecasting-at-scale
├── lang2sql
├── postgres-docker
├── python
├── rstudio-docker
├── sdsu-docker-workshop
├── shinylive-r
├── statistical-rethinking-2024
├── vscode-python
├── vscode-python-template
├── vscode-r
└── vscode-r-template
As you can see in the screenshot below, the local folders are now available and accessible from the RStudio server (marked with a purple rectangle):
Note: You can use the volume argument to mount multiple volumes. For example, one for your project and second for a folder with your data folders
This enables us to read from and write to the local folder from the container during run time.
Clone Your Local RStudio Settings
In the previous section, we saw how to mount a local folder to the container with the volume argument. This enables us to save our code locally while working inside the container. In this section, we will see how we can leverage the volume argument to mount our local RStudio setting with the ones on the container. The idea here is to launch the container and run the RStudio server with our local settings without needing to update the settings any time we relaunch the container. This includes loading local settings such as color theme settings, code snippets, environment variables, etc.
Before we can update the docker run with the local RStudio configuration folder, we need to identify the folder path of the config folder of both the local and the one on the container. For example, the path on my machine is ~/.config/rstudio and it contains the following folders and files:
.
├── dictionaries
│   └── custom
├── rstudio-prefs.json
└── snippets
    └── r.snippets
Similarly, the .config/rstudio folder on the container is under the /home/rstudio/. Therefore, we will use the following mapping:
$HOME/.config/rstudio:/home/rstudio/.config/rstudio
Likewise, we want to mount the .Renviron file with the local environment variables. The .Renviron file is under the root folder on the local machine, and we follow the same approach to map the local file with the ones on the container:
$HOME/.Renviron:/home/rstudio/.Renviron
Let’s now add it all together and relaunch the container:
docker run --rm -ti \
-v .:/home/rstudio \
-v $HOME/.config/rstudio:/home/rstudio/.config/rstudio \
-v $HOME/.Renviron:/home/rstudio/.Renviron \
-e PASSWORD=yourpassword \
-p 8787:8787 rocker/rstudio
After mounting the local RStudio config folder with the one on the container, the server settings are now mapped with the local RStudio settings on my machine:

Summary
This tutorial focuses on customizing the Rocker’s RStudio image with the docker run command. We used the volume argument to mount the local folder to the container working directory. This enables us to work inside a containerized environment and save our work locally. In addition, we used the volume argument to clone the local RStudio settings to the container. This makes the transition from the local environment to the containerized smoother. The command can become long and convoluted as we add and use more arguments. Once you have finalized your run settings, the next step is to transition it into a YAML file using the Docker Compose. Beyond the simplification of the launch process of the container, Docker Compose enables you to manage more complex scenarios, such as launching multiple containers.
Resources
- RStudio — https://posit.co/products/open-source/rstudio/
- The Rocker Project — https://rocker-project.org/
- Docker Hub — https://hub.docker.com/
Running RStudio Inside a Container was originally published in Towards Data Science on Medium, where people are continuing the conversation by highlighting and responding to this story.
A step-by-step guide for setting up an RStudio server inside a container with your local RStudio settings
This is a step-by-step guide for setting up an RStudio server inside a container with your local RStudio settings. We will use the Rocker RStudio image and show how to customize it with the docker run command and its arguments.
By the end of this tutorial, you will be able to:
- Launch an RStudio server inside a container
- Mount local folders
- Clone local RStudio settings (color theme, code snippets, etc.)
- Load local Renviron setting

Introduction
RStudio is the primary IDE for the R programming language. Unlike other general-purpose IDEs such as VScode, RStudio was built and designed specifically for R users and their needs. This is one of the reasons for the popularity of RStudio among R users. By default, RStudio does not have native support for Docker. The main method for setting and running RStudio inside a container is using the RStudio server version. This required installing and setting the server inside a container, which might be an entry barrier for some users. Luckily, the Rocker project — the main source for R images provides built-in and ready-to-use images with an RStudio server.
Throughout this tutorial, we will use the Rocker RStudio image, which is available on Docker Hub.
Prerequisites
To follow along with this tutorial and run the code below, you will need:
- Docker Desktop (or any alternative)
- Docker Hub account
- Basic understanding of the docker run command
Getting Started with Rocker
The Rocker Project is the main hub for built-in R images. It provides various images with different R environment settings, such as base-r, tidyverse, ML-verse, shiny, geospatial, and, of course, the RStudio server image. The full list of available R images is on the Rocker’s Docker Hub page.
We will use the rocker/rstudio image, which, as its name implies, has an RStudio server installed and ready to use. Using thedocker run command, we can launch this container in an interactive mode and access the RStudio server via the browser.
Let’s get started by pulling the image with the docker pull command:
>docker pull rocker/rstudio                                                                                                                                            ok
Using default tag: latest
latest: Pulling from rocker/rstudio
a4a2c7a57ed8: Pull complete
d0f9831967fe: Pull complete
e78811385d51: Pull complete
c61633a20287: Pull complete
832cef14f2fb: Pull complete
8395fbba6231: Pull complete
fb53abdcfb34: Pull complete
c942edef0d7f: Pull complete
Digest: sha256:8e25784e1d29420effefae1f31e543c792d215d89ce717b0cc64fb18a77668f3
Status: Downloaded newer image for rocker/rstudio:latest
docker.io/rocker/rstudio:latest
You can use the docker images command to verify that the image was downloaded successfully:
>docker images                                                                                                                                                    ok  36s
REPOSITORY              TAG          IMAGE ID       CREATED       SIZE
rocker/rstudio          latest       7039fb162243   2 days ago    1.94GB
Let’s now go ahead and use the suggested command from the Rocker Project to launch RStudio inside the container with the docker run command:
>docker run --rm -ti -e PASSWORD=yourpassword -p 8787:8787 rocker/rstudio
Before we open the RStudio server on the browser, let’s review the run arguments we used above:
- rm — Automatically remove the container when it exits (from the terminal control + c)
- ti — Run the container in an interactive mode
- e — Set environment variable, in this case, to define the server login password as yourpassword
- p — Define the port mapping. In this case, we will map the container’s 8787 port with port 8787 on the local machine
After running the command, you can access the RStudio server on local host 8787 (e.g., http://localhost:8787). This will prompt the login page, where you should use:
- Username: rstudio
- Password: yourpassword (as set in the run commend)
You should expect the following output:
Note: You can stop the running container on terminal by clicking control+c.
Oh No! It Is Ephemeral!
By default, the Docker container runs in ephemeral mode. Any code created and saved on the container or input you generated will be lost when terminating the container run time. This is neither practical nor useful if you wish to use Docker as your development environment. To address this issue, we will use the volume (or v) argument, which enables the mount of local folders with the container files system.
The below code demonstrates the use of the volume argument to mount the folder we execute the run command from (e.g., .) with the RStudio server home folder:
docker run --rm -ti \
-v .:/home/rstudio \
-e PASSWORD=yourpassword \
-p 8787:8787 rocker/rstudio
The volume argument maps the local folder (e.g., source) with the container (e.g., target) using the following format source:target.
Let’s now go back to the browser and reopen the RStudio server using the local host address — http://localhost:8787. You should expect to see in the RStudio files section the folders and/or files that are available on the local folder you mount to the container. In my case, I will mount my tutorials folder, which has the following folders:
.
├── Introduction-to-Docker
├── awesome-ds-setting
├── forecast-poc
├── forecasting-at-scale
├── lang2sql
├── postgres-docker
├── python
├── rstudio-docker
├── sdsu-docker-workshop
├── shinylive-r
├── statistical-rethinking-2024
├── vscode-python
├── vscode-python-template
├── vscode-r
└── vscode-r-template
As you can see in the screenshot below, the local folders are now available and accessible from the RStudio server (marked with a purple rectangle):
Note: You can use the volume argument to mount multiple volumes. For example, one for your project and second for a folder with your data folders
This enables us to read from and write to the local folder from the container during run time.
Clone Your Local RStudio Settings
In the previous section, we saw how to mount a local folder to the container with the volume argument. This enables us to save our code locally while working inside the container. In this section, we will see how we can leverage the volume argument to mount our local RStudio setting with the ones on the container. The idea here is to launch the container and run the RStudio server with our local settings without needing to update the settings any time we relaunch the container. This includes loading local settings such as color theme settings, code snippets, environment variables, etc.
Before we can update the docker run with the local RStudio configuration folder, we need to identify the folder path of the config folder of both the local and the one on the container. For example, the path on my machine is ~/.config/rstudio and it contains the following folders and files:
.
├── dictionaries
│   └── custom
├── rstudio-prefs.json
└── snippets
    └── r.snippets
Similarly, the .config/rstudio folder on the container is under the /home/rstudio/. Therefore, we will use the following mapping:
$HOME/.config/rstudio:/home/rstudio/.config/rstudio
Likewise, we want to mount the .Renviron file with the local environment variables. The .Renviron file is under the root folder on the local machine, and we follow the same approach to map the local file with the ones on the container:
$HOME/.Renviron:/home/rstudio/.Renviron
Let’s now add it all together and relaunch the container:
docker run --rm -ti \
-v .:/home/rstudio \
-v $HOME/.config/rstudio:/home/rstudio/.config/rstudio \
-v $HOME/.Renviron:/home/rstudio/.Renviron \
-e PASSWORD=yourpassword \
-p 8787:8787 rocker/rstudio
After mounting the local RStudio config folder with the one on the container, the server settings are now mapped with the local RStudio settings on my machine:
Summary
This tutorial focuses on customizing the Rocker’s RStudio image with the docker run command. We used the volume argument to mount the local folder to the container working directory. This enables us to work inside a containerized environment and save our work locally. In addition, we used the volume argument to clone the local RStudio settings to the container. This makes the transition from the local environment to the containerized smoother. The command can become long and convoluted as we add and use more arguments. Once you have finalized your run settings, the next step is to transition it into a YAML file using the Docker Compose. Beyond the simplification of the launch process of the container, Docker Compose enables you to manage more complex scenarios, such as launching multiple containers.
Resources
- RStudio — https://posit.co/products/open-source/rstudio/
- The Rocker Project — https://rocker-project.org/
- Docker Hub — https://hub.docker.com/
Running RStudio Inside a Container was originally published in Towards Data Science on Medium, where people are continuing the conversation by highlighting and responding to this story.
Denial of responsibility! Techno Blender is an automatic aggregator of the all world’s media. In each content, the hyperlink to the primary source is specified. All trademarks belong to their rightful owners, all materials to their authors. If you are the owner of the content and do not want us to publish your materials, please contact us by email – [email protected]. The content will be deleted within 24 hours.