
Serving Transformer Models in Shiny Apps | by Peer Christensen | Sep, 2022
A step-by-step guide on combining the best of R and Python to create awesome NLP products
For a long time, R has been my go-to tool for most data science-related tasks. I particularly love how easily I can get things done fast and fluently. In particular, the emergence of the tidyverse has really been a game-changer for data wrangling, exploratory analysis, and data visualization. Moreover, Shiny — a framework for building versatile and beautiful web applications — has become increasingly popular.
However, when it comes to machine and deep learning, Python seems to be several steps ahead with ML/DL frameworks such as Sci-kit Learn, PyTorch, and Tensorflow/Keras. Consequently, I find myself using (and liking) Python more and more.
For me, the frustrating part was that I often wanted to deploy and expose computer vision and NLP models in Shiny apps. Even though Shiny has recently become available for Python, Shiny for Python is currently in a very early stage of development. Similar tools are indeed available to Python users, e.g. Streamlit and Gradio are great for exposing ML models, but I find that they are somewhat limited compared to Shiny — particularly when it comes to creating custom user interfaces. There are of course more options for Python that I will need to explore, but I really like developing Shiny apps.
I therefore set out to learn how to do the following:
- Use R’s reticulate package to use Python code in a Shiny app.
- Implement a pre-trained transformer model to process user input.
- Containerize apps containing both R and Python functionality as well as serving a transformer model.
In this article, we’ll go through all three steps to see how it’s done.
I must admit that getting started with reticulate and bridging the gap between R and Python was somewhat tricky and involved a bit of trial, error and tenacity. The good news is that now you might not have to. Here, I will show one way to use python code in R and Shiny.
Step 1: Getting set up
First things first, make sure you have all the required packages installed including shiny and reticulate and start a new Shiny app project.
Next, we will need to set up a Python environment. There are different ways of doing this, e.g. by using virtualenv as per the reticulate documentation. Here, we will use conda to set up our environment from a YAML-file in which we specify all the necessary dependencies. Create a new file called environment.yml in your project’s home directory with the following contents:
name: my_env
channels:
- conda-forge
- defaults
dependencies:
- python=3.8
- pip
- pip:
- numpy
As you can see, we’ve specified that the environment should be called my_env in which Python v. 3.8 will be installed along with pip — an installer, which in turn fetches the numpy package, which we will need for a simple function that we’ll create.
We can then create the environment by opening a terminal in ourRStudio session and running the following command:
conda env create -f environment.yml
You may check that the environment has been created with the command conda env list. To activate the environment, run the following:
conda activate my_env
Now, in order for reticulate to find the version of Python we just installed, copy and save the output of the commandwhich python for later. It should end in something like “../miniconda3/envs/my_env/bin/python”.
Step 2: Connecting Shiny with reticulate and Python
If you’ve initialized your project as a Shiny web app, you should already have a file called app.r. For this minimal example, we’ll keep it simple and modify the app that’s already made for us. At the top of this script, insert the following lines:
library(shiny)
library(reticulate)Sys.setenv(RETICULATE_PYTHON="python-path-in-my_env")
reticulate::use_condaenv("my_env")
You may also set RETICULATE_PYTHON in a file called .Rprofile instead.
Step 3: Creating and implementing Python functions
Now we can create a simple Python function that we will be using in the server code of app.r. Start by creating a script, which you may call python_functions.py with the following lines of code:
import numpy as npdef make_bins(x, length):low = min(x)
return np.linspace(low,high,length).tolist()
high = max(x)
length = int(length)
This function finds the lowest and highest values of a vector and uses Numpy’s linspace() function to return a list of equidistant numbers ranging from lowest to highest. The length of the list is equal to length and will be set interactively by users of the app. With the function defined, we can move on to app.r and modify the script to use our python function.
Right below the two lines we inserted in app.r in the previous step, we add the following line:
reticulate::py_run_file("python_functions.py")
This line makes our make_bins()function available whenever we start a Shiny session. Now, remove or comment out the following line in the server code:
bins <- seq(min(x), max(x), length.out = input$bins + 1)
We then substitute this line with the following:
bins <- py$make_bins(x, input$bins + 1)
Note the py$ part, which signals that the function is a python function. We can finally, run the app and hopefully see that it works!
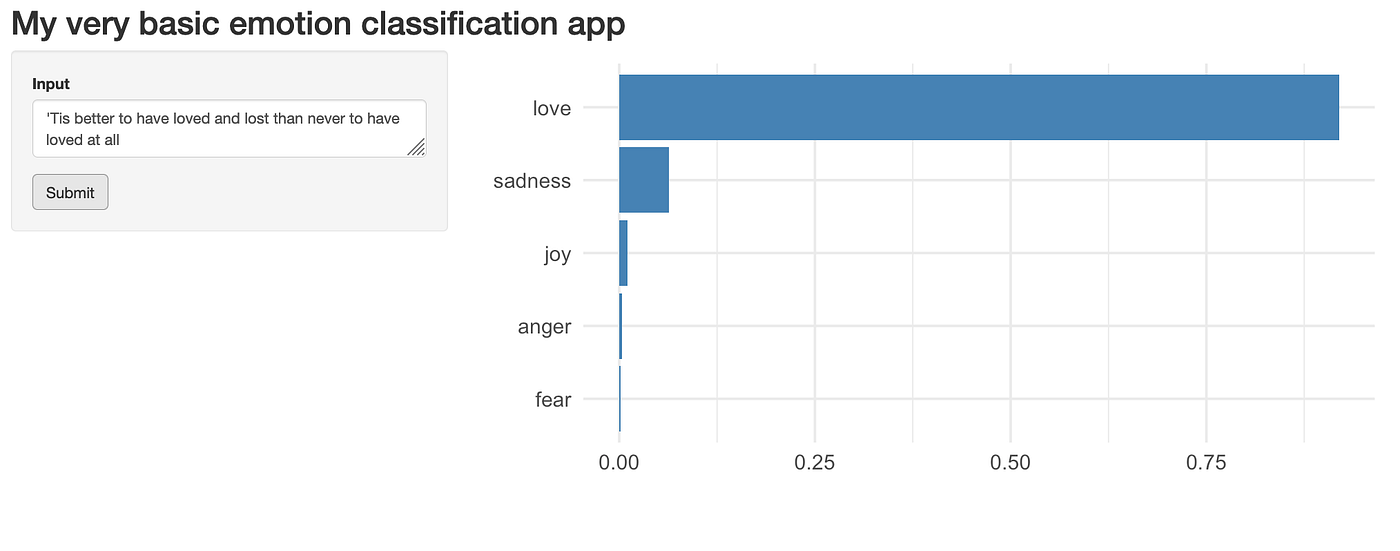
So now we’ll try to implement a transformer model that determines whether a given input text is either positive or negative. The model we’ll be using is called distilbert-base-uncased-emotion, which you may learn more about on the huggingface site. If you haven’t done so already, I encourage you to explore the site, the available models, and supported NLP and computer vision tasks.
Step 1: Updating the conda environment
We first need to add the packages torch and transformers to our environment.yml file in the following way:
name: my_env
channels:
- conda-forge
- defaults
dependencies:
- python=3.8
- pip
- pip:
- torch
- transformers
We can then update the environment with the following commands:
conda deactivate;
conda env update -f environment.yml --prune
The —-pruneflag ensures that unnecessary packages are removed when updating the environment.
Step 2: Updating python_functions.py
With torch and transformers installed, we’re ready to write new Python functions that allow us to use the model.
import torch
from transformers import pipeline
import numpy as npdef get_model():
model = pipeline("text-classification", model='bhadresh-savani/distilbert-base-uncased-emotion', top_k=-1)
return modeldef get_predictions(input_text, classifier):
predictions = classifier(input_text)
return predictions
The first time you run get_model() the model is donwloaded, which may take a minute or two. It’s a good idea, to run get_predictions() outside of a Shiny session to get an idea about what the output looks like.
Step 3: Creating a basic app exposing the model
Now, we can finally build an app that makes use of the model. I’ve provided a simple working script below, which you can try out if you’ve completed the previous steps.
You’ll notice that we load the emotion classification model on line 10 with model <- py$get_model().
Then, on lines 31–33, we apply the model to some input text provided by users and convert the output to a data frame, which makes plotting much easier.
predictions <- py$get_predictions(input$text)df <- map_df(predictions[[1]], unlist)
It can sometimes be tricky to convert the output of a Python function to a data type that R can work with. In case you run into trouble in your own project, you might find the reticulate docs useful (see “Type Conversion”).
Below you can see what the app will look like.
Docker and container technology offer a great way of running code and applications with full control over environments. We first need to create a Dockerfile, which can often be quite difficult and time consuming. here, I will show one solution to combining Python, R, Shiny and transformer models in a single Docker image. It may not be the most efficient one, and some dependencies and commands may be superfluous. Thus, you might be able to reduce both the time it takes to build the image as well as its size by tinkering with the Dockerfile with specifies how the image is built.
Step 1: Writing a Dockerfile
The first line of the Dockerfile indicates the base image. By default, the latest version is used. Usually, when putting the app into production, it’s advisable to opt for a specific version. The next few lines install a few dependencies including R.
FROM continuumio/miniconda3RUN apt-get update -y; apt-get upgrade -y; \
apt-get install -y vim-tiny vim-athena ssh r-base-core \
build-essential gcc gfortran g++
Normally, I prefer using Docker images created by the Rocker Project, which makes it very easy to write Dockerfiles for containerizing Shiny apps and other R-based applications. However, I ran into some issues when adding Python to the mix and decided to try a different way.
Next, our environment is installed and activated just as before. I have to admit that I’m not yet entirely sure about how many of the environment variables below that are strictly necessary.
COPY environment.yml environment.yml
RUN conda env create -f environment.ymlRUN echo "conda activate my_env" >> ~/.bashrcENV CONDA_EXE /opt/conda/bin/conda
ENV CONDA_PREFIX /opt/conda/envs/my_env
ENV CONDA_PYTHON_EXE /opt/conda/bin/python
ENV CONDA_PROMPT_MODIFIER (my_env)
ENV CONDA_DEFAULT_ENV my_env
ENV PATH /opt/conda/envs/my_env/bin:/opt/conda/bin:/usr/local/sbin:/usr/local/bin:/usr/sbin:/usr/bin:/sbin:/bin
Then, we download our model with the following line:
RUN python -c "from transformers import pipeline; pipeline('text-classification', model='bhadresh-savani/distilbert-base-uncased-emotion')"
It is important to do this at build time, as opposed to runtime. If we were to to this at runtime, every session would start by downloading the model!
There are different ways of installing R packages. This way is pretty straightforward.
RUN R -e "install.packages(c('dplyr','purrr','ggplot2','shiny','reticulate'), repos = 'http://cran.us.r-project.org')"
Note that this is actually a single line. You can also see that we’re installing dplyr, purrr and ggplot2, which are the tidyverse packages we actually need. Consequently, we need to load these specific packages and remove library(tidyverse) from app.r.
For some reason, I wasn’t able to install the entire tidyverse at this time. Besides, doing so would take considerably longer and result in an image that would be larger than necessary.
Lastly, we copy everything in our project folder to the image’s working directory, give write read/write permission, expose a port and specify a final command that actually runs the app.
COPY . ./RUN chmod ugo+rwx ./EXPOSE 3838CMD ["R", "-e", "shiny::runApp('/', host = '0.0.0.0', port = 3838)"]
Below you can see the entire Dockerfile.
Step 2: Building the image
If we simply call our Dockerfile “Dockerfile”, Docker will by default look for this file when we run the following command:
docker build -t mysimpleapp .
The -t is for ‘tag’ and we will tag this image ‘mysimpleapp’. The dot in the end indicates that the build context is the current directory.
In case you run into trouble due to disk space limitations, you may increase the allowed disk space in the Docker settings, or, in case you have large dangling images you don’t need, you can run docker system prune or docker system prune -a. Be aware that the latter command will remove all unused images!
Finally, keeping our fingers crossed, we can try and run our app!
docker run -it -p 3838:3838 mysimpleapp
The -it flag means that we want to run in interactive mode, so that we may see what’s going on ‘inside’ our container as it starts up. This might be helpful in case something unexpectedly goes wrong.
In your console, you should then see R starting up followed by ‘Listening on http://0.0.0.0:3838’. Point your browser to this address and check that the app works.
I’ve deployed a slightly more advanced app here. This app, which I’ve called Wine Finder, uses a semantic search model called all-MiniLM-L6-v2 that lets users search for wines they might like by typing queries describing the qualities they’re looking for in a wine. For instance, a query might be phrased as“full-bodied with notes of red berries”. The app includes descriptions of roughly 130.000 wines, which are then ranked by relevance with respect to the query. The dataset is available here. Below you can see what the app looks like.
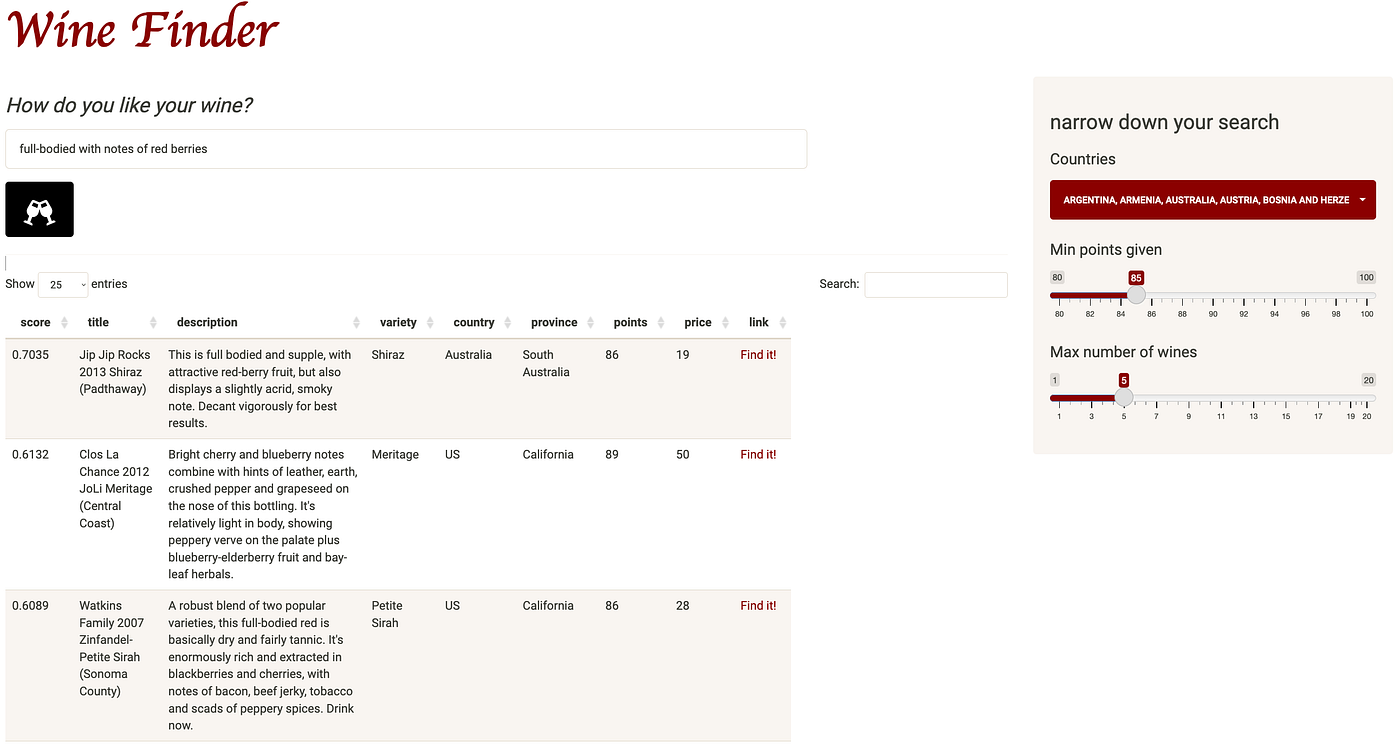
It may be a little slow to load since I’ve allowed the service to basically shut down when not in use. This results in “cold starts”, which is much cheaper than having the service constantly running.
We’ve seen how to implement python functions and transformer models in Shiny apps and how to wrap it all up in a docker image ready to be deployed as a web service. It is relatively easy to deploy docker images as web apps using cloud providers such as AWS and Microsoft Azure. However, for personal projects, I think Google Cloud is the cheapest option at the moment. If you would like to deploy e.g. a Shiny app on Google Cloud, make sure to check out my step-by-step guide to using Google Cloud Run for deploying shiny apps. No matter which of these providers you use, the process is roughly the same. You will need to have an account, push your docker image to a container registry and then set up a web service using the image.
We haven’t covered deployment of Shiny apps that run python code directly on Shinyapp.io. The procedure is slightly different as described in this tutorial. Be aware that ff you plan on exposing transformer models in your app, shinyapps.io may not be a viable option, at least not if you’re on the free tier. However, if you don’t need the app to actually contain a large transformer model and/or a lot of data, you may consider simply calling the Huggingface Inference API for the given model.

A step-by-step guide on combining the best of R and Python to create awesome NLP products
For a long time, R has been my go-to tool for most data science-related tasks. I particularly love how easily I can get things done fast and fluently. In particular, the emergence of the tidyverse has really been a game-changer for data wrangling, exploratory analysis, and data visualization. Moreover, Shiny — a framework for building versatile and beautiful web applications — has become increasingly popular.
However, when it comes to machine and deep learning, Python seems to be several steps ahead with ML/DL frameworks such as Sci-kit Learn, PyTorch, and Tensorflow/Keras. Consequently, I find myself using (and liking) Python more and more.
For me, the frustrating part was that I often wanted to deploy and expose computer vision and NLP models in Shiny apps. Even though Shiny has recently become available for Python, Shiny for Python is currently in a very early stage of development. Similar tools are indeed available to Python users, e.g. Streamlit and Gradio are great for exposing ML models, but I find that they are somewhat limited compared to Shiny — particularly when it comes to creating custom user interfaces. There are of course more options for Python that I will need to explore, but I really like developing Shiny apps.
I therefore set out to learn how to do the following:
- Use R’s reticulate package to use Python code in a Shiny app.
- Implement a pre-trained transformer model to process user input.
- Containerize apps containing both R and Python functionality as well as serving a transformer model.
In this article, we’ll go through all three steps to see how it’s done.
I must admit that getting started with reticulate and bridging the gap between R and Python was somewhat tricky and involved a bit of trial, error and tenacity. The good news is that now you might not have to. Here, I will show one way to use python code in R and Shiny.
Step 1: Getting set up
First things first, make sure you have all the required packages installed including shiny and reticulate and start a new Shiny app project.
Next, we will need to set up a Python environment. There are different ways of doing this, e.g. by using virtualenv as per the reticulate documentation. Here, we will use conda to set up our environment from a YAML-file in which we specify all the necessary dependencies. Create a new file called environment.yml in your project’s home directory with the following contents:
name: my_env
channels:
- conda-forge
- defaults
dependencies:
- python=3.8
- pip
- pip:
- numpy
As you can see, we’ve specified that the environment should be called my_env in which Python v. 3.8 will be installed along with pip — an installer, which in turn fetches the numpy package, which we will need for a simple function that we’ll create.
We can then create the environment by opening a terminal in ourRStudio session and running the following command:
conda env create -f environment.yml
You may check that the environment has been created with the command conda env list. To activate the environment, run the following:
conda activate my_env
Now, in order for reticulate to find the version of Python we just installed, copy and save the output of the commandwhich python for later. It should end in something like “../miniconda3/envs/my_env/bin/python”.
Step 2: Connecting Shiny with reticulate and Python
If you’ve initialized your project as a Shiny web app, you should already have a file called app.r. For this minimal example, we’ll keep it simple and modify the app that’s already made for us. At the top of this script, insert the following lines:
library(shiny)
library(reticulate)Sys.setenv(RETICULATE_PYTHON="python-path-in-my_env")
reticulate::use_condaenv("my_env")
You may also set RETICULATE_PYTHON in a file called .Rprofile instead.
Step 3: Creating and implementing Python functions
Now we can create a simple Python function that we will be using in the server code of app.r. Start by creating a script, which you may call python_functions.py with the following lines of code:
import numpy as npdef make_bins(x, length):low = min(x)
return np.linspace(low,high,length).tolist()
high = max(x)
length = int(length)
This function finds the lowest and highest values of a vector and uses Numpy’s linspace() function to return a list of equidistant numbers ranging from lowest to highest. The length of the list is equal to length and will be set interactively by users of the app. With the function defined, we can move on to app.r and modify the script to use our python function.
Right below the two lines we inserted in app.r in the previous step, we add the following line:
reticulate::py_run_file("python_functions.py")
This line makes our make_bins()function available whenever we start a Shiny session. Now, remove or comment out the following line in the server code:
bins <- seq(min(x), max(x), length.out = input$bins + 1)
We then substitute this line with the following:
bins <- py$make_bins(x, input$bins + 1)
Note the py$ part, which signals that the function is a python function. We can finally, run the app and hopefully see that it works!
So now we’ll try to implement a transformer model that determines whether a given input text is either positive or negative. The model we’ll be using is called distilbert-base-uncased-emotion, which you may learn more about on the huggingface site. If you haven’t done so already, I encourage you to explore the site, the available models, and supported NLP and computer vision tasks.
Step 1: Updating the conda environment
We first need to add the packages torch and transformers to our environment.yml file in the following way:
name: my_env
channels:
- conda-forge
- defaults
dependencies:
- python=3.8
- pip
- pip:
- torch
- transformers
We can then update the environment with the following commands:
conda deactivate;
conda env update -f environment.yml --prune
The —-pruneflag ensures that unnecessary packages are removed when updating the environment.
Step 2: Updating python_functions.py
With torch and transformers installed, we’re ready to write new Python functions that allow us to use the model.
import torch
from transformers import pipeline
import numpy as npdef get_model():
model = pipeline("text-classification", model='bhadresh-savani/distilbert-base-uncased-emotion', top_k=-1)
return modeldef get_predictions(input_text, classifier):
predictions = classifier(input_text)
return predictions
The first time you run get_model() the model is donwloaded, which may take a minute or two. It’s a good idea, to run get_predictions() outside of a Shiny session to get an idea about what the output looks like.
Step 3: Creating a basic app exposing the model
Now, we can finally build an app that makes use of the model. I’ve provided a simple working script below, which you can try out if you’ve completed the previous steps.
You’ll notice that we load the emotion classification model on line 10 with model <- py$get_model().
Then, on lines 31–33, we apply the model to some input text provided by users and convert the output to a data frame, which makes plotting much easier.
predictions <- py$get_predictions(input$text)df <- map_df(predictions[[1]], unlist)
It can sometimes be tricky to convert the output of a Python function to a data type that R can work with. In case you run into trouble in your own project, you might find the reticulate docs useful (see “Type Conversion”).
Below you can see what the app will look like.
Docker and container technology offer a great way of running code and applications with full control over environments. We first need to create a Dockerfile, which can often be quite difficult and time consuming. here, I will show one solution to combining Python, R, Shiny and transformer models in a single Docker image. It may not be the most efficient one, and some dependencies and commands may be superfluous. Thus, you might be able to reduce both the time it takes to build the image as well as its size by tinkering with the Dockerfile with specifies how the image is built.
Step 1: Writing a Dockerfile
The first line of the Dockerfile indicates the base image. By default, the latest version is used. Usually, when putting the app into production, it’s advisable to opt for a specific version. The next few lines install a few dependencies including R.
FROM continuumio/miniconda3RUN apt-get update -y; apt-get upgrade -y; \
apt-get install -y vim-tiny vim-athena ssh r-base-core \
build-essential gcc gfortran g++
Normally, I prefer using Docker images created by the Rocker Project, which makes it very easy to write Dockerfiles for containerizing Shiny apps and other R-based applications. However, I ran into some issues when adding Python to the mix and decided to try a different way.
Next, our environment is installed and activated just as before. I have to admit that I’m not yet entirely sure about how many of the environment variables below that are strictly necessary.
COPY environment.yml environment.yml
RUN conda env create -f environment.ymlRUN echo "conda activate my_env" >> ~/.bashrcENV CONDA_EXE /opt/conda/bin/conda
ENV CONDA_PREFIX /opt/conda/envs/my_env
ENV CONDA_PYTHON_EXE /opt/conda/bin/python
ENV CONDA_PROMPT_MODIFIER (my_env)
ENV CONDA_DEFAULT_ENV my_env
ENV PATH /opt/conda/envs/my_env/bin:/opt/conda/bin:/usr/local/sbin:/usr/local/bin:/usr/sbin:/usr/bin:/sbin:/bin
Then, we download our model with the following line:
RUN python -c "from transformers import pipeline; pipeline('text-classification', model='bhadresh-savani/distilbert-base-uncased-emotion')"
It is important to do this at build time, as opposed to runtime. If we were to to this at runtime, every session would start by downloading the model!
There are different ways of installing R packages. This way is pretty straightforward.
RUN R -e "install.packages(c('dplyr','purrr','ggplot2','shiny','reticulate'), repos = 'http://cran.us.r-project.org')"
Note that this is actually a single line. You can also see that we’re installing dplyr, purrr and ggplot2, which are the tidyverse packages we actually need. Consequently, we need to load these specific packages and remove library(tidyverse) from app.r.
For some reason, I wasn’t able to install the entire tidyverse at this time. Besides, doing so would take considerably longer and result in an image that would be larger than necessary.
Lastly, we copy everything in our project folder to the image’s working directory, give write read/write permission, expose a port and specify a final command that actually runs the app.
COPY . ./RUN chmod ugo+rwx ./EXPOSE 3838CMD ["R", "-e", "shiny::runApp('/', host = '0.0.0.0', port = 3838)"]
Below you can see the entire Dockerfile.
Step 2: Building the image
If we simply call our Dockerfile “Dockerfile”, Docker will by default look for this file when we run the following command:
docker build -t mysimpleapp .
The -t is for ‘tag’ and we will tag this image ‘mysimpleapp’. The dot in the end indicates that the build context is the current directory.
In case you run into trouble due to disk space limitations, you may increase the allowed disk space in the Docker settings, or, in case you have large dangling images you don’t need, you can run docker system prune or docker system prune -a. Be aware that the latter command will remove all unused images!
Finally, keeping our fingers crossed, we can try and run our app!
docker run -it -p 3838:3838 mysimpleapp
The -it flag means that we want to run in interactive mode, so that we may see what’s going on ‘inside’ our container as it starts up. This might be helpful in case something unexpectedly goes wrong.
In your console, you should then see R starting up followed by ‘Listening on http://0.0.0.0:3838’. Point your browser to this address and check that the app works.
I’ve deployed a slightly more advanced app here. This app, which I’ve called Wine Finder, uses a semantic search model called all-MiniLM-L6-v2 that lets users search for wines they might like by typing queries describing the qualities they’re looking for in a wine. For instance, a query might be phrased as“full-bodied with notes of red berries”. The app includes descriptions of roughly 130.000 wines, which are then ranked by relevance with respect to the query. The dataset is available here. Below you can see what the app looks like.
It may be a little slow to load since I’ve allowed the service to basically shut down when not in use. This results in “cold starts”, which is much cheaper than having the service constantly running.
We’ve seen how to implement python functions and transformer models in Shiny apps and how to wrap it all up in a docker image ready to be deployed as a web service. It is relatively easy to deploy docker images as web apps using cloud providers such as AWS and Microsoft Azure. However, for personal projects, I think Google Cloud is the cheapest option at the moment. If you would like to deploy e.g. a Shiny app on Google Cloud, make sure to check out my step-by-step guide to using Google Cloud Run for deploying shiny apps. No matter which of these providers you use, the process is roughly the same. You will need to have an account, push your docker image to a container registry and then set up a web service using the image.
We haven’t covered deployment of Shiny apps that run python code directly on Shinyapp.io. The procedure is slightly different as described in this tutorial. Be aware that ff you plan on exposing transformer models in your app, shinyapps.io may not be a viable option, at least not if you’re on the free tier. However, if you don’t need the app to actually contain a large transformer model and/or a lot of data, you may consider simply calling the Huggingface Inference API for the given model.
Denial of responsibility! Techno Blender is an automatic aggregator of the all world’s media. In each content, the hyperlink to the primary source is specified. All trademarks belong to their rightful owners, all materials to their authors. If you are the owner of the content and do not want us to publish your materials, please contact us by email – [email protected]. The content will be deleted within 24 hours.