
Setting A Dockerized Python Environment — The Hard Way
Setting A Dockerized Python Environment — The Hard Way
This post will review different methods to run a dockerized Python environment from the command line (CLI). Am I recommending you run your Python environment from the CLI? Absolutely not!
There are better ways to set up a Python development environment, such as using VScode and the Dev Containers extension. We will use the “hard way” to set up a Python environment from the CLI for learning purposes. We will review different approaches to launching a container with the run command and see how to customize a built-in image using the Dockerfile.
Prerequisites
To follow along with this tutorial, you will need the following:
- Docker Desktop (or equivalent) if you are using a macOS or Windows OS machine, or Docker installed if you are using a Linux OS
- Docker Hub account to pull the image from.
Throughout this tutorial, we will use the official Python image — python:3.1o.
Getting Started
Let’s get started by pulling the official Python 3.10 image from Docker Hub. First, let’s log in to Docker Hub by using the docker logincommand:
docker login docker.io                                                                                                                                                                      ok
Authenticating with existing credentials...
Login Succeeded
Next, we will use the docker pull command from the terminal:
docker pull python:3.10 ok
If this is the first time you pull the image, you should expect the following output:
3.10: Pulling from library/python
66932e2b787d: Pull complete
4afa7e263db1: Pull complete
c812910e5e62: Pull complete
f4e4299bb649: Pull complete
5213cc2f9120: Pull complete
4a3b5b2f0e66: Pull complete
c214ceb1cabf: Pull complete
f5336038b15c: Pull complete
Digest: sha256:f94601bb6374b0b63835a70c9e5c3ba1b19bc009133900a9473229a406018e46
Status: Downloaded newer image for python:3.10
docker.io/library/python:3.10
You can review the image details with the use of the docker images command:
docker images                                                                                                                                                                          ok  11s
REPOSITORY   TAG       IMAGE ID       CREATED      SIZE
python       3.10      f7537c504c9a   7 days ago   1.01GB
Before running the container, let’s review the image metadata with the docker inspect command:
docker inspect python:3.10
This will return the below JSON output:
[
    {
        "Id": "sha256:f7537c504c9a91a22c9a255ee02048e7079cacdee583290e8238c605d17f9600",
        "RepoTags": [
            "python:3.10"
        ],
        "RepoDigests": [
            "python@sha256:f94601bb6374b0b63835a70c9e5c3ba1b19bc009133900a9473229a406018e46"
        ],
        "Parent": "",
        "Comment": "buildkit.dockerfile.v0",
        "Created": "2024-02-03T10:49:13Z",
        "Container": "",
        "ContainerConfig": {
            "Hostname": "",
            "Domainname": "",
            "User": "",
            "AttachStdin": false,
            "AttachStdout": false,
            "AttachStderr": false,
            "Tty": false,
            "OpenStdin": false,
            "StdinOnce": false,
            "Env": null,
            "Cmd": null,
            "Image": "",
            "Volumes": null,
            "WorkingDir": "",
            "Entrypoint": null,
            "OnBuild": null,
            "Labels": null
        },
        "DockerVersion": "",
        "Author": "",
        "Config": {
            "Hostname": "",
            "Domainname": "",
            "User": "",
            "AttachStdin": false,
            "AttachStdout": false,
            "AttachStderr": false,
            "Tty": false,
            "OpenStdin": false,
            "StdinOnce": false,
            "Env": [
                "PATH=/usr/local/bin:/usr/local/sbin:/usr/local/bin:/usr/sbin:/usr/bin:/sbin:/bin",
                "LANG=C.UTF-8",
                "GPG_KEY=A035C8C19219BA821ECEA86B64E628F8D684696D",
                "PYTHON_VERSION=3.10.13",
                "PYTHON_PIP_VERSION=23.0.1",
                "PYTHON_SETUPTOOLS_VERSION=65.5.1",
                "PYTHON_GET_PIP_URL=https://github.com/pypa/get-pip/raw/dbf0c85f76fb6e1ab42aa672ffca6f0a675d9ee4/public/get-pip.py",
                "PYTHON_GET_PIP_SHA256=dfe9fd5c28dc98b5ac17979a953ea550cec37ae1b47a5116007395bfacff2ab9"
            ],
            "Cmd": [
                "python3"
            ],
            "ArgsEscaped": true,
            "Image": "",
            "Volumes": null,
            "WorkingDir": "",
            "Entrypoint": null,
            "OnBuild": null,
            "Labels": null
        },
        "Architecture": "arm64",
        "Variant": "v8",
        "Os": "linux",
        "Size": 1005570383,
        "VirtualSize": 1005570383,
        "GraphDriver": {
            "Data": {
                "LowerDir": "/var/lib/docker/overlay2/d2fd76e7396796018a959209b51fe8311a188c8eae8e339e9e556de0889ca0bd/diff:/var/lib/docker/overlay2/bbedb25c5aa6ec3f2fc632e62a53989a329b907143fac165f899209293627a69/diff:/var/lib/docker/overlay2/ed6a4bf49214e6b496b7716443b8de380481cd9416bc4a378f29183c9129786f/diff:/var/lib/docker/overlay2/ac9543f44a835c203fb0b0b28958d94df72d206c9060c9d83307b39f50355102/diff:/var/lib/docker/overlay2/94a9f92c36ea6251feda52be8e76ec4da4a9c66b744a29472e1ccfdf34a6f69d/diff:/var/lib/docker/overlay2/6ee22c274256834a64008022856d365d91373bb490ae9f2f1723cb524b246a29/diff:/var/lib/docker/overlay2/2fa272376e0ce68f4f34f18e5ecb1ddd58a32fb20a82e5a417514047f8e684a3/diff",
                "MergedDir": "/var/lib/docker/overlay2/f2d64d1affbe99afb05251435f7705cb97e2efa4f8febb494b4cbaa21e7f742a/merged",
                "UpperDir": "/var/lib/docker/overlay2/f2d64d1affbe99afb05251435f7705cb97e2efa4f8febb494b4cbaa21e7f742a/diff",
                "WorkDir": "/var/lib/docker/overlay2/f2d64d1affbe99afb05251435f7705cb97e2efa4f8febb494b4cbaa21e7f742a/work"
            },
            "Name": "overlay2"
        },
        "RootFS": {
            "Type": "layers",
            "Layers": [
                "sha256:9f8c60461a42fd9f275c56f4ec8fea8a8ea2d938493e316e830994a3814cf0aa",
                "sha256:927a28cdbf6c1705342b2cba0069457313815058dcebe1996e46cade38a09370",
                "sha256:e85139d96aee18e99fc964d02546be48cc6a4d4dfd9f465a91f172b7c535e55f",
                "sha256:f3168ba6a8d2ec30e12002ad5b7b497cf7409f3e19cc8d8f447f6cf4231a2482",
                "sha256:acbc6c8127209b09fa336e354037fdc630d3594e15174f2bc1bdbf31d5591376",
                "sha256:06c4da96c7dd2fbbbb541e000bd0ea4cfbf7c80b24f098a9d67f677ef5e6c63e",
                "sha256:1cdf208dc10679cf5db6d4f0e17ff6d5bfe754b4195ddd3b153b6d1ff51ce909",
                "sha256:5d6f554f67c7da9d34763916bac632a450902c6e6fdbf9244f888f110fd37740"
            ]
        },
        "Metadata": {
            "LastTagTime": "0001-01-01T00:00:00Z"
        }
    }
]
The ispect command provides a lot of useful information about the image, such as the layers information, the image size, the hardware architecture, etc. As we want to run the image, the most interesting detail is the CMD setting. The CMDcommand in the Dockerfile defines what command to execute during the container launch time. We can parse from the above output the CMD information with the jq package:
docker inspect python:3.10 | jq '.[] | .Config | .Cmd'                                                                                                                                      ok
[
  "python3"
]
As you can see, the image is set to execute the python3 command during the container run time. Let’s now launch the container using the run command:
docker run python:3.10
And… nothing happens. The reason for that, in short, is that we need to give Docker access to the terminal. We will use the interactive and TTY arguments to run the image in an interactive mode:
docker run --interactive --tty python:3.10
This will attach the terminal to the container and open Python inside the container:
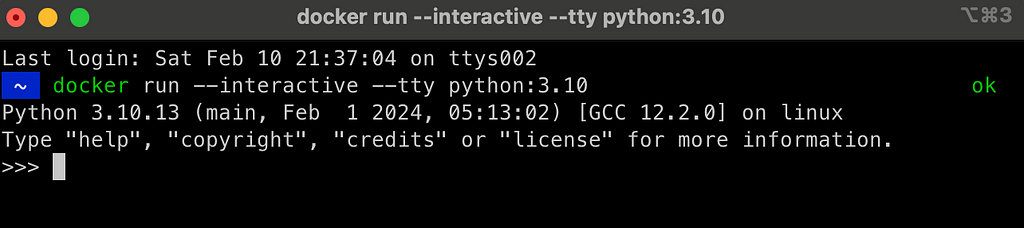
While we were able to launch Python inside a container, it is not as useful:
- We cannot create, edit, and run scripts inside the Python interpreter
- By default, the Python image comes with a limited number of libraries. In this mode, you cannot add additional ones
- Last but not least, the container is ephemeral. Once you stop it, all the work is lost
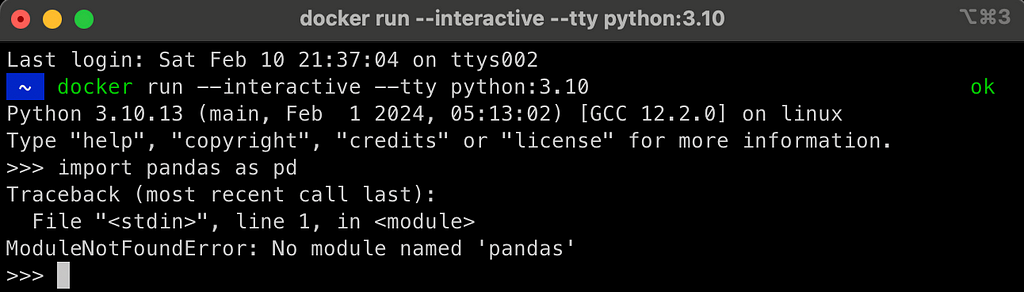
For example, if we will try to load pandas, we will get the following error:
In the following sections, we will address those issues by creating a Dockerfile and customizing the base image functionality. This includes adding the following features:
- Set a virtual environment and install packages with a requirements file. For simplicity,
- Install a vim editor to edit files
- Change the CMD command to open a shell terminal upon launch (as opposed to the Python interpreter). This will enable us to create new scripts, edit, and execute from the terminal
Customize the Base Image
To customize the Python environment and make the above changes, we will create a Dockerfile with the following functionality:
- Import the Python image — python:3.10
- Set a virtual environment
- Install required libraries
- Install vim editor
- Expose a bash terminal
Setting a Python Virtual Environment
To set up a Python virtual environment, we will use the following two helper files:
requirements.txt
wheel==0.40.0
pandas==2.0.3
This file defines the list of Python libraries to install in the virtual environment. For example, in this case, we will install the Pandas library, version 2.0.3. Generally, I also install the wheels library, which handles C dependencies.
The next helper file is the below bash script, which sets the virtual environment and installs the required libraries from the requirements.txt file.
set_python_env.sh
#!/usr/bin/env bash

PYTHON_ENV=$1

python3 -m venv /opt/$PYTHON_ENV  \
        && export PATH=/opt/$PYTHON_ENV/bin:$PATH \
        && echo "source /opt/$PYTHON_ENV/bin/activate" >> ~/.bashrc

source /opt/$PYTHON_ENV/bin/activate

pip3 install -r ./requirements/requirements.txt
Note: We use a variable (marked as $1) to define the environment name, which will be assigned to the PYTHON_ENV variable. Using variables during the build is a good practice, as it enables us to modify some of the image characteristics without modifying the code. We will assign the variable via the Dockerfile.
Let’s explain the following concatenate code from the above bash script that sets the virtual environment:
python3 -m venv /opt/$PYTHON_ENV  \
    && export PATH=/opt/$PYTHON_ENV/bin:$PATH \
    && echo "source /opt/$PYTHON_ENV/bin/activate" >> ~/.bashrc
The above three lines of code include three concatenate expressions:
- First, the python3 -m venv /opt/$PYTHON_ENV set a virtual environment with the venv command
- Second, add the virtual environment path to the PATH variable
- Third, add to the .bashrc file the activate command of the environment. This will ensure that whenever we launch the terminal, it will activate this virtual environment by default (otherwise, you will have to do it manually upon the launch of the environment)
Once the environment is set, we use the source command to activate the environment, and the pip3 command to install the libraries inside the environment.
Creating a Dockerfile
After we review the helper files, let's see how they are incorporated inside the below Dockerfile.
Dockerfile
FROM python:3.10

ARG PYTHON_ENV=my_env
ENV PYTHON_ENV=$PYTHON_ENV

RUN mkdir requirements

COPY requirements.txt set_python_env.sh /requirements/

RUN bash ./requirements/set_python_env.sh $PYTHON_ENV

RUN apt-get update && \
    apt-get install -y \
    vim \
    && apt update


CMD ["/bin/sh", "-c", "bash"]
As you can see, we are using the same image — python:3.10as our base image.
Next, we set an argument named PYTHON_ENV with the ARG command to define the virtual environment name. We setmy_env as the default value, which can be modified during the build time using the arg argument. We use the PYTHON_ENV argument to set an environment variable as well.
Before setting the virtual environment, we will create inside the image a new library under the root folder named requirements and use the COPY command to copy the above helper files — requirements.txt and set_my_python.sh to the requirements folder.
Next, we call the bash script — set_my_python.sh , which sets the virtual environment and installs the required libraries. As mentioned above, we use the PYTHON_ENV variable as an argument with the set_my_python.sh file to set the virtual environment name dynamically.
We use the apt command to install vim — a CLI editor. This will enable us to edit code on via the container CLI.
Last but not least, use the CMD command to launch a shell terminal using bash:
CMD ["/bin/sh", "-c", "bash"]
At this point, we have the below files in the local folder:
.
├── Dockerfile
├── requirements.txt
└── set_python_env.sh
Let’s now go ahead and build the image with the docker build command:
docker build .-f Dockerfile -t my_python_env:3.10
[+] Building 47.3s (10/10) FINISHED
 => [internal] load build definition from Dockerfile                                                 0.2s
 => => transferring dockerfile: 389B                                                                 0.0s
 => [internal] load .dockerignore                                                                    0.2s
 => => transferring context: 2B                                                                      0.0s
 => [internal] load metadata for docker.io/library/python:3.10                                       0.0s
 => [1/5] FROM docker.io/library/python:3.10                                                         1.3s
 => [internal] load build context                                                                    0.4s
 => => transferring context: 460B                                                                    0.0s
 => [2/5] RUN mkdir requirements                                                                     0.5s
 => [3/5] COPY requirements.txt set_python_env.sh /requirements/                                     0.2s
 => [4/5] RUN bash ./requirements/set_python_env.sh my_env                                          26.8s
 => [5/5] RUN apt-get update &&     apt-get install -y     vim     && apt update                    17.4s
 => exporting to image                                                                               0.7s
 => => exporting layers                                                                              0.6s
 => => writing image sha256:391879baceea6154c191692d4bcb9ec9690de6dc4d5edd5b2ed13f6c579dd05c         0.0s
 => => naming to docker.io/library/my_python_env:3.10
Let’s run again the docker images command to review the current images:
docker images
REPOSITORY      TAG       IMAGE ID       CREATED         SIZE
my_python_env   3.10      391879baceea   7 minutes ago   1.23GB
python          3.10      f7537c504c9a   8 days ago      1.01GB
As you can note, adding the virtual environment and installing the packages added about 250 Mb to the image size.
Running the Python Environment
After we built the image, let’s launch the image with the docker run command and check if the above properties are defined as expected:
docker run --interactive --tty my_python_env:3.10
This launches the image in interactive mode, and opens a bash terminal as expected:
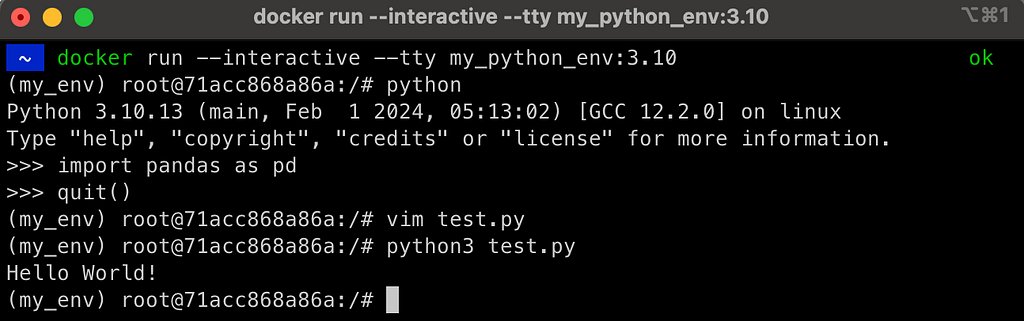
As you can notice in the above screenshot, it launched the container inside the bash terminal, and the virtual environment is set as expected as my_env. The pandas library was installed and can be loaded, and we can now edit files from the terminal.
One issue to take care of is that the container is still ephemeral. Therefore, any code we create inside the image is not exportable and will be lost after we stop the container from running.
A simple solution is to mount a volume with the volume argument. For simplicity, we will go ahead and mount the local folder, where we keep the Dockerfile and the helper files, to a new folder inside the container named my_scripts:
docker run -v .:/my_scripts --interactive --tty my_python_env:3.10
And here is the output:
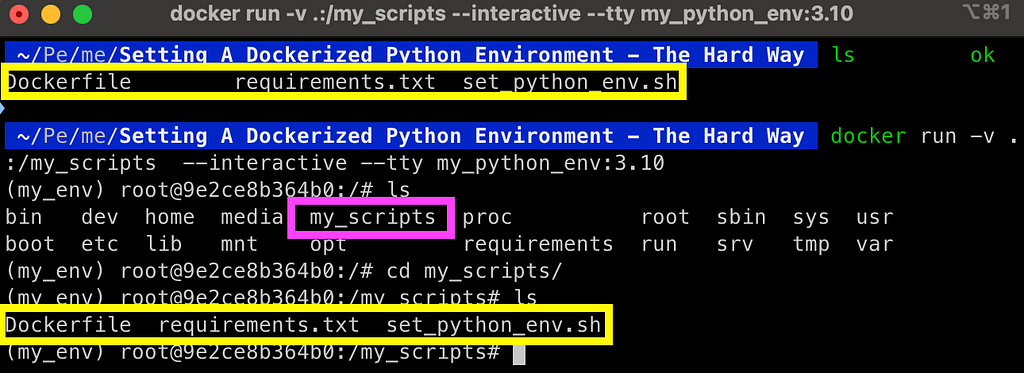
Once the folder is mounted, any file that is created, modified, or deleted from the mounted folder inside the container will be reflected to the local folder. This enables you to maintain your code when stopping the container.
Summary
In this tutorial, we reviewed how to set a dockerized Python environment using the command line. While this is neither a practical nor recommended approach to develop with Python, it is a great learning experience of Docker core commands and basic functionalities. We show how we can easily take a built-in image and customize it according to our needs. Last but not least, we saw how to mount a local folder to the container with the volume argument to transfer the container from an ephemeral mode to a persistent mode.
Resources
- A full tutorial for setting up a Dockerized Python environment with VScode and the Dev Containers — https://github.com/RamiKrispin/vscode-python
- Setting a dockerized Python development environment with GitHub template — https://medium.com/@rami.krispin/setting-a-dockerized-python-development-environment-template-de2400c4812b
- Docker vs. virtual environment — https://medium.com/@rami.krispin/running-python-r-with-docker-vs-virtual-environment-4a62ed36900f
- Dockerfile reference — https://docs.docker.com/engine/reference/builder/
Setting A Dockerized Python Environment — The Hard Way was originally published in Towards Data Science on Medium, where people are continuing the conversation by highlighting and responding to this story.
Setting A Dockerized Python Environment — The Hard Way
This post will review different methods to run a dockerized Python environment from the command line (CLI). Am I recommending you run your Python environment from the CLI? Absolutely not!
There are better ways to set up a Python development environment, such as using VScode and the Dev Containers extension. We will use the “hard way” to set up a Python environment from the CLI for learning purposes. We will review different approaches to launching a container with the run command and see how to customize a built-in image using the Dockerfile.

Prerequisites
To follow along with this tutorial, you will need the following:
- Docker Desktop (or equivalent) if you are using a macOS or Windows OS machine, or Docker installed if you are using a Linux OS
- Docker Hub account to pull the image from.
Throughout this tutorial, we will use the official Python image — python:3.1o.
Getting Started
Let’s get started by pulling the official Python 3.10 image from Docker Hub. First, let’s log in to Docker Hub by using the docker logincommand:
docker login docker.io                                                                                                                                                                      ok
Authenticating with existing credentials...
Login Succeeded
Next, we will use the docker pull command from the terminal:
docker pull python:3.10 ok
If this is the first time you pull the image, you should expect the following output:
3.10: Pulling from library/python
66932e2b787d: Pull complete
4afa7e263db1: Pull complete
c812910e5e62: Pull complete
f4e4299bb649: Pull complete
5213cc2f9120: Pull complete
4a3b5b2f0e66: Pull complete
c214ceb1cabf: Pull complete
f5336038b15c: Pull complete
Digest: sha256:f94601bb6374b0b63835a70c9e5c3ba1b19bc009133900a9473229a406018e46
Status: Downloaded newer image for python:3.10
docker.io/library/python:3.10
You can review the image details with the use of the docker images command:
docker images                                                                                                                                                                          ok  11s
REPOSITORY   TAG       IMAGE ID       CREATED      SIZE
python       3.10      f7537c504c9a   7 days ago   1.01GB
Before running the container, let’s review the image metadata with the docker inspect command:
docker inspect python:3.10
This will return the below JSON output:
[
    {
        "Id": "sha256:f7537c504c9a91a22c9a255ee02048e7079cacdee583290e8238c605d17f9600",
        "RepoTags": [
            "python:3.10"
        ],
        "RepoDigests": [
            "python@sha256:f94601bb6374b0b63835a70c9e5c3ba1b19bc009133900a9473229a406018e46"
        ],
        "Parent": "",
        "Comment": "buildkit.dockerfile.v0",
        "Created": "2024-02-03T10:49:13Z",
        "Container": "",
        "ContainerConfig": {
            "Hostname": "",
            "Domainname": "",
            "User": "",
            "AttachStdin": false,
            "AttachStdout": false,
            "AttachStderr": false,
            "Tty": false,
            "OpenStdin": false,
            "StdinOnce": false,
            "Env": null,
            "Cmd": null,
            "Image": "",
            "Volumes": null,
            "WorkingDir": "",
            "Entrypoint": null,
            "OnBuild": null,
            "Labels": null
        },
        "DockerVersion": "",
        "Author": "",
        "Config": {
            "Hostname": "",
            "Domainname": "",
            "User": "",
            "AttachStdin": false,
            "AttachStdout": false,
            "AttachStderr": false,
            "Tty": false,
            "OpenStdin": false,
            "StdinOnce": false,
            "Env": [
                "PATH=/usr/local/bin:/usr/local/sbin:/usr/local/bin:/usr/sbin:/usr/bin:/sbin:/bin",
                "LANG=C.UTF-8",
                "GPG_KEY=A035C8C19219BA821ECEA86B64E628F8D684696D",
                "PYTHON_VERSION=3.10.13",
                "PYTHON_PIP_VERSION=23.0.1",
                "PYTHON_SETUPTOOLS_VERSION=65.5.1",
                "PYTHON_GET_PIP_URL=https://github.com/pypa/get-pip/raw/dbf0c85f76fb6e1ab42aa672ffca6f0a675d9ee4/public/get-pip.py",
                "PYTHON_GET_PIP_SHA256=dfe9fd5c28dc98b5ac17979a953ea550cec37ae1b47a5116007395bfacff2ab9"
            ],
            "Cmd": [
                "python3"
            ],
            "ArgsEscaped": true,
            "Image": "",
            "Volumes": null,
            "WorkingDir": "",
            "Entrypoint": null,
            "OnBuild": null,
            "Labels": null
        },
        "Architecture": "arm64",
        "Variant": "v8",
        "Os": "linux",
        "Size": 1005570383,
        "VirtualSize": 1005570383,
        "GraphDriver": {
            "Data": {
                "LowerDir": "/var/lib/docker/overlay2/d2fd76e7396796018a959209b51fe8311a188c8eae8e339e9e556de0889ca0bd/diff:/var/lib/docker/overlay2/bbedb25c5aa6ec3f2fc632e62a53989a329b907143fac165f899209293627a69/diff:/var/lib/docker/overlay2/ed6a4bf49214e6b496b7716443b8de380481cd9416bc4a378f29183c9129786f/diff:/var/lib/docker/overlay2/ac9543f44a835c203fb0b0b28958d94df72d206c9060c9d83307b39f50355102/diff:/var/lib/docker/overlay2/94a9f92c36ea6251feda52be8e76ec4da4a9c66b744a29472e1ccfdf34a6f69d/diff:/var/lib/docker/overlay2/6ee22c274256834a64008022856d365d91373bb490ae9f2f1723cb524b246a29/diff:/var/lib/docker/overlay2/2fa272376e0ce68f4f34f18e5ecb1ddd58a32fb20a82e5a417514047f8e684a3/diff",
                "MergedDir": "/var/lib/docker/overlay2/f2d64d1affbe99afb05251435f7705cb97e2efa4f8febb494b4cbaa21e7f742a/merged",
                "UpperDir": "/var/lib/docker/overlay2/f2d64d1affbe99afb05251435f7705cb97e2efa4f8febb494b4cbaa21e7f742a/diff",
                "WorkDir": "/var/lib/docker/overlay2/f2d64d1affbe99afb05251435f7705cb97e2efa4f8febb494b4cbaa21e7f742a/work"
            },
            "Name": "overlay2"
        },
        "RootFS": {
            "Type": "layers",
            "Layers": [
                "sha256:9f8c60461a42fd9f275c56f4ec8fea8a8ea2d938493e316e830994a3814cf0aa",
                "sha256:927a28cdbf6c1705342b2cba0069457313815058dcebe1996e46cade38a09370",
                "sha256:e85139d96aee18e99fc964d02546be48cc6a4d4dfd9f465a91f172b7c535e55f",
                "sha256:f3168ba6a8d2ec30e12002ad5b7b497cf7409f3e19cc8d8f447f6cf4231a2482",
                "sha256:acbc6c8127209b09fa336e354037fdc630d3594e15174f2bc1bdbf31d5591376",
                "sha256:06c4da96c7dd2fbbbb541e000bd0ea4cfbf7c80b24f098a9d67f677ef5e6c63e",
                "sha256:1cdf208dc10679cf5db6d4f0e17ff6d5bfe754b4195ddd3b153b6d1ff51ce909",
                "sha256:5d6f554f67c7da9d34763916bac632a450902c6e6fdbf9244f888f110fd37740"
            ]
        },
        "Metadata": {
            "LastTagTime": "0001-01-01T00:00:00Z"
        }
    }
]
The ispect command provides a lot of useful information about the image, such as the layers information, the image size, the hardware architecture, etc. As we want to run the image, the most interesting detail is the CMD setting. The CMDcommand in the Dockerfile defines what command to execute during the container launch time. We can parse from the above output the CMD information with the jq package:
docker inspect python:3.10 | jq '.[] | .Config | .Cmd'                                                                                                                                      ok
[
  "python3"
]
As you can see, the image is set to execute the python3 command during the container run time. Let’s now launch the container using the run command:
docker run python:3.10
And… nothing happens. The reason for that, in short, is that we need to give Docker access to the terminal. We will use the interactive and TTY arguments to run the image in an interactive mode:
docker run --interactive --tty python:3.10
This will attach the terminal to the container and open Python inside the container:
While we were able to launch Python inside a container, it is not as useful:
- We cannot create, edit, and run scripts inside the Python interpreter
- By default, the Python image comes with a limited number of libraries. In this mode, you cannot add additional ones
- Last but not least, the container is ephemeral. Once you stop it, all the work is lost
For example, if we will try to load pandas, we will get the following error:
In the following sections, we will address those issues by creating a Dockerfile and customizing the base image functionality. This includes adding the following features:
- Set a virtual environment and install packages with a requirements file. For simplicity,
- Install a vim editor to edit files
- Change the CMD command to open a shell terminal upon launch (as opposed to the Python interpreter). This will enable us to create new scripts, edit, and execute from the terminal
Customize the Base Image
To customize the Python environment and make the above changes, we will create a Dockerfile with the following functionality:
- Import the Python image — python:3.10
- Set a virtual environment
- Install required libraries
- Install vim editor
- Expose a bash terminal
Setting a Python Virtual Environment
To set up a Python virtual environment, we will use the following two helper files:
requirements.txt
wheel==0.40.0
pandas==2.0.3
This file defines the list of Python libraries to install in the virtual environment. For example, in this case, we will install the Pandas library, version 2.0.3. Generally, I also install the wheels library, which handles C dependencies.
The next helper file is the below bash script, which sets the virtual environment and installs the required libraries from the requirements.txt file.
set_python_env.sh
#!/usr/bin/env bash

PYTHON_ENV=$1

python3 -m venv /opt/$PYTHON_ENV  \
        && export PATH=/opt/$PYTHON_ENV/bin:$PATH \
        && echo "source /opt/$PYTHON_ENV/bin/activate" >> ~/.bashrc

source /opt/$PYTHON_ENV/bin/activate

pip3 install -r ./requirements/requirements.txt
Note: We use a variable (marked as $1) to define the environment name, which will be assigned to the PYTHON_ENV variable. Using variables during the build is a good practice, as it enables us to modify some of the image characteristics without modifying the code. We will assign the variable via the Dockerfile.
Let’s explain the following concatenate code from the above bash script that sets the virtual environment:
python3 -m venv /opt/$PYTHON_ENV  \
    && export PATH=/opt/$PYTHON_ENV/bin:$PATH \
    && echo "source /opt/$PYTHON_ENV/bin/activate" >> ~/.bashrc
The above three lines of code include three concatenate expressions:
- First, the python3 -m venv /opt/$PYTHON_ENV set a virtual environment with the venv command
- Second, add the virtual environment path to the PATH variable
- Third, add to the .bashrc file the activate command of the environment. This will ensure that whenever we launch the terminal, it will activate this virtual environment by default (otherwise, you will have to do it manually upon the launch of the environment)
Once the environment is set, we use the source command to activate the environment, and the pip3 command to install the libraries inside the environment.
Creating a Dockerfile
After we review the helper files, let's see how they are incorporated inside the below Dockerfile.
Dockerfile
FROM python:3.10

ARG PYTHON_ENV=my_env
ENV PYTHON_ENV=$PYTHON_ENV

RUN mkdir requirements

COPY requirements.txt set_python_env.sh /requirements/

RUN bash ./requirements/set_python_env.sh $PYTHON_ENV

RUN apt-get update && \
    apt-get install -y \
    vim \
    && apt update


CMD ["/bin/sh", "-c", "bash"]
As you can see, we are using the same image — python:3.10as our base image.
Next, we set an argument named PYTHON_ENV with the ARG command to define the virtual environment name. We setmy_env as the default value, which can be modified during the build time using the arg argument. We use the PYTHON_ENV argument to set an environment variable as well.
Before setting the virtual environment, we will create inside the image a new library under the root folder named requirements and use the COPY command to copy the above helper files — requirements.txt and set_my_python.sh to the requirements folder.
Next, we call the bash script — set_my_python.sh , which sets the virtual environment and installs the required libraries. As mentioned above, we use the PYTHON_ENV variable as an argument with the set_my_python.sh file to set the virtual environment name dynamically.
We use the apt command to install vim — a CLI editor. This will enable us to edit code on via the container CLI.
Last but not least, use the CMD command to launch a shell terminal using bash:
CMD ["/bin/sh", "-c", "bash"]
At this point, we have the below files in the local folder:
.
├── Dockerfile
├── requirements.txt
└── set_python_env.sh
Let’s now go ahead and build the image with the docker build command:
docker build .-f Dockerfile -t my_python_env:3.10
[+] Building 47.3s (10/10) FINISHED
 => [internal] load build definition from Dockerfile                                                 0.2s
 => => transferring dockerfile: 389B                                                                 0.0s
 => [internal] load .dockerignore                                                                    0.2s
 => => transferring context: 2B                                                                      0.0s
 => [internal] load metadata for docker.io/library/python:3.10                                       0.0s
 => [1/5] FROM docker.io/library/python:3.10                                                         1.3s
 => [internal] load build context                                                                    0.4s
 => => transferring context: 460B                                                                    0.0s
 => [2/5] RUN mkdir requirements                                                                     0.5s
 => [3/5] COPY requirements.txt set_python_env.sh /requirements/                                     0.2s
 => [4/5] RUN bash ./requirements/set_python_env.sh my_env                                          26.8s
 => [5/5] RUN apt-get update &&     apt-get install -y     vim     && apt update                    17.4s
 => exporting to image                                                                               0.7s
 => => exporting layers                                                                              0.6s
 => => writing image sha256:391879baceea6154c191692d4bcb9ec9690de6dc4d5edd5b2ed13f6c579dd05c         0.0s
 => => naming to docker.io/library/my_python_env:3.10
Let’s run again the docker images command to review the current images:
docker images
REPOSITORY      TAG       IMAGE ID       CREATED         SIZE
my_python_env   3.10      391879baceea   7 minutes ago   1.23GB
python          3.10      f7537c504c9a   8 days ago      1.01GB
As you can note, adding the virtual environment and installing the packages added about 250 Mb to the image size.
Running the Python Environment
After we built the image, let’s launch the image with the docker run command and check if the above properties are defined as expected:
docker run --interactive --tty my_python_env:3.10
This launches the image in interactive mode, and opens a bash terminal as expected:
As you can notice in the above screenshot, it launched the container inside the bash terminal, and the virtual environment is set as expected as my_env. The pandas library was installed and can be loaded, and we can now edit files from the terminal.
One issue to take care of is that the container is still ephemeral. Therefore, any code we create inside the image is not exportable and will be lost after we stop the container from running.
A simple solution is to mount a volume with the volume argument. For simplicity, we will go ahead and mount the local folder, where we keep the Dockerfile and the helper files, to a new folder inside the container named my_scripts:
docker run -v .:/my_scripts --interactive --tty my_python_env:3.10
And here is the output:
Once the folder is mounted, any file that is created, modified, or deleted from the mounted folder inside the container will be reflected to the local folder. This enables you to maintain your code when stopping the container.
Summary
In this tutorial, we reviewed how to set a dockerized Python environment using the command line. While this is neither a practical nor recommended approach to develop with Python, it is a great learning experience of Docker core commands and basic functionalities. We show how we can easily take a built-in image and customize it according to our needs. Last but not least, we saw how to mount a local folder to the container with the volume argument to transfer the container from an ephemeral mode to a persistent mode.
Resources
- A full tutorial for setting up a Dockerized Python environment with VScode and the Dev Containers — https://github.com/RamiKrispin/vscode-python
- Setting a dockerized Python development environment with GitHub template — https://medium.com/@rami.krispin/setting-a-dockerized-python-development-environment-template-de2400c4812b
- Docker vs. virtual environment — https://medium.com/@rami.krispin/running-python-r-with-docker-vs-virtual-environment-4a62ed36900f
- Dockerfile reference — https://docs.docker.com/engine/reference/builder/
Setting A Dockerized Python Environment — The Hard Way was originally published in Towards Data Science on Medium, where people are continuing the conversation by highlighting and responding to this story.
Denial of responsibility! Techno Blender is an automatic aggregator of the all world’s media. In each content, the hyperlink to the primary source is specified. All trademarks belong to their rightful owners, all materials to their authors. If you are the owner of the content and do not want us to publish your materials, please contact us by email – [email protected]. The content will be deleted within 24 hours.