
Training and Deploying a Custom Detectron2 Model for Object Detection using PDF Documents (Part 1…
Training and Deploying a Custom Detectron2 Model for Object Detection Using PDF Documents (Part 1: Training)
Making your machine learn how to see PDFs like a human
I have been trying for the better half of a year to solve a business case by making PDF documents machine readable, at least in the sense that headers/titles (text specifying a section) can be extracted from a document, along with their associated contents, thus forming some semblance of a relational data structure. Initially, I approached this by using a convolutional neural net (CNN), along with the combination of both a CNN and recurrent neural network (RNN), to classify the structure of a document using text and textual features (font, font size, weight, etc). A framework for this has been implemented by Rahman & Finin and goes beyond inferring document structure by also using Long Short-Term Memory (LSTM) for semantic classification of the various divided sections. The problem that I faced is that I had neither the time or energy to prepare and annotate enough data in order to make accurate models using a similar framework.
To make this process much easier as a one man team, I turned to computer vision! Instead of trying to extract the text and textual features from a PDF and infer document structure this way, I would convert PDF pages to images, infer the document structure visually via object detection, and then OCR the corresponding inferences (ex: a page header) and their associated contents (ex: the header’s contents). In this article, I’m going to show you how to do the same using Detectron2!
Detectron2 is Facebook AI Research’s next generation library that simplifies the process of building computer vision applications. Within the various possible use cases for computer vision (image recognition, semantic segmentation, object detection, and instance segmentation), this article will be training a custom Detectron2 model for object detection, which is easily differentiated from the others by its use of bounding boxes. Once trained, we will then dockerize the application and deploy it to Heroku/AWS, as well as explore other topics such as memory management and batch inference to help you customize your scripts and model to your use case.
For following along with this article, it will be helpful to have in advance:
- Strong Python Knowledge
- Knowledge of Django and Docker for the deployment process (covered in part 2)
- Familiarity with AWS
Detectron2 Installation
If you are a Mac or Linux user, you are in luck! This process will be relatively simple by running the following command:
pip install torchvision && pip install "detectron2@git+https://github.com/facebookresearch/[email protected]#egg=detectron2"
Please note that this command will compile the library, so you will need to wait a bit. If you want to install Detectron2 with GPU support, please refer to the official Detectron2 installation instruction for detailed information.
If however you are a Windows user, this process will be a bit of a pain, but I was able to manage doing this on Windows myself.
Follow closely with the instructions laid out here by the Layout Parser package for Python (which is also a helpful package to use if you don’t care about training your own Detectron2 model for PDF structure/content inference and want to rely on pre-annotated data! This is certainly more time friendly, but you will find that with specific use cases, you can train a much more accurate and smaller model on your own, which is good for memory management in deployment, as I will discuss later). Ensure you install pycocotools, along with Detectron2, as this package will assist in loading, parsing and visualizing COCO data, the format we need our data in to train a Detectron2 model.
The local Detectron2 installation will be used in Part 2 of this article series, as we will be using an AWS EC2 instance later on in this article for Detectron2 training.
Detectron2 Custom Training — Annotation using LabelMe
For image annotation, we need two things: (1) the images we will be annotating and (2) an annotation tool. Assemble a directory with all the images you want to annotate, but if you are following along with my use case and would like to use PDF images, assemble a dir of PDFs, install the pdftoimage package:
pip install pdf2image
And then use the following script to convert each PDF page to an image:
import os
from pdf2image import convert_from_path

# Assign input_dir to PDF dir, ex: "C://Users//user//Desktop//pdfs"
input_dir = "##"
# Assign output_dir to the dir you’d like the images to be saved"
output_dir = "##"
dir_list = os.listdir(input_dir)

index = 0
while index < len(dir_list):

    images = convert_from_path(f"{input_dir}//" + dir_list[index])
    for i in range(len(images)):
        images[i].save(f'{output_dir}//doc' + str(index) +'_page'+ str(i) +'.jpg', 'JPEG')
    index += 1
Once you have a dir of images, we are going to use the LabelMe tool, see installation instructions here. Once installed, just run the command labelme from the command line or a terminal. This will open a window with the following layout:
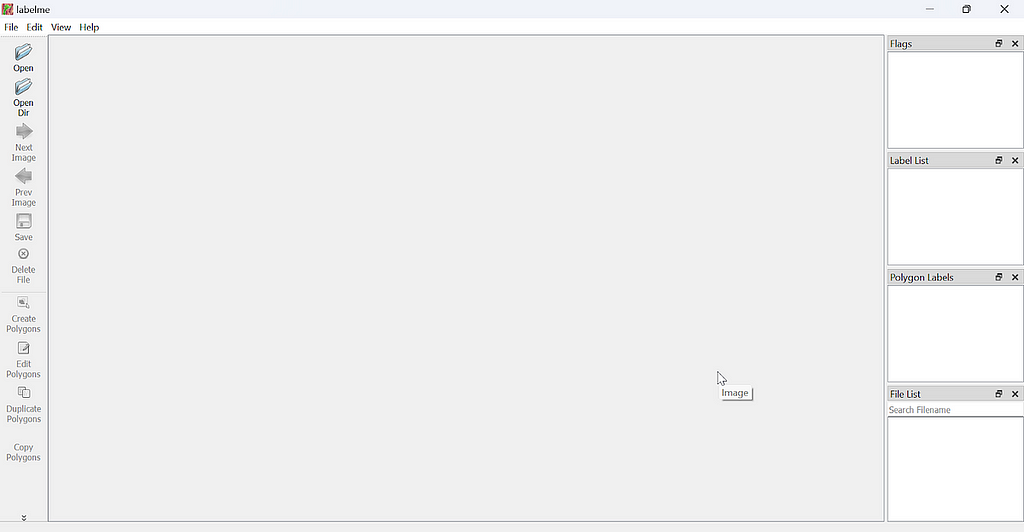
Click the “Open Dir” option on the left hand side and open the dir where your images are saved (and let’s name this dir “train” as well). LabelMe will open the first image in the dir and allow you to annotate over each of them. Right click the image to find various options for annotations, such as Create Polygons to click each point of a polygon around a given object in your image or Create Rectangle to capture an object while ensuring 90 degree angles.
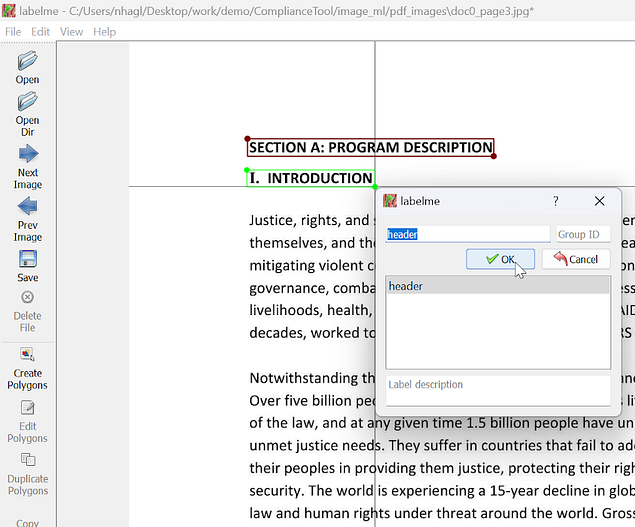
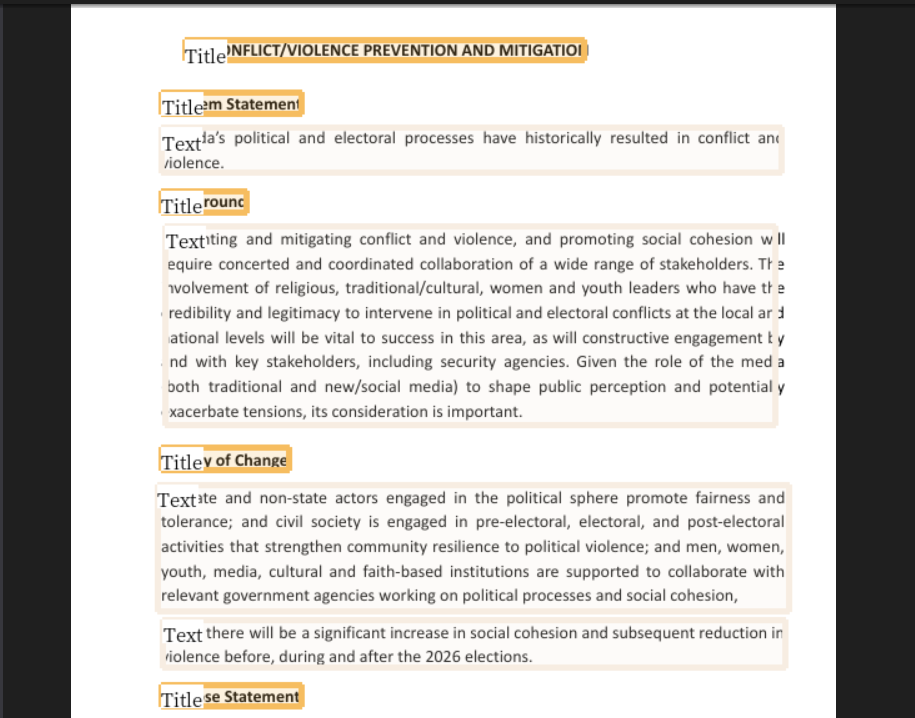
Once the bounding box/polygon has been placed, LabelMe will ask for a label. In the example below, I provided the label header for each of the header instances found on the page. You can use multiple labels, identifying various objects found in an image (for the PDF example this could be Title/Header, Tables, Paragraphs, Lists, etc), but for my purpose, I will just be identifying headers/titles and then algorithmically associating each header with its respective contents after model inferencing (see Part 2).
Once labeled, click the Save button and then click Next Image to annotate the next image in the given dir. Detectron2 is excellent at detecting inferences with minimal data, so feel free to annotate up to about 100 images for initial training and testing, and then annotate and train further to increase the model’s accuracy (keep in mind that training a model on more than one label category will decrease the accuracy a bit, requiring a larger dataset for improved accuracy).
Once each image in the train dir has been annotated, let’s take about 20% of these image/annotation pairs and move them to a separate dir labeled test.
If you are familiar with Machine Learning, a simple rule of thumb is that there needs to be a test/train/validation split (60–80% training data, 10–20% validation data, and 10–20% test data). For this purpose, we are just going to do a test/train split that is 20% test and 80% train.
Detectron2 Custom Training — COCO Format
Now that we have our folders of annotations, we need to convert the labelme annotations to COCO format. You can do that simply with the labelme2coco.py file in the repo I have here. I refactored this script from Tony607 which will convert both the polygram annotations and any rectangle annotations that were made (as the initial script didn’t properly convert the rectangle annotations to COCO format).
Once you download the labelme2coco.py file, run it in the terminal with the command:
python labelme2coco.py path/to/train/folder
and it will output a train.json file. Run the command a second time for the test folder and edit line 172 in labelme2coco.py to change the default output name to test.json (otherwise it will overwrite the train.json file).
Detectron2 Custom Training — EC2
Now that the tedious process of annotation is over, we can get to the fun part, training!
If your computer doesn’t come with Nvidia GPU capabilities, we will need to spin up an EC2 instance using AWS. The Detectron2 model can be trained on the CPU, but if you try this, you will notice that it will take an extremely long time, whereas using Nvidia CUDA on a GPU based instance would train the model in a matter of minutes.
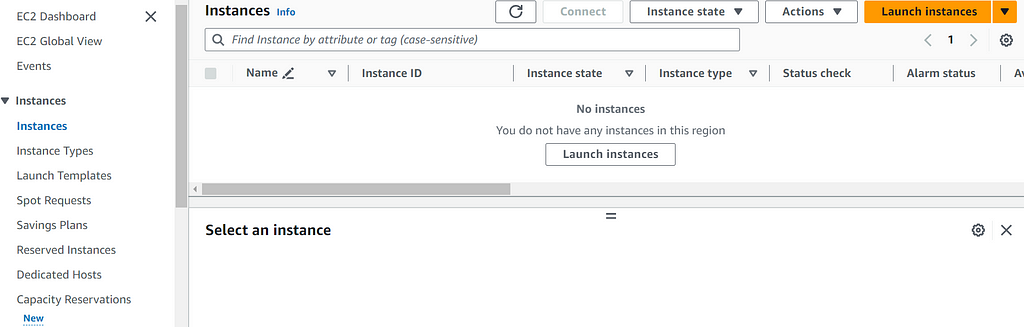
To start, sign into the AWS console. Once signed in, search EC2 in the search bar to go to the EC2 dashboard. From here, click Instances on the left side of the screen and then click the Launch Instances button
The bare minimum level of detail you will need to provide for the instance is:
- A Name
- The Amazon Machine Image (AMI) which specifies the software configuration. Make sure to use one with GPU and PyTorch capabilities, as it will have the packages needed for CUDA and additional dependencies needed for Detectron2, such as Torch. To follow along with this tutorial, also use an Ubuntu AMI. I used the AMI — Deep Learning AMI GPU PyTorch 2.1.0 (Ubuntu 20.04).
- The Instance type which specifies the hardware configuration. Check out a guide here on the various instance types for your reference. We want to use a performance optimized instance, such as one from the P or G instance families. I used p3.2xlarge which comes with all the computing power, and more specifically GPU capabilities, that we will need.
PLEASE NOTE: instances from the P family will require you to contact AWS customer service for a quota increase (as they don’t immediately allow base users to access higher performing instances due to the cost associated). If you use the p3.2xlarge instance, you will need to request a quota increase to 8 vCPU.
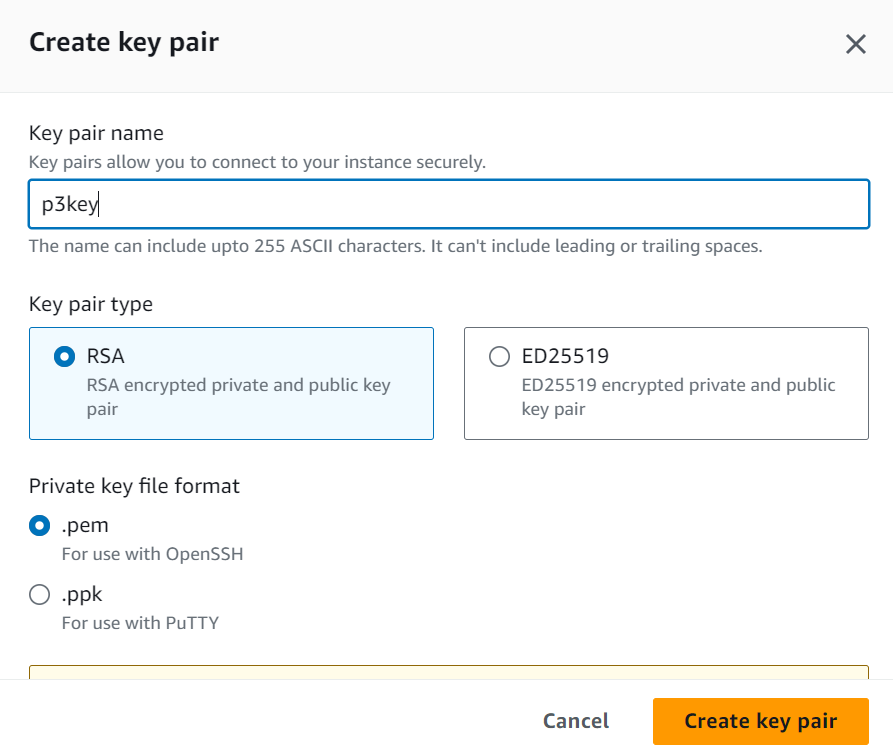
- Specify a Key pair (login). Create this if you don’t already have one and feel free to name it p3key as I did.
- Finally, Configure Storage. If you used the same AMI and Instance type as I, you will see a starting default storage of 45gb. Feel free to up this to around 60gb or more as needed, depending on your training dataset size in order to ensure the instance has enough space for your images.
Go ahead and launch your instance and click the instance id hyperlink to view it in the EC2 dashboard. When the instance is running, open a Command Prompt window and we will SSH into the EC2 instance using the following command (and make sure to replace the bold text with (1) the path to your .pem Key Pair and (2) the address for your EC2 instance):
ssh -L 8000:localhost:8888 -i C:\path\to\p3key.pem ubuntu@ec2id.ec2region.compute.amazonaws.com
As this is a new host, say yes to the following message:

And then Ubuntu will start along with a prepackaged virtual environment called PyTorch (from the AWS AMI). Activate the venv and start up a preinstalled jupyter notebook using the following two commands:

This will return URLs for you to copy and paste into your browser. Copy the one with localhost into your browser and change 8888 to 8000. This will take you to a Jupyter Notebook that looks similar to this:
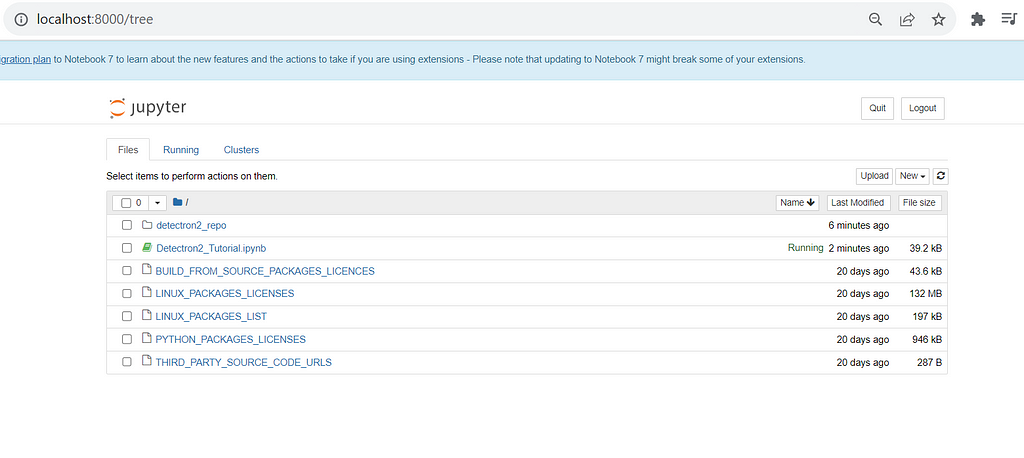
From my github repo, upload the Detectron2_Tutorial.ipynb file into the notebook. From here, run the lines under the Installation header to fully install Detectron2. Then, restart the runtime to make sure the installation took effect.
Once back into the restarted notebook, we need to upload some additional files before beginning the training process:
- The utils.py file from the github repo. This provides the .ipynb files with configuration details for Detectron2 (see documentation here for reference if you’re interested on configuration specifics). Also included in this file is a plot_samples function that is referenced in the .ipynb file, but has been commented out in both. You can uncomment and use this to plot the training data if you’d like to see visuals of the samples during the process. Please note that you will need to further install cv2 to use the plot_samples feature.
- Both the train.json and test.json files that were made using the labelme2coco.py script.
- A zip file of both the Train images dir and Test images dir (zipping the dirs allows you to only upload one item to the notebook; you can keep the labelme annotation files in the dir, this won’t affect the training). Once both of these zip files have been uploaded, open a terminal in the notebook by clicking (1) New and then (2) Terminal on the top right hand side of the notebook and use the following commands to unzip each of the files, creating a separate Train and Test dir of images in the notebook:
! unzip ~/train.zip -d ~/
! unzip ~/test.zip -d ~/
Finally, run the notebook cells under the Training section in the .ipynb file. The last cell will output responses similar to the following:
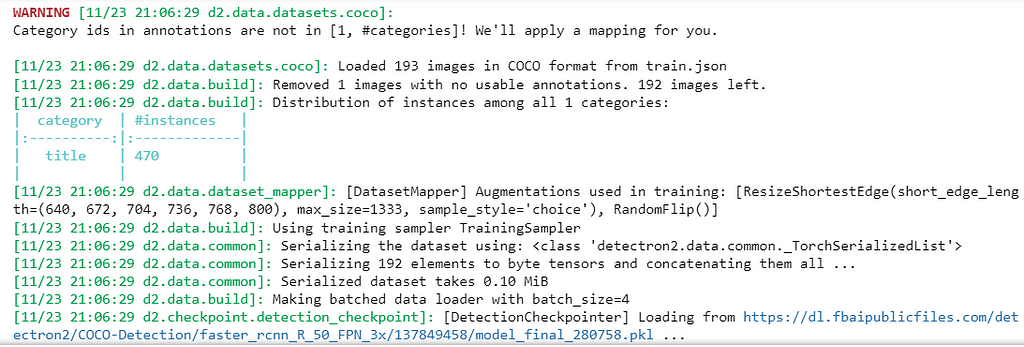
This will show the amount of images being used for training, as well as the count of instances that you had annotated in the training dataset (here, 470 instances of the “title” category, were found prior to training). Detectron2 then serializes the data and loads the data in batches as specified in the configurations (utils.py).
Once training begins, you will see Detectron2 printing events:
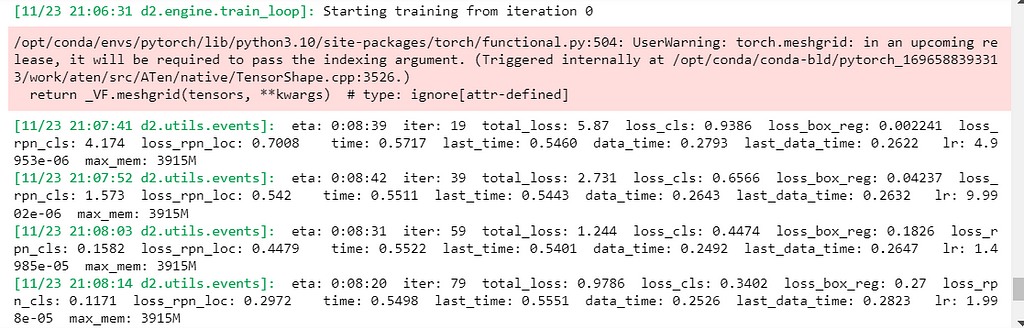
This lets you know information such as: the estimated training time left, the number of iterations performed by Detectron2, and most importantly to monitor accuracy, the total_loss, which is an index of the other loss calculations, indicating how bad the model’s prediction was on a single example. If the model’s prediction is perfect, the loss is zero; otherwise, the loss is greater. Don’t fret if the model isn’t perfect! We can always add in more annotated data to improve the model’s accuracy or use the final trained model’s inferences that have a high score (indicating how confident the model is that an inference is accurate) in our application.
Once completed, a dir called output will be created in the notebook with a sub dir, object detection, that contains files related to the training events and metrics, a file that records a checkpoint for the model, and lastly a .pth file titled model_final.pth. This is the saved and trained Detectron2 model that can now be used to make inferences in a deployed application! Make sure to download this before shutting down or terminating the AWS EC2 instance.
Now that we have the model_final.pth, follow along for a Part 2: Deployment article that will cover the deployment process of an application that uses Machine Learning learning, with some keys tips on how to make this process efficient.
Unless otherwise noted, all images used in this article are by the author
Training and Deploying a Custom Detectron2 Model for Object Detection using PDF Documents (Part 1… was originally published in Towards Data Science on Medium, where people are continuing the conversation by highlighting and responding to this story.
Training and Deploying a Custom Detectron2 Model for Object Detection Using PDF Documents (Part 1: Training)
Making your machine learn how to see PDFs like a human
I have been trying for the better half of a year to solve a business case by making PDF documents machine readable, at least in the sense that headers/titles (text specifying a section) can be extracted from a document, along with their associated contents, thus forming some semblance of a relational data structure. Initially, I approached this by using a convolutional neural net (CNN), along with the combination of both a CNN and recurrent neural network (RNN), to classify the structure of a document using text and textual features (font, font size, weight, etc). A framework for this has been implemented by Rahman & Finin and goes beyond inferring document structure by also using Long Short-Term Memory (LSTM) for semantic classification of the various divided sections. The problem that I faced is that I had neither the time or energy to prepare and annotate enough data in order to make accurate models using a similar framework.
To make this process much easier as a one man team, I turned to computer vision! Instead of trying to extract the text and textual features from a PDF and infer document structure this way, I would convert PDF pages to images, infer the document structure visually via object detection, and then OCR the corresponding inferences (ex: a page header) and their associated contents (ex: the header’s contents). In this article, I’m going to show you how to do the same using Detectron2!
Detectron2 is Facebook AI Research’s next generation library that simplifies the process of building computer vision applications. Within the various possible use cases for computer vision (image recognition, semantic segmentation, object detection, and instance segmentation), this article will be training a custom Detectron2 model for object detection, which is easily differentiated from the others by its use of bounding boxes. Once trained, we will then dockerize the application and deploy it to Heroku/AWS, as well as explore other topics such as memory management and batch inference to help you customize your scripts and model to your use case.
For following along with this article, it will be helpful to have in advance:
- Strong Python Knowledge
- Knowledge of Django and Docker for the deployment process (covered in part 2)
- Familiarity with AWS
Detectron2 Installation
If you are a Mac or Linux user, you are in luck! This process will be relatively simple by running the following command:
pip install torchvision && pip install "detectron2@git+https://github.com/facebookresearch/[email protected]#egg=detectron2"
Please note that this command will compile the library, so you will need to wait a bit. If you want to install Detectron2 with GPU support, please refer to the official Detectron2 installation instruction for detailed information.
If however you are a Windows user, this process will be a bit of a pain, but I was able to manage doing this on Windows myself.
Follow closely with the instructions laid out here by the Layout Parser package for Python (which is also a helpful package to use if you don’t care about training your own Detectron2 model for PDF structure/content inference and want to rely on pre-annotated data! This is certainly more time friendly, but you will find that with specific use cases, you can train a much more accurate and smaller model on your own, which is good for memory management in deployment, as I will discuss later). Ensure you install pycocotools, along with Detectron2, as this package will assist in loading, parsing and visualizing COCO data, the format we need our data in to train a Detectron2 model.
The local Detectron2 installation will be used in Part 2 of this article series, as we will be using an AWS EC2 instance later on in this article for Detectron2 training.
Detectron2 Custom Training — Annotation using LabelMe
For image annotation, we need two things: (1) the images we will be annotating and (2) an annotation tool. Assemble a directory with all the images you want to annotate, but if you are following along with my use case and would like to use PDF images, assemble a dir of PDFs, install the pdftoimage package:
pip install pdf2image
And then use the following script to convert each PDF page to an image:
import os
from pdf2image import convert_from_path

# Assign input_dir to PDF dir, ex: "C://Users//user//Desktop//pdfs"
input_dir = "##"
# Assign output_dir to the dir you’d like the images to be saved"
output_dir = "##"
dir_list = os.listdir(input_dir)

index = 0
while index < len(dir_list):

    images = convert_from_path(f"{input_dir}//" + dir_list[index])
    for i in range(len(images)):
        images[i].save(f'{output_dir}//doc' + str(index) +'_page'+ str(i) +'.jpg', 'JPEG')
    index += 1
Once you have a dir of images, we are going to use the LabelMe tool, see installation instructions here. Once installed, just run the command labelme from the command line or a terminal. This will open a window with the following layout:
Click the “Open Dir” option on the left hand side and open the dir where your images are saved (and let’s name this dir “train” as well). LabelMe will open the first image in the dir and allow you to annotate over each of them. Right click the image to find various options for annotations, such as Create Polygons to click each point of a polygon around a given object in your image or Create Rectangle to capture an object while ensuring 90 degree angles.
Once the bounding box/polygon has been placed, LabelMe will ask for a label. In the example below, I provided the label header for each of the header instances found on the page. You can use multiple labels, identifying various objects found in an image (for the PDF example this could be Title/Header, Tables, Paragraphs, Lists, etc), but for my purpose, I will just be identifying headers/titles and then algorithmically associating each header with its respective contents after model inferencing (see Part 2).
Once labeled, click the Save button and then click Next Image to annotate the next image in the given dir. Detectron2 is excellent at detecting inferences with minimal data, so feel free to annotate up to about 100 images for initial training and testing, and then annotate and train further to increase the model’s accuracy (keep in mind that training a model on more than one label category will decrease the accuracy a bit, requiring a larger dataset for improved accuracy).
Once each image in the train dir has been annotated, let’s take about 20% of these image/annotation pairs and move them to a separate dir labeled test.
If you are familiar with Machine Learning, a simple rule of thumb is that there needs to be a test/train/validation split (60–80% training data, 10–20% validation data, and 10–20% test data). For this purpose, we are just going to do a test/train split that is 20% test and 80% train.
Detectron2 Custom Training — COCO Format
Now that we have our folders of annotations, we need to convert the labelme annotations to COCO format. You can do that simply with the labelme2coco.py file in the repo I have here. I refactored this script from Tony607 which will convert both the polygram annotations and any rectangle annotations that were made (as the initial script didn’t properly convert the rectangle annotations to COCO format).
Once you download the labelme2coco.py file, run it in the terminal with the command:
python labelme2coco.py path/to/train/folder
and it will output a train.json file. Run the command a second time for the test folder and edit line 172 in labelme2coco.py to change the default output name to test.json (otherwise it will overwrite the train.json file).
Detectron2 Custom Training — EC2
Now that the tedious process of annotation is over, we can get to the fun part, training!
If your computer doesn’t come with Nvidia GPU capabilities, we will need to spin up an EC2 instance using AWS. The Detectron2 model can be trained on the CPU, but if you try this, you will notice that it will take an extremely long time, whereas using Nvidia CUDA on a GPU based instance would train the model in a matter of minutes.
To start, sign into the AWS console. Once signed in, search EC2 in the search bar to go to the EC2 dashboard. From here, click Instances on the left side of the screen and then click the Launch Instances button
The bare minimum level of detail you will need to provide for the instance is:
- A Name
- The Amazon Machine Image (AMI) which specifies the software configuration. Make sure to use one with GPU and PyTorch capabilities, as it will have the packages needed for CUDA and additional dependencies needed for Detectron2, such as Torch. To follow along with this tutorial, also use an Ubuntu AMI. I used the AMI — Deep Learning AMI GPU PyTorch 2.1.0 (Ubuntu 20.04).
- The Instance type which specifies the hardware configuration. Check out a guide here on the various instance types for your reference. We want to use a performance optimized instance, such as one from the P or G instance families. I used p3.2xlarge which comes with all the computing power, and more specifically GPU capabilities, that we will need.
PLEASE NOTE: instances from the P family will require you to contact AWS customer service for a quota increase (as they don’t immediately allow base users to access higher performing instances due to the cost associated). If you use the p3.2xlarge instance, you will need to request a quota increase to 8 vCPU.
- Specify a Key pair (login). Create this if you don’t already have one and feel free to name it p3key as I did.
- Finally, Configure Storage. If you used the same AMI and Instance type as I, you will see a starting default storage of 45gb. Feel free to up this to around 60gb or more as needed, depending on your training dataset size in order to ensure the instance has enough space for your images.
Go ahead and launch your instance and click the instance id hyperlink to view it in the EC2 dashboard. When the instance is running, open a Command Prompt window and we will SSH into the EC2 instance using the following command (and make sure to replace the bold text with (1) the path to your .pem Key Pair and (2) the address for your EC2 instance):
ssh -L 8000:localhost:8888 -i C:\path\to\p3key.pem ubuntu@ec2id.ec2region.compute.amazonaws.com
As this is a new host, say yes to the following message:
And then Ubuntu will start along with a prepackaged virtual environment called PyTorch (from the AWS AMI). Activate the venv and start up a preinstalled jupyter notebook using the following two commands:
This will return URLs for you to copy and paste into your browser. Copy the one with localhost into your browser and change 8888 to 8000. This will take you to a Jupyter Notebook that looks similar to this:
From my github repo, upload the Detectron2_Tutorial.ipynb file into the notebook. From here, run the lines under the Installation header to fully install Detectron2. Then, restart the runtime to make sure the installation took effect.
Once back into the restarted notebook, we need to upload some additional files before beginning the training process:
- The utils.py file from the github repo. This provides the .ipynb files with configuration details for Detectron2 (see documentation here for reference if you’re interested on configuration specifics). Also included in this file is a plot_samples function that is referenced in the .ipynb file, but has been commented out in both. You can uncomment and use this to plot the training data if you’d like to see visuals of the samples during the process. Please note that you will need to further install cv2 to use the plot_samples feature.
- Both the train.json and test.json files that were made using the labelme2coco.py script.
- A zip file of both the Train images dir and Test images dir (zipping the dirs allows you to only upload one item to the notebook; you can keep the labelme annotation files in the dir, this won’t affect the training). Once both of these zip files have been uploaded, open a terminal in the notebook by clicking (1) New and then (2) Terminal on the top right hand side of the notebook and use the following commands to unzip each of the files, creating a separate Train and Test dir of images in the notebook:
! unzip ~/train.zip -d ~/
! unzip ~/test.zip -d ~/
Finally, run the notebook cells under the Training section in the .ipynb file. The last cell will output responses similar to the following:
This will show the amount of images being used for training, as well as the count of instances that you had annotated in the training dataset (here, 470 instances of the “title” category, were found prior to training). Detectron2 then serializes the data and loads the data in batches as specified in the configurations (utils.py).
Once training begins, you will see Detectron2 printing events:
This lets you know information such as: the estimated training time left, the number of iterations performed by Detectron2, and most importantly to monitor accuracy, the total_loss, which is an index of the other loss calculations, indicating how bad the model’s prediction was on a single example. If the model’s prediction is perfect, the loss is zero; otherwise, the loss is greater. Don’t fret if the model isn’t perfect! We can always add in more annotated data to improve the model’s accuracy or use the final trained model’s inferences that have a high score (indicating how confident the model is that an inference is accurate) in our application.
Once completed, a dir called output will be created in the notebook with a sub dir, object detection, that contains files related to the training events and metrics, a file that records a checkpoint for the model, and lastly a .pth file titled model_final.pth. This is the saved and trained Detectron2 model that can now be used to make inferences in a deployed application! Make sure to download this before shutting down or terminating the AWS EC2 instance.
Now that we have the model_final.pth, follow along for a Part 2: Deployment article that will cover the deployment process of an application that uses Machine Learning learning, with some keys tips on how to make this process efficient.
Unless otherwise noted, all images used in this article are by the author
Training and Deploying a Custom Detectron2 Model for Object Detection using PDF Documents (Part 1… was originally published in Towards Data Science on Medium, where people are continuing the conversation by highlighting and responding to this story.
Denial of responsibility! Techno Blender is an automatic aggregator of the all world’s media. In each content, the hyperlink to the primary source is specified. All trademarks belong to their rightful owners, all materials to their authors. If you are the owner of the content and do not want us to publish your materials, please contact us by email – [email protected]. The content will be deleted within 24 hours.