
Using AI to Create Collages from Prompts
How to use ML models to extract objects from photographs and rearrange them to create modern art
In many of my previous posts, I showed how to use AI models to create new artwork from text prompts. For those projects, I used at least two AI models, a generator like a Generative Adversarial Networks (GAN) to create the images and a multi-modal language/image model like OpenAI’s Contrastive Language–Image Pre-training (CLIP) [1] to direct the generator.
For this project, I wanted to see if I could get CLIP to assemble modern photo collages from text prompts without using an AI model as a generator. I built a custom image generator that assembles parts of images and uses CLIP to analyze and adjust the parts in the collage iteratively. I call the system “CLIP and PASTE,” where the second acronym stands for Pictures Assembled Semantically Through Editing.
Here is a diagram that shows the significant components of CLIP and PASTE. I’ll discuss the elements briefly and then describe the details in the following sections.

The process starts with a text prompt, like “penguins skiing down a snowy mountain.” The system uses the Python Keyphrase Extraction library [2] to pull out keywords. It then searches for images from Wikimedia Commons [3] and OpenImages [4] that match the keywords in the prompt. I use the Wikimedia Search API to find potentially matching images. For OpenImages, I use the CLIP Text Encoder to find the best text match by comparing the embeddings from the keywords and the descriptions. Next, the system downloads the top 100 images from Wikimedia Commons and OpenImages and runs them through the CLIP Image Encoder, again comparing them to the keywords. The system runs the top images through the GRoIE [5] image segmentation model to create cutouts from the photos. The cutouts are rerun through CLIP to find the image parts that best match the keywords. I built a custom image compositor that randomly assembles the pieces into multiple photo collages. The layouts are run through CLIP to find the best one. The system adjusts the positions of the image parts by iteratively analyzing and compositing the collage using the Adam optimizer [6] in Pytorch. After 100 iterations, the final image is displayed.
You can read about the details of the system in the sections below. Be sure to check out the appendix for more generated photo collages. And you can create your own using the Google Colab here.
The art of making photo collages, also known as photo montages, goes back over 100 years.
Collage is often thought of as an archetypally modern artistic technique. The word — from the French verb coller, meaning “to stick” — was first used to describe the Cubist innovations of Pablo Picasso and Georges Braque, who began to stick newspaper cuttings and other materials onto their canvases in 1912. Since that moment, the story goes, artists have used the act of snipping and sticking as a means of bringing the world around us into unexpected, transformative combinations on canvas. — Samuel Reilly, The Economist
Here are some samples of early photo collages, shown chronologically clockwise from the top, left.


You can see how the art form progressed from including pasted newspaper clippings on canvases with paint and pencil drawings to compositions made solely by arranging cutouts of photographs.
Here are descriptions of the components and processes used in CLIP and PASTE.
Keyphrase Extraction
Unlike past projects where I used KeyBERT [7] to extract keywords and phrases from the text, I switched to using a package called Python Keyphrase Extraction (PKE). After experimenting with both packages a bit, I found that PKE seems to do a better job. For example, PKE allowed me to specify the parts of speech for the keywords (nouns, adjectives, and verbs.)
Here is a comparison of the keyphrases with scores extracted from “penguins skiing down a snowy mountain” with the two systems.
KeyBERT
penguins skiing snowy, 0.9217
penguins skiing, 0.8879
skiing snowy, 0.6593
skiing snowy mountain, 0.643
penguins, 0.6079PKE
penguins skiing, 0.5
snowy mountain, 0.5
Although KeyBERT came up with more candidate keyphrases, some of them, like “penguins skiing snowy” are nonsensical. HOWEVER, the PKE system seemed to have captured the gist of the prompt with two equally weighted keyphrases, “penguins skiing” and “snowy mountain.”
You can see the Python code I used for keyphrase extraction here.
Finding Source Images
As I mentioned in the overview, I collected images for the collages from Wikimedia Commons and the OpenImages dataset. Both sources release their images under the Creative Commons Attribution Sharealike open-source license.
To search for images in Wikimedia Commons, I used the API at https://commons.wikimedia.org/w/api.php.
Here is the Python code that sets up the parameters for the search.
s = requests.Session()
url = "https://commons.wikimedia.org/w/api.php"
params = {
"action": "query",
"generator": "images",
"prop": "imageinfo",
"gimlimit": 500,
"titles": keyphrases,
"iiprop": "url|dimensions",
"format": "json"
}
results = s.get(url=url, params=params)
When the results come back, I filter the images based on their dimensions. I keep the images that are 512×512 or greater in size.
For searching the pictures in the OpenImages dataset, I use the CLIP Text Encoder to compare the embeddings from the keyphrases to the embeddings from the descriptions in the dataset. If you would like to get more info on this process, you can read the details in my article on searching for design patents here.
Once I get the collection of images, I run them through the CLIP Image Encoder to compare them to the embedding for the entire prompt. Here are the top photos from Wikimedia Commons and OpenImages.
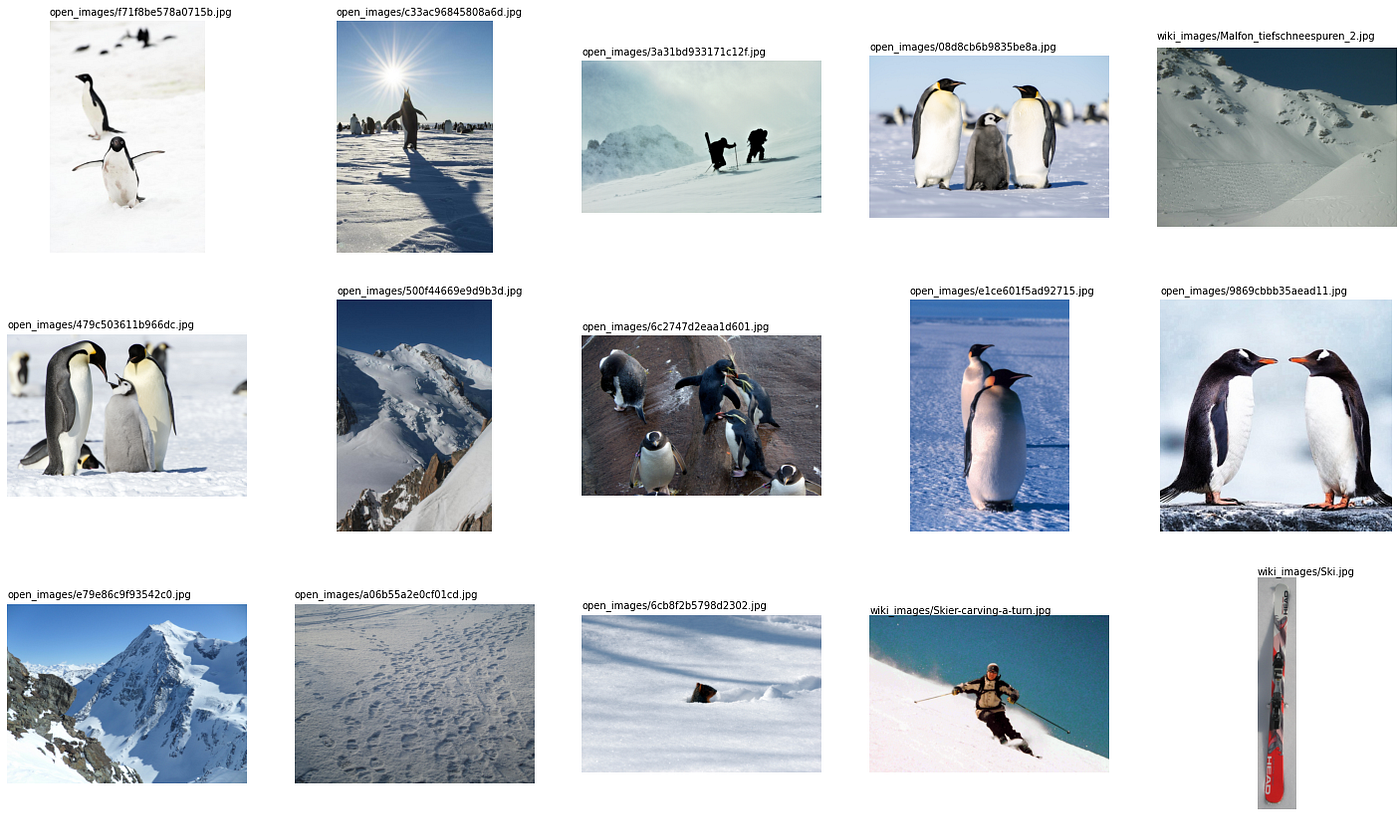
Image Segmentation
I used an AI model for image segmentation called GRoIE, which stands for Generic Region of Interest Extractor [5]. The system was developed by Leonardo Rossi et al. at the University of Parma in Italy. GRoIE will extract and label any discernable foreground objects given an input image. For each object it finds, it creates a mask image that defines object shape.
Note that the GRoIE model often finds and extracts more than one object in each input image. For example, in this photo, it found and isolated both penguins.


After I extracted all of the objects, I ran them through CLIP again to compare the image embeddings with the embedding from the prompt. The original image is on top, and the extracted image is below. Here are objects that were cut out of the top five images.

Creating a Background Color Gradient
I could have composited the image cutouts against a solid color, like white or black, for the photo collages. But to add interest to the background, I wrote a little Python code to create a vertical color gradient with five control points. And then, I use CLIP to analyze the resultant image and iteratively adjust the colors using the Adam optimizer [6] in Pytorch to find the best match for the text prompt.
We propose Adam, a method for efficient stochastic optimization that only requires first-order gradients with little memory requirement. The method computes individual adaptive learning rates for different parameters from estimates of first and second moments of the gradients; the name Adam is derived from adaptive moment estimation. — Diederik Kingma and Jimmy Ba
If you don’t speak in maths, the Adam method tweaks the parameters a little and notices if and how much the results improve for each iteration. It changes the parameters at different rates depending on how much each parameter contributes to improving the results.
Here is the resulting gradient for “penguins skiing down a snowy mountain” after 100 iterations of using CLIP and Adam on the 25 parameters (5 control points of red, green, and blue.)


On the left is a graph of the parameter values and on the right is the resultant gradient image. I’m not sure why it shows purple in the mid-lower region, but it looks fabulous!
Here are some additional background gradients using this method.


As you can see, creating an image with only 15 parameters can be reasonably expressive as directed by CLIP. The code to generate color gradients from text is here.
Finding the Best Collage Layout
Once the system has the background image and the cutouts, the next step is to arrange the objects meaningfully. To accomplish this, I created 100 random object placement variants and then ran them all through CLIP to see which layout best matches the text prompt. I sort the cutout images by size, putting the larger images in the background and the smaller ones in the foreground. Doing so cuts down the chance of occluding the smaller pictures.
Here is a sample of three of the random layouts.


After running all 100 layouts through CLIP, the one on the right had the closest match to “penguins skiing down a snowy mountain.” It’s pretty good, but it could use a little fine-tuning.
Optimizing the Layout
Similar to the method for creating the background gradient, I used the Adam optimizer again to adjust the object positions to match the text prompt better. This effectively reverses the functions, allowing the optimizer to home in on the best solution. I used a package called Kornia [8], written by Edgar Riba et al., that performs image processing routines in Pytorch that are mathematically differentiable.
The system makes minor adjustments to the positions of the objects and the colors in the gradient and then analyzes the resultant image using CLIP. It then checks to see if it moves towards a better solution or away from it. This cycle repeats 100 times to create the final image.
Here are the layouts for the first, 50th, and 100th iterations for “penguins skiing down a snowy mountain.”
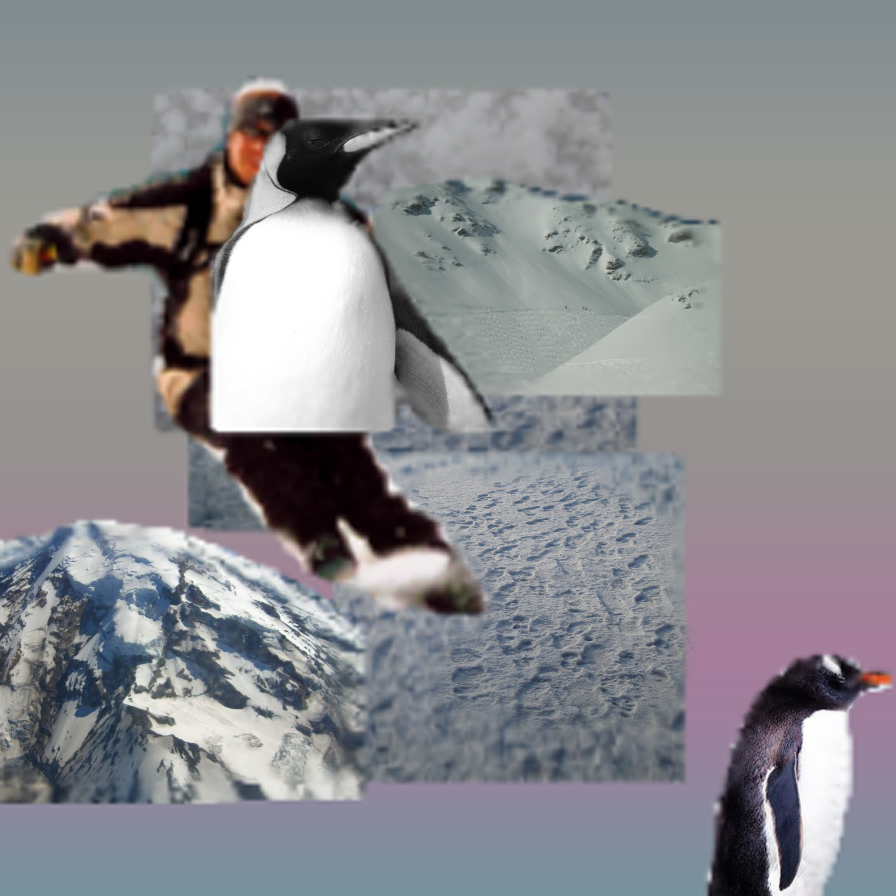

You can see how the system slid the penguin’s body over the head and chest of the human skier, organized the pictures of snow in the background, and adjusted the color gradient to move the purple to the top of the image.
Here’s the final collage for “penguins Skiing Down a snowy mountain.”

OK, that’s pretty cool (hah, pun intended). Because the collage is assembled using parameters, it is possible to render it in various sizes, including hi-res.
Be sure to check out more photo collages from CLIP and PASTE in the appendix.
The CLIP and PASTE system seems to work reasonably well. Note that it is highly dependent on finding appropriate images from Wikimedia Commons and OpenImages. If it can’t find pictures that match the words in the prompt, it will just forge ahead with whatever images it finds.
Future improvements would be adding image scaling and rotation to the mix. The optimizer will probably find better layouts if it has more parameters to control.
All source code for this project is available on GitHub. I released the source code under the CC BY-SA license.

I want to thank Jennifer Lim for her help with this project.
[1] CLIP by A. Radford et al., Learning Transferable Visual Models From Natural Language Supervision (2021)
[2] F. Boudin, PKE: An Open-Source Python-based Keyphrase Extraction Toolkit (2016), Proceedings of COLING 2016, the 26th International Conference on Computational Linguistics: System Demonstrations
[3] Wikimedia Commons (2004-present)
[4] OpenImages (2020)
[5] GRoIE by L. Rossi, A. Karimi, and A. Prati, A Novel Region of Interest Extraction Layer for Instance Segmentation (2020)
[6] D. P. Kingma and J. Lei Ba, Adam: A Method for Stochastic Optimization (2015), The International Conference on Learning Representations 2015
[7] M. Grootendorst, KeyBERT: Minimal keyword extraction with BERT (2020)
[8] E. Riba, D. Mishkin, D. Ponsa, E. Rublee, and G. Bradski, Kornia: an Open Source Differentiable Computer Vision Library for PyTorch (2020), Winter Conference on Applications of Computer Vision
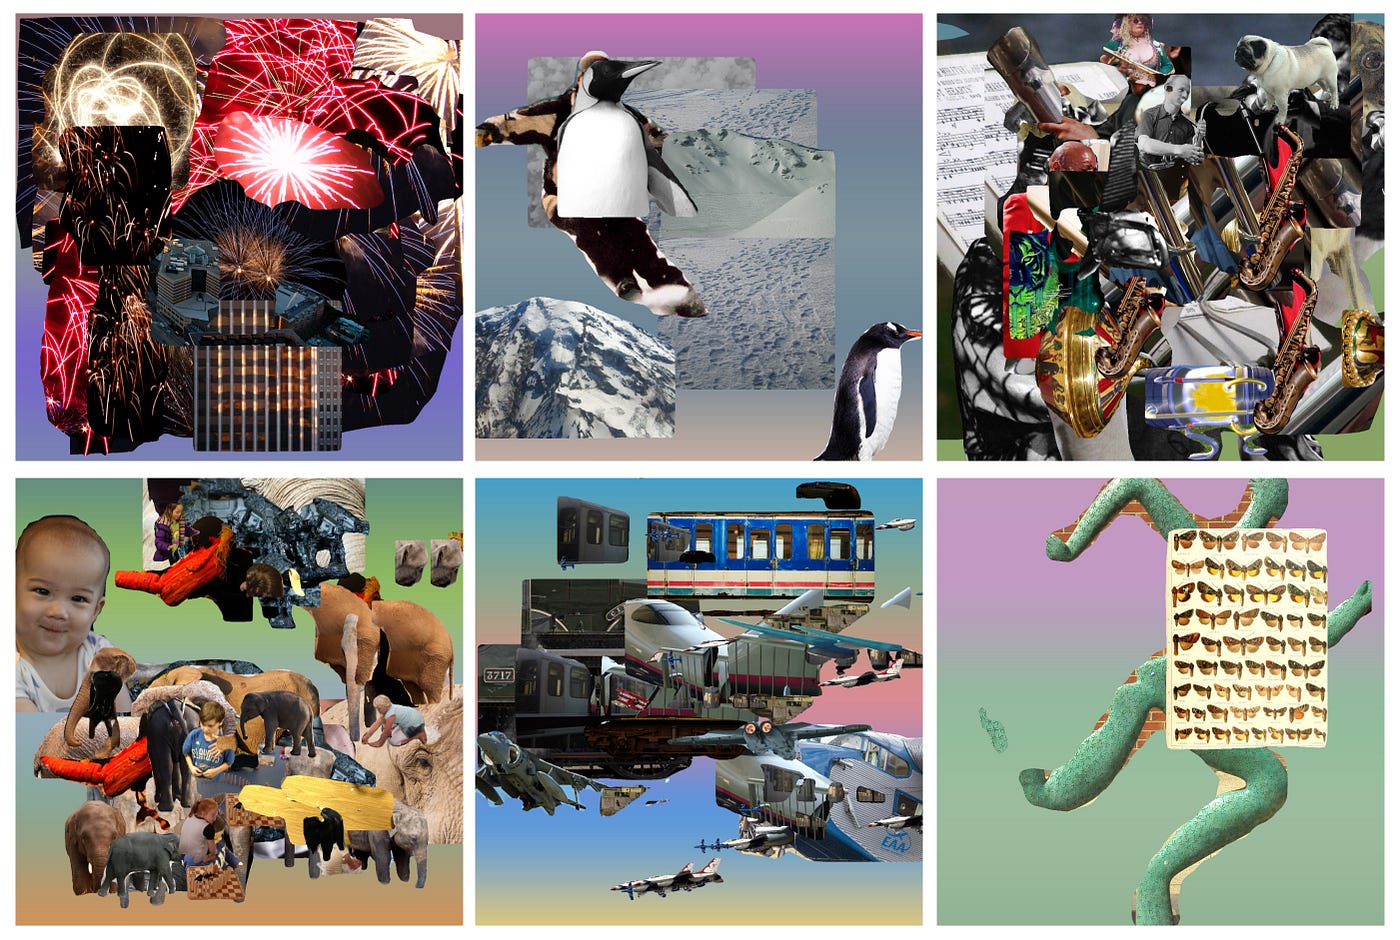
Here are some examples of using CLIP and PASTE to create photo collages.
fireworks over the Boston skyline

a pug in a brass band with saxophones

abstract man running with butterflies
This one used only two image cutouts.

How to use ML models to extract objects from photographs and rearrange them to create modern art
In many of my previous posts, I showed how to use AI models to create new artwork from text prompts. For those projects, I used at least two AI models, a generator like a Generative Adversarial Networks (GAN) to create the images and a multi-modal language/image model like OpenAI’s Contrastive Language–Image Pre-training (CLIP) [1] to direct the generator.
For this project, I wanted to see if I could get CLIP to assemble modern photo collages from text prompts without using an AI model as a generator. I built a custom image generator that assembles parts of images and uses CLIP to analyze and adjust the parts in the collage iteratively. I call the system “CLIP and PASTE,” where the second acronym stands for Pictures Assembled Semantically Through Editing.
Here is a diagram that shows the significant components of CLIP and PASTE. I’ll discuss the elements briefly and then describe the details in the following sections.
The process starts with a text prompt, like “penguins skiing down a snowy mountain.” The system uses the Python Keyphrase Extraction library [2] to pull out keywords. It then searches for images from Wikimedia Commons [3] and OpenImages [4] that match the keywords in the prompt. I use the Wikimedia Search API to find potentially matching images. For OpenImages, I use the CLIP Text Encoder to find the best text match by comparing the embeddings from the keywords and the descriptions. Next, the system downloads the top 100 images from Wikimedia Commons and OpenImages and runs them through the CLIP Image Encoder, again comparing them to the keywords. The system runs the top images through the GRoIE [5] image segmentation model to create cutouts from the photos. The cutouts are rerun through CLIP to find the image parts that best match the keywords. I built a custom image compositor that randomly assembles the pieces into multiple photo collages. The layouts are run through CLIP to find the best one. The system adjusts the positions of the image parts by iteratively analyzing and compositing the collage using the Adam optimizer [6] in Pytorch. After 100 iterations, the final image is displayed.
You can read about the details of the system in the sections below. Be sure to check out the appendix for more generated photo collages. And you can create your own using the Google Colab here.
The art of making photo collages, also known as photo montages, goes back over 100 years.
Collage is often thought of as an archetypally modern artistic technique. The word — from the French verb coller, meaning “to stick” — was first used to describe the Cubist innovations of Pablo Picasso and Georges Braque, who began to stick newspaper cuttings and other materials onto their canvases in 1912. Since that moment, the story goes, artists have used the act of snipping and sticking as a means of bringing the world around us into unexpected, transformative combinations on canvas. — Samuel Reilly, The Economist
Here are some samples of early photo collages, shown chronologically clockwise from the top, left.
You can see how the art form progressed from including pasted newspaper clippings on canvases with paint and pencil drawings to compositions made solely by arranging cutouts of photographs.
Here are descriptions of the components and processes used in CLIP and PASTE.
Keyphrase Extraction
Unlike past projects where I used KeyBERT [7] to extract keywords and phrases from the text, I switched to using a package called Python Keyphrase Extraction (PKE). After experimenting with both packages a bit, I found that PKE seems to do a better job. For example, PKE allowed me to specify the parts of speech for the keywords (nouns, adjectives, and verbs.)
Here is a comparison of the keyphrases with scores extracted from “penguins skiing down a snowy mountain” with the two systems.
KeyBERT
penguins skiing snowy, 0.9217
penguins skiing, 0.8879
skiing snowy, 0.6593
skiing snowy mountain, 0.643
penguins, 0.6079PKE
penguins skiing, 0.5
snowy mountain, 0.5
Although KeyBERT came up with more candidate keyphrases, some of them, like “penguins skiing snowy” are nonsensical. HOWEVER, the PKE system seemed to have captured the gist of the prompt with two equally weighted keyphrases, “penguins skiing” and “snowy mountain.”
You can see the Python code I used for keyphrase extraction here.
Finding Source Images
As I mentioned in the overview, I collected images for the collages from Wikimedia Commons and the OpenImages dataset. Both sources release their images under the Creative Commons Attribution Sharealike open-source license.
To search for images in Wikimedia Commons, I used the API at https://commons.wikimedia.org/w/api.php.
Here is the Python code that sets up the parameters for the search.
s = requests.Session()
url = "https://commons.wikimedia.org/w/api.php"
params = {
"action": "query",
"generator": "images",
"prop": "imageinfo",
"gimlimit": 500,
"titles": keyphrases,
"iiprop": "url|dimensions",
"format": "json"
}
results = s.get(url=url, params=params)
When the results come back, I filter the images based on their dimensions. I keep the images that are 512×512 or greater in size.
For searching the pictures in the OpenImages dataset, I use the CLIP Text Encoder to compare the embeddings from the keyphrases to the embeddings from the descriptions in the dataset. If you would like to get more info on this process, you can read the details in my article on searching for design patents here.
Once I get the collection of images, I run them through the CLIP Image Encoder to compare them to the embedding for the entire prompt. Here are the top photos from Wikimedia Commons and OpenImages.
Image Segmentation
I used an AI model for image segmentation called GRoIE, which stands for Generic Region of Interest Extractor [5]. The system was developed by Leonardo Rossi et al. at the University of Parma in Italy. GRoIE will extract and label any discernable foreground objects given an input image. For each object it finds, it creates a mask image that defines object shape.
Note that the GRoIE model often finds and extracts more than one object in each input image. For example, in this photo, it found and isolated both penguins.
After I extracted all of the objects, I ran them through CLIP again to compare the image embeddings with the embedding from the prompt. The original image is on top, and the extracted image is below. Here are objects that were cut out of the top five images.
Creating a Background Color Gradient
I could have composited the image cutouts against a solid color, like white or black, for the photo collages. But to add interest to the background, I wrote a little Python code to create a vertical color gradient with five control points. And then, I use CLIP to analyze the resultant image and iteratively adjust the colors using the Adam optimizer [6] in Pytorch to find the best match for the text prompt.
We propose Adam, a method for efficient stochastic optimization that only requires first-order gradients with little memory requirement. The method computes individual adaptive learning rates for different parameters from estimates of first and second moments of the gradients; the name Adam is derived from adaptive moment estimation. — Diederik Kingma and Jimmy Ba
If you don’t speak in maths, the Adam method tweaks the parameters a little and notices if and how much the results improve for each iteration. It changes the parameters at different rates depending on how much each parameter contributes to improving the results.
Here is the resulting gradient for “penguins skiing down a snowy mountain” after 100 iterations of using CLIP and Adam on the 25 parameters (5 control points of red, green, and blue.)
On the left is a graph of the parameter values and on the right is the resultant gradient image. I’m not sure why it shows purple in the mid-lower region, but it looks fabulous!
Here are some additional background gradients using this method.
As you can see, creating an image with only 15 parameters can be reasonably expressive as directed by CLIP. The code to generate color gradients from text is here.
Finding the Best Collage Layout
Once the system has the background image and the cutouts, the next step is to arrange the objects meaningfully. To accomplish this, I created 100 random object placement variants and then ran them all through CLIP to see which layout best matches the text prompt. I sort the cutout images by size, putting the larger images in the background and the smaller ones in the foreground. Doing so cuts down the chance of occluding the smaller pictures.
Here is a sample of three of the random layouts.
After running all 100 layouts through CLIP, the one on the right had the closest match to “penguins skiing down a snowy mountain.” It’s pretty good, but it could use a little fine-tuning.
Optimizing the Layout
Similar to the method for creating the background gradient, I used the Adam optimizer again to adjust the object positions to match the text prompt better. This effectively reverses the functions, allowing the optimizer to home in on the best solution. I used a package called Kornia [8], written by Edgar Riba et al., that performs image processing routines in Pytorch that are mathematically differentiable.
The system makes minor adjustments to the positions of the objects and the colors in the gradient and then analyzes the resultant image using CLIP. It then checks to see if it moves towards a better solution or away from it. This cycle repeats 100 times to create the final image.
Here are the layouts for the first, 50th, and 100th iterations for “penguins skiing down a snowy mountain.”
You can see how the system slid the penguin’s body over the head and chest of the human skier, organized the pictures of snow in the background, and adjusted the color gradient to move the purple to the top of the image.
Here’s the final collage for “penguins Skiing Down a snowy mountain.”
OK, that’s pretty cool (hah, pun intended). Because the collage is assembled using parameters, it is possible to render it in various sizes, including hi-res.
Be sure to check out more photo collages from CLIP and PASTE in the appendix.
The CLIP and PASTE system seems to work reasonably well. Note that it is highly dependent on finding appropriate images from Wikimedia Commons and OpenImages. If it can’t find pictures that match the words in the prompt, it will just forge ahead with whatever images it finds.
Future improvements would be adding image scaling and rotation to the mix. The optimizer will probably find better layouts if it has more parameters to control.
All source code for this project is available on GitHub. I released the source code under the CC BY-SA license.
I want to thank Jennifer Lim for her help with this project.
[1] CLIP by A. Radford et al., Learning Transferable Visual Models From Natural Language Supervision (2021)
[2] F. Boudin, PKE: An Open-Source Python-based Keyphrase Extraction Toolkit (2016), Proceedings of COLING 2016, the 26th International Conference on Computational Linguistics: System Demonstrations
[3] Wikimedia Commons (2004-present)
[4] OpenImages (2020)
[5] GRoIE by L. Rossi, A. Karimi, and A. Prati, A Novel Region of Interest Extraction Layer for Instance Segmentation (2020)
[6] D. P. Kingma and J. Lei Ba, Adam: A Method for Stochastic Optimization (2015), The International Conference on Learning Representations 2015
[7] M. Grootendorst, KeyBERT: Minimal keyword extraction with BERT (2020)
[8] E. Riba, D. Mishkin, D. Ponsa, E. Rublee, and G. Bradski, Kornia: an Open Source Differentiable Computer Vision Library for PyTorch (2020), Winter Conference on Applications of Computer Vision
Here are some examples of using CLIP and PASTE to create photo collages.
fireworks over the Boston skyline
a pug in a brass band with saxophones
abstract man running with butterflies
This one used only two image cutouts.
Denial of responsibility! Techno Blender is an automatic aggregator of the all world’s media. In each content, the hyperlink to the primary source is specified. All trademarks belong to their rightful owners, all materials to their authors. If you are the owner of the content and do not want us to publish your materials, please contact us by email – [email protected]. The content will be deleted within 24 hours.