
Image Color Extraction with Python in 4 Steps | by Boriharn K | May, 2022
Creating your own and unique list of colors
Why are the colors important?
Colors help get people’s attention at first sight. They are helpful in communicating messages, for example, using red and blue colors to express high and low temperatures or green and red colors to demonstrate financial values. Colors also have some benefits in data visualization.
Using basic colors is a good choice since they are ready to use and universal like mass-produced clothes. However, sometimes tailor-made colors are more suitable for telling the story and making the work stand out.
What are the right colors?
The Internet can be a good source. Recommended colors such as “The color of the year 20XX” on many websites can make your works look fashionable.
Another source of colors can be found in photos from your mobile phone or camera. You can take a picture of stuff that contains the color you want, or you might already have a photo with your favorite colors.
This article will guide on how to extract colors from images. The method can also be applied in a fun way to analyze your favorite photos, such as a stunning view from your vacation or stuff you like.
In total, there are 4 steps:
- 1. Select an image
- 2. Import libraries
- 3. Create a function
- 4. Apply the function
Let’s get started
1 Select an image
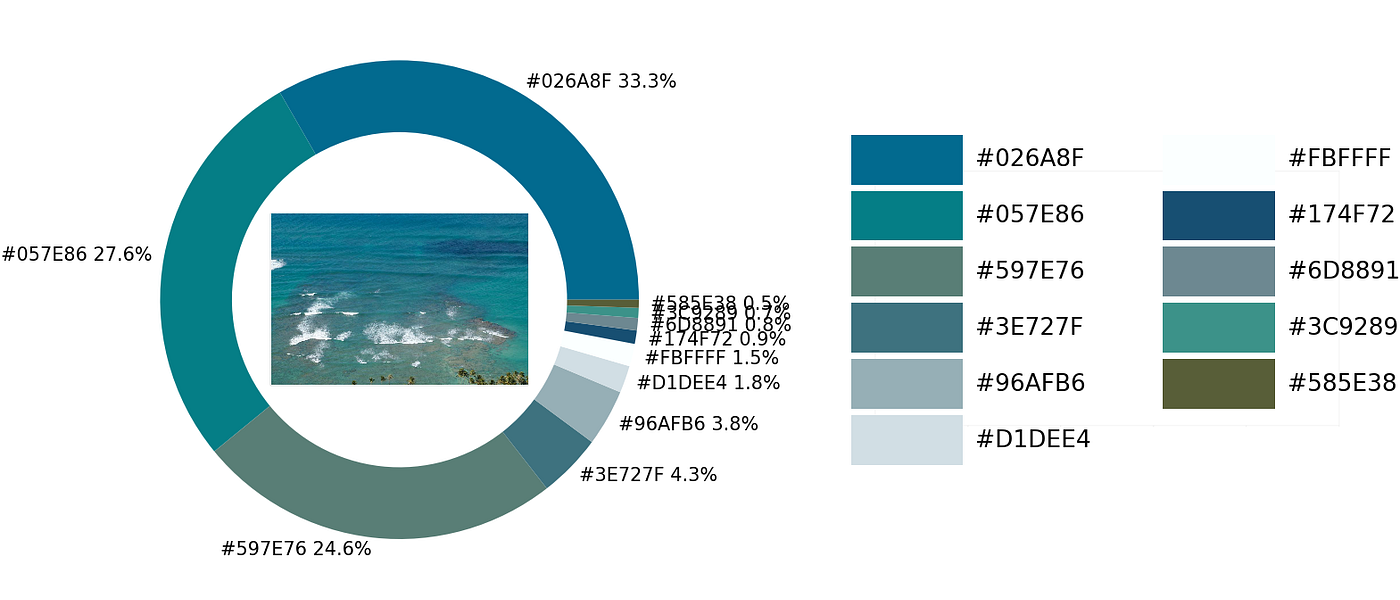
Start with selecting an image. For example, I will use a photo of sea water and coconut trees below.

Note: all photos in this article, except the cover, belong to me. I took them with my equipment(camera and mobile phone). If you want to test them for fair use with the codes in this article, please feel free to use without asking for permission.
2. Import libraries
Import Numpy, Panda, Matplotlib, and Image from Pillow.
Next, let’s import extcolors and rgb2hex libraries. The extcolors library returns the RGB values, which will be converted into HEX color codes with the rgb2hex library.
If there are some errors in importing both libraries, you can try installing some prerequisite libraries to make them work. These libraries are in the code below. Remove the # symbol in front of !pip and run to install them. Please don’t remove the # symbol before the version number. They are just the notes.
3. Create a function
Next, I will explain a step-by-step how to create a function for color extraction. If you want to get the function directly, please score down to Define a function.
Resizing the image
Start with preparing the input image. Pictures that are taken with modern cameras and mobile phones are too large. Some can take a picture with more than 50 megapixels (a 4K monitor can only display approximately 8.3 megapixels). If we directly use a huge image, processing may take some time.
Thus, the first thing to do is resize. The code below shows how to resize a picture to 900 pixels in width. If the image is not huge or your CPU is fast, this step can be omitted, or the output resolution number can be increased. Please take into account that after resizing the photo, the new one will be saved on your computer for reading in the next step.

Color extraction
Extract color with the extcolors library. The parameters that we have to set up:
- tolerance: group colors to limit the output and give a better visual representation. Based on a scale from 0 to 100. Where 0 won’t group any color and 100 will group all colors into one.
- limit: upper limit to the number of extracted colors presented in the output.
In the code below, I set the tolerance value equal to 12 and limit the number of color codes output to 11 colors (limit=12). The number can be changed as you desire. The obtained result will be in RGB color codes and their occurrence.

Define a function to convert the RGB codes into HEX color codes with the rgb2hex library and create a DataFrame.

Donut chart
Plot a donut chart to visualize the result.

Color palette
Create a color palette and label them with the HEX color codes. If the limit number in the extracting step is set up with more than 12 colors, the X-axis and Y-axis values can be modified to accommodate the result.

Finally, let’s combine the codes.
Voila!!…
Define a function
With all the steps we have done so far, let’s combine them to apply to other images easily.
4. Apply function
Explaining the parameters that we have to set up for the exact_color function:
exact_color('image location/name', resized_width, tolerance, zoom)
- image location/name: the image location and its name on your computer.
- resized_width: the photo width output that we want to resize.
- tolerance: group colors to limit the output based on a scale from 0 to 100.
- zoom: resize the photo in the center of the donut chart.
Example 1

exact_color('photo location', 900, 12, 2.5)

Example 2

exact_color('photo location', 900, 8, 2.5)

Improving the result
If the outcome has no color you are looking for, there are two methods to help get the color.
- Increasing the tolerance
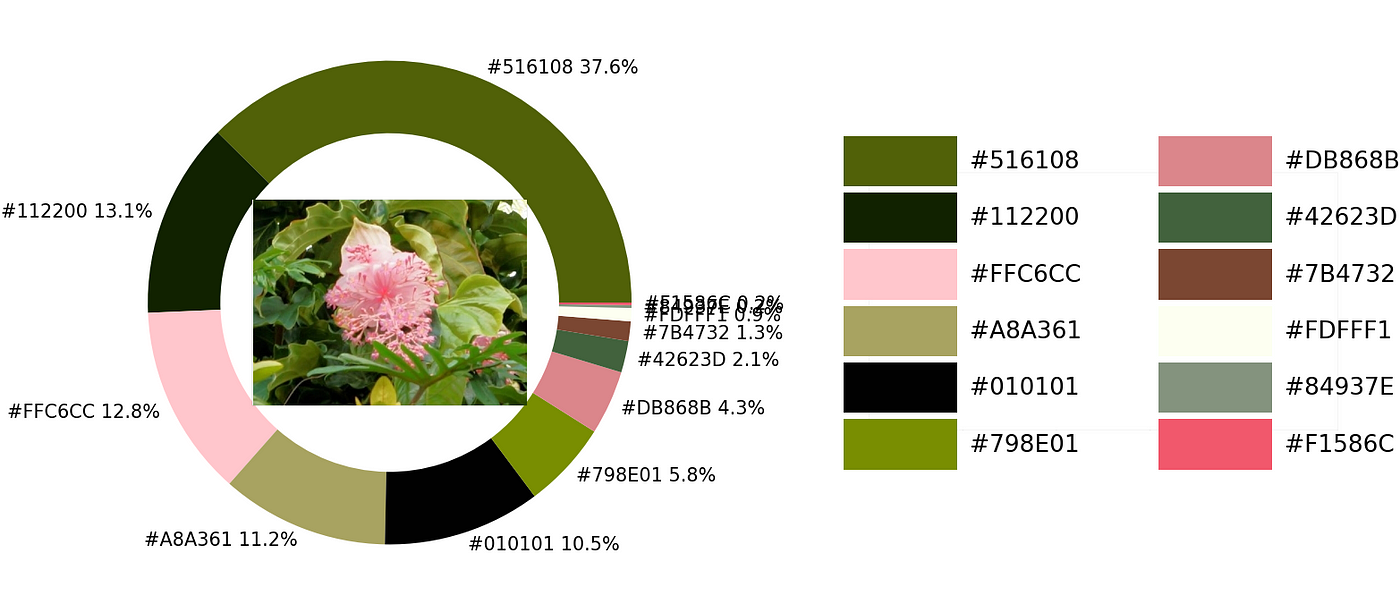
For example, I will exact the pink color of a hibiscus flower, a tropical flower, in the center of the photo below.

Start with setting the tolerance value equal to 12
exact_color('photo location', 900, 12, 2.5)
It can be noticed that there is no pink color in the result above. This might happen because the colors that are grouped are too small. Thus, we will increase the number of tolerance to 24.
exact_color('photo location', 900, 24, 2.5)

The result has been improved. There is a pink color code in the palette. We can go further by creasing the tolerance number to 36 to get more pink color codes. The following result returns 2 shades of pink color.
exact_color('photo location', 900, 36, 2.5)

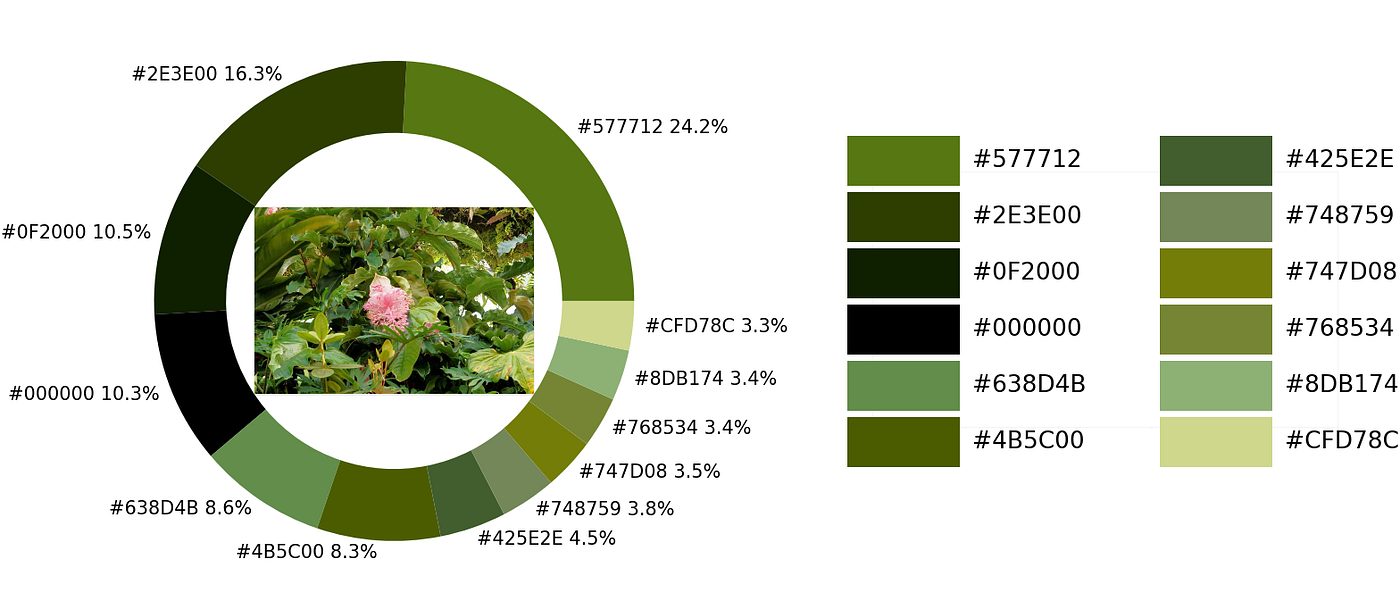
2. Cropping the input
Another way to improve the result is cropping the photo by using some computer programs before analyzing. I cropped the input image before running with the code. Even with a tolerance equal to 24, the extraction returns 3 shades of pink color.
exact_color('photo location', 900, 24, 4.5)
Summary
This article has explained how to extract colors from an image. The result can help analyze the colors and their amount. It is also possible to apply the function with Python for loop command to cope with bulk images. If you have any questions or suggestions, please feel free to leave a comment. Thanks for reading.
Creating your own and unique list of colors
Why are the colors important?
Colors help get people’s attention at first sight. They are helpful in communicating messages, for example, using red and blue colors to express high and low temperatures or green and red colors to demonstrate financial values. Colors also have some benefits in data visualization.
Using basic colors is a good choice since they are ready to use and universal like mass-produced clothes. However, sometimes tailor-made colors are more suitable for telling the story and making the work stand out.
What are the right colors?
The Internet can be a good source. Recommended colors such as “The color of the year 20XX” on many websites can make your works look fashionable.
Another source of colors can be found in photos from your mobile phone or camera. You can take a picture of stuff that contains the color you want, or you might already have a photo with your favorite colors.
This article will guide on how to extract colors from images. The method can also be applied in a fun way to analyze your favorite photos, such as a stunning view from your vacation or stuff you like.
In total, there are 4 steps:
- 1. Select an image
- 2. Import libraries
- 3. Create a function
- 4. Apply the function
Let’s get started
1 Select an image
Start with selecting an image. For example, I will use a photo of sea water and coconut trees below.
Note: all photos in this article, except the cover, belong to me. I took them with my equipment(camera and mobile phone). If you want to test them for fair use with the codes in this article, please feel free to use without asking for permission.
2. Import libraries
Import Numpy, Panda, Matplotlib, and Image from Pillow.
Next, let’s import extcolors and rgb2hex libraries. The extcolors library returns the RGB values, which will be converted into HEX color codes with the rgb2hex library.
If there are some errors in importing both libraries, you can try installing some prerequisite libraries to make them work. These libraries are in the code below. Remove the # symbol in front of !pip and run to install them. Please don’t remove the # symbol before the version number. They are just the notes.
3. Create a function
Next, I will explain a step-by-step how to create a function for color extraction. If you want to get the function directly, please score down to Define a function.
Resizing the image
Start with preparing the input image. Pictures that are taken with modern cameras and mobile phones are too large. Some can take a picture with more than 50 megapixels (a 4K monitor can only display approximately 8.3 megapixels). If we directly use a huge image, processing may take some time.
Thus, the first thing to do is resize. The code below shows how to resize a picture to 900 pixels in width. If the image is not huge or your CPU is fast, this step can be omitted, or the output resolution number can be increased. Please take into account that after resizing the photo, the new one will be saved on your computer for reading in the next step.
Color extraction
Extract color with the extcolors library. The parameters that we have to set up:
- tolerance: group colors to limit the output and give a better visual representation. Based on a scale from 0 to 100. Where 0 won’t group any color and 100 will group all colors into one.
- limit: upper limit to the number of extracted colors presented in the output.
In the code below, I set the tolerance value equal to 12 and limit the number of color codes output to 11 colors (limit=12). The number can be changed as you desire. The obtained result will be in RGB color codes and their occurrence.
Define a function to convert the RGB codes into HEX color codes with the rgb2hex library and create a DataFrame.
Donut chart
Plot a donut chart to visualize the result.
Color palette
Create a color palette and label them with the HEX color codes. If the limit number in the extracting step is set up with more than 12 colors, the X-axis and Y-axis values can be modified to accommodate the result.
Finally, let’s combine the codes.
Voila!!…
Define a function
With all the steps we have done so far, let’s combine them to apply to other images easily.
4. Apply function
Explaining the parameters that we have to set up for the exact_color function:
exact_color('image location/name', resized_width, tolerance, zoom)
- image location/name: the image location and its name on your computer.
- resized_width: the photo width output that we want to resize.
- tolerance: group colors to limit the output based on a scale from 0 to 100.
- zoom: resize the photo in the center of the donut chart.
Example 1
exact_color('photo location', 900, 12, 2.5)
Example 2
exact_color('photo location', 900, 8, 2.5)
Improving the result
If the outcome has no color you are looking for, there are two methods to help get the color.
- Increasing the tolerance
For example, I will exact the pink color of a hibiscus flower, a tropical flower, in the center of the photo below.
Start with setting the tolerance value equal to 12
exact_color('photo location', 900, 12, 2.5)
It can be noticed that there is no pink color in the result above. This might happen because the colors that are grouped are too small. Thus, we will increase the number of tolerance to 24.
exact_color('photo location', 900, 24, 2.5)
The result has been improved. There is a pink color code in the palette. We can go further by creasing the tolerance number to 36 to get more pink color codes. The following result returns 2 shades of pink color.
exact_color('photo location', 900, 36, 2.5)
2. Cropping the input
Another way to improve the result is cropping the photo by using some computer programs before analyzing. I cropped the input image before running with the code. Even with a tolerance equal to 24, the extraction returns 3 shades of pink color.
exact_color('photo location', 900, 24, 4.5)
Summary
This article has explained how to extract colors from an image. The result can help analyze the colors and their amount. It is also possible to apply the function with Python for loop command to cope with bulk images. If you have any questions or suggestions, please feel free to leave a comment. Thanks for reading.
Denial of responsibility! Techno Blender is an automatic aggregator of the all world’s media. In each content, the hyperlink to the primary source is specified. All trademarks belong to their rightful owners, all materials to their authors. If you are the owner of the content and do not want us to publish your materials, please contact us by email – [email protected]. The content will be deleted within 24 hours.