
Integrating an External API with a Chatbot Application using LangChain and Chainlit
A practical guide to integrating external APIs for advanced interactions with a chatbot application using LangChain and Chainlit
In this tutorial, we will see how we can integrate an external API with a custom chatbot application. In my previous articles on building a custom chatbot application, we’ve covered the basics of creating a chatbot with specific functionalities using LangChain and OpenAI, and how to build the web application for our chatbot using Chainlit.
If you’re new to this series, I recommend checking out my previous articles for a detailed step-by-step guide:
- Building a Chatbot Application with Chainlit and LangChain
- How to Build Your Own Chatbot with LangChain and OpenAI
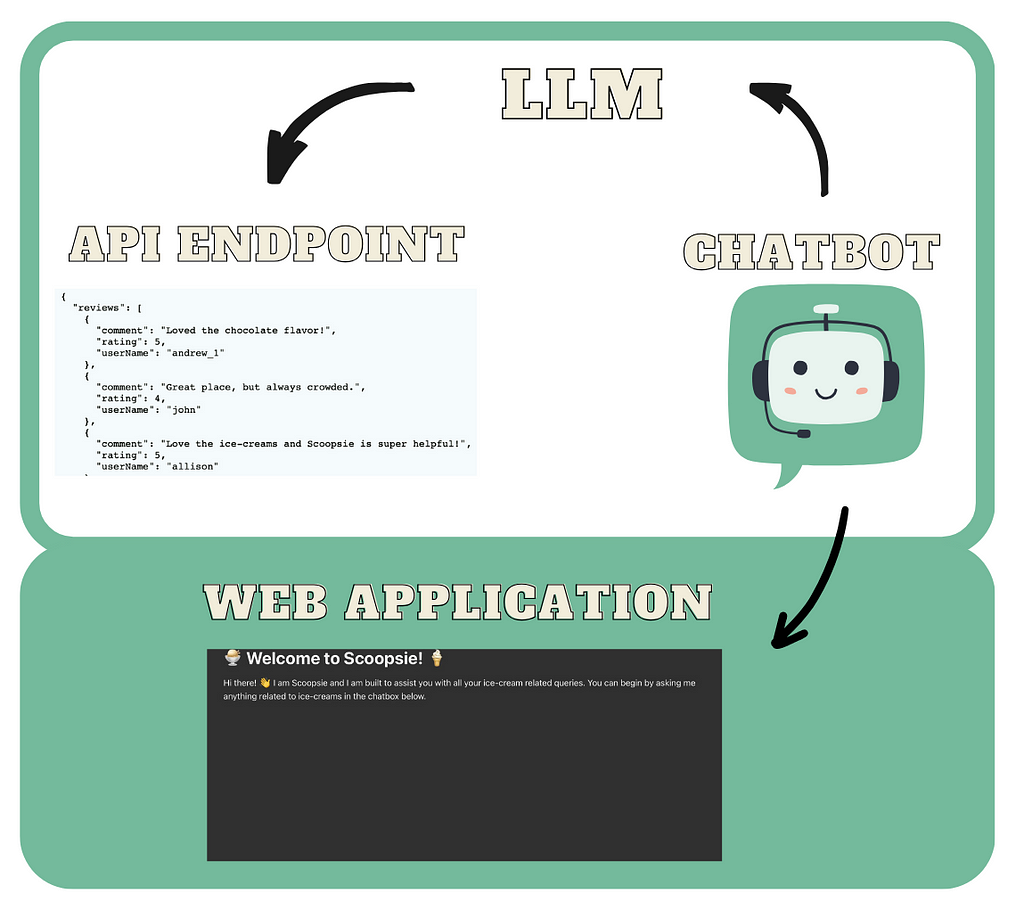
This tutorial will focus on enhancing our chatbot, Scoopsie, an ice-cream assistant, by connecting it to an external API. You can think of an API as an accessible way to extract and share data within and across programs. Users can make requests to an API to fetch or send data, and the API responds back with some information. We’ll connect Scoopsie to an API to fetch information from a fictional ice-cream store and use those responses to provide information. For most chatbot applications, linking your custom chatbot to an external API can be incredibly useful and, in some cases, even necessary.
Here’s a quick recap of where we left off: currently our chatbot.py uses the LLMChain to query OpenAI’s GPT-3.5 model to answer a user’s ice-cream related queries:
import chainlit as cl
from langchain_openai import OpenAI
from langchain.chains import LLMChain
from prompts import ice_cream_assistant_prompt_template
from langchain.memory.buffer import ConversationBufferMemory

from dotenv import load_dotenv

load_dotenv()


@cl.on_chat_start
def query_llm():
    llm = OpenAI(model='gpt-3.5-turbo-instruct',
                 temperature=0)
    conversation_memory = ConversationBufferMemory(memory_key="chat_history",
                                                   max_len=50,
                                                   return_messages=True,
                                                   )
    llm_chain = LLMChain(llm=llm,
             prompt=ice_cream_assistant_prompt_template,
             memory=conversation_memory)
    cl.user_session.set("llm_chain", llm_chain)


@cl.on_message
async def query_llm(message: cl.Message):
    llm_chain = cl.user_session.get("llm_chain")
    response = await llm_chain.acall(message.content,
                                     callbacks=[
                                         cl.AsyncLangchainCallbackHandler()])

    await cl.Message(response["text"]).send()
Environment Setup
If you haven’t set up a conda environment for the project yet, you can go ahead and create one. Remember that Chainlit requires python>=3.8.
conda create --name chatbot_langchain python=3.10
Activate your environment with:
conda activate chatbot_langchain
To install all dependencies, run:
pip install -r requirements.txt
Creating a Fictional Store API
We will begin by creating an API to connect to Scoopsie. This API represents a fictional ice-cream store to allow users to retrieve the store’s menu, along with other information such as customizations, user reviews and special offers. We’ll utilize Flask, a Python framework for web development, to encode the above information in different API endpoints. These include:
- /menu: aGET endpoint to retrieve the menu of flavors and toppings.
- /customizations: aGET endpoint to retrieve the customizations
- /special-offers: aGET endpoint to retrieve the special offers.
- /user-reviews: aGET endpoint to retrieve the user reviews.
To keep Scoopsie focused on providing information rather than handling transactions or processing orders, we’ll limit our current scope to these informational endpoints. However, you can expand this API to include other endpoints, such as a POST endpoint to allow the user to submit an order, or other GET endpoints.
Step 1
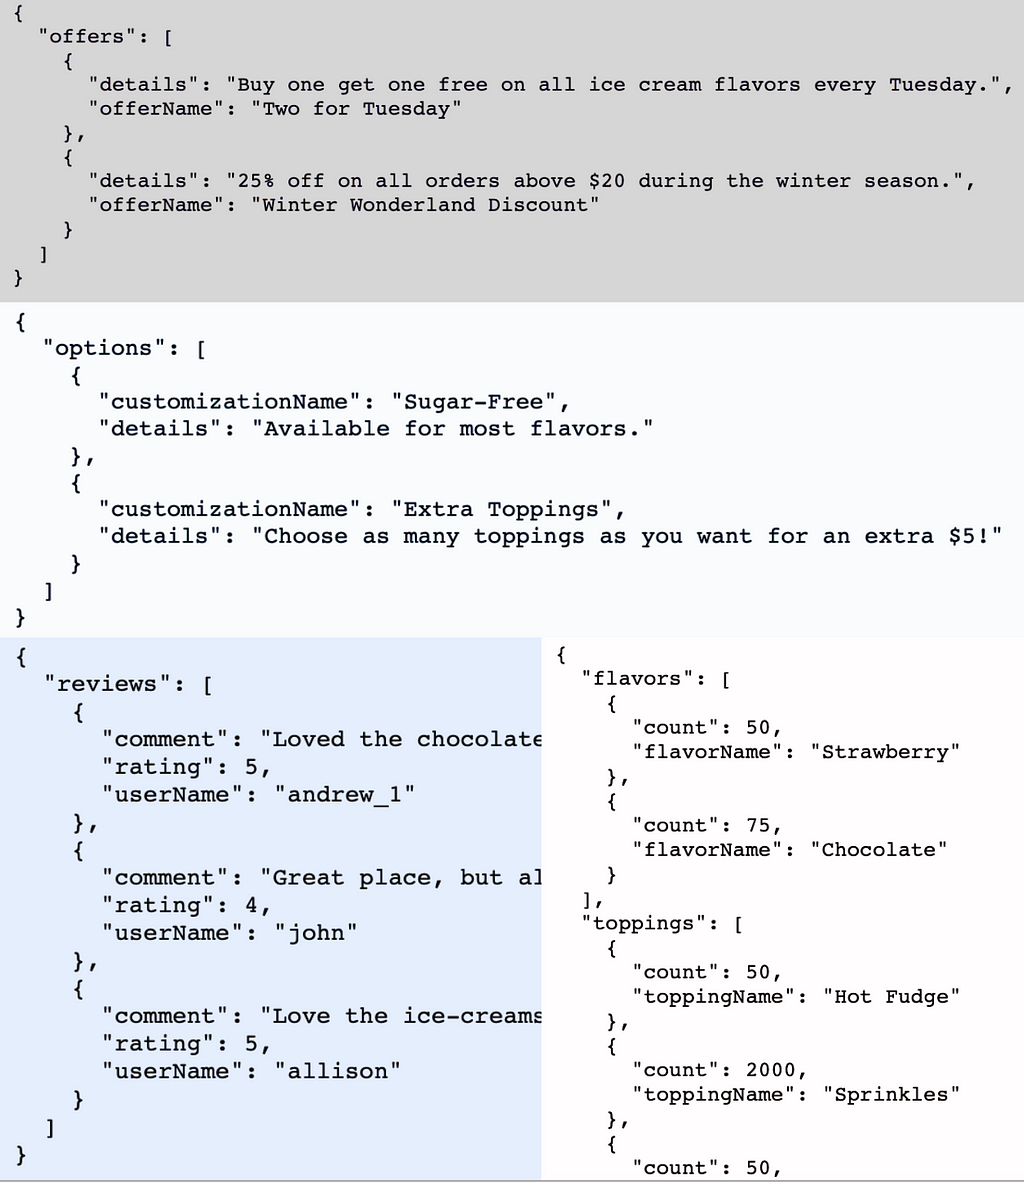
Let’s create a Python script named data_store.py to store static data like the menu, special offers, customer reviews, and customization options. Here's how we can structure it:
# Example menu, special offers, customer reviews, and customizations
menu = {
    "flavors": [
        {"flavorName": "Strawberry", "count": 50},
        {"flavorName": "Chocolate", "count": 75}
    ],
    "toppings": [
        {"toppingName": "Hot Fudge", "count": 50},
        {"toppingName": "Sprinkles", "count": 2000},
        {"toppingName": "Whipped Cream", "count": 50}
    ]
}
special_offers = {
    "offers": [
        {"offerName": "Two for Tuesday", "details": "Buy one get one free on all ice cream flavors every Tuesday."},
        {"offerName": "Winter Wonderland Discount", "details": "25% off on all orders above $20 during the winter season."}
    ]
}
customer_reviews = {
    "reviews": [
        {"userName": "andrew_1", "rating": 5, "comment": "Loved the chocolate flavor!"},
        {"userName": "john", "rating": 4, "comment": "Great place, but always crowded."},
        {"userName": "allison", "rating": 5, "comment": "Love the ice-creams and Scoopsie is super helpful!"}
    ]
}
customizations = {
    "options": [
        {"customizationName": "Sugar-Free", "details": "Available for most flavors."},
        {"customizationName": "Extra Toppings", "details": "Choose as many toppings as you want for an extra $5!"}
    ]
}
You can adjust the above script to better fit your specific needs. These examples show possible attributes for each category. In practical applications, storing this data in a database for dynamic retrieval is more suitable.
Step 2
Let’s set up our Flask application in a file named ice_cream_store_app.py, where we'll import the data from data_store.py. We can start by importing the required libraries and initializing the Flask application:
from flask import Flask, jsonify
from data_store import menu, special_offers, customer_reviews, customizations

app = Flask(__name__)
Step 3
Now, let’s configure the API endpoints functions. In Flask, these functions respond directly to web requests without needing explicit arguments, thanks to Flask’s routing mechanism. These functions are designed to:
- automatically handle requests without direct argument passing, except for the implicit self for class-based views, which we're not using here.
- return a tuple with two elements:
– a dict converted to JSON format via jsonify()
– an HTTP status code, typically 200 to indicate success.
Below are the endpoint functions:
@app.route('/menu', methods=['GET'])
def get_menu():
    """
    Retrieves the menu data.
    Returns:
        A tuple containing the menu data as JSON and the HTTP status code.
    """
    return jsonify(menu), 200

@app.route('/special-offers', methods=['GET'])
def get_special_offers():
    """
    Retrieves the special offers data.
    Returns:
        A tuple containing the special offers data as JSON and the HTTP status code.
    """
    return jsonify(special_offers), 200

@app.route('/customer-reviews', methods=['GET'])
def get_customer_reviews():
    """
    Retrieves customer reviews data.
    Returns:
        A tuple containing the customer reviews data as JSON and the HTTP status code.
    """
    return jsonify(customer_reviews), 200

@app.route('/customizations', methods=['GET'])
def get_customizations():
    """
    Retrieves the customizations data.
    Returns:
        A tuple containing the customizations data as JSON and the HTTP status code.
    """
    return jsonify(customizations), 200
For each function above, jsonify() is used to turn Python dictionaries into JSON format, which is then returned with a 200 status code for successful queries.
Step 4
Finally, let’s add the following code to our ice_cream_store_app.py script:
if __name__ == '__main__':
    app.run(debug=True)
The API can be started by running the following command in terminal:
python ice_cream_store_app.py

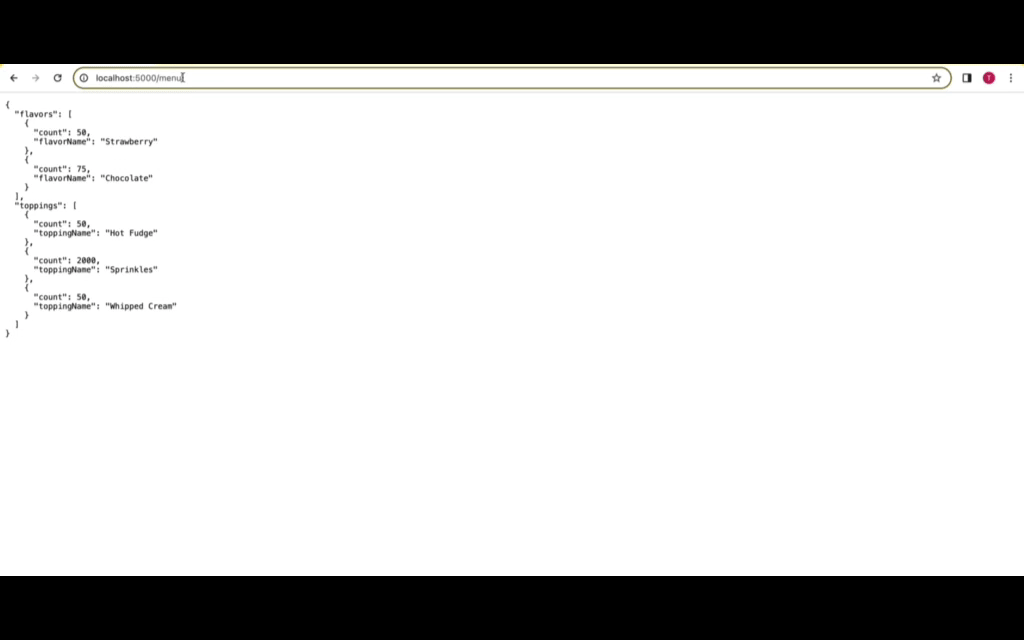
Once the application is running, Scoopsie’s custom API will be accessible at http://127.0.0.1:5000/. To check out the various endpoints, you can use tools like Postman or use a web browser to view a particular endpoint: http://127.0.0.1:5000/{endpoint_name}.
LangChain’s APIChain Explained
Chains in LangChain simplify complex tasks by executing them as a sequence of simpler, connected operations. These chains typically incorporate elements like LLMs, PromptTemplates, output parsers, or external third-party APIs, which we’ll be focusing on in this tutorial. I dive into LangChain’s Chain functionality in greater detail in my first article on the series, that you can access here.
Previously, we utilized LangChain’s LLMChain for direct interactions with the LLM. Now, to extend Scoopsie’s capabilities to interact with external APIs, we’ll use the APIChain. The APIChain is a LangChain module designed to format user inputs into API requests. This will enable our chatbot to send requests to and receive responses from an external API, broadening its functionality.
The APIChain can be configured to handle different HTTP methods (GET, POST, PUT, DELETE, etc.), set request headers, and manage the body of the request. It also supports JSON payloads, which are commonly used in RESTful API communications.
Setting up the API Chain from LangChain
Step 1
Let’s first import LangChain’s APIChain module, alongwith the other required modules, in our chatbot.py file. This script will host all our application logic. You can set up the necessary environment variables, such as the OPENAI_API_KEY in a .env script, which can be accessed by the dotenv python library.
import chainlit as cl
from langchain_openai import OpenAI
from langchain.chains import LLMChain, APIChain
from langchain.memory.buffer import ConversationBufferMemory
from dotenv import load_dotenv

load_dotenv()
Step 2
For the APIChain class, we need the external API’s documentation in string format to access endpoint details. This documentation should outline the API’s endpoints, methods, parameters, and expected responses. This aids the LLM in formulating API requests and parsing the responses. It’s helpful to define this information as a dictionary and then convert it in to a string for later usage.
Let’s create a new python script called api_docs.py and add the docs for our fictional store’s API:
import json

scoopsie_api_docs = {
    "base_url": "<http://127.0.0.1:5000/>",
    "endpoints": {
        "/menu": {
            "method": "GET",
            "description": "Retrieve the menu of flavors and customizations.",
            "parameters": None,
            "response": {
                "description": "A JSON object containing available flavors
                                and toppings along with their counts.",
                "content_type": "application/json"
            }
        },
        "/special-offers": {
            "method": "GET",
            "description": "Retrieve current special offers and discounts.",
            "parameters": None,
            "response": {
                "description": "A JSON object listing the current special
                                offers and discounts.",
                "content_type": "application/json"
            }
        },
        "/customer-reviews": {
            "method": "GET",
            "description": "Retrieve customer reviews for the ice cream store.",
            "parameters": None,
            "response": {
                "description": "A JSON object containing customer
                                reviews, ratings, and comments.",
                "content_type": "application/json"
            }
        },
        "/customizations": {
            "method": "GET",
            "description": "Retrieve available ice cream customizations.",
            "parameters": None,
            "response": {
                "description": "A JSON object listing available
                                customizations like toppings and sugar-free
                                options.",
                "content_type": "application/json"
            }
        }
    }
}

# Convert the dictionary to a JSON string
scoopsie_api_docs = json.dumps(scoopsie_api_docs, indent=2)
I’ve formatted our custom API’s documentation into a Python dictionary called scoopsie_api_docs. This dictionary includes the API's base URL and details our four endpoints under the endpoints key. Each endpoint lists its HTTP method (all GET for us), a concise description, accepted parameters (none for these endpoints), and the expected response format—a JSON object with relevant data. The dictionary is then turned into a JSON string using json.dumps, indented by 2 spaces for readability.
Let’s import this API documentation in our chatbot.py script:
from api_docs import scoopsie_api_docs
Step 3
The APIChain requires two prompts: one for selecting the right API endpoint and another to create a concise reply to the user query based on that endpoint. These prompts have default values, however, we will be creating our own prompts to ensure a personalized interaction. We can add the following new prompts in our prompts.py file:
api_url_template = """
Given the following API Documentation for Scoopsie's official
ice cream store API: {api_docs}
Your task is to construct the most efficient API URL to answer
the user's question, ensuring the
call is optimized to include only necessary information.
Question: {question}
API URL:
"""
api_url_prompt = PromptTemplate(input_variables=['api_docs', 'question'],
                                template=api_url_template)

api_response_template = """"
With the API Documentation for Scoopsie's official API: {api_docs}
and the specific user question: {question} in mind,
and given this API URL: {api_url} for querying, here is the
response from Scoopsie's API: {api_response}.
Please provide a summary that directly addresses the user's question,
omitting technical details like response format, and
focusing on delivering the answer with clarity and conciseness,
as if Scoopsie itself is providing this information.
Summary:
"""
api_response_prompt = PromptTemplate(input_variables=['api_docs',
                                                      'question',
                                                      'api_url',
                                                      'api_response'],
                                     template=api_response_template)
Here, the api_url_prompt generates the exact API URL for queries using the provided API documentation (api_docs). After identifying the correct endpoint with api_url_prompt, the APIChain uses the api_response_prompt to summarize the API's response to answer the user's query. Let's import these prompts in our chatbot.py script:
from prompts import api_response_prompt, api_url_prompt
Step 4
Let’s set up the APIChain to connect with our previously created fictional ice-cream store’s API. The APIChain module from LangChain provides the from_llm_and_api_docs() method, that lets us load a chain from just an LLM and the api docs defined previously. We'll continue using the gpt-3.5-turbo-instruct model from OpenAI for our LLM.
# Initialize your LLM
llm = OpenAI(model='gpt-3.5-turbo-instruct',
             temperature=0)

api_chain = APIChain.from_llm_and_api_docs(
        llm=llm,
        api_docs=scoopsie_api_docs,
        api_url_prompt=api_url_prompt,
        api_response_prompt=api_response_prompt,
        verbose=True,
        limit_to_domains=["<http://127.0.0.1:5000/>"]
    )
The parameter limit_to_domains in the code above limits the domains that can be accessed by the APIChain. According to the official LangChain documentation, the default value is an empty tuple. This means that no domains are allowed by default. By design this will raise an error on instantiation. You can pass None if you want to allow all domains by default. However, this is not recommended for security reasons, as it would allow malicious users to make requests to arbitrary URLs including internal APIs accessible from the server. To allow our store's API, we can specify its URL; this would ensure that our chain operates within a controlled environment.
Step 5
In the previous tutorials, we set up an LLMChain to handle general ice-cream related queries. We would still want to retain this functionality, since Scoopsie is a helpful conversational buddy, while also incorporating access to our fictional store’s menu and customization options via the APIChain. To combine these capabilities, we’ll use the llm_chain for general queries and the api_chain for accessing the store's API. This requires adjusting our Chainlit setup to support multiple chains from the start of a user session. Here's how we can adapt the @cl.on_chat_start decorator:
@cl.on_chat_start
def setup_multiple_chains():
    llm = OpenAI(model='gpt-3.5-turbo-instruct',
                 temperature=0)
    conversation_memory = ConversationBufferMemory(memory_key="chat_history",
                                                   max_len=200,
                                                   return_messages=True,
                                                   )
    llm_chain = LLMChain(llm=llm, prompt=ice_cream_assistant_prompt,
												 memory=conversation_memory)
    cl.user_session.set("llm_chain", llm_chain)

    api_chain = APIChain.from_llm_and_api_docs(
            llm=llm,
            api_docs=scoopsie_api_docs,
            api_url_prompt=api_url_prompt,
            api_response_prompt=api_response_prompt,
            verbose=True,
            limit_to_domains=["<http://127.0.0.1:5000/>"]
        )
    cl.user_session.set("api_chain", api_chain)
Upon initiating a new user session, this setup instantiates both llm_chain and api_chain, ensuring Scoopsie is equipped to handle a broad range of queries. Each chain is stored in the user session for easy retrieval. For information on setting up the llm_chain, you can view my previous article.
Step 6
Let’s now define the wrapper function around the @cl.on_message decorator:
@cl.on_message
async def handle_message(message: cl.Message):
    user_message = message.content.lower()
    llm_chain = cl.user_session.get("llm_chain")
    api_chain = cl.user_session.get("api_chain")

    if any(keyword in user_message for keyword in ["menu", "customization",
                                                   "offer", "review"]):
        # If any of the keywords are in the user_message, use api_chain
        response = await api_chain.acall(user_message,
                                         callbacks=[cl.AsyncLangchainCallbackHandler()])
    else:
        # Default to llm_chain for handling general queries
        response = await llm_chain.acall(user_message,
                                         callbacks=[cl.AsyncLangchainCallbackHandler()])
    response_key = "output" if "output" in response else "text"
    await cl.Message(response.get(response_key, "")).send()
In this setup, we retrieve both the llm_chain and api_chain objects. If the user message includes a keyword reflective of an endpoint of our fictional store's API, the application will trigger the APIChain. If not, we assume it is a general ice-cream related query, and trigger the LLMChain. This is a simple use-case, but for more complex use-cases, you might need to write more elaborate logic to ensure the correct chain is triggered. For further details on Chainlit's decorators and how to effectively utilize them, refer back to my previous article where I delve into these topics extensively.
Step 7
Now that our application code is ready, we can launch our chatbot. Open a terminal in your project directory and run the following command:
chainlit run chatbot.py -w --port 8000
You can access the chatbot by navigating to http://localhost:8000 in your web browser.
Demo
Scoopsie’s application interface is now ready! Here is a demo showcasing the chatbot in action:

Wrapping Up
We’ve successfully built an API for a fictional ice-cream store, and integrated it with our chatbot. As demonstrated above, you can access the web application of your chatbot using Chainlit, where both general queries and the fictional store’s API endpoints can be accessed.
You can find the code for this tutorial in this GitHub repo. The GitHub checkpoint for this tutorial will contain all developed code up until this point.
You can follow along as I share working demos, explanations and cool side projects on things in the AI space. Come say hi on LinkedIn and X! 👋
Integrating an External API with a Chatbot Application using LangChain and Chainlit was originally published in Towards Data Science on Medium, where people are continuing the conversation by highlighting and responding to this story.
A practical guide to integrating external APIs for advanced interactions with a chatbot application using LangChain and Chainlit
In this tutorial, we will see how we can integrate an external API with a custom chatbot application. In my previous articles on building a custom chatbot application, we’ve covered the basics of creating a chatbot with specific functionalities using LangChain and OpenAI, and how to build the web application for our chatbot using Chainlit.
If you’re new to this series, I recommend checking out my previous articles for a detailed step-by-step guide:
- Building a Chatbot Application with Chainlit and LangChain
- How to Build Your Own Chatbot with LangChain and OpenAI
This tutorial will focus on enhancing our chatbot, Scoopsie, an ice-cream assistant, by connecting it to an external API. You can think of an API as an accessible way to extract and share data within and across programs. Users can make requests to an API to fetch or send data, and the API responds back with some information. We’ll connect Scoopsie to an API to fetch information from a fictional ice-cream store and use those responses to provide information. For most chatbot applications, linking your custom chatbot to an external API can be incredibly useful and, in some cases, even necessary.
Here’s a quick recap of where we left off: currently our chatbot.py uses the LLMChain to query OpenAI’s GPT-3.5 model to answer a user’s ice-cream related queries:
import chainlit as cl
from langchain_openai import OpenAI
from langchain.chains import LLMChain
from prompts import ice_cream_assistant_prompt_template
from langchain.memory.buffer import ConversationBufferMemory

from dotenv import load_dotenv

load_dotenv()


@cl.on_chat_start
def query_llm():
    llm = OpenAI(model='gpt-3.5-turbo-instruct',
                 temperature=0)
    conversation_memory = ConversationBufferMemory(memory_key="chat_history",
                                                   max_len=50,
                                                   return_messages=True,
                                                   )
    llm_chain = LLMChain(llm=llm,
             prompt=ice_cream_assistant_prompt_template,
             memory=conversation_memory)
    cl.user_session.set("llm_chain", llm_chain)


@cl.on_message
async def query_llm(message: cl.Message):
    llm_chain = cl.user_session.get("llm_chain")
    response = await llm_chain.acall(message.content,
                                     callbacks=[
                                         cl.AsyncLangchainCallbackHandler()])

    await cl.Message(response["text"]).send()
Environment Setup
If you haven’t set up a conda environment for the project yet, you can go ahead and create one. Remember that Chainlit requires python>=3.8.
conda create --name chatbot_langchain python=3.10
Activate your environment with:
conda activate chatbot_langchain
To install all dependencies, run:
pip install -r requirements.txt
Creating a Fictional Store API
We will begin by creating an API to connect to Scoopsie. This API represents a fictional ice-cream store to allow users to retrieve the store’s menu, along with other information such as customizations, user reviews and special offers. We’ll utilize Flask, a Python framework for web development, to encode the above information in different API endpoints. These include:
- /menu: aGET endpoint to retrieve the menu of flavors and toppings.
- /customizations: aGET endpoint to retrieve the customizations
- /special-offers: aGET endpoint to retrieve the special offers.
- /user-reviews: aGET endpoint to retrieve the user reviews.
To keep Scoopsie focused on providing information rather than handling transactions or processing orders, we’ll limit our current scope to these informational endpoints. However, you can expand this API to include other endpoints, such as a POST endpoint to allow the user to submit an order, or other GET endpoints.
Step 1
Let’s create a Python script named data_store.py to store static data like the menu, special offers, customer reviews, and customization options. Here's how we can structure it:
# Example menu, special offers, customer reviews, and customizations
menu = {
    "flavors": [
        {"flavorName": "Strawberry", "count": 50},
        {"flavorName": "Chocolate", "count": 75}
    ],
    "toppings": [
        {"toppingName": "Hot Fudge", "count": 50},
        {"toppingName": "Sprinkles", "count": 2000},
        {"toppingName": "Whipped Cream", "count": 50}
    ]
}
special_offers = {
    "offers": [
        {"offerName": "Two for Tuesday", "details": "Buy one get one free on all ice cream flavors every Tuesday."},
        {"offerName": "Winter Wonderland Discount", "details": "25% off on all orders above $20 during the winter season."}
    ]
}
customer_reviews = {
    "reviews": [
        {"userName": "andrew_1", "rating": 5, "comment": "Loved the chocolate flavor!"},
        {"userName": "john", "rating": 4, "comment": "Great place, but always crowded."},
        {"userName": "allison", "rating": 5, "comment": "Love the ice-creams and Scoopsie is super helpful!"}
    ]
}
customizations = {
    "options": [
        {"customizationName": "Sugar-Free", "details": "Available for most flavors."},
        {"customizationName": "Extra Toppings", "details": "Choose as many toppings as you want for an extra $5!"}
    ]
}
You can adjust the above script to better fit your specific needs. These examples show possible attributes for each category. In practical applications, storing this data in a database for dynamic retrieval is more suitable.
Step 2
Let’s set up our Flask application in a file named ice_cream_store_app.py, where we'll import the data from data_store.py. We can start by importing the required libraries and initializing the Flask application:
from flask import Flask, jsonify
from data_store import menu, special_offers, customer_reviews, customizations

app = Flask(__name__)
Step 3
Now, let’s configure the API endpoints functions. In Flask, these functions respond directly to web requests without needing explicit arguments, thanks to Flask’s routing mechanism. These functions are designed to:
- automatically handle requests without direct argument passing, except for the implicit self for class-based views, which we're not using here.
- return a tuple with two elements:
– a dict converted to JSON format via jsonify()
– an HTTP status code, typically 200 to indicate success.
Below are the endpoint functions:
@app.route('/menu', methods=['GET'])
def get_menu():
    """
    Retrieves the menu data.
    Returns:
        A tuple containing the menu data as JSON and the HTTP status code.
    """
    return jsonify(menu), 200

@app.route('/special-offers', methods=['GET'])
def get_special_offers():
    """
    Retrieves the special offers data.
    Returns:
        A tuple containing the special offers data as JSON and the HTTP status code.
    """
    return jsonify(special_offers), 200

@app.route('/customer-reviews', methods=['GET'])
def get_customer_reviews():
    """
    Retrieves customer reviews data.
    Returns:
        A tuple containing the customer reviews data as JSON and the HTTP status code.
    """
    return jsonify(customer_reviews), 200

@app.route('/customizations', methods=['GET'])
def get_customizations():
    """
    Retrieves the customizations data.
    Returns:
        A tuple containing the customizations data as JSON and the HTTP status code.
    """
    return jsonify(customizations), 200
For each function above, jsonify() is used to turn Python dictionaries into JSON format, which is then returned with a 200 status code for successful queries.
Step 4
Finally, let’s add the following code to our ice_cream_store_app.py script:
if __name__ == '__main__':
    app.run(debug=True)
The API can be started by running the following command in terminal:
python ice_cream_store_app.py
Once the application is running, Scoopsie’s custom API will be accessible at http://127.0.0.1:5000/. To check out the various endpoints, you can use tools like Postman or use a web browser to view a particular endpoint: http://127.0.0.1:5000/{endpoint_name}.
LangChain’s APIChain Explained
Chains in LangChain simplify complex tasks by executing them as a sequence of simpler, connected operations. These chains typically incorporate elements like LLMs, PromptTemplates, output parsers, or external third-party APIs, which we’ll be focusing on in this tutorial. I dive into LangChain’s Chain functionality in greater detail in my first article on the series, that you can access here.
Previously, we utilized LangChain’s LLMChain for direct interactions with the LLM. Now, to extend Scoopsie’s capabilities to interact with external APIs, we’ll use the APIChain. The APIChain is a LangChain module designed to format user inputs into API requests. This will enable our chatbot to send requests to and receive responses from an external API, broadening its functionality.
The APIChain can be configured to handle different HTTP methods (GET, POST, PUT, DELETE, etc.), set request headers, and manage the body of the request. It also supports JSON payloads, which are commonly used in RESTful API communications.
Setting up the API Chain from LangChain
Step 1
Let’s first import LangChain’s APIChain module, alongwith the other required modules, in our chatbot.py file. This script will host all our application logic. You can set up the necessary environment variables, such as the OPENAI_API_KEY in a .env script, which can be accessed by the dotenv python library.
import chainlit as cl
from langchain_openai import OpenAI
from langchain.chains import LLMChain, APIChain
from langchain.memory.buffer import ConversationBufferMemory
from dotenv import load_dotenv

load_dotenv()
Step 2
For the APIChain class, we need the external API’s documentation in string format to access endpoint details. This documentation should outline the API’s endpoints, methods, parameters, and expected responses. This aids the LLM in formulating API requests and parsing the responses. It’s helpful to define this information as a dictionary and then convert it in to a string for later usage.
Let’s create a new python script called api_docs.py and add the docs for our fictional store’s API:
import json

scoopsie_api_docs = {
    "base_url": "<http://127.0.0.1:5000/>",
    "endpoints": {
        "/menu": {
            "method": "GET",
            "description": "Retrieve the menu of flavors and customizations.",
            "parameters": None,
            "response": {
                "description": "A JSON object containing available flavors
                                and toppings along with their counts.",
                "content_type": "application/json"
            }
        },
        "/special-offers": {
            "method": "GET",
            "description": "Retrieve current special offers and discounts.",
            "parameters": None,
            "response": {
                "description": "A JSON object listing the current special
                                offers and discounts.",
                "content_type": "application/json"
            }
        },
        "/customer-reviews": {
            "method": "GET",
            "description": "Retrieve customer reviews for the ice cream store.",
            "parameters": None,
            "response": {
                "description": "A JSON object containing customer
                                reviews, ratings, and comments.",
                "content_type": "application/json"
            }
        },
        "/customizations": {
            "method": "GET",
            "description": "Retrieve available ice cream customizations.",
            "parameters": None,
            "response": {
                "description": "A JSON object listing available
                                customizations like toppings and sugar-free
                                options.",
                "content_type": "application/json"
            }
        }
    }
}

# Convert the dictionary to a JSON string
scoopsie_api_docs = json.dumps(scoopsie_api_docs, indent=2)
I’ve formatted our custom API’s documentation into a Python dictionary called scoopsie_api_docs. This dictionary includes the API's base URL and details our four endpoints under the endpoints key. Each endpoint lists its HTTP method (all GET for us), a concise description, accepted parameters (none for these endpoints), and the expected response format—a JSON object with relevant data. The dictionary is then turned into a JSON string using json.dumps, indented by 2 spaces for readability.
Let’s import this API documentation in our chatbot.py script:
from api_docs import scoopsie_api_docs
Step 3
The APIChain requires two prompts: one for selecting the right API endpoint and another to create a concise reply to the user query based on that endpoint. These prompts have default values, however, we will be creating our own prompts to ensure a personalized interaction. We can add the following new prompts in our prompts.py file:
api_url_template = """
Given the following API Documentation for Scoopsie's official
ice cream store API: {api_docs}
Your task is to construct the most efficient API URL to answer
the user's question, ensuring the
call is optimized to include only necessary information.
Question: {question}
API URL:
"""
api_url_prompt = PromptTemplate(input_variables=['api_docs', 'question'],
                                template=api_url_template)

api_response_template = """"
With the API Documentation for Scoopsie's official API: {api_docs}
and the specific user question: {question} in mind,
and given this API URL: {api_url} for querying, here is the
response from Scoopsie's API: {api_response}.
Please provide a summary that directly addresses the user's question,
omitting technical details like response format, and
focusing on delivering the answer with clarity and conciseness,
as if Scoopsie itself is providing this information.
Summary:
"""
api_response_prompt = PromptTemplate(input_variables=['api_docs',
                                                      'question',
                                                      'api_url',
                                                      'api_response'],
                                     template=api_response_template)
Here, the api_url_prompt generates the exact API URL for queries using the provided API documentation (api_docs). After identifying the correct endpoint with api_url_prompt, the APIChain uses the api_response_prompt to summarize the API's response to answer the user's query. Let's import these prompts in our chatbot.py script:
from prompts import api_response_prompt, api_url_prompt
Step 4
Let’s set up the APIChain to connect with our previously created fictional ice-cream store’s API. The APIChain module from LangChain provides the from_llm_and_api_docs() method, that lets us load a chain from just an LLM and the api docs defined previously. We'll continue using the gpt-3.5-turbo-instruct model from OpenAI for our LLM.
# Initialize your LLM
llm = OpenAI(model='gpt-3.5-turbo-instruct',
             temperature=0)

api_chain = APIChain.from_llm_and_api_docs(
        llm=llm,
        api_docs=scoopsie_api_docs,
        api_url_prompt=api_url_prompt,
        api_response_prompt=api_response_prompt,
        verbose=True,
        limit_to_domains=["<http://127.0.0.1:5000/>"]
    )
The parameter limit_to_domains in the code above limits the domains that can be accessed by the APIChain. According to the official LangChain documentation, the default value is an empty tuple. This means that no domains are allowed by default. By design this will raise an error on instantiation. You can pass None if you want to allow all domains by default. However, this is not recommended for security reasons, as it would allow malicious users to make requests to arbitrary URLs including internal APIs accessible from the server. To allow our store's API, we can specify its URL; this would ensure that our chain operates within a controlled environment.
Step 5
In the previous tutorials, we set up an LLMChain to handle general ice-cream related queries. We would still want to retain this functionality, since Scoopsie is a helpful conversational buddy, while also incorporating access to our fictional store’s menu and customization options via the APIChain. To combine these capabilities, we’ll use the llm_chain for general queries and the api_chain for accessing the store's API. This requires adjusting our Chainlit setup to support multiple chains from the start of a user session. Here's how we can adapt the @cl.on_chat_start decorator:
@cl.on_chat_start
def setup_multiple_chains():
    llm = OpenAI(model='gpt-3.5-turbo-instruct',
                 temperature=0)
    conversation_memory = ConversationBufferMemory(memory_key="chat_history",
                                                   max_len=200,
                                                   return_messages=True,
                                                   )
    llm_chain = LLMChain(llm=llm, prompt=ice_cream_assistant_prompt,
												 memory=conversation_memory)
    cl.user_session.set("llm_chain", llm_chain)

    api_chain = APIChain.from_llm_and_api_docs(
            llm=llm,
            api_docs=scoopsie_api_docs,
            api_url_prompt=api_url_prompt,
            api_response_prompt=api_response_prompt,
            verbose=True,
            limit_to_domains=["<http://127.0.0.1:5000/>"]
        )
    cl.user_session.set("api_chain", api_chain)
Upon initiating a new user session, this setup instantiates both llm_chain and api_chain, ensuring Scoopsie is equipped to handle a broad range of queries. Each chain is stored in the user session for easy retrieval. For information on setting up the llm_chain, you can view my previous article.
Step 6
Let’s now define the wrapper function around the @cl.on_message decorator:
@cl.on_message
async def handle_message(message: cl.Message):
    user_message = message.content.lower()
    llm_chain = cl.user_session.get("llm_chain")
    api_chain = cl.user_session.get("api_chain")

    if any(keyword in user_message for keyword in ["menu", "customization",
                                                   "offer", "review"]):
        # If any of the keywords are in the user_message, use api_chain
        response = await api_chain.acall(user_message,
                                         callbacks=[cl.AsyncLangchainCallbackHandler()])
    else:
        # Default to llm_chain for handling general queries
        response = await llm_chain.acall(user_message,
                                         callbacks=[cl.AsyncLangchainCallbackHandler()])
    response_key = "output" if "output" in response else "text"
    await cl.Message(response.get(response_key, "")).send()
In this setup, we retrieve both the llm_chain and api_chain objects. If the user message includes a keyword reflective of an endpoint of our fictional store's API, the application will trigger the APIChain. If not, we assume it is a general ice-cream related query, and trigger the LLMChain. This is a simple use-case, but for more complex use-cases, you might need to write more elaborate logic to ensure the correct chain is triggered. For further details on Chainlit's decorators and how to effectively utilize them, refer back to my previous article where I delve into these topics extensively.
Step 7
Now that our application code is ready, we can launch our chatbot. Open a terminal in your project directory and run the following command:
chainlit run chatbot.py -w --port 8000
You can access the chatbot by navigating to http://localhost:8000 in your web browser.
Demo
Scoopsie’s application interface is now ready! Here is a demo showcasing the chatbot in action:
Wrapping Up
We’ve successfully built an API for a fictional ice-cream store, and integrated it with our chatbot. As demonstrated above, you can access the web application of your chatbot using Chainlit, where both general queries and the fictional store’s API endpoints can be accessed.
You can find the code for this tutorial in this GitHub repo. The GitHub checkpoint for this tutorial will contain all developed code up until this point.
You can follow along as I share working demos, explanations and cool side projects on things in the AI space. Come say hi on LinkedIn and X! 👋
Integrating an External API with a Chatbot Application using LangChain and Chainlit was originally published in Towards Data Science on Medium, where people are continuing the conversation by highlighting and responding to this story.
Denial of responsibility! Techno Blender is an automatic aggregator of the all world’s media. In each content, the hyperlink to the primary source is specified. All trademarks belong to their rightful owners, all materials to their authors. If you are the owner of the content and do not want us to publish your materials, please contact us by email – [email protected]. The content will be deleted within 24 hours.