
Own ChatGPT Bot in Telegram
Recently, mirror sites providing access to ChatGPT have started to appear. However, using them is unsafe because such sites can collect and analyze all your correspondence. Especially those sites that provide such access completely free of charge. There is a demand for such sites because some countries block access to ChatGPT, and OpenAI blocks access to some countries. And for some users, 20 dollars for a ChatGPT subscription is expensive.
So today, we will write our own chatbot based on ChatGPT in the Telegram messenger.
This is very easy to do, and in some tasks, using it may be more convenient than on the official website chat.openai.com.
We will write the bot in Python, and we will send requests via the OpenAI API.
Sometimes when registering, OpenAI gives grants of 5-18 dollars. But even if no grants are currently being issued, $5 will be enough for you for about 650,000 tokens of chatGPT v3.5, and this is a lot for a chat.
For comparison, the book “Gone with the Wind” by Margaret Mitchell contains approximately 420,000 words, and “War and Peace” by Leo Tolstoy contains 590,000 words.
Plus, APIs work faster than the free version of chat.openai.com, and unlike the paid subscription to chat.openai.com, which costs $20 per month, using APIs, you only pay for what you use, and if you don’t have many requests, it’s more profitable to use the API.
Perhaps by the time the article is published, the ChatGPT-4 API will not be open to everyone yet, but the GPT-3.5 version also solves many tasks well.
So, let’s get started.
First, we need to create a Telegram BOT, for which we need to ask BotFather, the main Telegram bot, to create a bot. We type @botfather in the search bar on Telegram, open it, and press /start.
To create a new bot, we write/newbot, after which you will be asked to enter the name of your bot, and come up with a unique name, noting that it should end with the word “bot.”
I will name my bot sinenko_gpt4_bot, because all the interesting names were already taken.
Next, you need to specify the username, which will represent your bot. It should also end with the word bot.
I will name it the same — sinenko_gpt4_bot. After this, BotFather will give you a token, which we will use to access the Telegram API.

To get an API key for ChatGPT from OpenAI, we need to follow the link and register.
After registration, you need to create a new API key and save it.


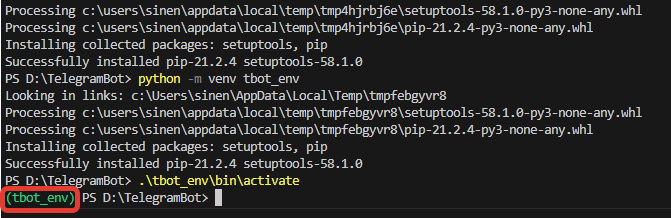
Now let’s create a directory with our project. I’ll call it TelegramBot. In this directory, we create a Python script. I’ll call it bot.py. We will need Python libraries: telebot, requests, and JSON. But first, let’s create a new Python environment in the project directory (this is not a mandatory step, but I’m used to creating a separate environment for each project).
Open the terminal, go to the project directory, and execute the command
Where tbot is the arbitrary name of your environment. After successfully creating the new environment, a folder with the environment’s name will appear in the project directory. In my case, it’s tbot_env. Now we need to activate it by running the activation script:
Depending on your system and Python version, the activation script might also be found at the following path:
.\tbot_env\Scripts\activateAfter successful activation, a green inscription with the name of your environment will appear in your command line, in my case (tbot_env).
Attention! Sometimes on Windows 8 and above, when activating the environment, an error is given, prohibiting the execution of the executable file. To solve this problem, execute the command:
Set-ExecutionPolicy RemoteSignedAfter which, a confirmation will be requested, and you need to enter [Y].
Now let’s update pip and install the libraries we will need for our work:
python -m pip install --upgrade pip
pip install telebot, mysql-connector-python
Now let’s write a simple Telegram bot:
import telebot
from telebot import types


bot = import telebot
from telebot import types


bot = telebot.TeleBot('TELEGRAM_API_KEY')


@bot.message_handler(commands=['start']) # This decorator says that the next function should be called when the bot receives a message with the /start command.
def start(message): # This is the definition of the start function. This function will be called when the bot receives a message with the /start command.
    markup = types.ReplyKeyboardMarkup(resize_keyboard=True)
    btn1 = types.KeyboardButton("Start")
    markup.add(btn1)
    bot.send_message(message.from_user.id, "Hi, I'm the Telegram bot ChatGPT!", reply_markup=markup)

bot.polling(none_stop=True, interval=1) # for the bot to start "listening" or "polling" the Telegram server for new messages. "Polling" means regularly receiving data from the Telegram server by the bot to find out if new messages have been received for it.
After this, let’s run our script with the command:
Now let’s open Telegram and go to the chat with our bot using the link that FatherBot gave us. In my case it’s: t.me/sinenko_gpt4_bot
And click on the Start button or enter the /start command. After that, we should receive a greeting message: “Hi, I’m the Telegram bot ChatGPT!” this means that our bot is working and successfully processing user messages. This code works through the polling function, which means the script itself will go to the Telegram server once a second and check if there are new messages. This is very convenient when the script is running on your local computer or when the server does not have a white IP address and a domain on the internet.

Now let’s add processing for any text entered by the user. To do this, after the start function, we add the following code, which will respond with “OK” to any message entered by the user:
@bot.message_handler(content_types=['text'])
def get_text_messages(message):
    markup = types.ReplyKeyboardMarkup(resize_keyboard=True)
    bot.send_message(message.from_user.id, 'OK', reply_markup=markup)
Now let’s test our bot and write some text.

Now we have learned how to accept incoming messages from users and give a response.
Now we need to redirect received messages to the GPT chat and return its answer to our users.
To make a request to the API, we need to send a request to the URL in JSON format.
The request should look like this:
data = {
    'model': 'gpt-3.5-turbo',  # Selected GPT model
    'messages': [
        {'role': 'system','content': 'You are my assistant.'}, # We specify the role of the bot
        {"role": "user", "content": 'some user message'}, # User request
        {"role": "assistant", "content": 'Answer of ChatGPT'} # Answer of the Chat-GPT
    ],
    'max_tokens': 1000,  # Maximum number of tokens in the response
    'n': 1,  #  Number of text variants
    'temperature': 0.1  # Temperature (creative component)
}
To send a user request to the GPT chat, we need to pass {“role”: “user,” “content”: ‘some user message’} in the messages array.
But for ChatGPT to understand its role in the dialogue, you can also pass {‘role’: ‘system’,’content’: ‘You are my assistant.’}.
If you want ChatGPT to remember your entire dialogue, then all past dialogue needs to be passed in each request:
{“role”: “user,” “content”: ‘first user message’},
{“role”: “assistant,” “content”: ‘first answer of ChatGPT’},
{“role”: “user,” “content”: ‘second user message’},
{“role”: “assistant,” “content”: ‘second answer of ChatGPT’},
{“role”: “user,” “content”: ‘some user message’}
But please note that tokens are also spent on sending all the previous dialogue.
Let’s now add the forwarding of user messages to the GPT chat into our bot’s code:
import requests
import json


api_key_openai = 'OPENAI_API_KEY'


url="https://api.openai.com/v1/chat/completions"
headers = {
    'Content-Type': 'application/json',
    'Authorization': 'Bearer '+api_key_openai
}


data = {
    'model': 'gpt-3.5-turbo',  # Selected GPT model
    'messages': [
        {'role': 'system','content': 'You are my assistant.'} # We specify the role of the bot
    ],
    'max_tokens': 1000,  # Maximum number of tokens in the response
    'n': 1,  #  Number of text variants
    'temperature': 0.1  # Temperature (creative component)
}
@bot.message_handler(content_types=['text'])
def get_text_messages(message):
    markup = types.ReplyKeyboardMarkup(resize_keyboard=True)


    data['messages'].append({"role": "user", "content": message.text}) # Add a new user request to our dialog array, form a request to the server on behalf of the user, with the text received in telegram
    response = requests.post(url, headers=headers, data=json.dumps(data))  # Send a request to the server in json format
    result = response.json() # get the answer in json format and convert to an array
    print(result)
    bot.send_message(message.from_user.id, result['choices'][0]['message']['content'], reply_markup=markup) # Take the text from the array from ChatGPT and send it to Telegram
    data['messages'].append({"role": "assistant", "content": result['choices'][0]['message']['content']}) # Add a new bot response to our dialog array
Now let’s run our script and try to write some message:

Now we have a fully functional chatbot that can be used.
The API will be sent your entire dialogue; over time, the dialogue can become large, and it would be pointless to spend your tokens, so after sending a message, you can delete the first messages from the messages array. And leave, for example, the last 40 messages. This will be quite enough. To clear old messages, add the following code after sending a message:
# Delete the first element of the array if the array is longer than 40 elements, but leave the first element of the array, which is the initial text of the bot
while len(data['messages']) > 40:
    data['messages'].pop(1)
If there are more than 40 messages, we delete the oldest messages, except for the first one (because the first message stores the role of our bot).
We can also change the role of our bot to anyone, and we can make it write poems from your sentences, invent horror stories or solve math problems. For this, it is enough to change the content field of the system message. Let’s change it in the following way:
data = {
    'model': 'gpt-3.5-turbo',  # Selected GPT model
    'messages': [
        {'role': 'system','content': 'You are my Chinese translator, translate all messages I write in Chinese and write the transcription in square brackets using English letters.'}, # We specify the role of the bot
    ],
    'max_tokens': 1000,  # Maximum number of tokens in the response
    'n': 1,  #  Number of text variants
    'temperature': 0.1  # Temperature (creative component)
}
Let’s launch and check the operation:

By the way, for the role of a translator in the ‘messages’ variable, you can delete all messages except the system one. This will save your tokens very much, and five dollars will be enough for translating 300,000+ words.
The article showed the simplest example of a bot, and this bot can be infinitely improved. You can also make a chat division for each separate Telegram user, save it to a database, and add advertisements and subscriptions. There are also missing error handlers in case API requests fail.
But these are topics for other articles:)
Link to the bot on GitHub.
Recently, mirror sites providing access to ChatGPT have started to appear. However, using them is unsafe because such sites can collect and analyze all your correspondence. Especially those sites that provide such access completely free of charge. There is a demand for such sites because some countries block access to ChatGPT, and OpenAI blocks access to some countries. And for some users, 20 dollars for a ChatGPT subscription is expensive.
So today, we will write our own chatbot based on ChatGPT in the Telegram messenger.
This is very easy to do, and in some tasks, using it may be more convenient than on the official website chat.openai.com.
We will write the bot in Python, and we will send requests via the OpenAI API.
Sometimes when registering, OpenAI gives grants of 5-18 dollars. But even if no grants are currently being issued, $5 will be enough for you for about 650,000 tokens of chatGPT v3.5, and this is a lot for a chat.
For comparison, the book “Gone with the Wind” by Margaret Mitchell contains approximately 420,000 words, and “War and Peace” by Leo Tolstoy contains 590,000 words.
Plus, APIs work faster than the free version of chat.openai.com, and unlike the paid subscription to chat.openai.com, which costs $20 per month, using APIs, you only pay for what you use, and if you don’t have many requests, it’s more profitable to use the API.
Perhaps by the time the article is published, the ChatGPT-4 API will not be open to everyone yet, but the GPT-3.5 version also solves many tasks well.
So, let’s get started.
First, we need to create a Telegram BOT, for which we need to ask BotFather, the main Telegram bot, to create a bot. We type @botfather in the search bar on Telegram, open it, and press /start.

To create a new bot, we write/newbot, after which you will be asked to enter the name of your bot, and come up with a unique name, noting that it should end with the word “bot.”
I will name my bot sinenko_gpt4_bot, because all the interesting names were already taken.
Next, you need to specify the username, which will represent your bot. It should also end with the word bot.
I will name it the same — sinenko_gpt4_bot. After this, BotFather will give you a token, which we will use to access the Telegram API.
To get an API key for ChatGPT from OpenAI, we need to follow the link and register.
After registration, you need to create a new API key and save it.
Now let’s create a directory with our project. I’ll call it TelegramBot. In this directory, we create a Python script. I’ll call it bot.py. We will need Python libraries: telebot, requests, and JSON. But first, let’s create a new Python environment in the project directory (this is not a mandatory step, but I’m used to creating a separate environment for each project).
Open the terminal, go to the project directory, and execute the command
Where tbot is the arbitrary name of your environment. After successfully creating the new environment, a folder with the environment’s name will appear in the project directory. In my case, it’s tbot_env. Now we need to activate it by running the activation script:
Depending on your system and Python version, the activation script might also be found at the following path:
.\tbot_env\Scripts\activateAfter successful activation, a green inscription with the name of your environment will appear in your command line, in my case (tbot_env).
Attention! Sometimes on Windows 8 and above, when activating the environment, an error is given, prohibiting the execution of the executable file. To solve this problem, execute the command:
Set-ExecutionPolicy RemoteSignedAfter which, a confirmation will be requested, and you need to enter [Y].
Now let’s update pip and install the libraries we will need for our work:
python -m pip install --upgrade pip
pip install telebot, mysql-connector-python
Now let’s write a simple Telegram bot:
import telebot
from telebot import types


bot = import telebot
from telebot import types


bot = telebot.TeleBot('TELEGRAM_API_KEY')


@bot.message_handler(commands=['start']) # This decorator says that the next function should be called when the bot receives a message with the /start command.
def start(message): # This is the definition of the start function. This function will be called when the bot receives a message with the /start command.
    markup = types.ReplyKeyboardMarkup(resize_keyboard=True)
    btn1 = types.KeyboardButton("Start")
    markup.add(btn1)
    bot.send_message(message.from_user.id, "Hi, I'm the Telegram bot ChatGPT!", reply_markup=markup)

bot.polling(none_stop=True, interval=1) # for the bot to start "listening" or "polling" the Telegram server for new messages. "Polling" means regularly receiving data from the Telegram server by the bot to find out if new messages have been received for it.
After this, let’s run our script with the command:
Now let’s open Telegram and go to the chat with our bot using the link that FatherBot gave us. In my case it’s: t.me/sinenko_gpt4_bot
And click on the Start button or enter the /start command. After that, we should receive a greeting message: “Hi, I’m the Telegram bot ChatGPT!” this means that our bot is working and successfully processing user messages. This code works through the polling function, which means the script itself will go to the Telegram server once a second and check if there are new messages. This is very convenient when the script is running on your local computer or when the server does not have a white IP address and a domain on the internet.
Now let’s add processing for any text entered by the user. To do this, after the start function, we add the following code, which will respond with “OK” to any message entered by the user:
@bot.message_handler(content_types=['text'])
def get_text_messages(message):
    markup = types.ReplyKeyboardMarkup(resize_keyboard=True)
    bot.send_message(message.from_user.id, 'OK', reply_markup=markup)
Now let’s test our bot and write some text.
Now we have learned how to accept incoming messages from users and give a response.
Now we need to redirect received messages to the GPT chat and return its answer to our users.
To make a request to the API, we need to send a request to the URL in JSON format.
The request should look like this:
data = {
    'model': 'gpt-3.5-turbo',  # Selected GPT model
    'messages': [
        {'role': 'system','content': 'You are my assistant.'}, # We specify the role of the bot
        {"role": "user", "content": 'some user message'}, # User request
        {"role": "assistant", "content": 'Answer of ChatGPT'} # Answer of the Chat-GPT
    ],
    'max_tokens': 1000,  # Maximum number of tokens in the response
    'n': 1,  #  Number of text variants
    'temperature': 0.1  # Temperature (creative component)
}
To send a user request to the GPT chat, we need to pass {“role”: “user,” “content”: ‘some user message’} in the messages array.
But for ChatGPT to understand its role in the dialogue, you can also pass {‘role’: ‘system’,’content’: ‘You are my assistant.’}.
If you want ChatGPT to remember your entire dialogue, then all past dialogue needs to be passed in each request:
{“role”: “user,” “content”: ‘first user message’},
{“role”: “assistant,” “content”: ‘first answer of ChatGPT’},
{“role”: “user,” “content”: ‘second user message’},
{“role”: “assistant,” “content”: ‘second answer of ChatGPT’},
{“role”: “user,” “content”: ‘some user message’}
But please note that tokens are also spent on sending all the previous dialogue.
Let’s now add the forwarding of user messages to the GPT chat into our bot’s code:
import requests
import json


api_key_openai = 'OPENAI_API_KEY'


url="https://api.openai.com/v1/chat/completions"
headers = {
    'Content-Type': 'application/json',
    'Authorization': 'Bearer '+api_key_openai
}


data = {
    'model': 'gpt-3.5-turbo',  # Selected GPT model
    'messages': [
        {'role': 'system','content': 'You are my assistant.'} # We specify the role of the bot
    ],
    'max_tokens': 1000,  # Maximum number of tokens in the response
    'n': 1,  #  Number of text variants
    'temperature': 0.1  # Temperature (creative component)
}
@bot.message_handler(content_types=['text'])
def get_text_messages(message):
    markup = types.ReplyKeyboardMarkup(resize_keyboard=True)


    data['messages'].append({"role": "user", "content": message.text}) # Add a new user request to our dialog array, form a request to the server on behalf of the user, with the text received in telegram
    response = requests.post(url, headers=headers, data=json.dumps(data))  # Send a request to the server in json format
    result = response.json() # get the answer in json format and convert to an array
    print(result)
    bot.send_message(message.from_user.id, result['choices'][0]['message']['content'], reply_markup=markup) # Take the text from the array from ChatGPT and send it to Telegram
    data['messages'].append({"role": "assistant", "content": result['choices'][0]['message']['content']}) # Add a new bot response to our dialog array
Now let’s run our script and try to write some message:
Now we have a fully functional chatbot that can be used.
The API will be sent your entire dialogue; over time, the dialogue can become large, and it would be pointless to spend your tokens, so after sending a message, you can delete the first messages from the messages array. And leave, for example, the last 40 messages. This will be quite enough. To clear old messages, add the following code after sending a message:
# Delete the first element of the array if the array is longer than 40 elements, but leave the first element of the array, which is the initial text of the bot
while len(data['messages']) > 40:
    data['messages'].pop(1)
If there are more than 40 messages, we delete the oldest messages, except for the first one (because the first message stores the role of our bot).
We can also change the role of our bot to anyone, and we can make it write poems from your sentences, invent horror stories or solve math problems. For this, it is enough to change the content field of the system message. Let’s change it in the following way:
data = {
    'model': 'gpt-3.5-turbo',  # Selected GPT model
    'messages': [
        {'role': 'system','content': 'You are my Chinese translator, translate all messages I write in Chinese and write the transcription in square brackets using English letters.'}, # We specify the role of the bot
    ],
    'max_tokens': 1000,  # Maximum number of tokens in the response
    'n': 1,  #  Number of text variants
    'temperature': 0.1  # Temperature (creative component)
}
Let’s launch and check the operation:
By the way, for the role of a translator in the ‘messages’ variable, you can delete all messages except the system one. This will save your tokens very much, and five dollars will be enough for translating 300,000+ words.
The article showed the simplest example of a bot, and this bot can be infinitely improved. You can also make a chat division for each separate Telegram user, save it to a database, and add advertisements and subscriptions. There are also missing error handlers in case API requests fail.
But these are topics for other articles:)
Link to the bot on GitHub.
Denial of responsibility! Techno Blender is an automatic aggregator of the all world’s media. In each content, the hyperlink to the primary source is specified. All trademarks belong to their rightful owners, all materials to their authors. If you are the owner of the content and do not want us to publish your materials, please contact us by email – [email protected]. The content will be deleted within 24 hours.