
Real-Time Typeahead Search with Elasticsearch (AWS OpenSearch) | by Zhou (Joe) Xu | Jun, 2022
An end-to-end example of building a scalable and intelligent search engine on the cloud with the MovieLens dataset
· 1. Introduction
· 2. Dataset Preparation
· 3. Setting up the OpenSearch
· 4. Index data
· 5. Basic Query with Match
· 6. Basic Front-end Implementation with Jupyter Notebook and ipywidgets
· 7. Some Advanced Queries
∘ 7.1 Match Phrase Prefix
∘ 7.2 Match + Prefix with Boolean
∘ 7.3 Multi-field Search
· 8. Conclusion
· About Me
· References
Have you ever thought about how Google makes its search engine so intelligent that it can predict what we think and autocomplete the whole search term even without us typing the whole thing? It is called typeahead search. It is a very useful language prediction tool that many search interfaces use to provide suggestions for users as they type in a query. [1]
As a data scientist or anyone who works on the backend of the data, sometimes we may want such an interactive search engine interface for our users to query structured/unstructured data with minimal effort. This can always bring the user experience to the next level.
Luckily, we don’t have to build it from scratch. There are many open-source tools ready to be used, and one of them is Elasticsearch.
Elasticsearch is a distributed, free and open search and analytics engine for all types of data, including textual, numerical, geospatial, structured, and unstructured. Known for its simple REST APIs, distributed nature, speed, and scalability, Elasticsearch is the central component of the Elastic Stack, a set of free and open tools for data ingestion, enrichment, storage, analysis, and visualization. [2]
On the other hand, AWS OpenSearch, created by Amazon, is a forked version of Elasticsearch fit into its AWS ecosystem. It has a very similar interface with underlying structures with Elasticsearch. In this post, to simplify the process of downloading, installing, and setting up Ealsticsearch on your local machine, I will instead walk you through an end-to-end example of indexing and querying data using AWS Open Search.
In the real world, another great reason to use such cloud services is scalability. We can easily adjust the resources we need to accommodate any data complexity.
Please bear in mind that even though we use AWS OpenSearch here, you can still follow the steps in Elasticsearch if you already have it set up. These tools are very similar in nature.
In this example, we are going to use the MovieLens 20M Dataset, which is a popular open movie dataset used by many data professionals in various projects. It is called 20M because there are 20 million ratings included in the dataset. In addition, there are 465,000 tag applications, 27,000 movies, and 138,000 users included in the whole dataset.
This dataset contains several files and can be used for very complex examples, but assuming we only want to build a movie search engine here that can query movie titles, years, and genres, we only need one file movies.csv.
This is a very clean dataset. The structure is shown below:
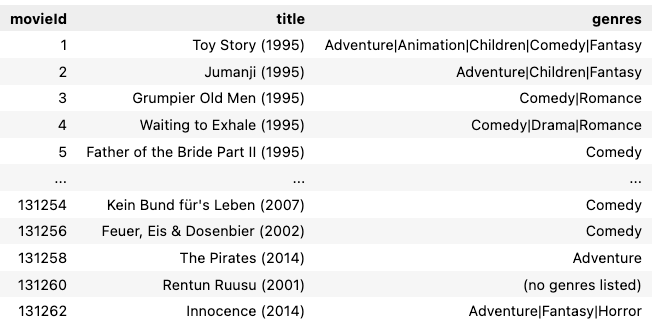
There are only 3 fields: movieId, title (with years in parenthesis), and genres (separated by |). We are going to index the dataset using title and genres, but it looks like there are movies without genres specified (eg, movieId = 131260), so we may want to replace these genres as NA, to prevent them from being queried as unwanted genre keywords. Several lines of processing should suffice:
import pandas as pd
import numpy as npdf = pd.read_csv('../data/movies.csv')
df['genres'] = df['genres'].replace('(no genres listed)', np.NaN)
df.to_csv('../data/movies_clean.csv', index=False)
With this super short chunk of code, we have just cleaned up the dataset and saved it as a new file called movie_clean.csv . Now we can go ahead and spin up an AWS OpenSearch domain.
Here is the official documentation from AWS OpenSearch. You can follow it for a more detailed introduction, or you can read through the simplified version I made below.
If you don’t have an AWS account, you can follow this link to sign up for AWS. You also need to add a payment method for AWS services. However don’t panic yet, as in this tutorial, we will use the minimal resources and the cost should be no more than $1.

After your account is created, simply log into your AWS management console, and search for the OpenSearch service, or click here to go into the OpenSearch dashboard.
In the dashboard, follow the steps below:
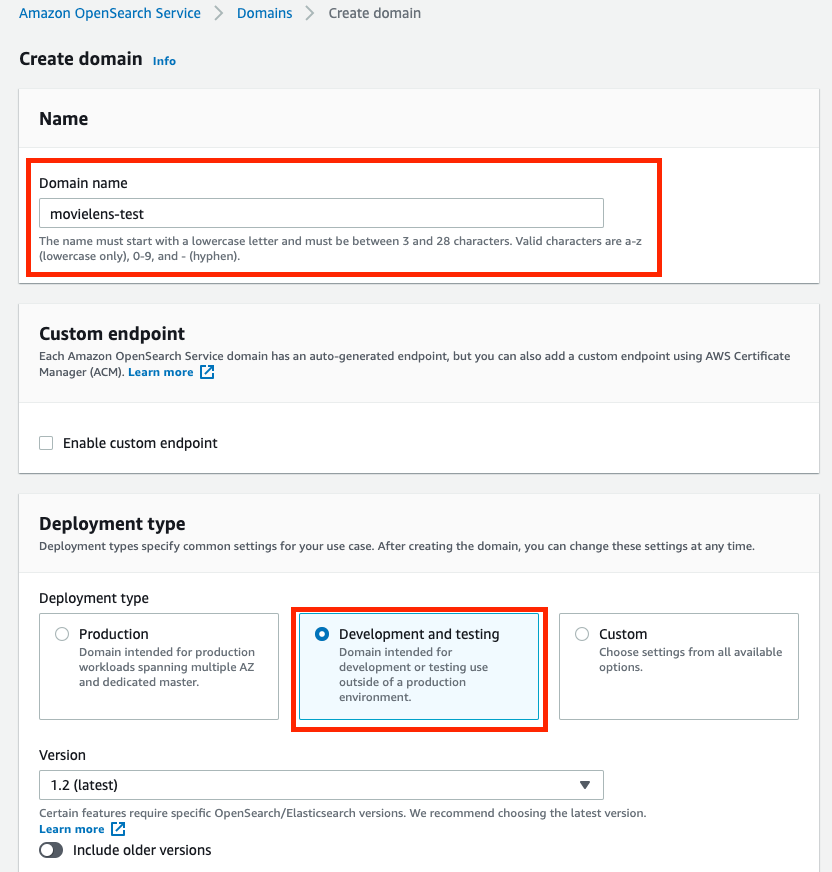
- Choose Create domain.
- Give a Domain name.
- In Development type, select Development and testing.
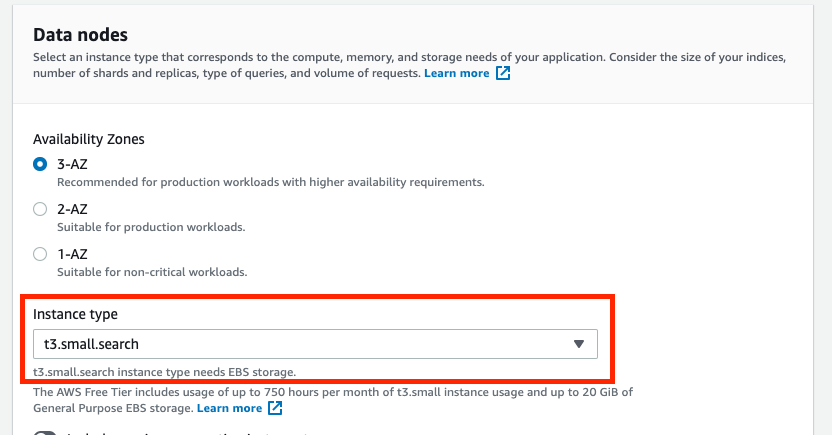
4. Change Instance type to t3.small.search, and keep all others as default.
5. For simplicity of this project, in Network, choose Public access
6. In Fine-grained access control, Create the master user by setting the username and password.
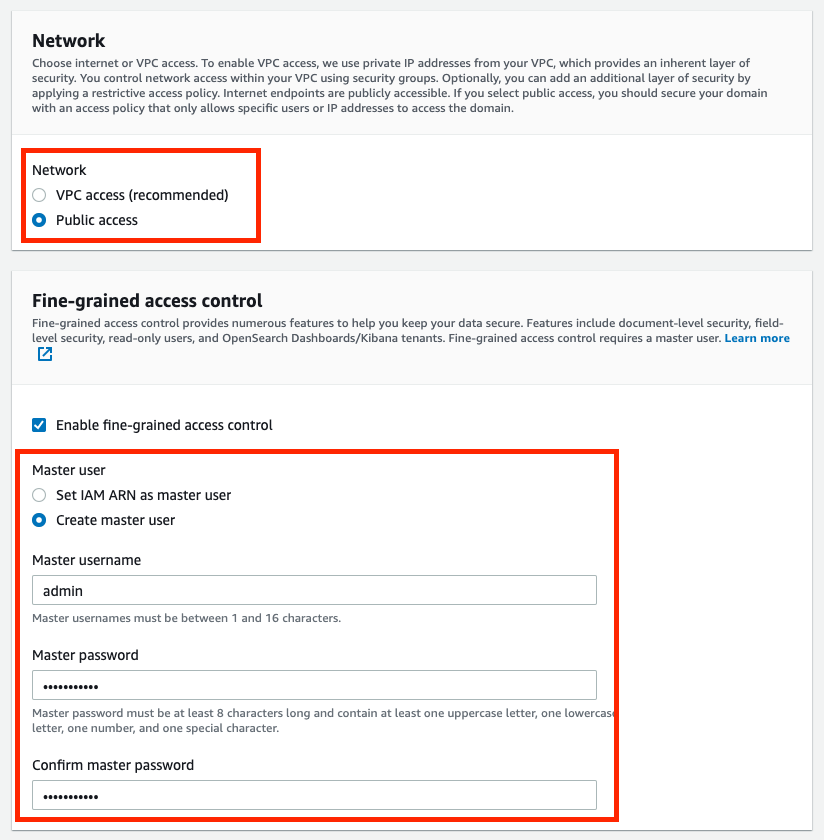
7. In the Access policy, Choose Only use fine-grained access control

8. Ignore all the other settings by leaving them as default. Click on Create. This can take up to 15–30 minutes to spin up, but usually faster from my experience.
AWS OpenSearch or Elasticsearch is intelligent enough to automatically index any data we upload, after which we can write queries with any logical rules to query the results. However, some preprocessing work might be needed to simplify our query efforts.
As we recall, our data consists of 3 columns:
Both titles and genres are important to us as we may want to enter any keywords in either/both of them to search for the movie we want. Multi-field search is supported in OpenSearch, but for simplicity of query, we can also preprocess it by putting all of our interested keywords into one dedicated column, so that it increases the efficiency and lowers the query complexity.
Using the preprocessing code above, we insert a new column called search_index to the dataframe that contains the title and all the genres:

The next step is to convert data into JSON format in order to bulk upload it to our domain. The format specified for bulk data upload can be found in the developer guide Option 2. Something like this:
{"index": {"_index": "movies", "_id": "2"}}
{"title": "Jumanji (1995)", "genres": "Adventure|Children|Fantasy", "search_index": "Jumanji (1995) Adventure Children Fantasy"}
where the first line specifies the index (document) name to be saved in the domain as well as the record id (Here I used the movieId column as the unique identifier). The second line includes all the other fields in the dataset.
The following code is used for the conversion:
After being converted, the data is stored in the data folder as movies.json . Now we need to upload it into the domain as below:
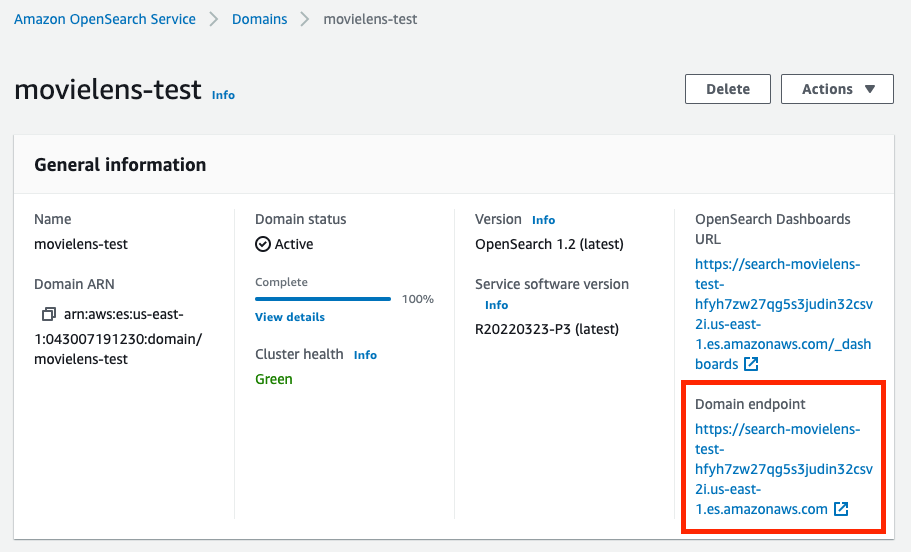
Note that the endpoint can be found on your OpenSearch domain page. The username and password are the master username & password we set when creating this domain.
If it returns a <Response [200]>, then we are good to go. The dataset is successfully uploaded into the AWS OpenSearch domain.
Now, with the data uploaded, we have done all the work on the server-side. OpenSearch automatically indexes the data to be ready for queries. We can now start working on the client-side to querying the data from the domain.
To read more about the querying languages, here are 2 options:
- Get started with the AWS OpenSearch Service Developer Guide
- There are some very detailed documentations for querying data from Elasticsearch and OpenSearch in this Official Elasticsearch Guide Query DSL.
However, we do not need very advanced functionalities in this example. We will mostly use around the standard match query with some small variations.
Here is a basic example:
Here, we write the query to look for any matched records with the title = “jumanji”, serialize the JSON query as a string, and send it to the domain with the endpoint and credentials. Let’s see the returned result:
{'took': 4,
'timed_out': False,
'_shards': {'total': 5, 'successful': 5, 'skipped': 0, 'failed': 0},
'hits': {'total': {'value': 1, 'relation': 'eq'},
'max_score': 10.658253,
'hits': [{'_index': 'movies',
'_type': '_doc',
'_id': '2',
'_score': 10.658253,
'_source': {'title': 'Jumanji (1995)',
'genres': 'Adventure|Children|Fantasy',
'search_index': 'Jumanji (1995) Adventure Children Fantasy'}}]}}
As we can see, it returns the record with the title equals to jumanji . There is only one matched result from our dataset, with the exact title as Jumanji (1995) , together with the other info such as id, genres, and the search_index.
OpenSearch automatically handles the upper/lower case letters, any symbols, and white spaces, so it can find our record well. In addition, the score means how much confidence the returned results match our query, the higher the better. In this case, it’s 10.658253 . If we include the year in the search query, like “jumanji 1995”, the score will then increase to 16.227726 . It is an important metric to rank the results when there are multiple ones returned by the query.
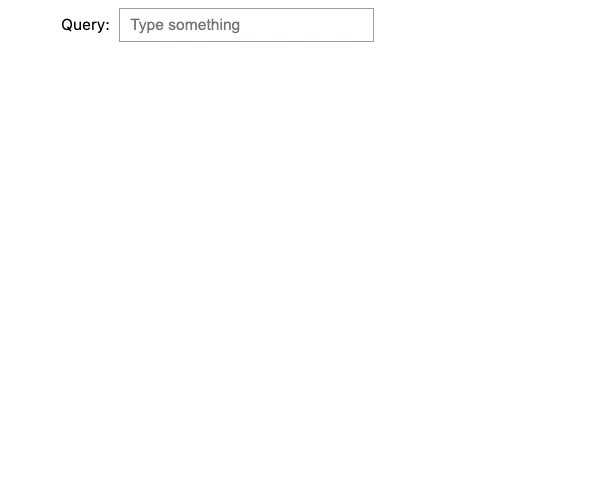
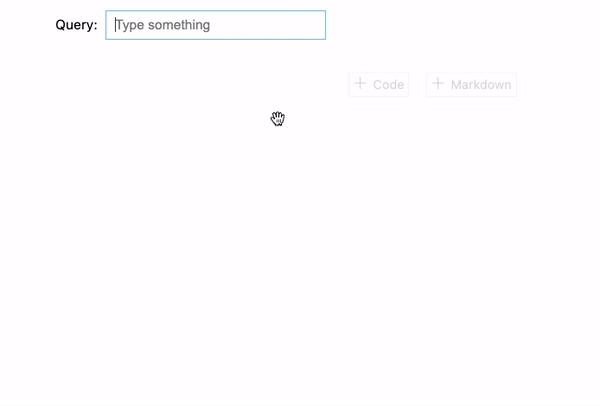
As a data scientist, Jupyter Notebook is a good friend, and with the popular ipywidgets, we can make the notebooks very interactive. Here is some code to build a basic GUI that includes a text box (for entering keywords) and a text output (for query results display).
There are 5 sections in the code:
- search function: A wrapper of the basic query introduced in the section above. By giving an input, it searches and returns the results that contain the input keywords.
- bold: A function that uses Markdown to bold the keywords in the results for better visualization of the results.
- printmd: A wrapper function to display Markdown in IPython
- text_change: A function that handles widget events. In this case, whenever the value changes in the text box, it will execute the search function and return the top 10 results ranked by the scores. There is also a timing module implemented to show how long it takes to search.
- The last section of the code defines the widget elements to be displayed: a text box and an output. The widget event is triggered when the value in the box is changed, and the results will display in the output.
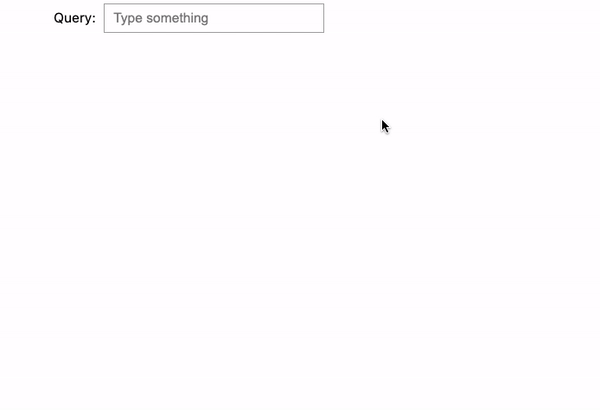
Here is what it looks like when we execute the code:
While we enter the keyword “jumanji”, it keeps searching for the updated keyword. During the process, there are 3 sets of results returned by the keywords “j”, “ju”, and “jumanji” respectively. However, it is empty for “jum”, “juma”, “juman”, or “jumanj” because the match query we used here treats the keywords entered as exact terms and there is no movie in our dataset that contains these words.
This does not look like our expected typeahead functionality. To improve the performance, we will look into some advanced query options below, including prefix, boolean, and multi-field searches.
7.1 Match Phrase Prefix
One simple fix to the problem we encountered in the section above is to use match phrase prefix query instead of the match query. Match phrase prefix query can return the documents that contain the words of a provided text in the same order as provided. The last term of the provided text is treated as a prefix, matching any words that begin with that term. [5]
It seems to be what we want: As we enter the query, we don’t have to finish the term before it can tell the results.
So let’s modify our query this way!
Here I will not show the Python code again, because everything stays the same, except for some slight modification of the query in the search function. Now match becomes match_phrase_prefix :
query = {
'query': {
'match_phrase_prefix': {
'title': prefix
}
}
}
With the change, here is what it looks like now:
We tried 3 examples here:
- jumanji: Now it’s fixed! As we type, the search engine uses the entered text as a prefix and renders all desired output flawlessly.
- harry potter: It does the same thing as the previous example. When we reach the second term “potter”, it starts to show all the Harry Potter movies.
- potter harry: However, if we reverse “harry potter” into “potter harry”, it won’t show any results because order matters in the match phrase prefix query.
Imagine when we use the search engine, we are not always 100% sure that we remember all the keywords in the correct order, so we may want to improve the search engine so that it becomes more intelligent to help us solve the issue.
7.2 Match + Prefix with Boolean
To break down the requirements for such a query:
- The last term needs to be treated as a prefix
- The other terms need to be exact matches
- We do not need the exact order to get desired results
Unfortunately, there is no such query type in Elasticsearch/OpenSearch we can directly use, but the tools are flexible enough that we can implement the logic using boolean queries.
The code shown above is the updated search function. As we can see here, the query becomes much longer now after incorporating the bool operation must:
- If we enter a search text that contains more than one word, then we will treat the last term as a prefix, AND the previous terms are exact matches.
- If the search text is only one word (or less), then we will just treat it as a prefix to search.
After implementing the changes, let’s see the results:

Now, when entering in a completely mixed order: “potter harry prince blood”, the search engine knows what we are looking for, and it is able to return the correct result: Harry Potter and the Half-Blood Prince (2009).
7.3 Multi-field Search
Until now, we only searched in the movie title field, but we can further improve the search engine to make it even smarter by leveraging some hidden fields, such as genres in our case.
To search among multiple fields, there is multi-match query in the Elasticsearch user guide. However, it does not provide enough power to search prefixes while ignoring orders at the same time as we just did. We still need booleans to make a compound query.
There is a shortcut: Remember that we previously processed the dataset and prepared a combined search_index column to include both title and genre information. With this new field, we can easily modify our previous query to include the hidden genre information without explicitly using multi-match queries.
Here is the modified search_prefix function, but if you look closely, there is no change from the last one, except we replaced title by search_index to search among both titles and genres.
Here is the result after the change:
We tried 2 examples:
- Let’s say we remember that there is an adventure movie with the keyword “impossible”. We then enter “impossible adventure”, and it will return all the Mission Impossible movies because they are classified as “adventure” movies.
- Same thing for Harry Potter. If entering “potter adventure”, it will return all the Harry Potter movies because they are all “adventure” movies as well.
In this post, we just walked through an end-to-end example to build an intelligent type-ahead search engine with the following steps:
- Prepare a movie dataset
- Set up an AWS OpenSearch domain
- Bulk upload the dataset to the OpenSearch service for indexing
- Build a simple type-ahead search engine GUI
- Several ways of querying data from the domain, from basic to advanced topics
The result is very impressive: we are able to mimic the type-ahead searches as what Google does. While typing the keyword, the search engine analyzes and searches the database in near real-time (0.2 seconds) to render the closest matches and guide us in the direction of further narrowing down the list of search results.
On the other hand, we have modified the queries using boolean operations that enable us to mix the keyword orders. We can also enter values that belong to the hidden fields, such as the genre names to help us narrow down and locate the desired result. Both of the features make the search engine even more intelligent.
There are still many places in this example that we can potentially improve in the future:
- Jupyter Notebook and its
ipywidgetsare very powerful in building GUIs. Here we only used text box and output, but there are many more widgets that could be used for this example, such as buttons to trigger search, checkboxes or dropdowns to add filters on the results, or select boxes to click on the suggested results as Google offers. - However,
ipywidgetsstill has limited capabilities compared to the toolkits that front-end developers use, such as JavaScript. The workflow shown in this example is only intended for quick testing and development usage for data scientists, who are very familiar with Jupyter Notebooks but with limited experience in front-end development. If we want to build a robust search engine app, this is not the best practice to take. - Elasticsearch/OpenSearch Domain Specific Language (DSL) is a very versatile tool for us to write queries that can suit almost any need. In this example, we just covered a very superficial layer of it. If you are interested in learning more, here is the complete documentation provided by Elasticsearch.
- AWS OpenSearch is scalable. In this example, we picked
t3.small.searchfor this 27,000-movie dataset, but we can usually expect better results if we scale up the resources. In the real world, the amount of the data could be of a completely different magnitude as well, so proper resources need to be chosen for the actual data size. - Security is a serious topic for any cloud service. In this example, we almost completely ignored all the security settings, but if it is in a production environment, we need to take much more effort to enhance the security levels.
At the very end of the post, one last reminder: Please remember to delete the AWS OpenSearch domain if you no longer need it, or it will incur unnecessary costs!
Thank you for reading! If you like this article, please follow my channel (really appreciate it 🙏). I will keep writing to share my ideas and projects about data science. Feel free to contact me if you have any questions.
I am a data scientist at Sanofi. I embrace technology and learn new skills every day. You are welcome to reach me from Medium Blog, LinkedIn, or GitHub. My opinions are my own and not the views of my employer.
Please see my other articles:
[1] Dynamic Web — Typeahead Search: https://doc.dynamicweb.com/documentation-9/how-tos/general/implementing-typeahead-search
[2] Elastic — What is Elasticsearch: https://www.elastic.co/what-is/elasticsearch
[3] MovieLens 20M Dataset: https://grouplens.org/datasets/movielens/20m/
F. Maxwell Harper and Joseph A. Konstan. 2015. The MovieLens Datasets: History and Context. ACM Transactions on Interactive Intelligent Systems (TiiS) 5, 4, Article 19 (December 2015), 19 pages. DOI=http://dx.doi.org/10.1145/2827872
[4] Amazon OpenSearch Service Developer Guide: https://docs.aws.amazon.com/opensearch-service/latest/developerguide/gsg.html
[5] Elasticsearch Guide — Query DSL: https://www.elastic.co/guide/en/elasticsearch/reference/current/query-dsl.html
An end-to-end example of building a scalable and intelligent search engine on the cloud with the MovieLens dataset

· 1. Introduction
· 2. Dataset Preparation
· 3. Setting up the OpenSearch
· 4. Index data
· 5. Basic Query with Match
· 6. Basic Front-end Implementation with Jupyter Notebook and ipywidgets
· 7. Some Advanced Queries
∘ 7.1 Match Phrase Prefix
∘ 7.2 Match + Prefix with Boolean
∘ 7.3 Multi-field Search
· 8. Conclusion
· About Me
· References
Have you ever thought about how Google makes its search engine so intelligent that it can predict what we think and autocomplete the whole search term even without us typing the whole thing? It is called typeahead search. It is a very useful language prediction tool that many search interfaces use to provide suggestions for users as they type in a query. [1]
As a data scientist or anyone who works on the backend of the data, sometimes we may want such an interactive search engine interface for our users to query structured/unstructured data with minimal effort. This can always bring the user experience to the next level.
Luckily, we don’t have to build it from scratch. There are many open-source tools ready to be used, and one of them is Elasticsearch.
Elasticsearch is a distributed, free and open search and analytics engine for all types of data, including textual, numerical, geospatial, structured, and unstructured. Known for its simple REST APIs, distributed nature, speed, and scalability, Elasticsearch is the central component of the Elastic Stack, a set of free and open tools for data ingestion, enrichment, storage, analysis, and visualization. [2]
On the other hand, AWS OpenSearch, created by Amazon, is a forked version of Elasticsearch fit into its AWS ecosystem. It has a very similar interface with underlying structures with Elasticsearch. In this post, to simplify the process of downloading, installing, and setting up Ealsticsearch on your local machine, I will instead walk you through an end-to-end example of indexing and querying data using AWS Open Search.
In the real world, another great reason to use such cloud services is scalability. We can easily adjust the resources we need to accommodate any data complexity.
Please bear in mind that even though we use AWS OpenSearch here, you can still follow the steps in Elasticsearch if you already have it set up. These tools are very similar in nature.
In this example, we are going to use the MovieLens 20M Dataset, which is a popular open movie dataset used by many data professionals in various projects. It is called 20M because there are 20 million ratings included in the dataset. In addition, there are 465,000 tag applications, 27,000 movies, and 138,000 users included in the whole dataset.
This dataset contains several files and can be used for very complex examples, but assuming we only want to build a movie search engine here that can query movie titles, years, and genres, we only need one file movies.csv.
This is a very clean dataset. The structure is shown below:
There are only 3 fields: movieId, title (with years in parenthesis), and genres (separated by |). We are going to index the dataset using title and genres, but it looks like there are movies without genres specified (eg, movieId = 131260), so we may want to replace these genres as NA, to prevent them from being queried as unwanted genre keywords. Several lines of processing should suffice:
import pandas as pd
import numpy as npdf = pd.read_csv('../data/movies.csv')
df['genres'] = df['genres'].replace('(no genres listed)', np.NaN)
df.to_csv('../data/movies_clean.csv', index=False)
With this super short chunk of code, we have just cleaned up the dataset and saved it as a new file called movie_clean.csv . Now we can go ahead and spin up an AWS OpenSearch domain.
Here is the official documentation from AWS OpenSearch. You can follow it for a more detailed introduction, or you can read through the simplified version I made below.
If you don’t have an AWS account, you can follow this link to sign up for AWS. You also need to add a payment method for AWS services. However don’t panic yet, as in this tutorial, we will use the minimal resources and the cost should be no more than $1.
After your account is created, simply log into your AWS management console, and search for the OpenSearch service, or click here to go into the OpenSearch dashboard.
In the dashboard, follow the steps below:
- Choose Create domain.
- Give a Domain name.
- In Development type, select Development and testing.
4. Change Instance type to t3.small.search, and keep all others as default.
5. For simplicity of this project, in Network, choose Public access
6. In Fine-grained access control, Create the master user by setting the username and password.
7. In the Access policy, Choose Only use fine-grained access control
8. Ignore all the other settings by leaving them as default. Click on Create. This can take up to 15–30 minutes to spin up, but usually faster from my experience.
AWS OpenSearch or Elasticsearch is intelligent enough to automatically index any data we upload, after which we can write queries with any logical rules to query the results. However, some preprocessing work might be needed to simplify our query efforts.
As we recall, our data consists of 3 columns:
Both titles and genres are important to us as we may want to enter any keywords in either/both of them to search for the movie we want. Multi-field search is supported in OpenSearch, but for simplicity of query, we can also preprocess it by putting all of our interested keywords into one dedicated column, so that it increases the efficiency and lowers the query complexity.
Using the preprocessing code above, we insert a new column called search_index to the dataframe that contains the title and all the genres:
The next step is to convert data into JSON format in order to bulk upload it to our domain. The format specified for bulk data upload can be found in the developer guide Option 2. Something like this:
{"index": {"_index": "movies", "_id": "2"}}
{"title": "Jumanji (1995)", "genres": "Adventure|Children|Fantasy", "search_index": "Jumanji (1995) Adventure Children Fantasy"}
where the first line specifies the index (document) name to be saved in the domain as well as the record id (Here I used the movieId column as the unique identifier). The second line includes all the other fields in the dataset.
The following code is used for the conversion:
After being converted, the data is stored in the data folder as movies.json . Now we need to upload it into the domain as below:
Note that the endpoint can be found on your OpenSearch domain page. The username and password are the master username & password we set when creating this domain.
If it returns a <Response [200]>, then we are good to go. The dataset is successfully uploaded into the AWS OpenSearch domain.
Now, with the data uploaded, we have done all the work on the server-side. OpenSearch automatically indexes the data to be ready for queries. We can now start working on the client-side to querying the data from the domain.
To read more about the querying languages, here are 2 options:
- Get started with the AWS OpenSearch Service Developer Guide
- There are some very detailed documentations for querying data from Elasticsearch and OpenSearch in this Official Elasticsearch Guide Query DSL.
However, we do not need very advanced functionalities in this example. We will mostly use around the standard match query with some small variations.
Here is a basic example:
Here, we write the query to look for any matched records with the title = “jumanji”, serialize the JSON query as a string, and send it to the domain with the endpoint and credentials. Let’s see the returned result:
{'took': 4,
'timed_out': False,
'_shards': {'total': 5, 'successful': 5, 'skipped': 0, 'failed': 0},
'hits': {'total': {'value': 1, 'relation': 'eq'},
'max_score': 10.658253,
'hits': [{'_index': 'movies',
'_type': '_doc',
'_id': '2',
'_score': 10.658253,
'_source': {'title': 'Jumanji (1995)',
'genres': 'Adventure|Children|Fantasy',
'search_index': 'Jumanji (1995) Adventure Children Fantasy'}}]}}
As we can see, it returns the record with the title equals to jumanji . There is only one matched result from our dataset, with the exact title as Jumanji (1995) , together with the other info such as id, genres, and the search_index.
OpenSearch automatically handles the upper/lower case letters, any symbols, and white spaces, so it can find our record well. In addition, the score means how much confidence the returned results match our query, the higher the better. In this case, it’s 10.658253 . If we include the year in the search query, like “jumanji 1995”, the score will then increase to 16.227726 . It is an important metric to rank the results when there are multiple ones returned by the query.
As a data scientist, Jupyter Notebook is a good friend, and with the popular ipywidgets, we can make the notebooks very interactive. Here is some code to build a basic GUI that includes a text box (for entering keywords) and a text output (for query results display).
There are 5 sections in the code:
- search function: A wrapper of the basic query introduced in the section above. By giving an input, it searches and returns the results that contain the input keywords.
- bold: A function that uses Markdown to bold the keywords in the results for better visualization of the results.
- printmd: A wrapper function to display Markdown in IPython
- text_change: A function that handles widget events. In this case, whenever the value changes in the text box, it will execute the search function and return the top 10 results ranked by the scores. There is also a timing module implemented to show how long it takes to search.
- The last section of the code defines the widget elements to be displayed: a text box and an output. The widget event is triggered when the value in the box is changed, and the results will display in the output.
Here is what it looks like when we execute the code:
While we enter the keyword “jumanji”, it keeps searching for the updated keyword. During the process, there are 3 sets of results returned by the keywords “j”, “ju”, and “jumanji” respectively. However, it is empty for “jum”, “juma”, “juman”, or “jumanj” because the match query we used here treats the keywords entered as exact terms and there is no movie in our dataset that contains these words.
This does not look like our expected typeahead functionality. To improve the performance, we will look into some advanced query options below, including prefix, boolean, and multi-field searches.
7.1 Match Phrase Prefix
One simple fix to the problem we encountered in the section above is to use match phrase prefix query instead of the match query. Match phrase prefix query can return the documents that contain the words of a provided text in the same order as provided. The last term of the provided text is treated as a prefix, matching any words that begin with that term. [5]
It seems to be what we want: As we enter the query, we don’t have to finish the term before it can tell the results.
So let’s modify our query this way!
Here I will not show the Python code again, because everything stays the same, except for some slight modification of the query in the search function. Now match becomes match_phrase_prefix :
query = {
'query': {
'match_phrase_prefix': {
'title': prefix
}
}
}
With the change, here is what it looks like now:
We tried 3 examples here:
- jumanji: Now it’s fixed! As we type, the search engine uses the entered text as a prefix and renders all desired output flawlessly.
- harry potter: It does the same thing as the previous example. When we reach the second term “potter”, it starts to show all the Harry Potter movies.
- potter harry: However, if we reverse “harry potter” into “potter harry”, it won’t show any results because order matters in the match phrase prefix query.
Imagine when we use the search engine, we are not always 100% sure that we remember all the keywords in the correct order, so we may want to improve the search engine so that it becomes more intelligent to help us solve the issue.
7.2 Match + Prefix with Boolean
To break down the requirements for such a query:
- The last term needs to be treated as a prefix
- The other terms need to be exact matches
- We do not need the exact order to get desired results
Unfortunately, there is no such query type in Elasticsearch/OpenSearch we can directly use, but the tools are flexible enough that we can implement the logic using boolean queries.
The code shown above is the updated search function. As we can see here, the query becomes much longer now after incorporating the bool operation must:
- If we enter a search text that contains more than one word, then we will treat the last term as a prefix, AND the previous terms are exact matches.
- If the search text is only one word (or less), then we will just treat it as a prefix to search.
After implementing the changes, let’s see the results:
Now, when entering in a completely mixed order: “potter harry prince blood”, the search engine knows what we are looking for, and it is able to return the correct result: Harry Potter and the Half-Blood Prince (2009).
7.3 Multi-field Search
Until now, we only searched in the movie title field, but we can further improve the search engine to make it even smarter by leveraging some hidden fields, such as genres in our case.
To search among multiple fields, there is multi-match query in the Elasticsearch user guide. However, it does not provide enough power to search prefixes while ignoring orders at the same time as we just did. We still need booleans to make a compound query.
There is a shortcut: Remember that we previously processed the dataset and prepared a combined search_index column to include both title and genre information. With this new field, we can easily modify our previous query to include the hidden genre information without explicitly using multi-match queries.
Here is the modified search_prefix function, but if you look closely, there is no change from the last one, except we replaced title by search_index to search among both titles and genres.
Here is the result after the change:
We tried 2 examples:
- Let’s say we remember that there is an adventure movie with the keyword “impossible”. We then enter “impossible adventure”, and it will return all the Mission Impossible movies because they are classified as “adventure” movies.
- Same thing for Harry Potter. If entering “potter adventure”, it will return all the Harry Potter movies because they are all “adventure” movies as well.
In this post, we just walked through an end-to-end example to build an intelligent type-ahead search engine with the following steps:
- Prepare a movie dataset
- Set up an AWS OpenSearch domain
- Bulk upload the dataset to the OpenSearch service for indexing
- Build a simple type-ahead search engine GUI
- Several ways of querying data from the domain, from basic to advanced topics
The result is very impressive: we are able to mimic the type-ahead searches as what Google does. While typing the keyword, the search engine analyzes and searches the database in near real-time (0.2 seconds) to render the closest matches and guide us in the direction of further narrowing down the list of search results.
On the other hand, we have modified the queries using boolean operations that enable us to mix the keyword orders. We can also enter values that belong to the hidden fields, such as the genre names to help us narrow down and locate the desired result. Both of the features make the search engine even more intelligent.
There are still many places in this example that we can potentially improve in the future:
- Jupyter Notebook and its
ipywidgetsare very powerful in building GUIs. Here we only used text box and output, but there are many more widgets that could be used for this example, such as buttons to trigger search, checkboxes or dropdowns to add filters on the results, or select boxes to click on the suggested results as Google offers. - However,
ipywidgetsstill has limited capabilities compared to the toolkits that front-end developers use, such as JavaScript. The workflow shown in this example is only intended for quick testing and development usage for data scientists, who are very familiar with Jupyter Notebooks but with limited experience in front-end development. If we want to build a robust search engine app, this is not the best practice to take. - Elasticsearch/OpenSearch Domain Specific Language (DSL) is a very versatile tool for us to write queries that can suit almost any need. In this example, we just covered a very superficial layer of it. If you are interested in learning more, here is the complete documentation provided by Elasticsearch.
- AWS OpenSearch is scalable. In this example, we picked
t3.small.searchfor this 27,000-movie dataset, but we can usually expect better results if we scale up the resources. In the real world, the amount of the data could be of a completely different magnitude as well, so proper resources need to be chosen for the actual data size. - Security is a serious topic for any cloud service. In this example, we almost completely ignored all the security settings, but if it is in a production environment, we need to take much more effort to enhance the security levels.
At the very end of the post, one last reminder: Please remember to delete the AWS OpenSearch domain if you no longer need it, or it will incur unnecessary costs!
Thank you for reading! If you like this article, please follow my channel (really appreciate it 🙏). I will keep writing to share my ideas and projects about data science. Feel free to contact me if you have any questions.
I am a data scientist at Sanofi. I embrace technology and learn new skills every day. You are welcome to reach me from Medium Blog, LinkedIn, or GitHub. My opinions are my own and not the views of my employer.
Please see my other articles:
[1] Dynamic Web — Typeahead Search: https://doc.dynamicweb.com/documentation-9/how-tos/general/implementing-typeahead-search
[2] Elastic — What is Elasticsearch: https://www.elastic.co/what-is/elasticsearch
[3] MovieLens 20M Dataset: https://grouplens.org/datasets/movielens/20m/
F. Maxwell Harper and Joseph A. Konstan. 2015. The MovieLens Datasets: History and Context. ACM Transactions on Interactive Intelligent Systems (TiiS) 5, 4, Article 19 (December 2015), 19 pages. DOI=http://dx.doi.org/10.1145/2827872
[4] Amazon OpenSearch Service Developer Guide: https://docs.aws.amazon.com/opensearch-service/latest/developerguide/gsg.html
[5] Elasticsearch Guide — Query DSL: https://www.elastic.co/guide/en/elasticsearch/reference/current/query-dsl.html
Denial of responsibility! Techno Blender is an automatic aggregator of the all world’s media. In each content, the hyperlink to the primary source is specified. All trademarks belong to their rightful owners, all materials to their authors. If you are the owner of the content and do not want us to publish your materials, please contact us by email – [email protected]. The content will be deleted within 24 hours.